THE LITTLE PRINZ PART 7
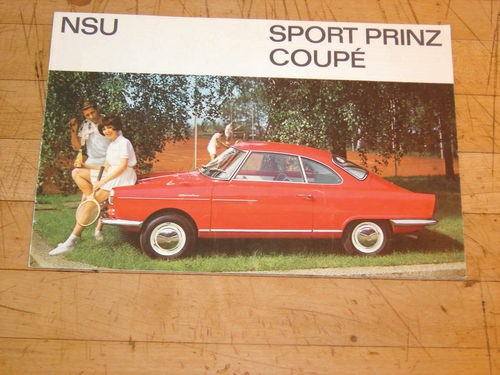
We’re Really Moving Along With This Project. Oh, Wait a Minute, Removing That Undercoating Is Tougher Than It Looked… The Hood Needs to Be Reinforced…There’s Trouble With the Battery Tray and…
After the last pieces of major work on the nose of the NSU, I thought I’d just have a few quick items to address before stripping and priming the body. Then I looked at my “still-todo” list…
Underestimating the Undercoating
In talking to a couple of media blasting shops in my area, I learned that all the undercoating needed to be removed before they could do the actual stripping of paint, rust, etc. They suggested I could save a lot of money by doing it myself before bringing the car in. They could remove it for me, but they’d basically be scraping it by hand, too—a laborintensive, costly process.
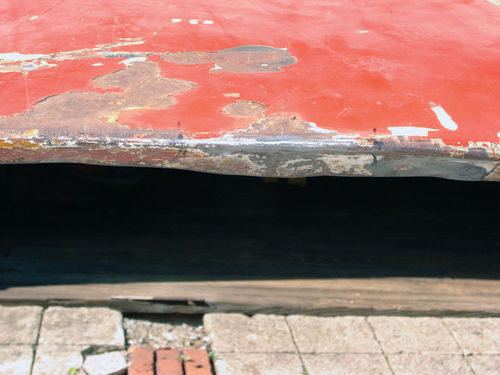
This proved to be an understatement. There is simply no easy way to remove this stuff. It comes down to a combination of paint scrapers, razor blades and anything else with an edge, augmented by chemical strippers, heat guns and propane torches. Without having the luxury of a rotisserie or a lift, it meant doing much of this lying on my back with the stuff raining down on me. Even with a facemask, particles inevitably found their way into eyes, ears and nose. The wheel wells were particularly challenging.
I don’t know when this coating was applied to my car, but whoever did it slathered it on liberally. It was laid on thick and extended beyond the undersides and wheel wells into the front trunk as well. It flaked off easily in only a few places. The rest was really well-adhered. Simply getting underneath it with a scraper removed it the cleanest, but in places it wouldn’t budge without softening first. Chemical strippers were not very effective and I wasn’t keen on all the fumes, even wearing a respirator.


I got the best results by melting one section at a time with a propane torch, then quickly scraping while the coating was still soft. It left some residue, but it was really little more than a stain that I’m hoping the blasters can handle.
Despite how tenacious the undercoating seemed to be, I continued to find areas of surface rust beneath it in places, even where the film was present on both sides of the metal. It’s hard to understand how moisture could have gotten in. I have to assume it was already present when the coating was applied. Whatever the case, even the occasional presence of rust validated the need to get all this stuff off. I’m still working on it, tackling small sections at a time in between other work sessions on the car. I find this “little-at-a-time” approach is most effective when I have a tedious, long-haul piece of work to do. It gets done bit-by-bit rather than through some grueling marathon effort. After all, this is supposed to be fun. Isn’t it?
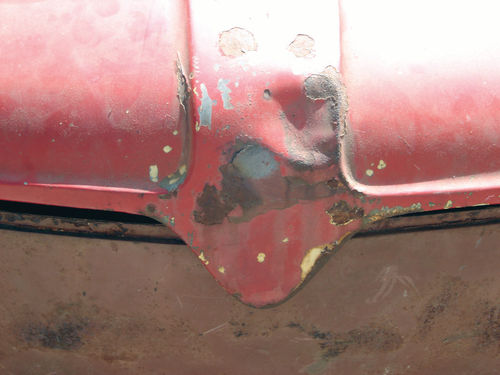
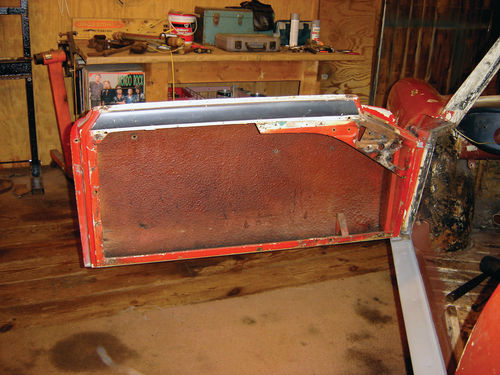
Trouble in the Hood(s)
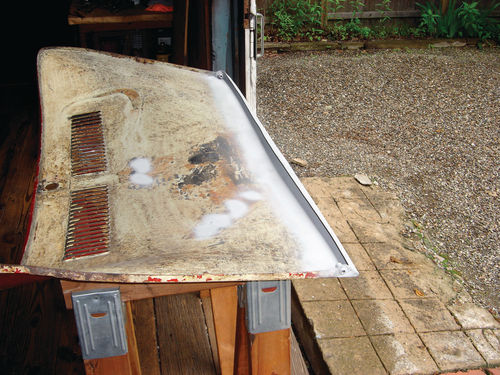
The front and rear hoods had been removed and I knew that, aside from removing the undercoating that had been applied to those as well, they both needed some repairs.
Like the nose of the car itself (featured last month), the leading edge of the front lid had been damaged. I was able to get most of the dents out with a hammer and dolly, though the presence of a welded-in piece of the latch mechanism on the inside made access difficult. I also found a stress tear in the sheet metal at the rear edge that required welding and grinding. Finally, I found that a number of holes where chrome trim and badges needed to mount had been welded shut. Fortunately, I had those pieces so I could locate and drill the holes to ensure the trim fit correctly. Better to do that now, rather than after the car is primed and painted.
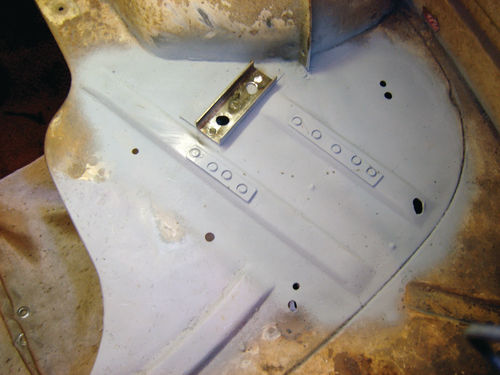
The rear engine compartment lid presented similar challenges, including stress cracks alongside the hinge pins. Worse, the trailing edge of the lid had a nasty bend and crack. These were apparently caused by the same side impact that required my earlier straightening of the tail fin on that side of the car (March). I hammered out the dent and welded the crack, but the area still seemed weak. Any bending pressure applied to the sides threatened to re-crease that same section. It was clear I needed to strengthen and stiffen that rear edge.
So I made up a second piece of sheet metal to fit under that rear edge. I punched holes in the original piece, clamped the new piece behind it and made a series of plug welds through those holes to join the two together, effectively doubling the thickness. I coated both mating surfaces with zincrich weld-through primer before joining them to deter rust from forming later. After a little grinding to clean things up, the rear edge is much stronger and less likely to fold like a cheap suit again if the lid is opened unevenly and subjected to those bending stresses.
Keep Plugging Away
I used my improving plug-weld skills to address a similar stress crack found under the battery tray in the rear engine compartment.
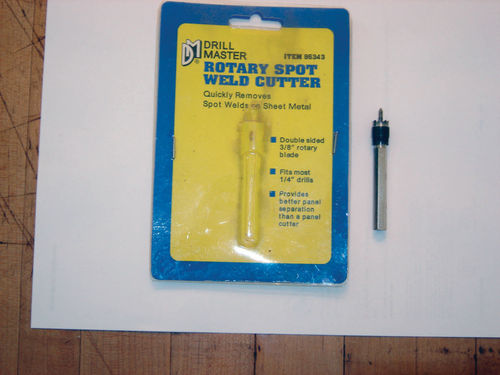
The battery tray was in bad shape with corrosion and bends. It was welded in, but I was able to remove it without totally destroying it by using an inexpensive spot-weld cutter found at my local cheap-tool big-box store. For those who haven’t used one, this is simply a bit you can use in your hand drill. It has a steel point for centering on the weld. The point is spring-loaded and recesses when you press down, allowing a tiny hole saw to engage and cut the metal right around the edges of the spot weld. They’re only $5 or so and work like a charm.
As it turns out, it was a good thing I removed the battery tray to fix it as it revealed some additional damage that needed attention. Below the tray is a backing plate for a bolt that comes up through the rear sheet metal to secure the suspension. A hole in the bottom of the battery tray provides a view of, and access to, that bolt for installing and removing the rear suspension. However, once the tray was removed, I noticed a tear in the sheet metal adjoining the backing plate. Either gradual stress over time or a sudden sharp hit to the suspension must have caused the crack.
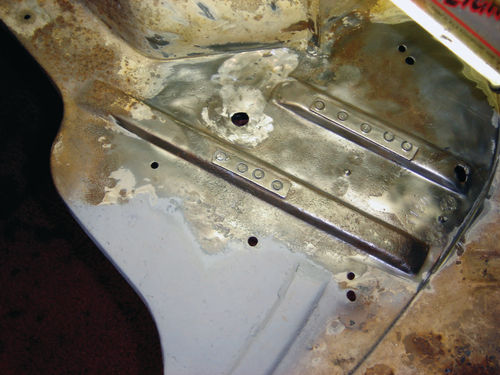
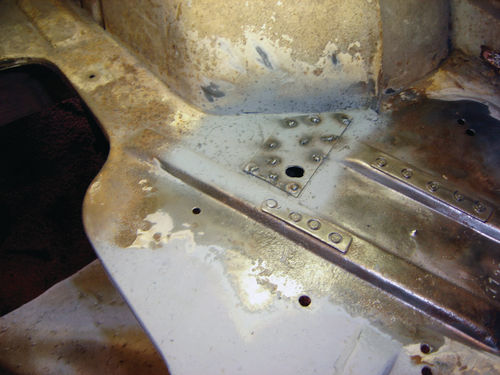
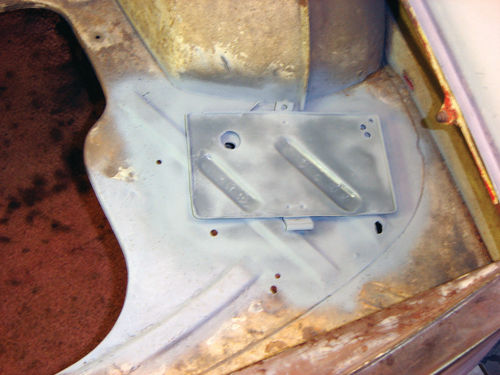
To assess the full extent of the crack, I had to remove the backing plate, too. Sure enough, there was more damage underneath. I flattened and welded the cracked area, but I was concerned that it might be weak. So I decided to once again strengthen this area with an extra plate of sheet metal. As with the rear trunk lid, I plugwelded a small piece over it. Before I did, I confirmed that the suspension bolt would still have enough length to engage its nut and lock washer. I also verified that the backing plate would not be raised so high by this additional thickness that it would hit the battery tray on top of it.
Once all was adjusted, welded back together and cleaned up, I could breathe a bit easier, confident that my rear suspension wouldn’t come poking through into the engine compartment when I hit my first pothole. Given the toll that winter weather takes on New England road surfaces, this is not an unlikely scenario.
Filling in the Missing Pieces
I’d like to have every part of the body and interior that’s going to be painted all together to be sent for media blasting and priming at one time. Otherwise, it could get expensive and slow things down if I start bringing in extra parts to have done as an afterthought.
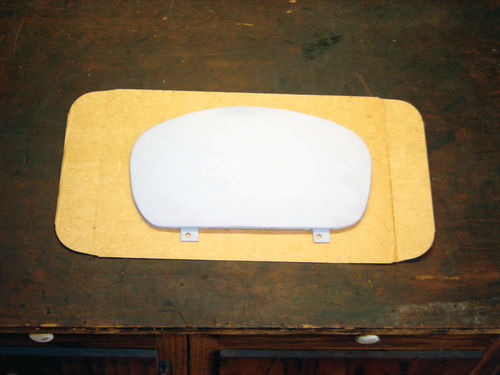
The dashboard is an integral piece of the body, so it will get done as part of the overall car. But one piece I was missing was the glove box lid. These are fragile and easily broken off, so they’re often missing from these cars and replacements are hard to find. I did find one for sale online, but the guy wanted an exorbitant price for it, so I resolved to make one myself.
The lid is a simple flat stamping of sheet metal with a folded edge around the outside for stiffness. Without a means to press a part like this, I cut the basic shape, then welded an edge around it instead. I made the edge deeper than it needed to be, giving my shrinker/ stretcher enough to grab so I could use them to eliminate any warpage and keep the lid flat. Afterwards, I ground down both the edge itself and the welds holding it to the face and added some improvised hinges.
It’s a pretty good facsimile and it fits the opening tightly, though I may add a thin rubber gasket around the edge where it meets the dashboard just to avoid scratches and rattles. I’ll also need to come up with a latch mechanism, but I’m confident I can find a pretty close aftermarket part to do the job.
The Long Road Home
I’m whittling away at the remaining items. I’ve welded another crack I found in the sheet metal under the rear shelf, stripped off some previously-overlooked trim pieces and hammered the interior roof supports back into place.
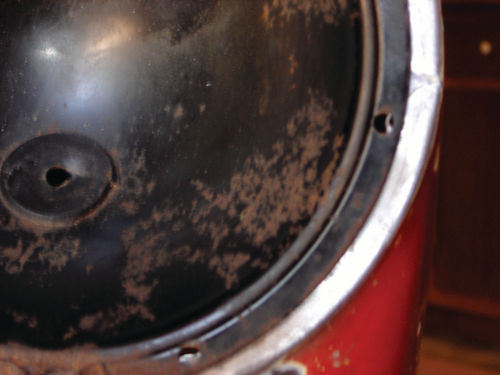
I did discover a bit of an issue with the headlights. I am extremely grateful to my friends in the NSU Club of Ireland for locating a set of complete headlight assemblies. When I checked their fit, however, I found that the buckets that get mounted first in the body openings were slightly too small, causing the holes for the mounting screws to just miss their counterparts in the car. I suspect this is one of the slight variations that exist between early and late iterations of the Sport Prinz. I’m not sure I have enough overlap to simply drill new holes. If not, I may have to weld some tabs next to the existing holes in the car body to relocate them a bit more toward the center.
I’m also still having a problem getting the doors off. I may have to leave the door shells mounted. The blasting and painting shops said they could do their jobs with them still in place, though it’s not ideal. But it would be better than butchering those door hinges trying to get the pins out. In the meantime, I gutted all the window and lock mechanism components out of the doors. It looks like the door shells were also treated with undercoating, so I’ll have more of that to deal with as well.
I’ve been thinking ahead as to how I’m going to transport the car to the media blasting and paint shops when the time comes. I don’t have a trailer, but I do have an old pickup, though it’s a light-duty short-bed model without a hitch. However, the body cart is constructed such that it’s narrow enough and short enough, while lifting the Sport Prinz high enough, that it will just fit in the bed of the truck with the tailgate down. About three feet of the body will be sticking out the back, but if I tie it down securely and mount caution flags, it just might work.
Of course, I have to figure out how to get the car up into the back, but I’m inspired by the creativity of others who’ve faced similar challenges. One of the members of the now-inactive NSU Club here in the U.S., Frank Baker, has been extremely helpful in sharing parts, technical information and general encouragement. Frank is an original owner of a Sport Prinz and has kept the car through numerous moves during his long Army career and retirement. In fact, at one point he transported his NSU in the back of a pickup all the way from Oklahoma to California! Next to that, getting my car to some local shops should be a piece of cake.
Seeing One—Mine?—In Motion
In the meantime, I couldn’t resist ordering a DVD copy of that 1964 movie “Man’s Favorite Sport?” which features an NSU Sport Prinz bearing suspicious similarities to mine. If nothing else, it’ll be fun to see one in action. Maybe the credits at the end will even contain references to who supplied the car—a possible route to finding out where it went after and whether mine could, in fact, be that very one. It wouldn’t propel it to stardom like the Bullitt Mustang, but it would be fun to know.