Replacing and Repairing Dash Panels
Sometimes the Project Calls for Removing a Dashboard. In Other Cases, There’s Dash Damage to Be Fixed.
THE THOUGHT OF having to replace a damaged dash in a restoration project can make even the most seasoned restorer consider the possibility of another vocation. It isn’t that removing a dash is terribly complicated—most removable dash panels are held in place by only a few bolts. It’s what happens after those bolts are removed that is unnerving.
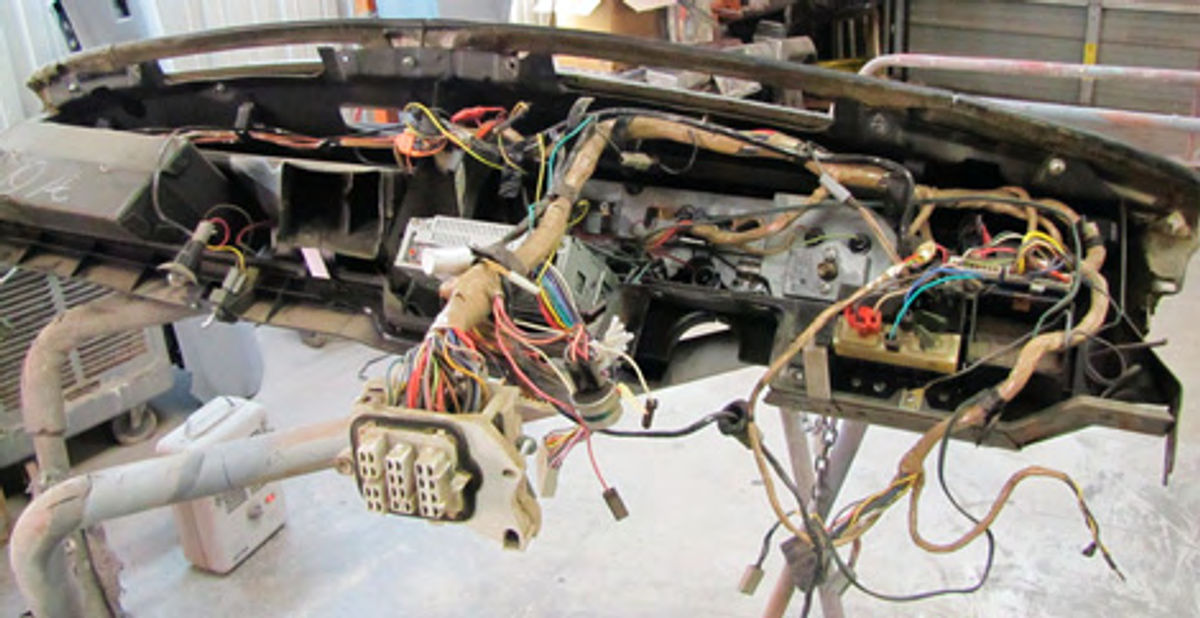
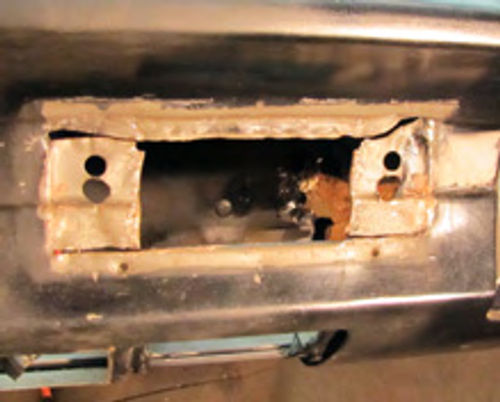
So what happens that can create such strong second thoughts about the entire project? You expose all of what’s seen in Photo 1.
And there are other potentially daunting dash projects that a restorer sometimes faces as well, such as restoring one to its original shape after it has been cut up to receive a modern CD player. Or how about dealing with those cracks that tend to appear in aging plastic dashes?
Well, we certainly can’t cover all three scenarios simultaneously, so let’s start by discussing the removal of a dash.
Get It Out of the Car
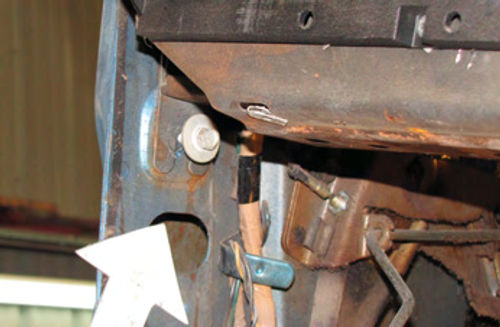
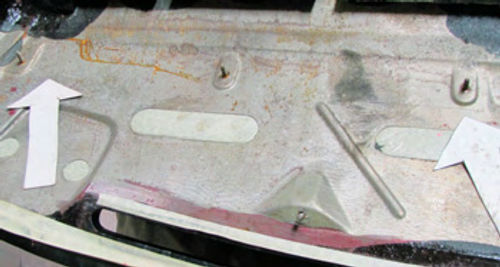
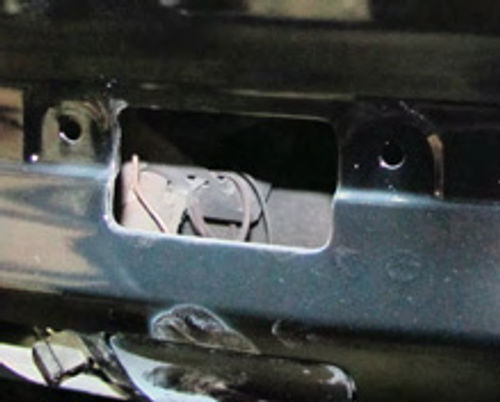
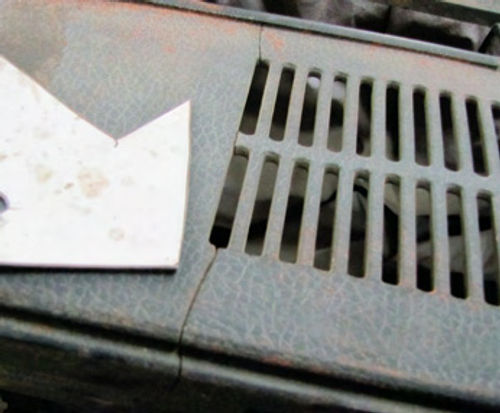
The good news about finding a mess like what we see in Photo 1 is that dealing with it is really not that complicated once you get the dash out of the car. Removal generally is as easy as removing a few bolts, like the ones shown in Photo 2 that are located on both cowl posts underneath the front edge of the dash, and the ones seen in Photo 3 found in or near the defroster vents located just behind the windshield. Take all of these bolts out and the dash will practically drop into your lap. How’s that for an easy removal process?

The catch is that removing those bolts may be the only easy part there is to pulling a dash panel. The hard part starts with knowing what needs to be accomplished before those bolts are removed and what needs to be done once those bolts are loosened and the dash is ready to come out of the car.
The Question of the Steering Column
The best place to start is with the steering column. You could remove the three or four bolts holding the column to the base of the dash and let it sag down or you can take a few more minutes and remove a few more bolts, the ones securing the column to the firewall and the ones securing the column to the steering gear box, unplug the column wiring harness and remove the entire unit from the car. If this is your first dash replacement I recommend that you take the time to remove the column from the car. Dash removal life gets a whole lot easier when you do that.
You’ll notice in the photos that the windshield has been removed from this vehicle. In most cases, windshield removal isn’t a necessary step in replacing a dash. But if your project vehicle is destined for a complete teardown then removing the windshield to gain better access to the back of the dash once the upper retaining bolts have been removed is always a good idea. This car is getting a new windshield so I put in a call to my glass guys to come out and remove the old one.


Behind the Dash
The next step is to think about what lies behind the face of the dash. You will find everything from the speedometer cable to vacuum lines routed to both the HVAC (heating, ventilation and air conditioning) switch and the HVAC unit itself, to cables that control everything from manual vents to the hood latch and, finally, the main wiring harness.
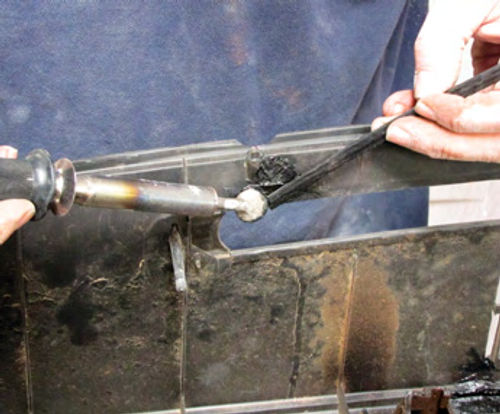
Notice in Photo 4 that I have unbolted the top of the dash and allowed it to lean back a few inches. The dash will only lean back like this if you remove the upper bolts and only loosen the lower bolts where the dash mounts to the cowl. This allows the dash to swivel down and what that does is allow me to see all of those above-mentioned connections that might need to be disconnected before the dash is completely turned loose.
The cables and vacuum lines may seem like no-brainers to remove, and most are, just unclip or unplug each one individually and they fall out of the way. In some of the more complicated vehicles, with vacuum hoses and cables routed throughout the dash, you should take the time to identify and mark each cable and hose as you disconnect it. Taking photographs also helps.
Dealing With the Wiring Harness
The main wiring harness is a different story. It has been my experience that the best way to remove a dash from a vehicle is with the main wiring harness still attached to the dash. That means unbolting the fuse panel and unplugging the firewall connections from the car. That allows you to bring the dash out of the car as a completely wired unit. Believe me, it is a lot easier to disassemble then reassemble a dash if you are not trying to trace individual wires from the discomfort of the front floor- board. Photo 5 is a look at what I’m talking about. This is the back side of the dash once it has been removed from the vehicle. That’s a lot of wiring that otherwise would have to be disconnected and dealt with in the car. This way I have everything right where I can find it.
Pulling the Pad
Recall my occasional admonition to never remove a piece of your project vehicle before you have the replacement part in hand? One good reason for that is you have something to compare to the old part. In this case I am replacing the upper dash pad so I can use the new pad to determine how the old pad is attached to the dash panel. As it turned out, it has a series of bolts, some of which are hidden behind the A/C vents and the instrument cluster. Once they are removed, the pad comes off of the dash panel (Photo 6). Without the new pad for comparison, finding these bolts would be very difficult and require a lot more teardown.

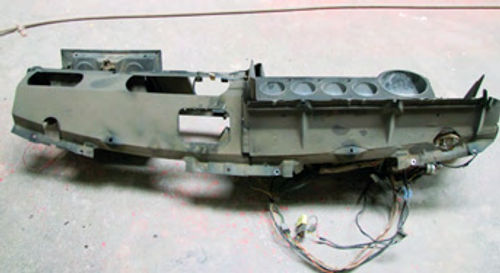
So what does the dash look like with the pad removed? Take a look at Photo 7 and notice that I left the glove box intact but had to remove part of the instrument cluster to access some of the mounting bolts to remove the pad. With the old pad off it is a matter of mounting the new pad and installing the dash back into the car. Nothing to it.
OK, there might be a little more to it if you need to replace the entire dash. In that case the sequence for disassembly once the dash is on the bench would be to remove the glove box, ash tray, air conditioner vent tubes if so equipped, the instrument cluster, the switches such as the headlight switch and wiper switch, and finally the wiring harness. Re-assembly would be the reverse of the above suggested disassembly.
When the Dash Won’t Budge…
The second dash in our threesome cannot be unbolted and removed from the car—it’s welded into place. You’ll see this type of construction on a lot of older Ford and Chrysler products. It’s an economical way to construct a vehicle but doesn’t do much to improve the mood of a restorer if he finds he needs to work on a dash like the one shown in Photo 8. This one had been hacked and cut to install a CD player.
I didn’t hold out much hope for repairing this mess so instead I opted to locate a vehicle at a local salvage yard that had the same dash and do a radio face plate transplant. What that entails is cutting out the center section of the dash from a donor vehicle and transplanting that section into this dash.
The process starts by trimming down the donor piece until it fits seamlessly into the damaged dash (Photo 9). What isn’t obvious here is that I’ve yet to remove the hacked-up portion of the dash. Instead I clamped the donor piece over the damaged area of the dash so that I can use a die grinder with a three- inch cut-off wheel to cut along the top and bottom of the donor piece and end up with perfect cut lines that will allow the donor piece to slip right into place once the old piece is removed.
After that, a little welding, a little plastic body filler work, and a little paint work is in order. The result is a dash that will now accept an original-style radio (Photo 10).
When Your Plastic Dash Is Cracked
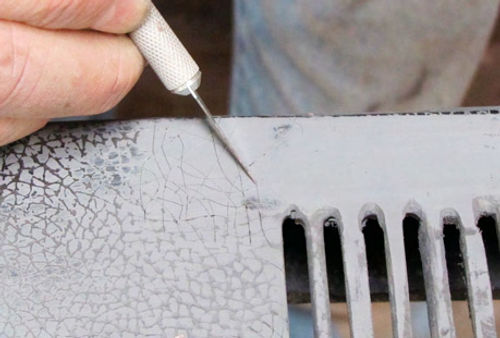
The last dash in our trio of examples is a hard plastic removable dash panel that has suffered a number of serious cracks (Photo 11).
If there is anything you need to know about restoring a vintage plastic dash like this one, it’s that these units become extremely fragile and prone to breaking as they age. That means you need to take your time removing this type of dash and make sure it is supported as you go about the removal process. A case in point—I cracked the base of this dash carrying it from the car to the bench because I didn’t have it balanced.
So, how do you repair a hard plastic dash? My preference is to weld the cracks then finish the repair using a little Evercoat Easy Sand polyester finishing and blending putty (evercoat.com) to smooth the welds. Here’s the process:
In Photo 12 I’m repairing this dash by plastic welding one of the cracks from the inside. After I weld the inside I’ll weld the outside. The only reason I started on the inside of the dash instead of on the face is this way I can build up the weld and add to the strength of the repair.
What tool am I using to create the welds? Because I couldn’t be certain regarding the type of plastic used in making this dash I opted to use the Eastwood TPO, TEO & PP Plastic Welding Kit #50347 ($70). This kit comes with universal plastic welding sticks that will easily melt and bond to anything made of plastic. That eliminates the need to know which type of plastic I’m working with and ensures that my welds are secure. The kit comes with a set of instructions on how best to weld plastic so be sure to check those out before starting.
That’s the easy part of this repair. After the welding comes the filling and smoothing using the Evercoat Easy Sand, priming with a good 2K primer, blocking with a small block using 320-grit sandpaper and, finally, replacing the heavy graining texture on the face of the dash.
The best way I have found to replace a heavy grain look is to use an X-ACTO knife and cut each grain individually (Photo 13). The catch is that this method will leave the repaired area with very well-defined graining lines. To soften those lines I applied an additional coat of primer over each repair and sanded that primer using a red Scotch-Brite pad. That softens the lines and prepares the dash for painting.
When you’re preparing to paintplas- ticinteriorpieceslikethisdash, there are three things you must do before you break open the paint can. The first is to thoroughly clean the part to be painted using a good degreaser. My preference is PPG DX320. The reason for degreasing is simple. People put everything from lemon oil to car wax on interior pieces to keep them looking good. A high-quality degreaser is the only thing that will completely remove those products. What happens if you don’t degrease interior pieces prior to painting? The paint applied over old wax or other cleaning products will not stick and it will probably develop fisheye dots as you spray. If you get fisheye dots, stop painting, wipe the part clean of the fresh paint using lacquer thinner and start over.
The second step is to thoroughly sand the dash. For the smooth areas I like to sand hard plastic using 400-grit wet sandpaper. And for the areas that have a grain- ing effect, I use a red Scotch-Brite pad.

The third step is to clean the piece one last time using a degreaser and a tack cloth to remove any specks of trash and then apply two coats of adhesion promoter. My choice of adhesion promoter is a 15-oz. aerosol can of Bulldog #ETPO123B Adhesion Promoter. Read the application instructions printed on the can before applying.
To paint this dash I opted to use PPG Omin MBC 9300. This is a pure black that is applied medium wet for three coats and with no clear coat. The result is a semi-gloss finish that matches the look of the original dash(Photo14).Got a question on anything paint and body related? Send it along.
Products supplied by:
LPL Body Works, LLC
5815 Contented Lane
Amarillo, TX 79109
Paint and body repair DVDs
Eastwood Company
263Shoemaker Rd.
Pottstown, PA 19464
eastwood.com Automotive restoration tools and supplies


