
How -to Quarter Panel Replacement
Sometimes You Replace the Whole Panel…or Just a Portion. We’ll Demonstrate Both Procedures On This Car.
SOMETHING YOU MAY have gathered from following my two restoration series, Project Charger and Project Mustang, is that I don’t like to cut off an entire quarter panel and replace it. My preference is to cut out and replace only that portion of a quarter that is beyond repair. In most cases that means cutting out severely rusted sections and replacing that metal with new metal.
Yes, front and rear quarter panel sections are available for many of the more popular vehicles out there. I used an aftermarket replacement rear section on the right quarter of Project Charger.
But while most of the time sectioning in a piece of the quarter works very well, there are times when a full quarter panel replacement becomes necessary. Usually that time is when the outer wheel house has severe rust and the quarter panel has to be removed to gain access to that wheel house so it can be replaced. This is one of those times.
Diagnosing the Extent of the Rust Problem
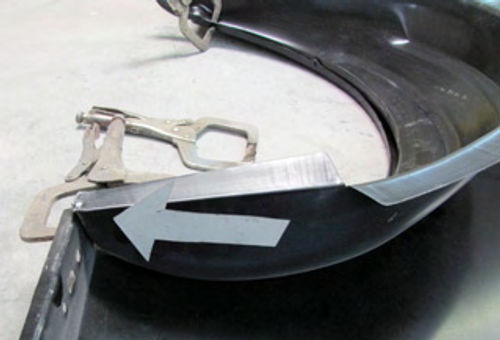
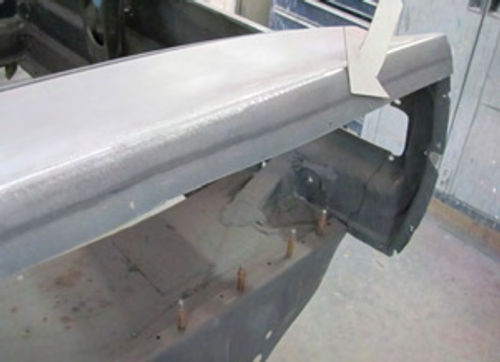
This is the lower rear section of the right quarter panel on a 1965 Mustang (Photo 1).
Some people refer to these cars as “Ruststangs,” and there is good reason for that description. Early Mustangs had a tendency to take on water like a leaky rowboat then hold that water like a porcelain sink. That resulted in a lot of rusted panels.
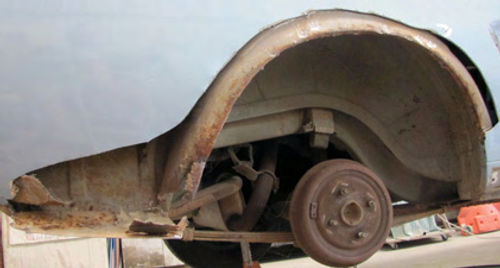
Obviously, this quarter panel has a severe rust problem. That’s bad enough, but when you see this much rust on the outside you have to wonder how much more rust is present on the inside. I have to go deeper.
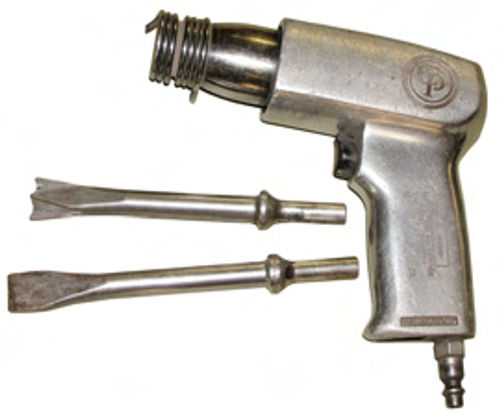
The easiest way to go deeper is to take an air chisel with a panel cutter bit attached (Photo 2), and remove some of the quarter panel where the rust is located. What this does is expose any rust issues that lay deeper inside the structure of the car.
You can see in Photo 3 that I ended up removing a lot of the quarter panel as I chased the rust deeper into the car and farther around the wheel house. The result of all this cutting is that I know that not only is the outer panel badly rusted, the wheel house is rusted, and the extension panel is rusted. Where’s the extension panel located? This is the part of the floor pan that drops vertically to connect to the bottom of the quarter panel just behind the wheel house.
Planning the Fix
The first step to repairing this car is to order a few parts. As some of you may know, my rule is to never remove welded-on pieces of your ride before you have the replacement pieces in hand. This ensures that you’ll never cut away something you can’t readily replace.
So why did I bend my own rule and cut into the quarter panel before ordering parts? In a case like this you have to know the full extent of the rust and the only way to make that determination is to open up the area in question. Further more, note that I only cut away metal that I knew for certain could be purchased in the aftermarket, like the quarter panel.


Here is the new outer wheel housing and the replacement extension panel for the trunk floor pan (Photo 4). Notice that I didn’t purchase the full right side of the floor pan. That part of the car was rust free. All I needed was the vertical extension, and it can be purchased separately from the pan.
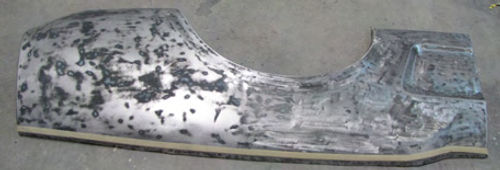
Here is the right quarter panel (Photo 5). This is known in the business as a full, or “OEM-style” quarter. Notice that this panel comes complete, all the way up to the mounting flange where the panel welds to the sail panel.
By contrast, the panel in Photo 6 is known in the business as a “skin.” Notice that the top part of the quarter is missing. This panel will weld just below the body line on the side of the car, along the cut line I’ve laid out in masking tape.
What’s with the spotted paint job and the cut line I’ve laid out? The factory primer was exceedingly thick and full of runs so I sanded the panel using a DA with 180-grit sandpaper attached to remove the bulk of the primer. As for the cut line, before I’m through with the rust repairs on this car I’ll replace the left quarter using this “skin.” I’ll explain the cut line when I reach that point.
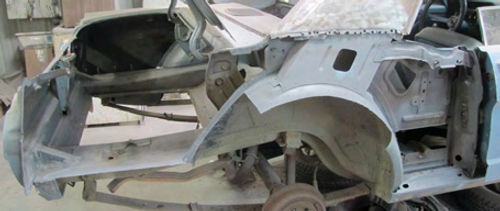
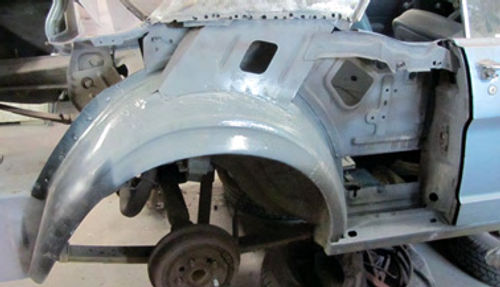
Now, getting back to the business of replacing the right quarter panel,I’m Going to jump ahead in the process momentarily because I want you to note that I’m not going to cut out and replace the entire outer wheel house. This panel is used to support the package tray structure and the trunk hinge structure. If I cut around the supporting segment of the wheel house, as shown in Photo 7, then trim my new wheel house to glove fit into what’s left of the original wheel house, I’m way ahead of the game even though that means doing some cosmetic work to the wheel house assembly to hide my sectioning.
Fitting the New Quarter and Wheel House Panels
But that’s looking ahead to a point further into the process. Before that work can be done, I want to verify the fit between the new quarter panel and the new outer wheel house panel. The issue here concerns the curve of the wheel house panel matching the curve of the quarter panel and the depth of the wheel house where it fills the void between the quarter panel and the floor pan extension panel.
Matching the curve isn’t a big deal. A few pair of Vise-Grip pliers can pull the wheel house around so that it conforms to the quarter. A little hammer and dolly work around the curve of the wheel house will help to relieve the stress placed on it by the Vise-Grips and help it hold its shape once the Vise-Grips are removed.
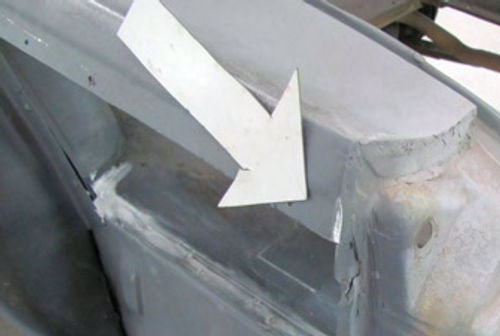
However, the depth of the wheel house where it meets the bottom of the quarter (Photo 8), is critical in that all three panels, the quarter, the wheel house, and the floor pan extension panel must meet and align here.

How do you deal with poor alignment? A body hammer and dolly is required to flatten then reshape the flange on the wheel house visible at the arrow in Photo 8. I mention this problem because it is very real when working with aftermarket parts. If you aren’t aware of issues like this they can make you want to pull your hair out trying to determine what is wrong with the fit.
Prepping the Car For the New OEM-Style Quarter Panel


This part of the project starts with exposing the seam where the old quarter is joined to the roof sail panel so that the spot welds can be drilled out (Photo 9). This seam was hidden beneath a lot of lead filler applied by the factory. Here you can see I’ve melted away the lead with a plumber’s propane torch then drilled out the spot welds using a Blair spot weld cutter kit #11082. If you have restored one of these cars before you’ve probably noticed a crack where these two panels are to meet at the quarter glass opening. That’s because the quarter and the sail panel don’t align well, and the result is a huge void just below the drip rail. The factory filled that void with lead. Lead worked wonders back then, but it wasn’t intended to act as a structural support. Every time the body flexed, this area was subjected to stress and thatstress equaled cracks. I’ll be sure to securely weld this area once the new quarter is in place.
The next step is to again use the air chisel with the panel cutter bit attached (upper bit in Photo 2) and remove the bulk of the old panel (Photo 10).
That leaves only the edges of the old quarter to remove and those are held in place with a few hundred spot welds. Each spot weld is drilled out individually using the Blair spot weld cutter before separating the remains of the old quarter from the car using the chisel bit (lower bit in Photo 2) to force the panels apart. Of course, there is always a problem area or two to deal with (Photo 11). This is a view of the right rear corner of the trunk opening. Notice that I’ve used a die grinder with a three-inch cut off wheel attached to trim around the area where the quarter welds to the rear body panel. The reason for making this cut is to gain better access to this joint to take it apart. I’ll do the same at the top of the trunk opening where the quarter welds to the package tray filler panel.
Recall that I said I would not be cutting out and replacing the entire outer wheel house? This Is how that is accomplished. I cut around the supporting structure and removed the rusted area of wheel house below that point. The floor pan extension panel is treated similarly. I removed the old panel by cutting the floor pan along the line where it folds downward. The new extension comes with a flange that will lie on top of this line. If you refer back to Photo 7 you can see where I made my cuts.
A Little Cleaning and Epoxy Application
As I showed you earlier (Photo 7), I took the time to grind all of the old spot welds smooth, followed that with a little sanding on all of the structural pieces, then finished up by applying a coat of epoxy to everything hidden beneath the quarter panel.
The epoxy will accomplish two things. First it gives the car some much-needed rust protection, and second it serves as a “weld through” primer as I start to put this car back together.
After that I sanded all three of the replacement panels inside and out using a 3M Scotch Brite Pad #7447 (red pad) then drilled 5/16-inch diameter spot weld holes around the perimeter of the new quarter spacing each hole about two inches apart. Finally, I coated the inside of the new quarter with a coat of epoxy.
Next I trimmed the new outer wheel house panel to fit around the sectioned area of the original housing and screwed it into place. After that I attached the floor pan extension panel to the floor pan using screws then clamped the bottom of the extension panel to the new outer wheel house. That lets me hang the new quarter panel and verify the fit.
What am I looking for as far as the fit of the new quarter is concerned? I need to see that the wheel house gloves into the new quarter panel along the wheel opening. Any gaps here would indicate I have the wheel house mounted too high or too low around the curve of the opening. How’s that? The wheel house is curved but that curve is elliptical. Any gap between the quarter and the wheel house means the wheel house needs to shift either clockwise or counterclockwise to where I have it currently screwed to the remains of the original wheel house.
All that may sound strange, but if you have a gap issue you will quickly see how shifting the new wheel house forward or backward will eliminate the gap problem
Once everything fits, I weld the new wheel house and floor pan extension panel to the car and finish with a little more epoxy everywhere I placed a weld (Photo 12).

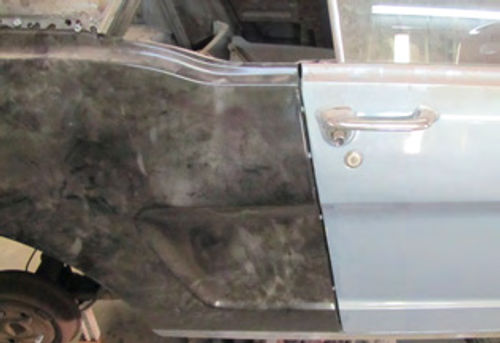
Finally the new quarter panel is mounted for the last time (Photo 13). Here I’m verifying the fit atthedoor.Look closely and you can see the heads of the #8 x 1 ⁄4-inch sheet metal screws used to hold the panel in alignment with the door.
At the rear of the car the quarter is aligned to the deck lid and to the quarter panel extension (Photo 14).
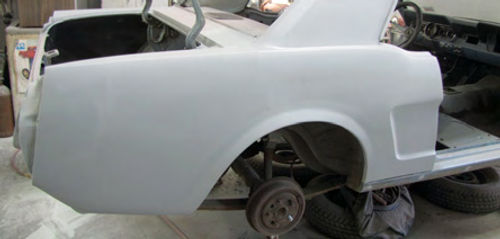
Once the alignment is complete and I’m happy with every body line and every panel-to-panel gap, I spent a few hours welding, a little time grinding, even more time applying plastic body filler, and finished up with three coats of urethane primer/surfacer (Photo 15).
Switching To the Left Side— Skins vs. Full Panels
The left side of the car is almost as rusty as the right side. I’ll do the same outer wheel house and floor pan extension panel replacement work that I did on the right side, but what I will not do is replace the entire quarter panel. Instead, I’ll use the “skin” I showed you earlier.
Is it easier to install a skin than it is to replace an entire quarter panel? It’s my opinion that it’s an absolute toss up as to which type of panel is easier to install. If you do a full quarter you are looking at a lot more labor removing the old panel but less labor welding and finishing the new panel once it is on the car. If you do a skin you are looking at less labor removing the old panel but far more labor welding and finishing the new panel. If I had to choose, I would go with the full quarter panel if for no other reason than I have found the stamping to be more accurate with the full panel than with the skin.
All that said, let’s hang a skin. Remember the cut line on the quarter skin I mentioned previously? Here is where that comes into play. I cut the new skin along the bottom of the masking tape line I laid out in Photo 6 using a die grinder with a three-inch cut off wheel attached. That puts the top of the new skin an inch and a half below the peak body line on the old quarter panel. That also happens to be the width of the piece of metal I removed from the skin. What trimming the quarter skin does is allow me to keep all of my body filler repair work along the side of the quarter and ensures I don’t have to contend with a wavy body line on top of the quarter.

Now notice in Photo 16 that I crimped the cut line on the old quarter using Eastwood’s Flange and Hole Punch Tool #31018 ($70). That will allow the new skin to glove right into the old panel for a seamless repair. I’ll also use Eastwood’s Panel Holding System #13751 ($38) to hold the new skin in place as I weld (Photo 17).
All of that work led to a lot of welding, grinding, smoothing and finally a little filling with plastic body filler. The end results can be seen in Photo 18.
Additional Detail Work
Before either of the quarters was removed from the car I took the time to remove the quarter glasses and the back glass. The back glass had to come out because I couldn’t risk pitting the glass with welding spatter. The quarter glasses had to go because I couldn’t spot weld the bottom of the quarter where it meets the rocker panel with the glass in place. Those welds are made on the inside of he quarter at the bottom of the quarter glass opening.
I left the deck lid on the car because the right quarter had to be aligned to it. The deck lid also plays a role in the alignment of the quarter panel extensions in that these extensions must align to both the deck lid and to the sides of the quarter panels.
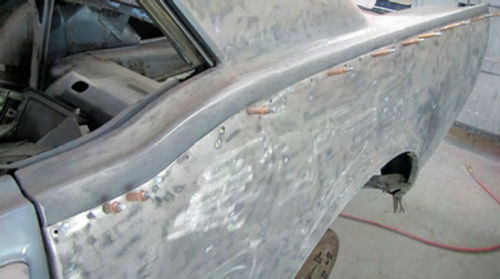
Finally, I ground away the forward and rear edges of the old left quarter, (arrow in Photo 19), to help the new panel tuck into the old panel for a better overall fit. Got a question? Send it along.
Resources
Project vehicle supplied by:
LPL Body Works, LLC
5815 Contented Lane, Amarillo, Texas 79109
Blair Equipment Co.
P.O. Box 2005, Flint, MI 48501-2005
Spot weld cutting kits


