
THE LITTLE PRINZ PART 4
A Large Section of the Car’s Roof Needed to Be Replaced. This Called for Measuring, Cutting, Flanging and Welding…Plus a Spare Roof.
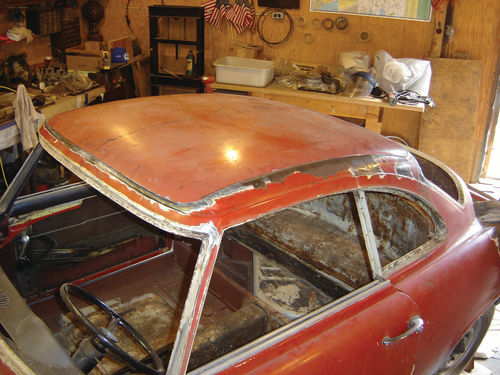
The last update on my progress restoring my 1959 NSU Sport Prinz centered on the replacement of the rotted rocker panels. Now it’s time to tackle the dented, rusted and perforated roof. One especially large hole turned out to be particularly problematic: the sunroof.
Fixing a Hole Where the Rain Gets in…
I’ve never been a fan of sunroofs. Like skylights in a house, they are bound to leak at some point. When they do, serious damage results. That said, I actually found the look of the aftermarket sunroof appealing when I first saw the NSU. It gave it a kind of jaunty, European flair, with its rollback canvas-and-vinyl covering. It was also one of the features that suggested the car may have had a cameo role in a 1964 movie called “Man’s Favorite Sport.” (See the original article in the December issue.) So I was torn over the decision of whether to keep it or not. That ended when I took a closer look.
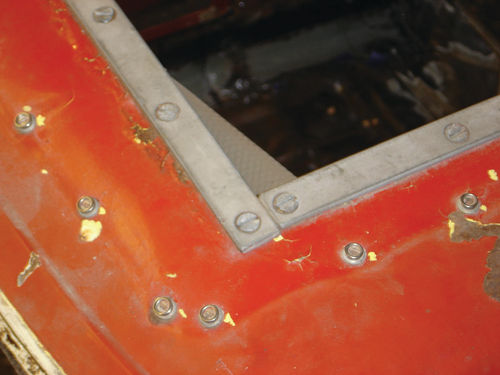
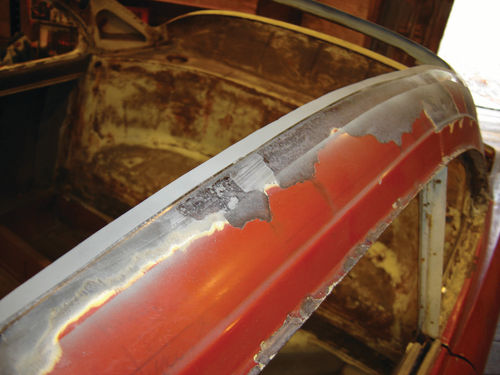
The framing consisted of multiple, heavy steel pieces bolted to each other through the roof skin at the edge of the opening. They were not overlapped or joined at the corners, nor were they curved to precisely match the contour of the roof. All this placed stress on the roof skin, causing cracks at some of the corners. Further, the installation had caused distortion and left a large number of holes, none of which had been adequately sealed. Add to this all the holes drilled for all the snaps and fasteners and it was a mess. The sunroof had to go.
But I learned that filling a hole in the gently-crowned center of a roof is not for the faint of heart. First, you have to either make or locate a patch with a matching crown—no easy task. Second, the likelihood is high for distortion as you weld, often leaving a rippled surface or “oil-canning” where the roof panel pops in and out with a “plunk” sound.
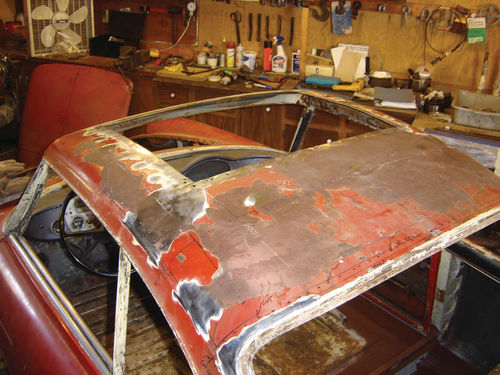
What’s more, in my case, simply plugging the sunroof hole would leave considerable other damage on the roof that would need to be addressed. There were several nasty, creased dents. It looked like someone had hit the roof with a hatchet. I had managed to iron some of them out using a hammer and dolly, but traces remained. There was also a lot of surface rust that left the roof skin very pitted.
Preparing the Replacement
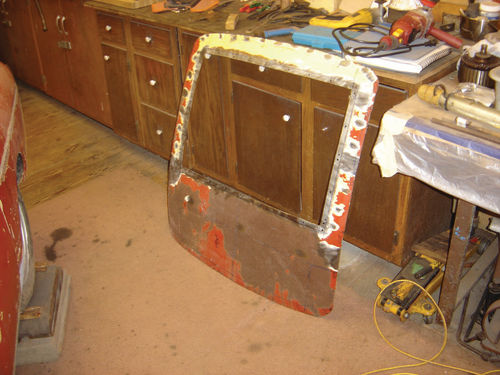
Fortunately, when I bought the car the seller had included another entire roof he had obtained somewhere along the way! Someone had cut it off at the front and rear pillars and it was virtually damage-free. I knew it would be a big job to remove the entire existing roof at the same points and line up the pillars. Among other things, I’d have to extensively brace the car this time so it didn’t fold in half. This was an intimidating prospect. The issue became moot, however, when I did some measuring and found that a raised body line on the edge of the new roof didn’t line up with the one on the car. This started me wondering whether this roof was really off a Sport Prinz or perhaps from a standard Prinz, which had a very different body design.
I was hoping that the discrepancy might just be due to the year of the donor car. If so, I might be able to at least use a large portion of the roof skin, avoiding the body lines and pillars altogether. The Sport Prinz was designed for NSU by Bertone in Italy. In fact, Bertone actually built the first 200 cars or so for NSU, after which they built just the bodies for the next 2000 or more (mine is one of these) before NSU switched to a German coach builder altogether. I learned that throughout this transition, some dimensions had apparently changed slightly. So one couldn’t always interchange body panels, glass, etc. between early and late models. But I hoped that, if the extra roof was just from a later year car, perhaps at least the center portion of the skin would have the same profile as mine. I needed a way to check this before cutting into it.
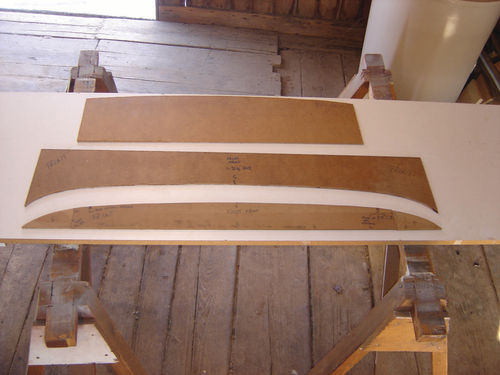
I didn’t have a profile gauge big enough to span the whole roof. Instead, I took measurements back from the windshield opening to specific points on the two roofs. Using cardboard, I cut templates which I then transferred to more rigid Masonite. After a lot of trial and error, I had several templates for the top and bottom surfaces at specific points on the spare roof that I then compared to my damaged one. They seemed to fit exactly, giving me faith that the skin would work. But I had to be more certain before I started cutting up my old roof.
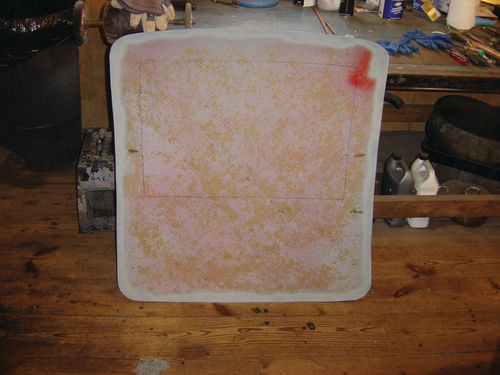
So I cut out the entire center section of the spare roof, from front windshield opening to rear, and between the raised body lines on the side. All cutting was done very slowly and carefully with a cut-off wheel on an inexpensive (Harbor Freight) high-speed electric cutting tool to keep the cuts as straight and even as possible. Where tight turns were necessary in the corners, I also used an (equally inexpensive Harbor Freight) air-powered reciprocating body saw. While the body saw is good for curves, I find it tends to wander and its thin blade makes for a more wavy cut when trying to keep a straight line. Plus, I only have a small compressor, so I can only use most air-driven tools in short bursts. The plight of the home hobbyist…
I figured this was the largest piece of this roof I’d ever be able to use anyway and, once cut, I could lay it on top of the old roof to see if the match my templates predicted was accurate. To my great relief, the piece of roof skin fit perfectly on top of the old one! It looked so nice laying there and covering all the ugliness of the old one that I would have liked to just weld it in place, as is.
But that was not an option. It would have been lying proud of the surrounding metal and would have left the old one rotting away underneath. The old one had to come out.
Planning the Next Step
Before plunging past the point of no return and cutting the existing roof, however, I had to take into account how I planned to weld the replacement piece in. Normally, I butt-weld patches instead of lap-welding. This requires more care and skill, but it avoids the problem of leaving a flange behind the weld which can become a home for rust. In this case, however, lining up such a big patch and holding it firmly in position while I tried to complete a butt weld all the way around it seemed beyond my skill level. Besides, I reasoned, having a flange behind the weld in this case wouldn’t be an issue, since it would be facing into the car, behind the headliner, and not subject to collecting road salt, etc. Further, putting a flange all around the opening would add a bit more stiffness to a pretty flimsy roof skin.
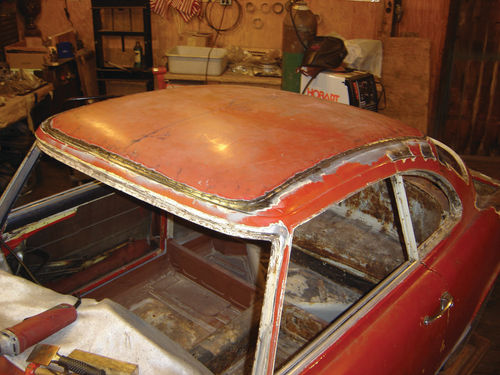
Now the question was just how much of the old roof to cut out. I would have liked to cut all the way from the front windshield opening to the rear opening, and down the sides all the way to those raised body lines. But doing so would have left my cut and subsequent weld behind internal braces under the roof skin. I’d have no access to see that my welds were getting good penetration or to do any hammering, even if it had to be through the flange, to try to keep things straight as I went. So I had to move in toward the center of the roof around all sides a little, allowing room for the half-inch flange I’d have to form, too.
Cutting out that much of the roof was a bit unnerving. I was confident that there was still enough around the edges to retain the structural integrity of the car, but I still tried to avoid testing it. Once I had the hole cut, I had to flange it. I had considered the options for this before I started. There are manual flanging pliers out there, but this was a lot of length to do by hand. There are also pneumatic flangers that can be had almost as cheaply. I don’t have a massive compressor plumbed in to supply ports all over my barn. I have a small, 22 gallon model that is only good for short bursts on most air tools. But the flangers didn’t seem to require a lot of airflow, so I figured I could get by if I went slowly.
I don’t generally like to buy cheap tools. I usually opt for better quality, though I’m often able to find good quality used tools at lower prices in places like flea markets and garage sales. In this instance, however, my local cheap-tool big-box store had a super sale on their pneumatic flanger, which had actually gotten decent user reviews (if you can believe them). So I took a chance and, luckily, it worked like a charm. I now had a nice, uniform depression all around the big hole in my roof to support the replacement panel and hold it flush to the surrounding metal while I welded it in.
Before welding, I actually considered using panel bond. This would have eliminated any issues with heat distortion. It also forms a waterproof seal in the gap between patch and flange, eliminating rust concerns. I wasn’t worried that the repair panel would fly off the car, either. There was no question that panel bond is strong enough to do the job. Tests have shown it yields a joint stronger than a weld. Many components on modern cars are held together with bonding agents. In fact, so are many components on modern aircraft, including wing assemblies!
I’ve used panel bond before and found the stuff to be great in appropriate applications. However, this wasn’t one of them. After a lot of research, I found it wasn’t the right option in this case, since the seam would be visible and would require some filler, primer and paint over the top—not the right place for panel bond. Those who’ve used it in these situations report that the seam inevitably shows through as a “ghost line” later— something I didn’t want to happen all around the roof of my car. So, it was back to welding.
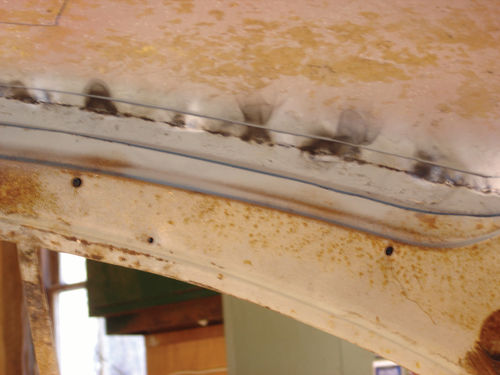
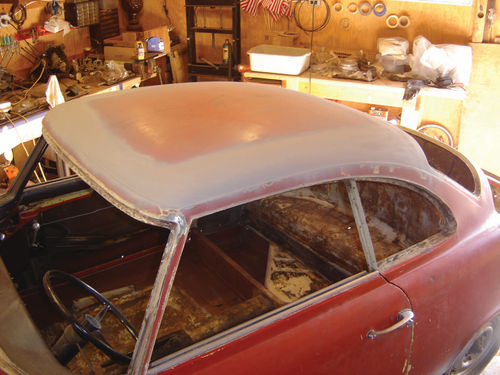
A Delicate Skin Graft
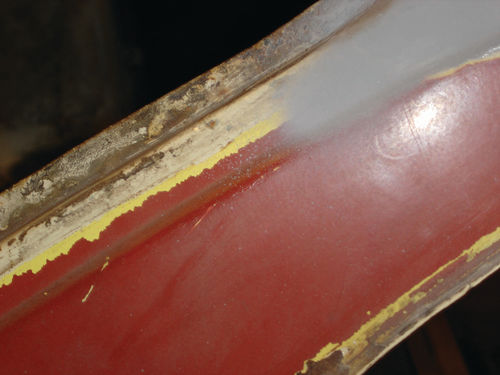
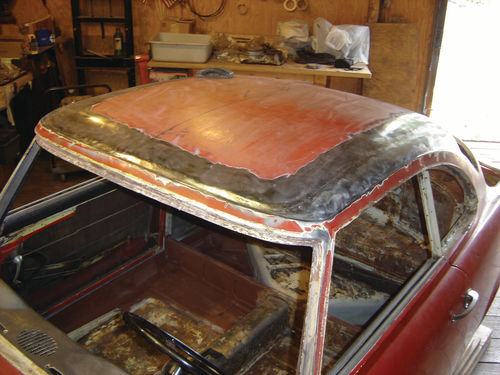
I carefully cut down the piece of replacement roof skin to fit in the opening on top of the flange. Even though the flange would be inside the car, I coated it and the mating underside of the replacement panel with weld-through primer to discourage rust from forming. Then I welded the panel in very slowly, tacking back and forth across the roof to allow the welds to cool and using hammer and dolly where I could to overcome shrinkage and keep the joint flush. This was accomplished bit-by-bit over a couple of days, after which I ground and blended the joint as much as possible, again trying to avoid excessive heat build-up.
Even with all the care taken, the seams, especially on the sides, shrank in a little bit. But I had planned to apply a thin coating of waterproof filler over them anyway to eliminate any pits and pinholes and prevent rust. Again, when the car goes in for media blasting, some or all of this may be removed and I may have to re-apply it, but that’s OK. It’s keeping moisture out in the meantime and I know I’ll still have to do some final fairing with filler over the epoxy primer anyway.
All-in-all, the roof came out pretty good. It’s certainly an improvement over the old one. The test will come in the final prep with filler and primer to ensure that this very visible area looks good after paint is applied.
Time to Build a Body Cart
Next I plan to address the battered and beaten nose of the car. But before I do, I also need to start stripping all remaining items off the car to prep it for blasting and priming. I had removed the front and rear windshields, headliner, visors, etc. before starting on the roof. Even though the car seems to be down to a shell, I still need to remove doors, wiring, cables, gauges, and brake and fuel system components. I also need to drop the front and rear suspensions. Since that would mean leaving the car immobile at best, lying on the ground at worst, I’ll tackle making a body cart so I can still move the body shell around and have access to the bottom.


