
THE LITTLE PRINZ PART 14
The Wiring Harness Is Done… But It Can’t Be Tested Until a Steering Column Actuator Arm Is Totally Rebuilt for the 1959 NSU Sport Prinz.
At last report (August) I was in the midst of redoing my wiring harness. I had separated the jury-rigged pieces from the original elements. Then I had to resolve discrepancies in wiring sizes and circuit layout from the specifications.
In the end, I decided to stay true to the manual’s schematic so it could be used down the road for troubleshooting. I did retain some of the original wiring after ensuring it was in good condition and showed continuity end-to-end. I used a high-temperature PVC wire sheath to enclose all legs of the harness, since much of it runs through the center tunnel of the car which also carries heat from the engine to the passenger compartment.
The final result looked good, with all wires neatly contained and labeled. In the end, it cost me far less than the reproduction available from the U.K. It also gave me experience in another area I had never explored before, which was part of my aim with this restoration. And by doing it myself I learned a lot more about my car’s electrical system and have greater confidence the harness will fit and work properly.
But in starting to connect everything for de-bugging, I immediately ran into the failed component that had prompted the jury-rigging in the first place. Unfortunately, it appeared to be neither replaceable nor repairable.
The Mystery of the Second Arm—or Repairing Parts That Weren’t Meant to Be Serviced
Readers are undoubtedly familiar with the “80/20 rule.” It’s the old adage that says the first 80 percent of most jobs will take 20 percent of the time/ effort/expense; the remaining 20 percent of the job will cost you the other 80 percent. The rule seems to hold in many situations, including auto restoration. Many projects stall when the restorer is down to that last 20 percent, often because the issues are the thorniest. With an old car, especially an old “foreign” car, those issues often center around lack of parts availability. That’s especially true for parts that were originally designed to be disposable rather than repairable.
When I removed the electrical system from the car I was careful to label, diagram and photograph everything. But I didn’t know enough about it at that point to stand back and understand why it had been hacked up.
Now I did.
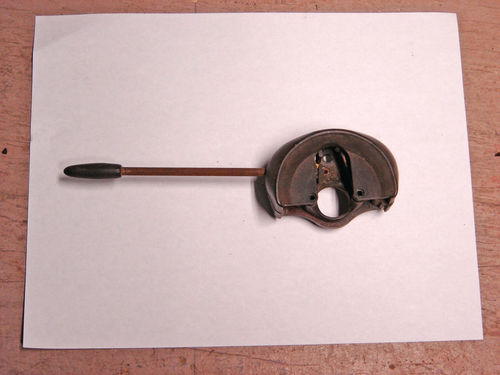
All the switches that had been added to the dashboard were there to provide functions that had failed in one original component: a steering column-mounted switch. I had originally assumed the switch was there to simply control the directional signals. I didn’t realize it was supposed to have a second arm for additional functions.
Once again, I was bitten by false assumptions based on my experiences with other cars. For one thing, the arm for the NSU’s column-mounted directional switch is on the left of the steering column instead of the right. But more than that, it is actually a double switch and should therefore have a second control arm on the right side as well.
My friend Frank Baker of the former U.S. NSU Club educated me to the fact that the right-hand side of the switch provides functions that include a headlight dimmer and a horn actuator. With the right arm missing, it’s no wonder some previous owner resorted to splicing in separate toggles for these necessary functions. Given the work that took, including punching holes in the dashboard, I guess that these switches were hard to come by and/or expensive even back then.
Not surprisingly, the parts situation is even worse now. I couldn’t find a replacement anywhere. And, as with many electrical components, this switch seemed clearly intended for replacement, not repair.
Once again, the uniqueness of the little car had presented me with a potential show-stopper. It seemed I’d have to either forgo these functions, wire a jury-rigged setup again (though perhaps hidden under the dash) or just put everything on hold while I kept trying to find a replacement. Instead, I decided to pursue a fourth option: to see if there was any way I could fix the old switch.
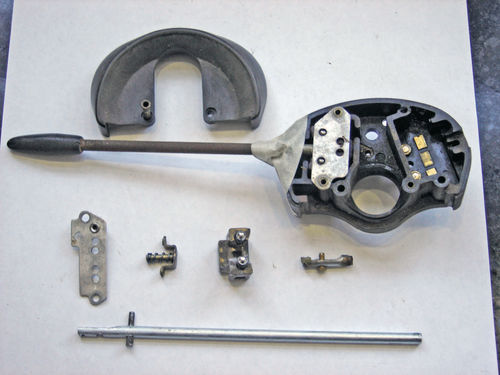
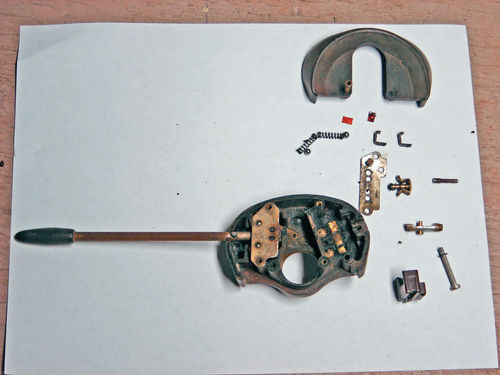
Thankfully, at least the plastic housing could be separated after removing a screw. However, each side’s internal switching mechanism was then covered by a thin metal plate held in place by tiny brass rivets. It clearly wasn’t meant to be taken apart. But, since I had nothing to lose, I carefully ground the heads off the two rivets on the broken side and opened it up. Inside, I found the broken stub of the actuating arm, along with a bunch of pieces of the switch itself. The switch mechanism was pretty simple. A plastic slider held brass contacts that made various connections to outer terminals when the arm was moved. The switch would “click” into those positions compliments of tiny, spring-loaded ball bearings in the top of the slider that would engage circular holes in the cover plate. Unfortunately, whatever broke the arm had also broken that plastic slider.
Working With Shattered Plastic
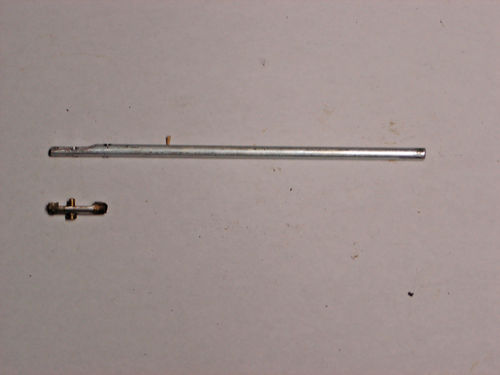
To fix the switch, several repairs would be needed. First, a new actuating arm would need to be made. This was a pretty simple 5mm (3 ⁄16”) diameter steel rod with a knob on the end. However, where it engaged the slider it would require a flat to be ground down and several very small holes to be drilled. More on that later.
Aside from the arm, the most troubling repair would be the broken plastic slider. I was able to recover several of the main pieces, though the plastic had not broken cleanly. A number of small splinters ranging in size from sand grains to dust particles poured out. Fitting the main pieces together left some gaps that would need to be filled. Finally, one of the ball bearings that clicked the switch into position was missing. Fortunately, I just happened to have one that size.
So, all I needed to do was make a new arm, repair the slider and then see if I could get everything back together as a working whole, and hold it that way by somehow replacing those brass rivets. Simple, right?
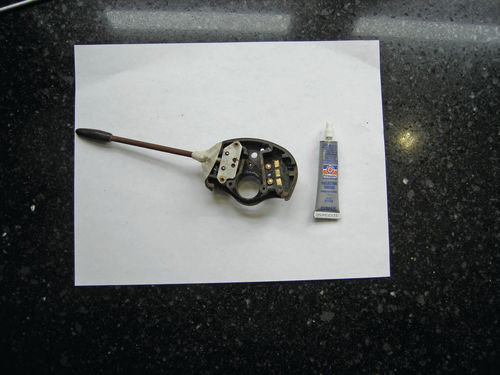
I decided to tackle the plastic slider first. This is one of those times when I wished I had access to a 3-D printer so I could just fabricate a new one. Failing that, I turned to an old nemesis: JB Weld epoxy. While many people swear by it, I’ve had mixed results working with this product. At times, it seems to stick to anything and form a rock-solid bond. At others, it breaks apart at the slightest touch. I know cleanliness is key, so I thoroughly cleaned all mating surfaces before starting. I then worked very carefully, fitting the pieces together then filling and building up any voids. I did it in several phases, letting the epoxy fully cure between each one. I then used a Dremel tool to grind off any excess and re-carve the necessary grooves and holes. It seemed structurally sound and I was able to fit all the necessary parts back onto it. Only a trial run would tell whether it would break apart at the first application of pressure.
While the slider was in process, I turned my attention to the actuator arm. I scrounged around and came up with a piece of the right-size rod. In grinding down the flat, however, I noticed a lot of sparks coming off the grinder. This indicated a high carbon content, meaning hardened steel. Therefore, drilling the tiny ( 1 ⁄16” and 3 ⁄32”) holes was going to be difficult, if not impossible, with the tools I have.
Sure enough, even cobalt-hardened bits failed to bite. So I reverted to mild steel rod which was cheap and available at the home center. The mild steel was much easier to work with and, thanks to those cobalt drill bits, I was able to make all the necessary holes.
Before attempting re-assembly, I had to clean up the old, dried-out grease inside. This introduced a new question: exactly what type of grease should be used between sliding (brass) electrical contacts? Lubrication is necessary to prevent wear, yet good electrical conductivity must be retained. I spent some time looking into this and learned that most greases are not conductive. There are specially-formulated conductive greases for use in some electrical applications, but here the grease will be smeared back and forth, potentially allowing connections to form where you don’t want them. It seems that most such situations call for a “dielectric” (non-conducting) grease. Even though it will end up between the mating surfaces, there should still be enough contact between them to allow current to flow. Dielectric grease is used in many other automotive applications, so I applied a thin film of it here.
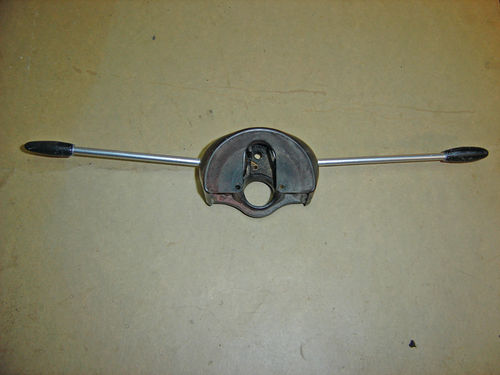
Putting things together was a bit like assembling a watch. I had to hold several tiny, spring-loaded parts in place, some of them greased, while securing the metal plate with equally tiny screws and nuts to replace the original rivets. But I got it together and the actuator arm moved into its various positions with a satisfying “click.” Electrical testing confirmed it was making the right contacts in the appropriate positions. I made up a plastic knob to match the other side and used chrome spray paint on both arms to make them match. It may not be totally correct, but at least I have an original that works rather than a bunch of mismatched toggle switches mounted in the dash.
A Long Shot at Fashioning a Front Bumper
Perhaps even wackier than going to such lengths to salvage a normally cheap, disposable part, my quest for a front bumper led me on another adventure. Someone had suggested I might be able to fashion a makeshift front bumper out of one from another car, such as an old MG. While this seemed like a long shot, photos did suggest that the rear bumper of a 1960s vintage MGB was pretty similar to the front one for my NSU. Knowing this was a real reach, I wasn’t about to buy one to find out. But I thought it would be interesting to get hold of one just to see how far off it was and whether there was any chance it could be modified to fit. Alas, without a handy MGB junkyard or friend with a bumper I could borrow, this remained just an entertaining thought—until I remembered something.
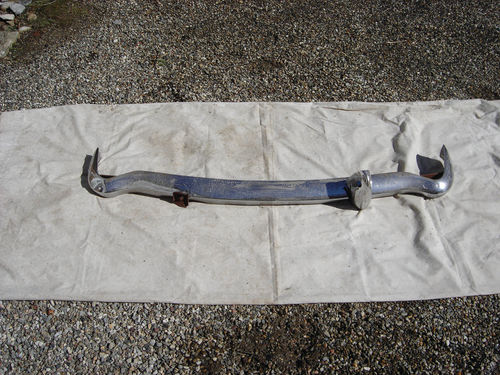
We have a park nearby with a wooded mountain trail that we walk from time to time. I had noticed the abandoned carcass of an old MG out there in the woods. It wasn’t even the remnants of a whole car—only about a third of it, from the rear wheel wells back. Don’t ask me how or when someone dumped it there, or where the rest of the car is, but it’s been sitting for years and there’s virtually nothing left of it—except the back bumper!
So I resolved to salvage that bumper one way or another. I had to find a path down to it, as it sat at the bottom of an almost-vertical drop. But I got there and after a lot of cursing, scraped knuckles and frozen fingers I got the bumper off.
All the effort was for naught, however. The bumper width was OK, but its curvature is much shallower than the NSU and the wraparounds at the ends are much too short. Anything can be modified, but I’m afraid this one would just take too much work. And then I’d have to get it re-chromed at huge expense.
Oh, well; I think I’ll just find someone who can use it. It’s not in bad shape really and I hate to see stuff go to waste. If there’s anyone out there trying to piece together an old MG, ideally someone who just happens to have NSU parts to trade, you know where to find me…


