
How -to The (Ongoing) Tale of Three MG Ts, Pt. 3
We’re Stripping Parts From One Car, Rebuilding Another’s Generator and Saving the Frame From the Third.
EDITOR’S NOTE: THIS is the third installment in an ongoing series of articles about three different approaches to the restoration of an early postwar T Series MG. The articles will compare a red 1952 MG TD that’s getting a stock frame-up restoration, a yellow 1954 MG TF that’s getting a “rolling restoration” and a blue-and-white 1950 MG TD “parts car” that is going to be fixed up as a “rat rod.”At the end of the series we’ll compare the costs and fun factors of each of the three projects.
Stripping and Strengthening the Red MG
For the red MG TD that is getting a complete, basically stock restoration, the first quarter of the year was a period in which the car’s body came further apart than we once ever dreamed it would. After the body was completely disassembled, the parts had to be stripped of old paint and rust. In addition, we swapped a few parts between the two TDs so the restored car got the best parts.
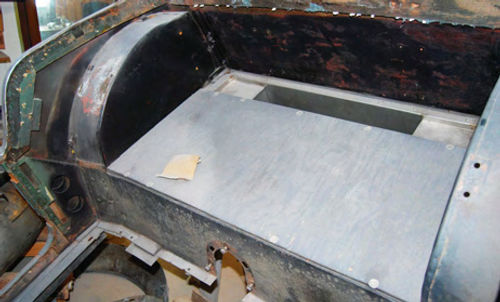
As we related earlier, we had removed all the front end sheet metal and the gas tank before using a homemade sling and a chain hoist to remove the car’s body tub from the chassis. After that, we had a cowl section, body tub, doors and one stubborn running board still painted red to worry about storing. We stretched a couple of long 2x4 boards across one of our Backyard Buddy (backyardbuddy. com) four-post lifts and parked the body there for the winter.
Toward the end of winter, we ran into John Diermeier, the owner of John’s Custom Auto ( ) in Manawa, Wisconsin, and he mentioned that work at his body shop had slowed down during the cold months and he needed a “keep-busy” project like the MG restoration. John and a friend came to our storage building, looked the car over and agreed to take on the job of repairing the body and painting the car. We loaded it on a trailer and they took it away.
John had never worked on a T-Series MG, but he’s a veteran body man and we had all the books and other aids needed to guide him toward a mostly authentic restoration. Isay the project is “mostly authentic” because we are going to keep the “dished” Smith’s instruments that the car had when we bought it (which aren’t correct for our late-1952 car), the very nice stainless steelside curtain bin that a previous owner fabricated and the steel-belted radial tires. We also changed the rear axle gearing. In addition, at least some engine parts, like the finned oil pan, are from different TDs. We had Jeff Schlemmer of Advanced Distributors (advanceddistributors.com) upgrade and re-curve the distributor, too.
Good MG T Series Restoration Resources
The resources we’re using to guide the restoration are a reprint of the original MG Midget Workshop Manual, a book called “The Complete MG TD Restoration Manual” by Horst Schach, a clubpublished compilation of technical articlescalled“The‘T’SeriesHandbook” and the more recent “40 Years of the Sacred Octagon 1964-2004”CD.
The factory workshop manual reprint is available from Moss Motors (MossMotors.com) and all of the other references can be purchased from The New England MG ‘T’ Register (nemgtr.org). In addition, we find the Web site http://www.mgcars.org.uk/ mgtd/ very helpful.
Furthermore, you should get a copy of Moss Motors’ free MGT catalog. It has exploded views of all the parts and assemblies.
Stripping and Cleaning Body Parts
After loading John Diermeier up with a bunch of books, he got rolling on taking the body apart more than we had done. This involved cutting and grinding a few of the old, rusty fasteners, such as those that were keeping the last running board on. John first attempted to remove the old red finish (which seemed like a very thick, very smooth enamel applied many years ago) with paint strippers.It didn’t take long to realize that going this route would take forever and require many hours of labor at standard body shop rates; likely, thousands of dollars!
John called us and recommended that we have the parts “tanked” by a commercial stripper in the Milwaukee area. Hot tank stripping or chemical dipping is an effective way to remove rust, paint and other finishes from metal car parts. It will remove everything on the metal and will even eat some metals. Chemical stripping typically leaves the item looking fresh and clean and ready for bodywork. It works especially well on individual parts.
The companies that offer the chemical dipping process have giant tanks that can hold a complete car body or pickup truck cab. The body assemblies are dipped into the caustic solution for several hours and the rust-eating acid flows into areas where a media blaster could never reach.
After dipping a vehicle or parts into the caustic solution, they must then be dipped a second time into a neutralizing bath that removes the acid.
Once the sheet metal has been treated with a neutralizing agent, the strippers will usually electro-coat or “e-coat” the dipped items to protect the bare metal.
If you’re considering this process, however, there are several considerations to keep in mind. For starters, there are few facilities that offer this process so you might have to ship your parts a distance away.

Also, keep in mind that the caustic solution can get into hidden areas like channels in the metal or gaps between flanges and crevices formed where more than one panel comes together. And, it can stay in place after the dipping is completed. There are many such areas on cars made from the mid-1930s on up. Luckily, the main body structure of the MG TD is built more like an early 1930s car with the edges of sheet metal panels bent to a 90-degree angle and nailed to a wooden frame.
Unfortunately, we discovered that dipping the wood-framed MG body tub into an acid bath is a big NO-NO. The old, porous wood will soak up the caustic solution and hold it like a sponge. This can ruin the wood, but the bigger problem is that the metal can’t be fully cleaned and neutralized where wood is attached to it.
Even with an all-steel body, some basic prep work is required prior to dipping.Things like liners or matting inside a vehicle can create a huge mess if a car is dipped without removing them. If you don’t do it, the dipper will charge for the added time it takes.
Before dipping a vehicle, remove all of the door and trunk hinges. A car body or pickup cab can be dipped with door hinges attached, but that prevents the full cleaning and rinsing of the metal behind the door hinges.
Of special importance is the fact that aluminum parts will “go away” in the dip tank. On many cars the serial number tags and other nomenclature plates are made of aluminum and will be destroyed in the hot acid tank. Spring steel also cannot stay in a tank as long as sheet metal. Spring steel must be removed within just a few hours so it doesn’t become brittle. Hardened spring steel hood springs and trunk springs must also be removed.
Now for some good news. We had the MG hood, four fenders, running boards and gas tank (plus two old-time parts cabinets) stripped for $700. We figured it would have taken 40 hours at $55 per hour—$2200—to have those parts stripped in the body shop.
Time for a Fender Swap
Since the wood-framed MG TD body tub couldn’t be tank stripped, John Diermeier took the old finish off the hard way—with a dual-action sander. Paint removal revealed rotted sheet metal on the left-hand quarter panel and, upon closer inspection, the wooden “timber” under the metal was rotted at the same point. Obviously, some moisture had accumulated there, causing both wood rot and rusting.
One nice thing about restoring an MG TD is that you can get almost every part from Moss Motors, and both the sheet metal and wood were in stock. We’ll be installing them in a future segment.
One final thing to mention about the red car is that we decided to use the front fenders and running boards from the blue-and-white car on it. It turned out that these parts on the red car had a thick build-up of plastic body filler, while the blue car’s fenders and boards had never been repaired. In fact, while the blue and-white car was incredibly rusty (we think it may have been in a flood), its grille, front fenders, hood and running boards are actually the nicest ones for an original restoration.
The parts from both cars needed total refinishing, but the ones from the blue and-white “jalopy” just had more of the correct factory shape.
The Yellow“ Rolling Restoration”
As noted above, the plan for our second MG, the yellow TF model, isto fix it while we keep it going. That way, we will have an MG T Series carto drive this summer, but there’s another motive, too. We want to see if we can save a considerable amount of money by carefully restoring a “pretty nice” old car without ripping it completely apart. The car needs a few minor mechanical fixes, some spring work, possibly a bit of wood replacement, new paint, chrome plating, a new top and some soft trim work.
Until we get toward the end of our three-car restoration project, the progress on this car is going to be slow, since we want to continue using it until one of the other cars is completed.
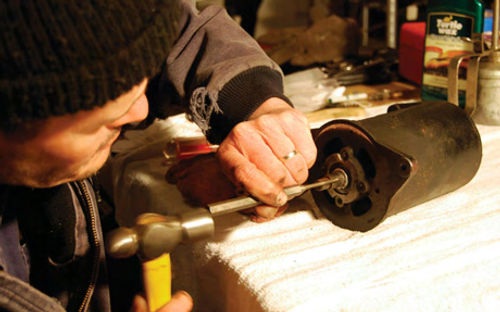
We had mentioned in an earlier segment that the car’s dynamo (British term for generator) had been making weird noises and we suspected worn bushings. So, this is the only job we started on this car.
The 12-volt generator is a Lucas unit of more or less typical early-1950s design, although it’s unlike American generators at the rear. The end plate has an extension through which the armature shaft exits back toward a coupling that holds it to the round housing for the tachometer drive gears. On the top of this extension, at about 11 o’clock, is a threaded hole for lubrication. A small pipe shaped like a bullet tip threads into the hole. It has a slot for a screwdriver on one end and the other end is hollow so that you can insert a spring-loaded felt pad. An occasional drop of oil on the pad lubricates the rear generator bushing.
The fan on the front of our generator was wobbling asit rotated. The last time we ordered a fan belt for the car, we were told there were two modern applications. Apparently, neither was an exact match to the original, since the catalog described one as the “short” belt and the other as the “long” one. We had ordered the short belt and had a real job getting it to fit on. We guessed that the tightness of the fit had worn out the front bushing. Oddly enough, the generator was still working fine in an electrical sense, but it sure made a racket.
Normally, we take our generators (and starters) to an outfit called Fondy Auto Electric (fondyautoelectric.com) to have them remanufactured. They clean everything up, test the unit, replace bad parts, machine serviceable parts, put it all back together, do a final test and get it back to you in short order for about $125. For a few bucks more, they’ll even paint it.
This time, however, we decided to attempt a rebuild ourselves. Since the generator seemed to be working OK, we thought we could get some new bushings from Moss Motors and simply get rid of the noise. No such luck!
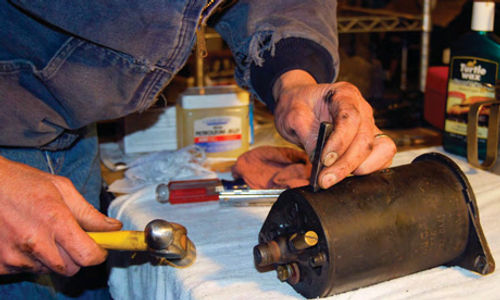
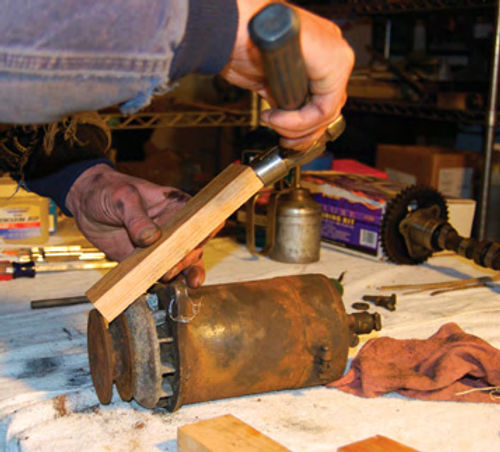
We removed the unit from the car by undoing the bolts that attach it to the engine and the bolt that positions it on a slotted bracket in front. We also removed the tachometer coupling at the rear. We detached and tagged the electrical leads. After slipping the belt off the pulley, we brought the generator to the bench. Next, we stamped the housing and the end plates, so they could be reassembled in the same position. We removed the pulley from the front end and undid the long bolts that sandwich the housing between the end plates. After tapping the end plates off, we freed the armature and slid it out of the housing.
As expected, the bushings were worn, but surprisingly, the armature was in worse shape. It had been blackened by arcing. Pieces of the mica were missing. There were chunks of insulation burnt away. We have no idea how the unit, in the condition it was in, was able to put out enough voltage to run the car and keep the battery charged.
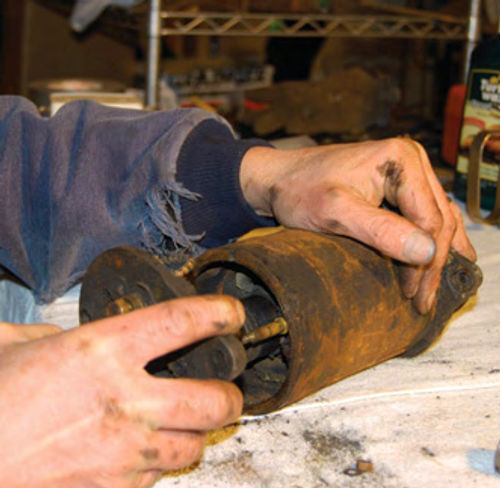
We dug out the generator from the blue-and-white 1950 TD since we don’t intend to use it when we build our hot rod. Like the rest of the car, it was very dirty and rusty. After Scraping the housing a little, we found the Lucas parts number and compared it to the number of the 1954 TF generator. Only the suffix letter was different, so we knew that the guts of two generators were basically the same. The older one had a “dished” type fan on the front. We had never seen that style before and it seemed like a “keeper” because it was different.
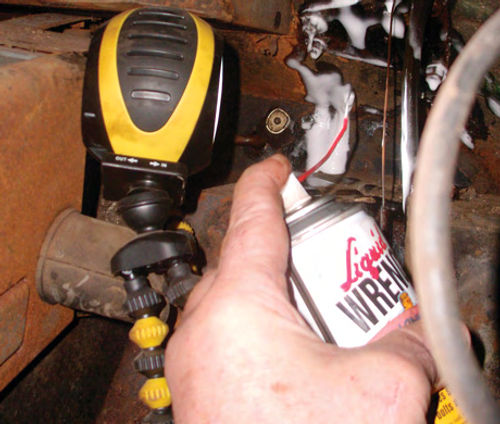
Because the second generator was so cruddy, it was a bit harder to take it apart. The armature would not drop out of the pulley and end plate as easily as the first one had. Since we did not want to tap so hard the threads would be ruined, we set the armature, end plate and pulley into a coil spring and soaked everything in Liquid Wrench for a week. After that, a few taps got things apart.
While all the parts of the second generator were filthy and rusty, the armature seems useable. We’ll have Fondy use the best parts to remanufacture one generator and if past experience is any indicator, they’ll be able to get the parts needed to repair the second one as well. Maybe we can even get a look at—and snap some photos of—the rebuilding process when we visit them.
The Challenge of the Blue MG
To car collectors rust is a beast and our blue MG TD has been viciously attacked by the nasty creature. The car had so much brown metal on it that it proved extremely difficult to get apart. When we took it to hot rod builder Mark Seidler at Phoenix Machine, LLC (phoenixmachinellc.com), he sent it back to us and said it was not worth fixing. Then, some members of Milwaukee’s Cheaters hot rod club shamed me. They had come to my shop for a seminar, saw the stripped MG and asked why we would even think of throwing it away when it was better than some of the Fords they built into beautiful cars.
They had thrown down the gauntlet and we accepted the challenge. From that point on we committed to building our MG hot rod on its original frame rails, even if they needed a bit of work. As we mentioned in Segment 2, we had talked toRichBickleofMuscleUpPerformance and HotRod Shop in Janesville,Wisconsin, about actually producing a ready-to roll chassis for MG TDs and TFs. Then Kelvin Dodd of Moss Motors Told us that there really is no market for such an item, since the original frame is such a “robust” piece. After that, we considered purchasing three frames or chassis through eBay. One chassis, with front and rear suspension bits, had a low starting bid of $1000, but it was in Georgia and getting it home to Wisconsin would take the “low bucks” aspect out of our project.
So, once we were mentally committed to repairing the frame that we already had, the job of stripping the car completely down got underway. We had previously removed the front end sheet metal, interior parts (what was left of them), engine, transmission and gas tank, so it seemed like the rest of the teardown should be a snap. Then, the rust beast reared its ugly brown head. Our best guess is that this TD was a car with approximately 20,000 original miles that was stored in a place that was flooded and the car was not dried out afterward.
We could best compare the TD to a 1920sRollinsedanthatsunkinGreenBay while being shipped from the factory on a barge. When it was brought out of the water in the early 1980s, we were invited to inspect the car. Since it had sunk in freshwater, the car’s 60-year-old paint actually looked nice, but much of the metal under it was rusted or barnacled.
While we didn’t find any barnacles on our MG, itsure had a lot of rust on every frame and suspension part. The engine and transmission looked ugly outside, but when we opened the gearbox, it was almost perfect inside. We suspect the engine will be the same. Apparently, the front didn’t get as wet as the rear, because the front sheet metal was pretty nice.
This Needs a Two-Wrench Approach
British cars like the TD were usually put together with nuts and bolts, rather than with bolts that thread into blind holes (which is more common on American iron). So, to take British cars apart, you generally need two wrenches—one for the bolt and one for the nut.And, on very rusty British cars, both of the fasteners are rusty, which makes for double the work. Even getting proper-size wrenches to fit on the rusty nuts and bolts was very difficult.
Virtually none of the fasteners on the car were reusable, but luckily all of the hardware for these models is available from Moss Motors. Many of the original fasteners had Whitworth or British standard threads and some of the available replacements do, too. We have several sets of Whitworth wrenches, but often they really aren’t needed as SAE or metric tools will usually do the job if you have enough different ones. Having a big compressor and an impact gun was a big help in getting some assemblies to come apart and quite a few fasteners had to be ground off with our Milwaukee tool and grinding discs.
As with any restoration job, having patience (as well as a good assortment of tools) helps tremendously. One of our favorite “take-apart” tools is our tiny Vise Grip pliers, which have come in handy for grabbing rounded fasteners many times. There are reports that British metallurgy right after World War II was inferior and we believe that after seeing how bad the fasteners on this car were. When we build the hot rod, we are going to use as many stainless steel fasteners as we can get Doc Hammett of Totally Stainless (totallystainless.com) to match up for us.
Sticking WithOld-Style Shocks
Although Moss Motors makes a kit to put “airplane” type shocks on MG Ts, we decided to stick with the original lever action shocks that resemble those used on many prewar (and a few postwar) American cars. Although the shocks resembled Stone Age artifacts, Peter Caldwell of Worldwide Auto Parts (nosimport.com)in Madison,Wisconsin, said he could rebuild them. Peter travels the country harvesting old shock cores and rebuilding them for sports car buffs. They come back looking like new and carry a lifetime guarantee. He surprised us with the news that he’s even doing some shocks for American cars these days. Peter’s rebuilds go so fast, that the shocks we sent him last week would already be done, except we didn’t send the shock links and he wants to fix them, too.
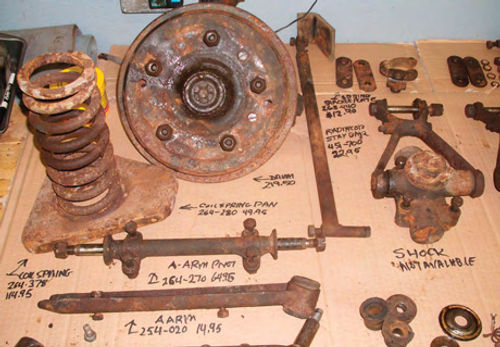
We laid out the old shocks, suspension parts and brake parts on large pieces of cardboard, then looked up replacement part numbers and prices in the Moss Motors catalog.(See photo on page 24.) Considering the amount of time we’d spend media blasting the rusty parts, we determined that labor costs would be higher than the price of new parts in some cases. When that’s true, it makes more sense to get a new part. In other cases, it’s cheaper to repair and refinish the old part. There are parts, like shocks, that only specialists like Worldwide Auto Parts can fix. As a restorer, it only makes sense to research all the options and do what’s best for you.
(Next Installment: The red MG TD’s body should have new paint by the next installment.The yellow MG TF’s generator should be done and we plan to replace the wind wings,since one blew off the car last year. As for the blue MG TD hot rod, we’re going to be sandblasting the frame, repairing rusty sections of the frame and getting the frame powder coated.)


