How -to The (Ongoing) Tale of Three MGTs, Pt. 2
The Red TD Hadan Engine & Gearbox Rebuild & New Rear Gears. Meanwhile, the“Parts Car”Has Frame Problems.
Editor’s note: This is the second in a series of articles about three different approachestotherestorationofanearly postwar T Series MG. The articles will compare a red 1952 MGTD that’s getting a stock frame-up restoration, a yellow 1954 MG TF that’s getting a “rolling restoration” and a blue-and-white 1950 MG TD “parts car” that is going to be fixed up as a “rat rod.” At the end we’ll compare the cost and fun factors of each of the three projects.
WISCONSIN HAD A colder and snowier winter than usual, and during this period we focused most of our attention on the red MG TD that is getting the full restoration. We also have purchased a couple of parts for the yellow MG TF. However, since it is stored in an unheated part of my home shop and storage building, most sprucing up of this car will be done when it’s above freezing. We did squeeze in some initial disassembly of the blue-and-white MG TD parts car and it turned out to be a mixed bag of good and bad parts.
We are going to describe the work done on each car without going into deep detail, since the MG TD/TF Workshop Manual does a great job of outlining important repair procedures. However, we will give some helpful advice about how we dealt with the more challenging phases of each job. We’ll also mention restorers and parts and product suppliers who helped us get past the snags.
Moving Ahead With the Red TD
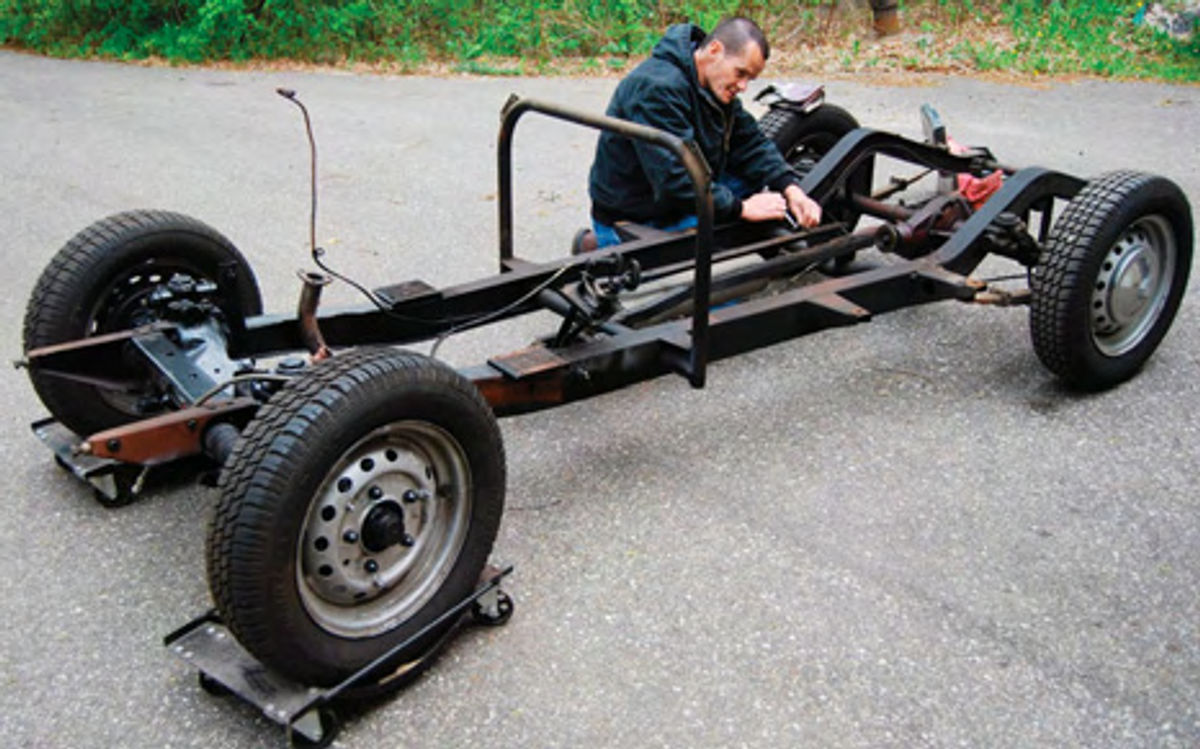
Steady progress has been made on the red TD since the first article in the January issue. You’ll recall that we had already removed the interior and drive train, which must be done before taking the front end sheet metal off a T Series car. We then removed the body tub using a homemade sling attached to a chain hoist that was fastened to the building rafters. The building has three Backyard Buddy 4-post lifts. We put the body tub on one of them and the bare frame on another. One running board was “stuck,” so we left it on the body tub.
Many people think that T-Series MGs have a wooden frame. The body tub is indeed built over a wood framework, but the chassis has a steel ladder frame. Most TD frames have a big hoop about one third back that supports the cowl. (The earliest TDs do not have this hoop.) The front suspension has a coil spring between A-arms and lever shocks. The rear also has lever shocks and a rigid rear axle that is slung under leaf springs. Steering is rack and pinion. Drum brakes are used in both front and rear, with the master cylinder in the frame.
Stripping the frame of brake, suspension and steering parts is fairly straightforward. Some of the shock absorber hold down bolts hide under the front end sheet metal. When removing the coil springs, you’ll want to wrap the A-arms with a chain to prevent rapid decompression of the spring that could send it flying. Brake drum removal did require a puller, but we used inexpensive Harbor Freight models hooked together to get the proper pull and they worked fine.
The TD frame wasn’t covered with dried-up grease and road grime, but it was oily in some spots and had surface rust on other areas. Portions of the frame, but not all of it, had been repainted black. The frame seemed to be in good condition, but we noticed that a hole near the front of the left rail, where the steering rack passes through, was egg shaped. Initially, we thought this might have been collision damage and we called a few MG experts to discuss this. It turns out that making the hole egg shaped is the only way to remove a steering rack without taking the car apart.
Once the frame was stripped bare, we used naval jelly and a paint scraper to remove as much of the old finish as we could and, of course, made sure to protect our hands, clothing and eyes from the chemical. When we had the frame scraped down as much as we possibly could by hand, we went over it with a knit wire wheel attached to our Milwaukee Tool grinder. This made easy work of getting the rest of the old finish off and cleaning the chassis rails and cross members.
We debated whether to have the frame powder coated or to protect it with a “rust paint” like those available from Eastwood (eastwood.com) or POR-15 (por15.com). We talked to two shops that both do a beautiful job of painting frames and recommend this because repairs work better. However, they have nice paint booths and spray systems for this job and we have rattle cans. We did the A-arms and coil springs with rattle can semi-gloss black and they look nice, but we just didn’t think that you can get as nice a look on the entire frame.
We have two frames in my commercial shop, Gunner’s Great Garage, that were finished different ways. One is an MG TD frame that was painted and the other is a Daimler SP250 frame that was powder coated. The Daimler frame looks better and its finish is much more durable. Since we did all the work to get our TD stripped down to the bare frame, we want to go for looks and durability regardless of higher price. So, we sent the frame to Statewide Powder Coating in New London, Wisconsin. Owner Jeff Maney works on a lot of drag racing cars and has an oven that takes a full frame for processing the powder coating.
Removing and rebuilding the red TD’s engine was our initial goal, but once that was done we decided to do a full restoration. We worked through many parts problems—especially with valve train parts—in doing the engine. The rocker arm assembly was sent to a specialist and came back looking like new. However, when we went to install it we found that the pedestals were different heights. When we got new pedestals, they had to be machined because the shaft didn’t slide through them easily.
Several camshafts were once available for MG TDs, but today the only readily available cam is a Crane high-lift design. We were able to get one from Moss Motors (mossmotors.com), but when we installed it there was no way to get a valve adjustment. It turned out we needed spacers under the pedestals, which no one had told us about. These would have been needed right from the start, but finding out that they were required later added extra shipping costs to the project. This is why it’s important to ask part suppliers questions and try to make a complete list of all needed parts before you place an order.
Sometimes the parts suppliers themselves will help you do this. The BMC 1500 engine in our MG Magnette sedan is basically the same engine that’s used in MGA sports cars. When we rebuilt it, Ceceilia Bruce at MGA supplier Scarborough Faire (scarboroughfaire.4mg.com) worked out a complete kit of parts for us. Whenwe did that motor, we only had to order one extra part and that saved us quite a bit in shipping costs—not to mention time delays.
As mentioned earlier, our original intent was to rebuild the TD engine and put the car back together as it was. But by the time the engine was removed, the car was halfway disassembled and it seemed silly not to go all the way. So, we took the entire car apart, right down to the bare frame. Then the first mechanical thing we rebuilt was the original rear axle.
The standard rear axle ratio used in a TD is 8/41 (5.125:1). Optional ratios are 8/39 (4.875:1) and 9/41 (4.55:1). This “tall” gearing makes for relatively quick getaways, but high revs at highway speeds. To improve highway driving, many enthusiasts switch to MGA 4.33:1 gears. The numerically lower gears reduce engine speed and provide smoother, quieter highway driving, better gas mileage and less wear and tear. We decided to convert ourcar to the 4.33:1 gears.
Moss Motors Ltd. (mossmotors.com) sells the TD-TF Ring & Pinion Interchange Book written by Carl M.Cedarstrand. The instructions in this book make the most sense when you have the parts ready to go.
We boughtthe gearset from SU carburetor expert Joe Curto (joecurto.com), who also rented us the Cedarstrand book and the tools required to do the job. The book tells you how to make the tools as well as a stand to hold the axle housing in a vertical position.
Mechanically, the MGA ring and pinion is a bolt-in conversion, but setting up the clearances, pinion depth and back lash takes time. Since the MGA pinion has a different spline than the TD pinion, the MGA pinion flange must be combined with the TD drive shaft.Both are the same size and use the same bolt pattern. You will also need to use the tubular MGA pinion bearing spacer, too.
The Cedarstrand book specifies the use of specific bearings. We ordered these from Moss, but found that we needed one other bearing to get the job done. Fortunately, a local business called Gene’s Bearings (phone ) was able to supply what we needed. At that time Gene’s Bearings had stores in two cities, but we hear that only the Antigo, Wisconsin, store is still open.
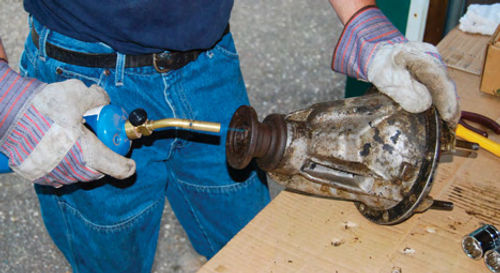
Before working on the axle housing, we stripped it down completely and hot tanked it to clean off grease, grime and old paint. After doing the ring and pinion conversion, we gave it a nice rattle can paint job using Ford Truck & Van paint. This offered a reddish maroon color that’s identical to the MG TD engine paint sold in catalogs.
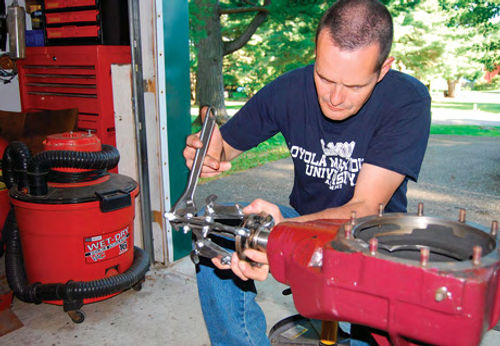
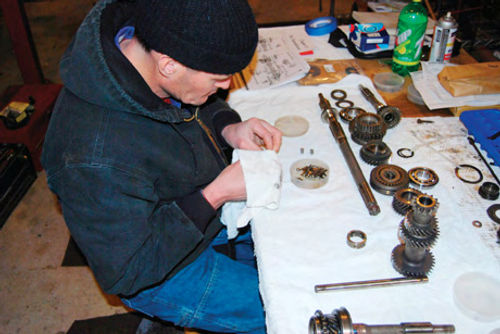
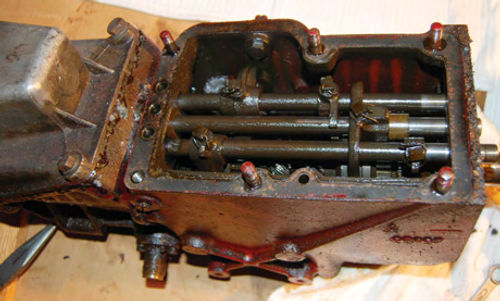
After converting the axle, we started a gearbox rebuild. The MG TD uses a four speed manual gearbox with synchros on second through fourth gears. The Workshop Manual has good instructions on how to remove this transmission and disassemble it. If you have never done this before, you can refer to the Youtube videos posted online by John Twist of University Motors, Ltd.(universitymotorsltd.com).John did not have a T-Series video posted at the time this was written, but his video on rebuilding the MGB gearbox will still be very helpful.
Disassembling a gearbox is scary, but not really difficult. You should go step by step in proper order and lay out the parts on your bench the same way they appear in workshop manual illustrations. The job consists of replacing worn parts and using new seals and gaskets. Our gearbox parts had quite a bit of wear and the layshaft gear unit (or cluster gear) was worn beyond repair. The layshaft itself was also worn at both ends, where needle bearings rub against it. A new cluster gear runs about $1000. Fortunately, while we were looking for a good used one— which is very hard to find—a friend told us about the blue-and-white 1950 MG TD being for sale. We purchased the entire car for $500, not knowing how the cluster gear was, but it proved to be good. We also needed new needle bearings from Moss, which came in the tiniest package we ever paid $90 for.
As things turned out, the blue-and white parts car proved to be a 20,000- mile vehicle that had been very poorly stored. The cluster gear and some other needed transmission parts were in very good condition, even though the car’s frame turned out to be so rotten an ice pick could be poked through it. When you consider the value of the time required to take a car apart, this second TD may turn out to be a “break even” proposition, but we did get some good parts from it.
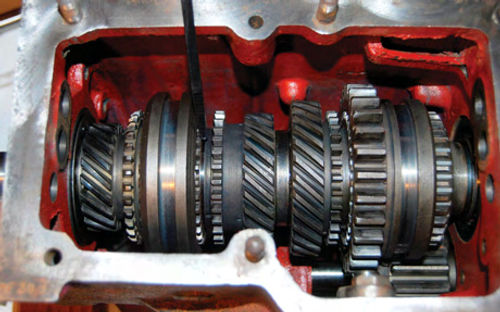
Other parts that commonly wear in the MG TD gearbox are the bronze thrust washers on the front and rear of the layshaft. These have oil rings machined into them. We replaced them because the laygear had too much endplay.
We checked all gears for missing teeth. First is prone to wear and ours had to be replaced. We removed the bearing from the front motion shaft (the nut holding it has a left-hand thread) and checked all bearings for excessive play or roughness. The shifter fork thicknesses checked out at around 0.300 in., which is fine. Quarter-inch-thick forks would have excessive wear and need to be replaced since the gears would not be engaged fully when selected.
TD synchros are integral with the higher gears and should be inspected for wear and looseness.
New or good synchros have cuts in the brass every 1/8 inch, but bad ones will be worn completely smooth. Excess wear of the selector shaft in the housing can cause gear lever rattle at speed.
The one in our car did have some wear, but we could not swap it for the one from the 1950 parts car, as that one was shorter.
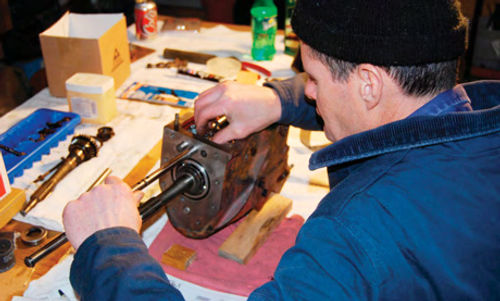
The MG TD Workshop Manual suggests the use of a dummy layshaft 9/16- in. in diameter by 6 11⁄32 in. long to ease the assembly of the layshaft with its bearings. We made one of these, but it was still very difficult to raise the cluster gear into proper position after the mainshaft assembly was in place. My mechanic friend Vince Sauberlich lifted the layshaft in a “sling” made of two electrical ties buckled together. He used the ribbed side of the plastic ties to try to move the key on the shaft into proper position so that the shaft slipped into the hole in the front of the gearbox case. This required sheer luck and took awhile.
Everything was then reassembled using new bearings, seals and gaskets. The TD does not use a gasket between the front of the gearbox and the bellhousing. Making a gasket would change the set-up of the front bearing and then require making a shim. A thin coat of Permatex non-silicone multi-use gasket goo is a better solution says MG expert Glenn Lennart.
The Yellow TF Waits for Better Weather
The yellow MG TF satin a metal building through the winter in 15-degree cold with its hood open and a few tools scattered about.
While driving the car several months ago, one of the old Plexiglas wind wings cracked and went sailing away, never to be found. Shortly thereafter, we started hearing a noise that turned out to be the generator. Apparently, the bearings are worn and the generator fan is wobbling. We have an opinion on what caused this. The parts catalogs offered “short” and “long” replacement fan belts. The short belt we had on the car fit very tightly and probably caused the bearings to wear.
As soon as it warms up outside, we are going to install new wind wings that we purchased from Moss Motors, Ltd., and get the generator off the car so that it can be repaired. Most likely, we’ll drop it off at Fondy Auto Electric (fondyautoelectric.com) for a rebuild. Later, we’ll have the car painted like they did it in the ’60s, without taking it completely apart. Other improvements inside, outside and underneath are in the works.
Meanwhile, the TD “Parts Car” Awaits a Frame and Body
When we purchased the TD parts car we stopped at a weekly cruise night on the way home. Complete, but crusty looking, our $500 “barn find” created a little jealousy among the other hobbyists at the cruise. They peeked at the car, complete with a fiberglass hardtop, and said, “Looks like an easy fix.”
They were wrong, but it didn’t really matter. As previously mentioned, we actually bought the car for the transmission parts which were worth over $1000 to us if good. They turned out to be very good, but that doesn’t mean we made a killing on the vehicle. It takes time to tear a car apart to get to the gearbox and time is money. When first we decided to try to fix the car as some type of “hot rod” for this series, we didn’t realize how bad the body and frame really were and what the cost might be.
Upon closer inspection and initial clean up (wearing rubber gloves for protection) the car turned out to be a low mileage machine that was probably once driven on salty winter roads and stored without cleaning off the salt. The radiator shell, front fenders and hood were actually better than the parts on the red MG in the sense that they had more of the correct shape to them.
The fenders on the red car had endured bangs and tears that had once been fixed with body filler. The blue-and white car’s fenders had a bit of surface rust, but absolutely no sheet metal damage. The blue fenders had never been fixed. The hood was in the same condition, but the chrome handles were shot.
For a real restoration, the hood handles, as well as the radiator shells and windshield frames from both cars needed re-chroming. Those parts on the red car looked nicer, but those on the blue-and-white car were in better shape. For instance, the grille slats were tightly fastened, the grille shell had no dings and the windshield frame had never been disassembled. On the red car, we had loose slats, small dents in the shell and a windshield frame that had once been disassembled and never put back together exactly right.
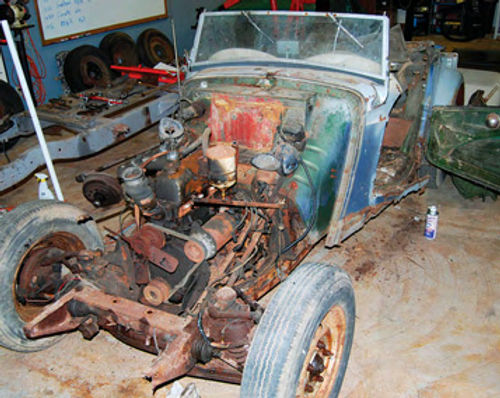
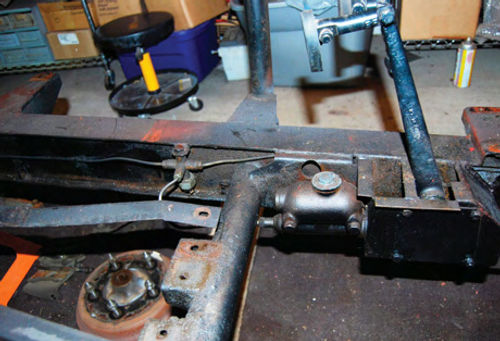
So far so good, but when we started taking things apart, we started seeing signs that fixing the car in any way was going to be a challenge. The large front bumper bolts, which usually loosen very easily, were rusted to the frame. When we tried to drench one with penetrating oil and then take it off using a giant socket and a long extension bar, we actually tore off the end of the rusty frame!
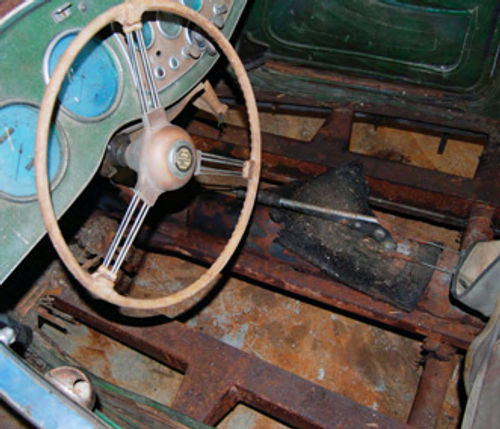
The body disintegrated as we continued disassembling the car. The front fenders and running boards were literally holding the rocker panels in place. The only way to remove the rotten wooden floorboards was to smash them out. Body attaching bolts could not be removed. After finally getting the engine and gearbox out of the chassis, we aired up the rotted tires, pushed the caronto the trailer and took it to Phoenix Machine (phoenixmachinellc.com) in New London, Wisconsin, so owner Mark Siedlercould cut it apart to get to the frame.
A few days later, Mark called. “Take your car back,” he said. “Even I can’t fix this frame for you because, from the cowl back, it’s so rusty I can poke an ice pick through it in almost every section.” We never unloaded the car after the return trip. It spent the winter in the trailer while we looked for an affordable frame on eBay. We talked to Mark and to exNASCARdriverRichBickle at Muscle Up Performance & Hot Rod Shop (muscleupperformance.com) in Janesville, Wisconsin, about manufacturing areproduction frame. Meanwhile,Kelvin Dodd at Moss Motors, Ltd., said that TD frames are very hardy and there is little call for this part. We just got a “rare” bad one.
So, we are torn between finding a used frame on eBay and working with Rich Bickle to build a new—and perhaps upgraded—frame as a one-time deal. We have every reason to believe that the original MG XPAG engine is as good as the gearbox was, so we may sell that to finance a frame.
For a body, Bob Lorkowski at L’Cars Automotive Specialties (lcars.com) in Cameron, Wisconsin, has offered to make “some kind of hot rod body” for our project. And after attending the recent British Motor Trade Association (britcar.org) conference in Daytona, we are thinking about using an engine setup we saw in a car at a show down there. That blue MGB was fitted with a 2.8-liter GM V-6 and automatic transmission. We were told there’s a kit for the MGB conversion, and we can’t help thinking this relatively inexpensive package can somehow be adapted to fit into the MG TD frame.
(Next: The red MG TD goes to the body shop to be painted with Wanda water based paint, the yellow MG TF gets ready for spring driving and the TD parts car takes the next step in its hot rod mystery tour.)


