
The (Ongoing) Tale of Three MG Ts, Pt. 7
Health Issues Have Slowed Down the Project Over the Past Year. But Now We’re Working With Wood and Rust.
Editor’s note: This is the seventh installment tracing different approaches to the restoration of a T Series MG. A red 1952 MG TD is getting a stock frame-up restoration, a yellow 1954 MG TF is undergoing a “rolling restoration” and a once blue-and-white 1950 MG TD “parts car” is going to be fixed up as a “hot rod.” At the end we’ll compare the cost and fun factors of each of the three projects.
IT HAS BEEN close to a year since I wrote about the MG project and there haven’t been a lot of improvements in any of the three cars, but there have been many changes in my life. Last July, shortly after the sixth installment of this series appeared, I had a bout with heart failure and though all is OK now, it slowed the three restorations down for a while during the spring and summer.
By September 2012 my meds were working and I had a unique opportunity to go to the Bonneville Salt Flats near Wendover, Utah, and crew for two cars entered in the Utah Salt Flats Racing Association’s “World of Speed” event. (See page 22 for more on that subject.) The salt flats venture also took time away from the MG project, but it gave me new ideas about how the “hot rod” 1950 MG TD should be done.
A third change came at the end of the year, when my son Jesse became my first employee at my Gunner’s Great Garage, where the hot rod MG TD is slowly being built. Jesse does not qualify as a “Gearhead Under 30,” but being a 1979 model, he’s pretty close. It’s better for him to do his restoration training on my car, rather than a customer’s, so his new assignment is building the MG hot rod.
That’s a summary of the past 12 months, so now let’s talk about each of the cars, where we’re at and where we’re heading.
Red 1952 MG TD
The red 1952 MG that’s getting a stock, frame-up restoration is at John’s Custom Auto in Manawa, Wisconsin (920-596- 1818). Shop owner John Diermeier has the car completely apart down to the wood framing under the metal body panels. Some of the panels were dip stripped by Restoration Specialists, Inc., of Franklin, Wisconsin (rsi-metal-cleaning. com). However, some panels that were attached to the wood body framing could not be dip stripped, since wood may absorb the acid and let the chemicals leech out under the new paint and ruin it. The panels attached to the wood framing were stripped using a DA sander.
John Diermeier spent many hours getting each panel smooth and gave each one a coat of gray primer to prevent rust from forming on the bare metal. Some of the wooden pieces, especially the ones that support the rocker panels, had wood rot in them. New ones were purchased from Moss Motors (mossmotors.com). These were reasonably priced, but required a bit of “tweaking.” Some notches cut into the rails did not match up with those in the original parts. (Another TD restorer told me that he had the same problem.) We “moved” our notches by making new notches that matched up with the old ones and used the cut-out wood pieces to fill in the incorrect notches. Luckily, Diermeier works on lots of boats, so he is comfortable working with wood.
As the body parts started coming together, Diermeier could see that the door fits were off. He said that he needed the chassis under the body to help figure out where to install shims to adjust the fit of the doors. Luckily some friends were bringing one Bonneville racing car—a 1993 Firebird—to my home garage where the already restored MG TD chassis was sitting. So they loaded the chassis on the same trailer and took it to John’s Custom Auto on their way home.
The red MG’s metal frame had already been powder coated. The front and rear suspensions had been rebuilt with new nuts, bolts, bushings, bearings, seals and so on from Moss Motors (all of which fit fine). The lever-action shocks at all four corners were rebuilt at Worldwide Auto Parts (nosimport.com) in Madison, Wisconsin, and we had the rear leafsprings re-arched (cold set) by Accurate Alignment (accuratealignment.com) in Appleton, Wisconsin. All the brake cylinderswere sleeved with stainlesssteel liners by Brake & Equipment Warehouse (brakeplace.com) in Minneapolis and the same company re-lined the brake shoes and provided hoses. New pre-bent stainless steel brake lines from Classic Tube (classictube.com) in Lancaster, New York, were installed.
As you can see, although we’re shooting for a good hobbyist-level restoration on this car (say $25,000 rather than $50,000), we are not cutting too many corners when it comes to doing a restoration that will last. Over the years we have found that old cars that sit unused for long periods of time will start to “age” by themselves. Using stainless steel brake parts and having the shocks rebuilt with Worldwide’s lifetime guarantee prevents deterioration during storage. At the same time, we admit that we could have shipped the leaf springs to Eaton Detroit (EatonSprings.com) and had the “memory” put back into the spring steel forever. If we were doing only one car in this project, we definitely would have gone this way, but we have to make some concessions to cost when doing three vehicles.
This brings you up to date on the red car. There is little obvious progress from a year ago, other than getting the body back on the chassis so we can use shims to make fit adjustments. However, many hours have been spent reworking body panels to the right shape and smoothness. Holes drilled in them over the years for aftermarket accessories had to be filled. Rusted flanges and lips on the panels required repair. There was plenty of filling and sanding done. In many cases, repaired metal panels then had to be nailed back on the wood framing. Driving tiny brads into 60-year-old hardwood body framing isn’t an easy task.
At this point, all of the body panels are ready to be refinished with a coat of bright red paint. Then comes the job of fitting all the parts back together, mounting the body on the frame and adjusting all the pieces to fit together properly. There is still a lot of work ahead on this little red car!
Yellow 1954 MG TF
The yellow MG TF that is destined to become a “rolling restoration” hasn’t been touched since the sixth installment last July. It’s not that the car doesn’t need attention; but it is the only still-complete MG in my collection that I can hop in and drive. My other MGs are in pieces. This keeps me from doing any significant teardowns until one of the other cars is ready to go back on the road.
However, if you’ve stopped bolting and unbolting parts to a car, it doesn’t mean you’re not working on its restoration. Over the years, I’ve met some very patient people who won’t even start a restoration project until they have gathered all the pieces, parts and information they need to do the job. In most cases, they’ll find other things they need, but the point is that restoration involves more than hands-on work. You need tools, manuals, training, input from hobbyists who have done the same job, research on paint colors, upholstery samples and so on.
In the case of the MG TF, an unexpected problem holding up progress is that two pieces of wood that support the body are bad. The Gas tank Back Panel has been bad since I got the car in 2002. Moisture caused this piece to rot. It is so soft in spots that you can poke your fingers into it. This panel ties the left and right rear quarters of the body tub together. Lips on the metal panels hold the flat board upward, at a slight angle to the front. The gas tank bolts on behind it.
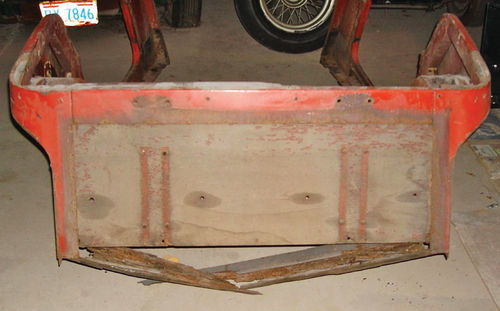
The other bad piece of wood is the Rear Bottom Rail, This is actually like a wooden frame cross member that lays across the car’s metal frame under the Gas tank Back Panel. It has a lip or channel that holds the back panel in position and actually supports the rear of the car’s body. Most of this piece has rotted or splintered away and it is nearly cracked through. If it were to crack all the way, I’m sure the rear of the body tub would loosen and drop down several inches!
As noted, our “3 MGs” project focus on this car calls for fixing it up as a rolling restoration. In other words, to make it look good with as little disassembly and expense as possible. We want to redo the TF the way people redid these MGs when they were used cars. After the project got underway, however, we discovered the hidden damage to the wood parts and the big question became whether we could replace just the two bad wood pieces without tearing the TF totally apart.
Most MG T Series experts and most guides to restoring these cars suggest that partial repairs of the wood body framing are impossible.
There are shops in the U.S. and Canada that specialize in reconstructing these wood structures and some people even ship their bodies to such shops for that aspect of the restoration. The shops do a first-class job of fixing the cars, but the process takes time and costs thousands of dollars.
In other cases, hobbyists buy wood kits from parts suppliers and do this job at home, often with mixed results.
I was convinced we could fix just the wood parts and started looking for someone who did this. There’s an Internet message board for T-Series MGs at Mailman@autox.team.net. After joining their mailing list, you can post questions about a car. We asked whether we could fix the TF without major disassembly. John Quilter, of Eugene, Oregon, answered us as follows:
“Back in 1977, when I did a street restoration on my MG TD, I did not take the body off the chassis. I did, however, replace the following with the body on the chassis: 1) the plywood panel behind the gas tank, 2) the ash member at the top of the body in the rear, 3) both wood pieces that the running boards attach to, 4) both door shut panel wood pieces. 5) both door hinge wood pieces.
“Somehow I was able to snake all these pieces into place and they were custom made by a retired cabinet maker, as at the time there were no repro wood pieces available for the car. I would try to stay away from taking the body off the frame unless you really have to as it could become a bit wobbly un-mounted from the chassis. I also had to trial-and error cut the two plywood boards that make up the floors. All this work is now 36 years old and the car seems as solid as when I completed it back in the day. I’m sure you’ll get plenty of responses that detail a more involved restoration process with the body off.”
John Quilter’s email message confirmed that what we want to do can be done and now we’re ready to try it. The car has been moved back into the heated section of my home shop and the next step is draining and removing the fuel tank to get at the Gas tank Backboard and Rear Bottom Rail. The pieces are available from Moss Motors and other firms for about $25 and $35, respectively.
Blue MG TD Hot Rod
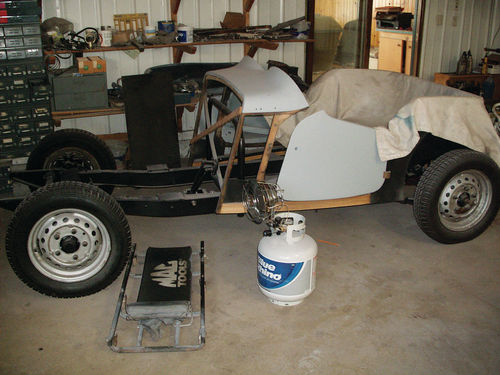
Until the end of 2012 the MG hot rod was a gray primered 1950 MG frame laying on end against a wall of the shop, a rebuilt 1940 Ford V8-60 flathead motor on an engine stand and a few shelves full of once-decrepit old parts that we’ve cleaned up and painted. The original goal was to build a “rat rod” on the cheap starting with a rusty, but complete MG TD that we bought for $500. But that plan keeps changing as we progress.
As explained in an earlier installment, fixing rust holes in the frame and buying a V8-60 cost more than expected. It took a lot of welding and fabrication at Waupaca Machine Repair ( ) to fix the frame. Then we discovered that V8-60 flatheads are getting rare. Ernie Silver at Egge Machine Co. (egge.com) also said that some parts needed to rebuild them are just about “unobtanium.” So we bought a V8-60 built by Rich Bickle,Sr. at Muscle-Up Performance & Hot Rod Shop (muscleupperformance.com). It cost a little more than a rebuildable engine and complete rebuild kit would have cost and by this time the total investment in this car stood at $5100. Was a “rat rod” still the best idea?
We started to envision a more polished “traditional” hot rod and then we went to Bonneville in September and that gave us another idea. On the salt we saw a hot rod owned by Brian Thomas of Salt Lake City that is powered by a supercharged Packard straight eight. Then we started thinking, what if we built a Bonneville-inspired MG TD hot rod? Now we’re not yet exactly sure what this means, but we are thinking of a car we can trailer to the Bonneville Salt Flats in future years and have fun driving around during the “World of Speed” event.
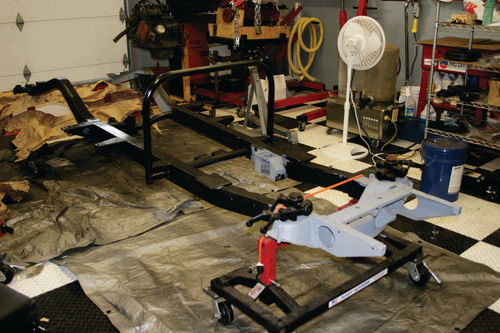
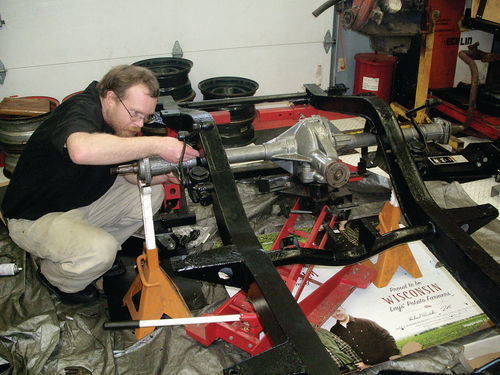
As noted earlier, when my son Jesse came to work at my Gunner’s Great Garage (gunnersgreatgarage.com) in January, I decided to make the hot rod MG his training project. We liftedthe gray primered frame onto our Backyard Buddy (backyardbuddy.com) EasyAccess system so we could roll it around. We bought some black Eastwood Ceramic Chassis Paint (Eastwood.com). This choice was based on the fact that we had previously used their Ceramic engine paint and liked it. The Ceramic Chassis paint is just as good and the finish came out looking almost as good as the black powder coat on the red MG’s frame.
Next we networked with hobbyists on the H.A.M.B. (a very active hot rodder’s Internet bulletin board) who had built MG TDs with V8-60s. We asked if they put their cars together with the stock MG suspension, as this would be the easy way to go. The answer was, “That’s how they did it in the ‘50s and that’s how we do it today.” Someone sent an article from an early ‘50s magazine that had information on such a swap. We started doing the front and rear suspensions with a mix of refurbished original parts and new parts from Moss.
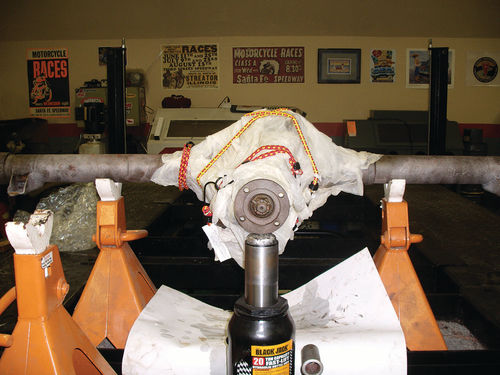
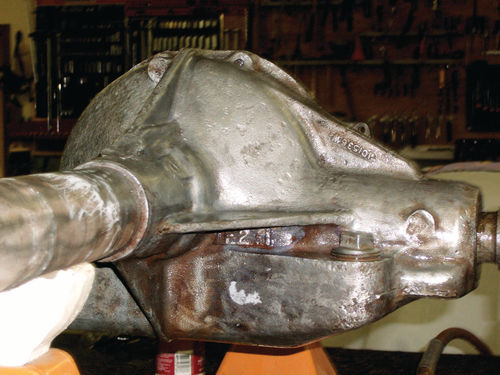
After determining the original rear axle also works with the V8-60, we dragged out the axle, cleaned it up and mounted it on the car. At the beginning of the project, the axle had been sandblasted, but over 18 months the “pumpkin” developed a coat of surface rust. Not to worry. After attending the SEMA Show, we weresent a container of a product called Evapo-Rust (Evaporust.com). We dug this out and it seemed like the perfectstuff to clean up the MG axle.
Evapo-Rust is a safe, effective rust remover that’s easy to use. With small objects that have light rust, you just let them soak in Evapo-Rust for 20 minutes to remove the rust. For bigger objects or ones with heavier rust you soak them overnight. Since it’s hard to dump a big part like an axle in Evapo-Rust, what the company recommends is wetting quality paper towels with it, laying them on the object, holding them in place with magnets and wrapping the towel-covered object with plastic to keep it from drying out quickly so it works overnight.
We didn’t have expensive paper towels so we used the less pricey Walmart ones. They seemed to work fine. We didn’t have a million magnets either, so after Jesse applied the wet towels, we held them on with bungee cords. We also used bungee cords to wrap the pumpkin with plastic.
The nice thing about Evapo-Rust is that it will not harm surrounding materials. That’s because it’s a water-based, nontoxic liquid that doesn’t work like an acid. You don’t get any bad smells either and a really nice advantage for the professional shop is that Evapo-Rust can be safely disposed of into sewers and drains. Plus, if you’re dipping small parts in it, after you’re done it can be put back in the container and used again.
Evapo-Rust would have come in handy for the pumpkin when it was blasted. That would have inhibited the formation of rust so a lot of work might have been avoided. An object treated with Evapo-Rust can be air dried and it will keep rust away for up to two weeks. For longer storage, you can apply it every two weeks.
As I understand it, Evapo-Rust uses a chemical process called chelation to selectively remove rust. A large synthetic molecule forms a bond with metals and holds them in a solution. The active ingredient in Evapo-Rust bonds to rust, while leaving surrounding materials unharmed.
The manufacturer says no scrubbing equipment is needed, but we did have to do a little wire brushing and wiping. After the first application, light surface rust still appeared on the axle, but a lot of it just wiped away with a rag. We want this axle to look really smooth and shiny when it’s back under the hot rod, so when we got to the point where only minimal rust remained, Jesse wire brushed the whole thing. After being treated with Evapo-Rust, the remaining light coat of rust was really easy to wire brush away and before long Jesse had a shiny bare metal pumpkin to go with the rest of the cleaned-up axle.
We are not going to cover all the details of putting the front and rear suspensions together because this was already done when we wrote about the other two cars. However, in the next installment we’ll touch on some jobs that haven’t been discussed previously, as well as some differences we found in the 1950 model from the red 1952 TD and the 1954 TF. Hopefully we also will have the TF wood replacement done and be painting the red TD.


