Let's Revive This VINTAGE DODGE PART 1
After 80 Years of Sunshine and Weather, This 1929 Dodge Coupe Was Showing a Good Deal of Exterior Wear. Can It Be “Revived” or Will the Owner Eventually Have to Reach for His Spray Gun?
The term “restoring a car” implies repainting it. But what could be more original on a restored car than a factory paint job?
Even if the paint on your car appears irredeemable, try reviving just one of its panels before opting for a re-spray which destroys a car’s exterior originality forever.
I did. I was so pleased with the results that I never had to reach for my spray gun.
The reception my un-restored 1929 Dodge rumble-seat coupe received at a local car show inspired me to shine up its original paint and brightwork. In short, the crowd loved the car, flaws and all.
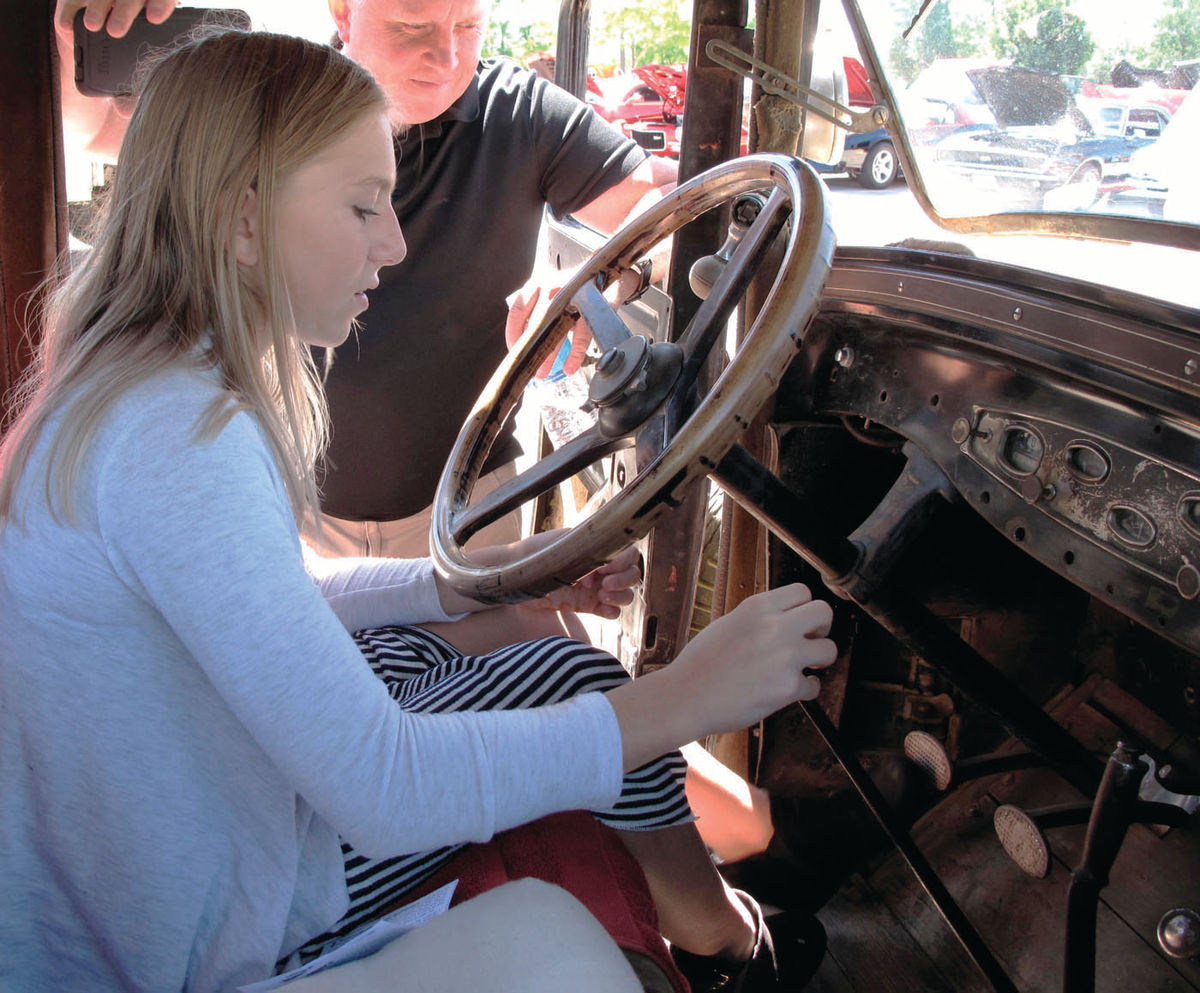
It helped, of course, that I allowed youngsters—and the few adults who wished it—to try out the rumble seat and sit behind the wheel (Photo 1).
Time and again, viewers told me how much they enjoyed seeing an un-restored car; a rarity at most shows. Their enthusiasm was for the car’s Timex appeal (it takes a lickin’ and keeps on tickin’); their applause was for my willingness to display it as a relic.
During rushed preparations, I’d done little beyond washing the dusty coupe, stored since the late 1960s. Curious, I’d taken a few moments to power-buff the faded paint on the rumble-seat lid. The old lacquer bounced back as if I’d hit it with a defibrillator.
To Buff or Leave It Ruff?
But should I buff the rest of the car? Survivor cars, I know, often appear in public wearing faded paint, tarnished brightwork and, sometimes, even dirt.
No one seems to question the trend, despite the incongruity of seeing (as in one national magazine recently) a 1926 Franklin runabout sporting a fresh canvas top, clean 1926 license plates...and the chalky blue paint of a barnyard trophy.
The Latin-derived “patina” denotes a broad, shallow dish from Roman times; but “patina” implies the coating, often green, that eventually forms on such a metal dish.
Because prizing an encrustation is celebrating neglect, I believe that most car lovers use “patina” as a synonym for general wear.
If so, I’m all for patina! I love the beauty of fine cracks and other blemishes common to aged lacquer. Such aging detail (patina) comes into sharp focus only on a polished car, however. By this definition, oxidized paint actually obscures a car’s patina.
Worse, the porosity of un-waxed paint invites damage to the metal beneath it; tarnish signals a chemical attack on brightwork.
And how can you appreciate a car’s gorgeous curves unless, as its designers intended, its paint is shiny enough to reflect light?
No, with my 1929 Dodge, I opted to do what any owner, then as now, could do: I polished up a storm. It’s the only way factory chrome and paint can look as “factory” as possible.
My Mission: Restore a Factory Shine
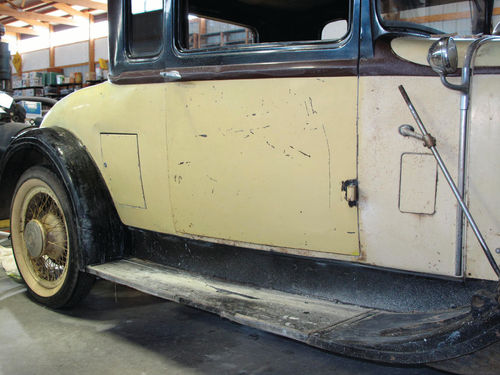
Buoyed by the attention the Dodge received at the car show, I set to work restoring its original paint: black fenders and roof; a medium chocolate-brown beltline (where the top meets the body) that extends forward over the hood; and a pale-yellow body, hood and wheels.
Although none of the car’s metal was rusted through, large sections of paint showed rust staining. How could this be?
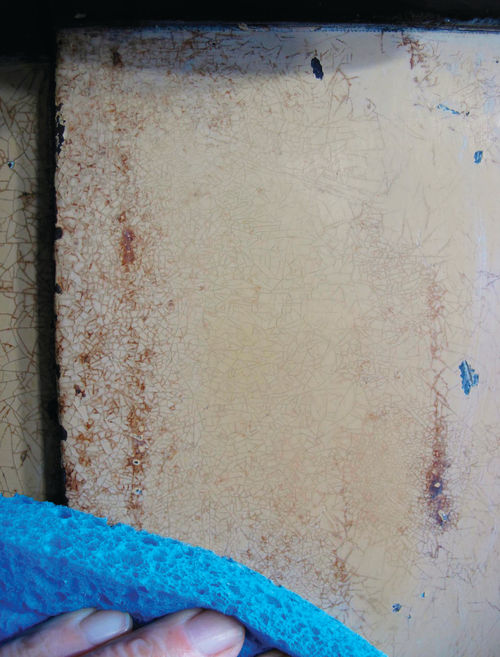
It turns out that crazing, the fine cracking so common to old lacquer, had exposed tiny slits of bare metal at the bottom of each crack. Exposure, if not to water at least to humid air, during decades of storage (the car was last licensed in 1967) produced mild surface rust and drippy red stains. Though block-sanding could never heal the crazing, it proved a remarkable cure-all for the rust staining, as before-andafter photos reveal (Photos 2 and 3). Eventually, I would buff, polish and wax the paint to restore and seal its natural gloss and protect damaged areas.

Because the car’s roof paint retained a slight shine, I initially doubted that it dated to the year the U.S. stock market crashed, signaling the end of the Roaring Twenties and the beginning of the Great Depression.
But during a diligent search, I spotted nary a hint of overspray around the windows or fabric-top insert. This, along with the red-oxide primer visible through a few thin spots in the lacquer, persuaded me that the roof paint is indeed 90 years old.
Yellow Paint Dates to 1929
Elsewhere, the crazing, chipping, fading and overall evidence of wear and tear spoke to the originality of the yellow paint on the body and hood.
At least two other observations confirm it. One, I discovered yellow paint behind door and rumble-seat trim panels, areas no painter would touch except during a full restoration, which this car has never received.
I also saw no hint of other shades of yellow (or any other color) when I sanded the body paint, which suggests that the body has never been re-sprayed.
Four clues (a poor taping job; a few rough, dry areas; paint drips, and unmarred paint over some nasty dents) testified to the three areas that had been repainted black: the fenders, a folding luggage rack and a sheet-metal cover that protects the gas tank.
Given the chalkiness of the 1929 Dodge’s yellow body, I started there in my quest to restore its paint.
Here, two critical questions arose:
First, was the paint film thick enough to shed its dead outer layer, as a snake sheds its skin, and still have enough left over to cover the primer? After test-sanding in a few areas, I could answer yes.
A Critical Decision: Speed or Control?
Second, which tool should I use: a powerbuffer or a hand-sanding block?
Speed—the main advantage of a buffer—comes at a loss of control, its great disadvantage. In an eye’s blink a buffer can cut through paint, especially on curves and at sharp body lines.
The inverse is true of hand sanding, whose main disadvantage—slowness— is offset by consummate control. This appealed to me.
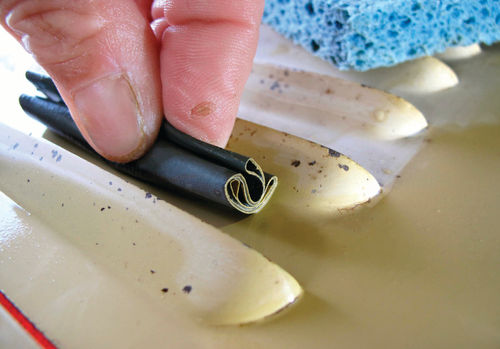
Thus my choice of tools—the handsanding block over the power-buffer— reflected my guiding principle: Because what comes off (original 1929 Dodge paint) can never go back on, slower is better. Toward that end, I assembled my supplies: 3M very fine 2000-grit wet-sanding paper, cut into strips to fit a 5-inch rubber sanding block; a sponge for wetting and wiping the panels; and a 5-gallon pail half-filled with warm water. To the water I added six or eight drops of Dawn dishwashing liquid as a lubricant (Photo 4).

I used a short sanding block to avoid a longer block’s tendency to cut and level. I wanted to remove only the layer of oxidized lacquer and preserve the undamaged paint beneath it—all without producing an unnecessarily thin finish.
I began sanding the aged yellow paint at the coupe’s passenger door, working one small section (about 12 inches by 12 inches) at a time.
I sanded in the same classic X-pattern that painters use to block-sand primer. That is, counter a few “pull” (downward diagonal) strokes from left to right with a few pull strokes from right to left.
In each section, I kept the overlapping X-pattern strokes moving from side to side.
Sanding With a Light Touch
Key to controlled sanding is a light touch; it takes very little pressure to cut through paint as oxidized as the Dodge’s. Therefore, I treated the sanding block as a hover board by letting it glide across the door panel (Photo 5).

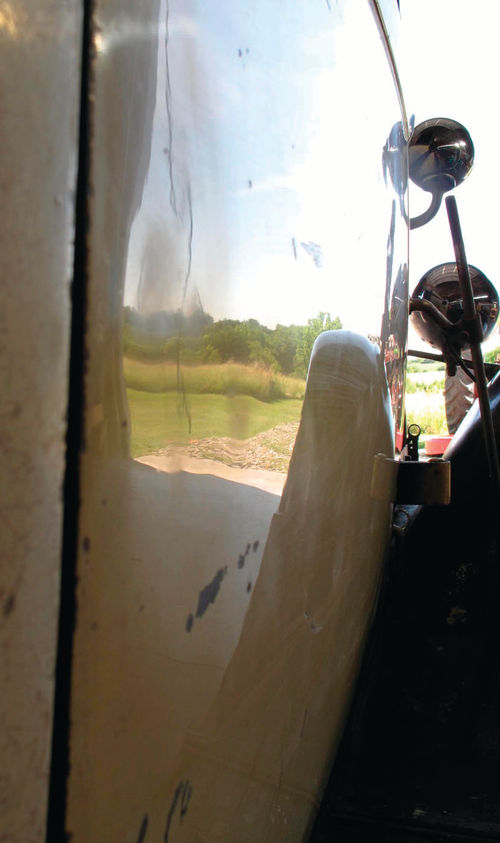
A light touch with wet 2000-grit paper produces sanding scratches that are nearly invisible, especially on yellow or other light-colored paint. The result is a highly reflective finish that, after buffing, will look like glass. Let your hands and eyes determine when to quit sanding. When the dry paint looks shiny and reflects nearby objects, and when it also feels slick to the touch, stop and move on to the next section (Photo 6).
Although sanding the entire body is slow, often tedious work, I found the transformation from section to section startling. Whereas the oxidized paint on the body and hood looked pale, tending toward off-white, my sanding revealed that its true tone is a rich butter-cream yellow (Photo 7).
Though unable to flush each panel with running water as I sanded—I worked in an unplumbed pole barn—I used other means to remove the sanding grit and paint residue.
Before starting, I’d wipe the area with a wet sponge. And then, periodically while sanding, I’d rinse the sandpaper, wipe the panel, rinse the sponge, re-wet the panel and resume work.
I also kept the panels wet by using a clean sponge to drip water onto my sanding block as I worked.
Some Areas Require Hand-Sanding
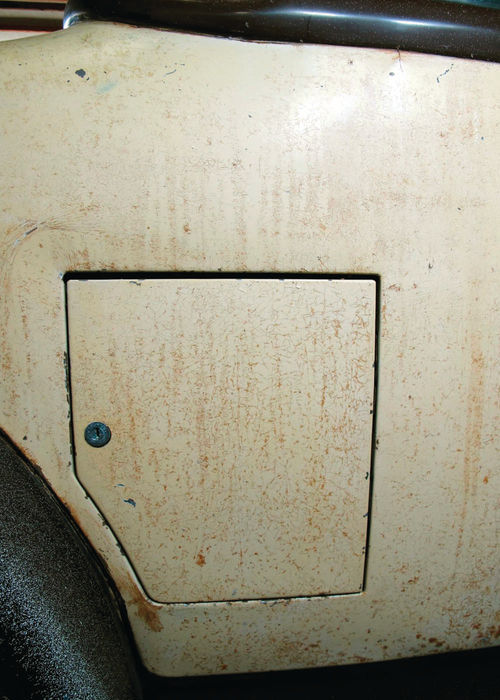


Beyond the passenger door, my sanding took me clockwise around the back of the car—first to the right quarter panel, notable for a locking door to allow loading golf clubs directly into the rumble-seat compartment. Around the lock cylinder and edges of the golf-club door, I sanded carefully by hand with a folded, well-worn piece of sandpaper. I held one edge of the folded sandpaper between my fingertips and placed the other, folded, edge against the paint. I moved the folded edge up and back with my fingertips, which touched only the sandpaper, not the car (Photos 8 and 9).
I used a similar technique elsewhere on the car: around door handles, brightwork strips and headlamp and taillamp bases, for instance—even around the monogram I discovered on the doors (Photo 10).
I taped off delicate brightwork, including the cowl trim and the brightwork surrounding the rumble-seat opening, to avoid accidentally sanding it.
Although I tried to use the sanding block for speed and uniformity, various dents, curves and sharp edges often prompted me to sand by hand.
For instance, where the right quarter panel curves into the flat metal adjoining the rumble-seat opening, I used my rubber sanding block for a bit. But I rubbed exceedingly gently; it is on such curves that the sun typically damages— and washing and waxing thins—paint over the years.
Discarding the block, I gave the curve a final easy working with a well-worn piece of 2000-grit sandpaper against the heel of my hand.
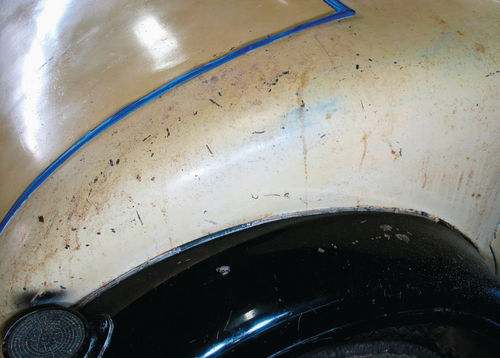
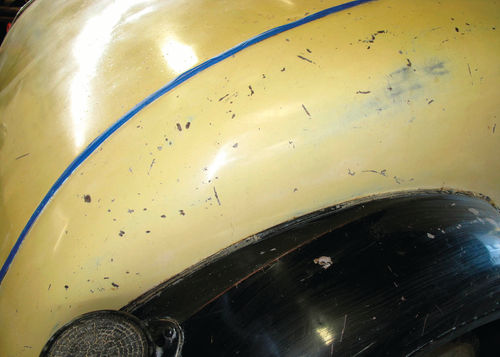
The paint on the quarter-panel curve was thin to begin with. Thus with both the block and by hand, I sought primarily to clean the stained paint (Photos 11 and 12).
The Car’s Worst Rust Stains
Next after the right quarter panel came the beavertail, or area between the rear bumper and lower lip of the rumble-seat opening. Here in this out-of-the-way area behind a strapped-on travel trunk I found the worst rusty bare metal and staining I’d yet encountered.
I treated the rusty beavertail paint with the same care I used elsewhere. Its rough condition meant I simply spent more time reviving it.
I did change sandpaper more frequently than I had elsewhere so I could cut to fresh paint faster. I also applied moderately more pressure to the sanding block, at least at first.
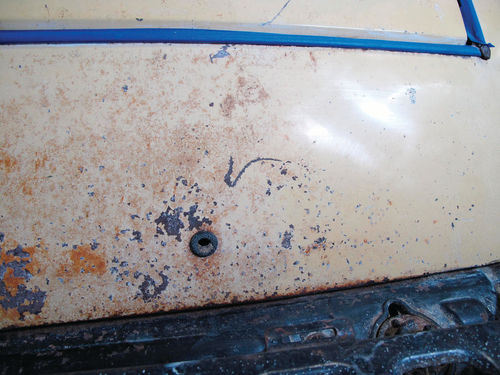

And while the paint remained flawed, the beavertail did look cleaner, brighter and shinier afterward (Photos 13 and 14).
To avoid the tedium of sanding the same areas on the driver’s side that I’d just sanded on the passenger side—door, quarter panel and half of the beavertail—I now changed tack.
Proceeding back up the car’s right side, I sanded three new areas of faded yellow I’d previously passed up: the rocker panel; cowl (both top and side); and the right half (upper and lower sections) of the center-hinged hood.

The rocker panel was, thankfully, small, as I elected to sand its compound curve and sharp edges by hand. Sanding the top and sides of the cowl proved tricky. The top, encircled by the chocolate-brown accent line and cowl trim strip, required sanding mostly by hand, without the rubber block (Photo 15).
Likewise, various hazards inhibited my sanding the side of the cowl: a vent door, the cowl brightwork strip, a cowl lamp and an anchor rod for the righthand spare tire, which mounts in the right front fender. Even the passenger door’s exposed lower hinge interfered. Here, I was able to use the sanding block only in the open areas.
The Agony of the Hood Louvers
Nothing prepared me for the agony of sanding the hood, however.
No, not the top hood half, an uninsulated horizontal panel baked by the sun above it and the hot engine below. The paint here was already as thin as onion skin and able to withstand only the light sanding I gave it to remove some rust stains.
The hard work came on the lower hood half, where the paint, less prone to heat damage, was oxidized but of a normal thickness. It sported many louvers to hand-sand, however, in addition to a large rusty patch.
Due to many small rusty paint chips and a general rust staining throughout the louvered section, it took 2 1 ⁄2 hours to sand 13 of the 26 right-side hood louvers during a first session. I spent about the same time to finish the job during a second session.

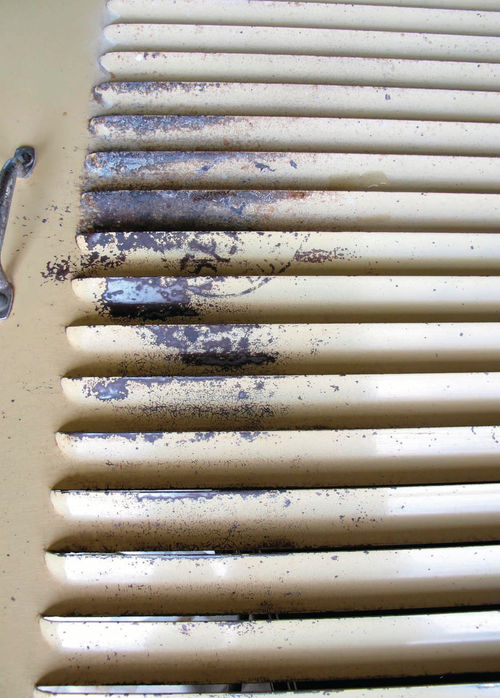
I used my rubber sanding block on the flat areas surrounding the louvers and on the flats of the louvers themselves. On the curved tops and bottoms each louver and where it rose from the flat metal, I sanded manually. That is, I rolled a seasoned (used) strip of 2000- grit sandpaper to avoid presenting sharp creases that could cut through the paint on these delicate protuberances (Photo 16). By painstakingly slow, careful sanding, I largely erased the circular rusty patch from the louvered section (Photos 17 and 18).
A Message From the Past!
Suddenly, just as I’d begun sanding the 14th louver from the front of the hood, a miraculous hidden message emerged. A divine vision, perhaps? Alas, no.
Rather, just as a stereoscopic image snaps into 3D once your brain recognizes and blends two separate views, words from the rust patch seemingly jumped out at me. Eureka!
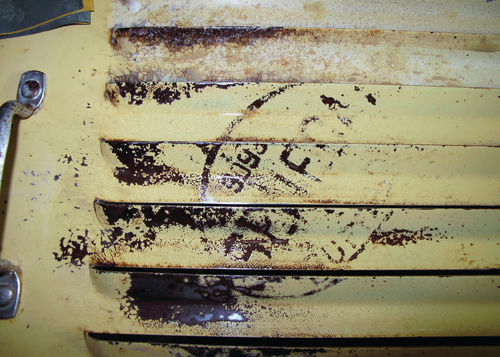
An oval mystery decal, long gone, that originally spanned four louvers has left a rusty ghost image. Perhaps the adhesive under the border and lettering was so strong that it ate away the paint. As I decipher it, it reads “Seneca Supp____.” Hmmm. Could that be “Seneca Supported”? Or maybe “Seneca Supporter”? (Photo 19.)
If it wasn’t upside-down, I’d suspect the sticker was part of a factory or dealer promotion of—I’m guessing here— Seneca gas, oil or grease. Some online research along those lines proved fruitless, however.
Ah, could the decal have read “Seneca Supplements”—a livestock feed additive of some sort? This perhaps makes the most sense, given the car’s Nebraska farm roots and what appears to be a 4-digit (3099?) stock number in the original decal.
Though I haven’t solved the puzzle as yet, the mystery only increases the car’s allure for me.
Next time, Curt needs the invaluable experience he gained sanding the body—along with an endless supply of patience—to revive the fender paint.


