
The (Ongoing) Tale of Three MGs, Pt. 8
Body Panels and Wood Framing Are Presenting Problems. And Some Brake Drums and Hubs Are Perplexing.
This is the eighth installment tracing different approaches to the restoration of a T Series MG. A red 1952 MG TD is getting a stock frame-up restoration, a yellow 1954 MG TF is undergoing a “rolling restoration” and a once blue-and white 1950 MG TD “parts car” is going to be fixed up as a hot rod. At the end I’ll compare the cost and fun factors of each of the three projects.
After a long hiatus, all three of my MG T projects are moving along at a relatively rapid pace, partially due to spreading out the workload. John Diermeier of John’s Custom Auto Body is working on the red car and has finished repairing, priming and fitting many body panels. He also has made repairs to the wood body framing.
The MG TF is in my home garage, where I had planned to replace two pieces of rotted wood. Once I got the rotted wood parts off the car, I ran into additional problems with other wood parts and rusty sheet metal. The repairs also involved taking more of the car apart and tearing up some of the soft trim.
My son Jesse is building the chassis of the second MG TD, which we plan to turn into a hot rod. We’ve had some brake drum problems with it.
Red 1952 MG TD
As we noted last time, John’s Custom Auto in Manawa, Wisconsin (920-596- 1818), had this car completely apart down to the wood framing under the metal body panels when he encountered door fit issues. On cars like an MG TD, with wood-framed metal bodies, door and other panel fits can be affected by: 1) differences between original and reproduction sheet metal; 2) differences in or damage to the wooden parts that support the sheet metal and 3) worn hardware, such as hinges and latches. In our case, we were dealing with all three problems.
T Series MGs were hand-built automobiles made with a lot of custom fitting at the factory. The sheet metal we obtained from Moss Motors (moss.com) was handy to have, but some out-of the-box pieces were a little flatter than the originals. This could affect the fits of the hood, gas tank, fenders and running boards on these cars, but door fit was our biggest problem early in the restoration. There was a big gap between the door edge and the wooden upright.

We had replaced some wood around the door with new wood from Moss and we had to custom fit or modify some of those pieces. The Moss catalog clearly states this may be necessary because of how the cars were originally made. We did not replace the upright, but noticed that it had some rot or splitting at the bottom, which could cause looseness and fit problems. At the same time, we were not anxious to rip the structure apart to replace the one piece.
John Diermeier spent lots of time checking and rechecking the reproduction front quarter panel and door to figure out why they weren’t fitting together just right. He noted the factory front quarter panel had more of a curve to it.
So he contacted a friend who makes cabinets to make up a wooden body buck to “curve” the fender panel in. He and his friend then sandwiched the sheet metal between two curved pieces of wood and squeezed them together to transfer the same curve to the once flat metal panels. The result: a perfectly shaped front quarter panel.
The damage at the bottom of the upright was another issue. This is actually a slightly curved and rear-slanting timber called a front latch pillar. A new one sells for around $50 in the Moss catalog, but you have to take the car apart to install it.
Then we remembered a product called RSP (Rapid Setting Polyester) that people used to fix wood-framed cars about 20-25 years ago. We started an Internet search for RSP and wound up on a forum on the Antique Automobile Club of America’s website (aaca.org) where it was discussed. This led us to a mention of something called Kwik-Poly. It was RSP.
Kwik Poly LLC (kwikpolyllc.com) is the same company that sold RSP and both products are basically or exactly the same. The company that markets it has always been in Missouri and has really expanded its market beyond the vintage vehicle hobby.
We remembered restorers raving about this stuff years ago and John Diermeier has been very happy with the results of using it to repair the latch pillar without removing it from the car. He says that you have to move fast, because Kwik Poly sets up very fast, and he’s anticipating using it when fixing boats as well.
Kwik Poly is a trade name, of course. The actual product is a Polyol that uses two agents—a base and a catalyst. Because of its wide versatility, Kwik Poly can repair and preserve things previously considered not repairable. It is combination filler, coating and bonding agent and by the time the three MGs are all fixed up, we expect we’ll have used it quite a bit.
Yellow 1954 MG TF
The yellow MG TF that didn’t get much attention at first is getting it now. The plan was to fix this car up without getting into an expensive body-off-frame restoration. The car is good mechanically and we wanted to replace a few deteriorated wood parts, patch up tears in the soft trim, install nicer carpets, bolt on shiny reproduction chrome and—before doing all this—sand, prime and paint it without completely stripping old paint or doing any major body disassembly.
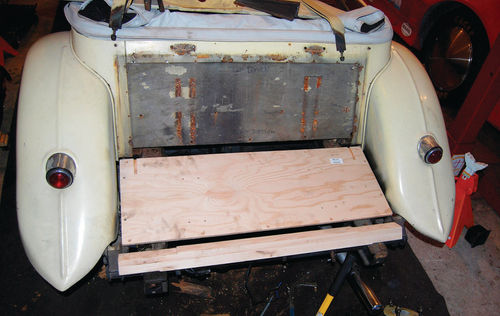
MG buffs call wood parts “timbers.” We knew the car had two. One is called the Rear Bottom Rail. It is a cross member that fits in a sort of “pocket” where the metal main body rail meets the rear fender. The rail rotted to the point where it was very thin and cracked. Above it sits a plywood panel called the Gas tank Backboard. Each end of this panel goes into a slot formed by the metal main body rail and rear quarter panel on each side of the car. The bottom of the plywood sits on a notch in the Rear Bottom Rail. A metal upper panel over the top of the plywood is nailed to the wood framing that supports the rear of the body.
What we wanted to do was replace the Rear Bottom Rail and the Gas tank Backboard without taking the body apart. Both parts are available in the Moss Motors catalog, but they aren’t designed to be individually installed. Most of the time, these parts only get replaced during a complete teardown. Our plan was essentially to remove the upper panel, loosen the fender bolts, spread the fenders apart and slip the new timbers in place.
Many members of a very useful MGT Internet forum at (http://www.team.net/ forums) thought this couldn’t be done. They are probably correct if you are talking about doing it exactly as the factory did with only original style fasteners and tools, but today we have a variety of modern products and procedures to work with. For instance, we can epoxy body panels together instead of bolting them and we have Nyloc nuts and other fasteners that didn’t exist in the mid1950s. Also, one enthusiast—John Sein of Irvine, California, said that some years ago he had done what we want to do.
What we’ve discovered so far is that after removing the top panel and two bolts that attach the rear fenders to brackets near the end of the frame, as well as a few small nails that fasten the rear quarter panels to the wood body framing, the sheet metal can be nudged far enough apart to slip the two timbers in. The Rear Bottom Rail has to be worked into the “pocket” on each side, but this seems doable. Then, the Gas tank Backboard can be tapped down into the slots between the metal main body rail and rear quarter panel on each side of the car.
What it appears we can’t possibly do is use all original-style fasteners to bolt things together. The old hardware was so rusty that it had to be cut, ground and chiseled to remove it from the car. We had to chisel away sections of the old Gas tank Backboard to get some bolts or screws loose. Then we had to use an air-powered cut-off tool to cut those bolts in half so that they could be removed from metal rails that support each end of the plywood backboard panel.
Factory workers installed the bolts that go through metal rails to fasten each side of the Gas tank Backboard in place before the sheet metal went on the car. At that point, the workers just pushed the bolt through the rails and the wood from the outside and put a nut and washer on the inside. Since we are leaving the sheet metal in place, we are going to have to hold the Gas tank Backboard in place with wood screws installed from inside the body. Since the backboard that comes from Moss has predrilled holes, we will either have to fill the holes with the Kwik-Poly product mentioned above or make our own Gas tank Backboard without the pre-drilled holes.
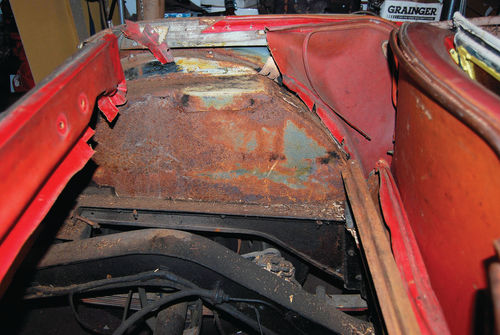
This is all written in future tense because when we removed the old rail and backboard, we found other problems that are going to stretch out the time needed to fix up the yellow TF. In addition to supporting the two timbers we wanted to replace, we discovered that the aforementioned metal main body rail also supports the side curtain compartment behind the seats.
This compartment is essentially a box with a lid that the MG’s “removable windows” fit into. At the bottom is a wooden floor made of several pieces of plywood that are supported by the metal main body frame rail on each side and other sturdy attachments at the front and rear. Once the floor is laid down and fastened in place, four sheet metal panels fit together to make a low, rectangular box on top of it. A lip on the bottom of the front panel gets bolted to the sheet metal Rear Body Tie Bar that runs across the car side to side. The top edge of each panel is formed into step-like bends that the wooden lid of the box fits into.
The lid is a simple plywood panel. The rear sheet metal panel has a full-length hinge that attaches to the back edge of the plywood lid, allowing it to be raised from the front to put the windows in. All of these parts sit between the inner rear fender wells and in a finished car, all of these parts and the fender wells are trimmed with vinyl that wraps over the edges of parts and gets held in place various ways (nails, moldings, glued, etc.). Moss Motors sells reproductions of the wooden floor and wooden lid. The sheet metal box sides and Rear Body Tie Bar are shown in the catalog, but are no longer available for MG TFs.
(Note: Moss does sell the Main Body Tie Bar for the MG TD and also sells the TD-style side curtain compartment, which is of a totally different design. The Main Body Tie Bar is about $500. The side curtain compartment is about $300.)
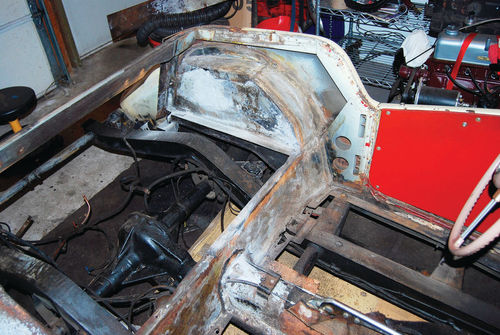
On our car, the wooden floor of the side curtain compartment was weak from age and moisture issues. The weak floor had affected the entire structure. In addition, there was a rusted-out section of the Rear Body Tie Bar’s bottom flange that affected the integrity of both the side curtain compartment and the car’s wooden floorboard. So, we removed the side curtain compartment floor and sheet metal box, the bucket seats and the driver and passenger floorboards.
Since all fasteners were rusty, this involved more grinding, cutting, chopping and chiseling, not to mention drilling. On these MGs, a lot of fasteners date back to the carriage building trade, including the heavy use of “caged nuts.” These cages are permanently attached to the undersides of rails and flanges. They hold the nut inside the cage to keep it from turning. The fastener goes into one part it’s holding, through the caged nut and comes out of the other part it’s fastening to the first one. You get a very solid attachment and the cage prevents the fastener from being pulled down into the wood and loosening up as it moves.
The caged nuts cause problems when things get very rusty and then you start taking the car apart. You can’t just cut the fasteners apart. Even when you use a cut-off tool to slice the tops and bottoms of the rusty bolts, the center section that passes through the caged nut stays in the cage. This proved to be a very tedious teardown. In some instances, the fasteners were drilled out. In other places, this wasn’t possible and all we could do is grind the tops and bottoms of the fasteners flush with the hole. When we re-assemble things, we plan to drill some of the holes in different spots and replace the original fasteners with stainless steel bolts, flat washers and Nyloc nuts. We think this will work fine.
One advantage to tearing the car down a lot more than we anticipated doing at first is the ability it gives us to access more parts for clean-up, rust treatment and repainting with specialty finishes. We plan to dress up a lot of the wiring and plumbing with wraps. (Remember, this is a “fix-up” project—not a Pebble Beach restoration.) We’re not quite sure how we’re going to repair rusty sections of the Rear Body Tie Bar and the inner fender wells, but whatever we decide to do will be covered in future articles. At least the work on the yellow TF has been started in earnest and is going basically well.
Blue 1950 MG TD Hot Rod
We started rebuilding the MG TD chassis as step one in building a hot rod. We put the rear axle, shock absorbers, leaf springs and brakes together in textbook fashion, which has been covered earlier in this series.
A problem arose when we went to put one of the extra-large axle shaft nuts on the driver’s side rear axle and it would not go on the threads. Our first guess was that the huge “castle” nuts were “sided” (left-hand thread on left nut and right-hand thread on right nut), but a look at the Moss catalog showed this wasn’t so. The part number is the same for the nuts on both sides.

We actually did minor damage to the threads in the expensive ($13.50) nut by trying to force it on. However, we were able to fix it by threading it on the right hand axle shaft (with the castle “turrets” facing inwards) and tightening it. The strong thread on the axle shaft acted like a tap and repaired the softer thread inside the nut.
Even after being repaired, the nut would not go on the left-hand axle shaft. Then we noticed a notation in the Moss catalog indicating that early TDs (through serial no. 12284) used 11 threads-per-inch British Standard Fine (11 TPI BSF) nuts and later TDs and all TFs used a 14-threads-per-inch SAE (14 TPI SAE) nut. So, we borrowed an axle shaft nut from the red 1952 MG TD and it went right on. This indicated that the 1950 TD’s previous owner had replaced an early axle shaft with a later one that had a different thread.
Two other issues were encountered when doing the car’s front brakes.
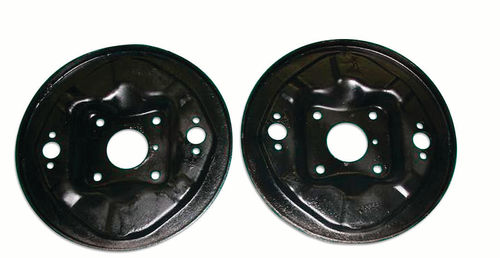
We found that the brake backing plates are mirror images of each other—not identical. The part numbers were partially worn off and what was left seemed to indicate that both were right-hand parts. This was impossible because, in addition to four mounting holes, the backing plates have a small hole between the mounting holes on one side only. This hole could end up facing toward the front or back, but no one seemed to know for sure. After asking several people and visiting over a dozen websites, we determined that the small hole faces forward.
According to one man posting on an Internet forum, a triangular symbol stamped on the brake side of the backing plate also points upward when the backing plates are properly mounted. We can’t swear this is true, but what the man stated was true in our case. There is also another surefire indication that you have the backing plates correctly oriented. When they’re correct, the most forward front wheel cylinder sits in a position lower than the rearward one.
Next we ran into problems with the hubs and brake drums. When we disassembled the 1950 TD we noticed that it had different style front hubs and drums than our 1953 TD. This is not reflected in the Moss catalog but it is covered in The T Type Restoration Handbook published by the New England MG T Register (nemgtr.org), the main club for these cars in the United States. This source documents that on Nov. 8, 1950, effective with TD 4251, the hub and brake drum assembly was changed from a separate hub and drum bolted and riveted to the hub to a one-piece casting.
The Workshop Manual advises that the earlier style hubs and drums should not be separated. Unfortunately, we had to separate these parts when we took them off because the car had extensive rust. Some steps in the parts removal phase had to be handled in unorthodox ways.
After taping off the friction surfaces, we blasted the drums and freshened their appearance with black Eastwood brake paint. We visited the T Series forum to try to save a little money on bearings over catalog prices. Listers there recommended numbers that belonged to current snowmobile bearings. We found the bearings on eBay and bought them there.
Since we could not find a source of the stubby, slotted, tapered-head screws originally used to hold the hubs and drums together, we re-used as many of the originals as we could salvage and found a couple of regular bolts that fit the holes. We ran these in and ground the tops off flat. Then we took everything to a machine shop and had the drums turned and trued up so they were round.
We noticed that the outer bearing openings on both hubs were a bit battered, and one was particularly bad. We were able to drive the smaller outer bearing into the hub, but it was a very tight fit. When we mounted the hub and drum on the stub axle, it was very difficult to push the drum all the way over the brake shoes. When we finally got it almost all the way on, we could not turn it. We had to hammer the hub and drum off the car. This left the larger, inner bearing stuck firmly on the stub axle and there seemed to be no way to get it off.
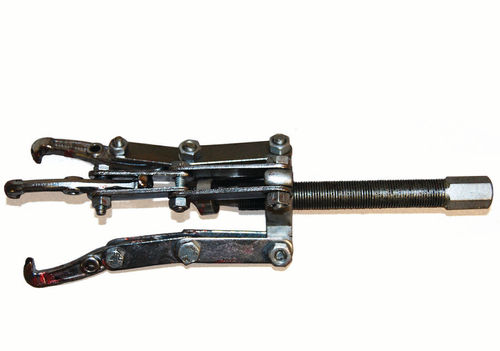
After some trial and error, we remembered how we had once taken our 3-jaw puller set apart and bolted the links to each other to get a longer puller. In this case, we needed both a longer puller and a puller with “fingers” small enough to grab the bearing without ruining the oil seal that was close behind it. It turned out that the fingers on the smallest 3-jaw puller were just right. So we assembled our “long” puller, starting with the smallest one, and got the bearing pulled without ruining the seal. Actually, hub problems persisted through several “experiments” and we wound up doing this four times and got proficient at it.
After four attempts to mount either hub on the driver’s side using different techniques, we wound up with either a tight-fitting drum or a wobbly wheel. We decided that the battered bearing holes were the most likely problem. Also remember that the Workshop Manual advises to not take the hubs and drums apart. Eventually, we gave up. We found a set of the later one-piece drums for sale on eBay and tried to buy them. We were outbid, but the seller turned out to have two more sets and he sold us one of them for $160 plus shipping.
In case you’re wondering, the early and late drums are interchangeable. We would strongly recommend the later type to anyone working on MG TD brakes. Since the early drums we have are fine (they have even been machined) and since the problem seems to lie with the hubs, maybe we’ll be able to resell those drums for an original early car restoration and recoup some of the money.
Next time: Hopefully we’ll be starting to paint the red MG TD by the next installment. The jobs of “fixing up” the wood and tub of the yellow car should also be further along. As far as the hot rod, we’re now thinking about a fiberglass body and hope to see progress in that phase of the car’s build.


