
A Restorer’s 1976 MG Midget, Pt. 1
He Restored It From the Bonnet to the Boot.
THIS IS MY 1976 MG Midget Restoration Log. The car is one of 20,894 built that year, and less than 15,000 of those were imported into the United States. Compare that to the Ford Mustang that saw a record 418,000 sales during its first full year on the market. In other words, while you do see Midgets on the road, you don’t see many of them.
The Inspection
May 28, 2005: I purchased the car in Seattle for $650. Due to its old tires and carburetor troubles, I put it on a rental trailer for the trip home to Cornelius, Oregon. Once we got home, I put it up on jack stands for an in-depth inspection.
Overall, the car has a solid body, the engine sounds good, the transmission shifts but there’s a slight hang-up going from third to second. It has faded paint and there’s evidence of water damage to the seats and floor boards (surface rust and the original carpet was gone) due to leaks in the convertible top before the original owner replaced it.
The wire wheels had been painted black over the rust pitting. Most of the lights worked, the turn signal switch detent is gone, the dash dimmer switch is frozen in the “off” position, the fan switch is apart, the brakes are poor, (a complete overhaul is needed), yet the master cylinder seems fine. The front U Joint is worn. The suspension bushings are worn/aged. There is a possible oil leak at the front main seal. It runs rich and will not idle below 1900 rpm.
Starting the Repairs
I felt it best to begin with the brakes and suspension, working from front to rear, and saving the cosmetics for last.
I ordered brake pads, rotors and polyurethane bushings for the front end from British Auto Works (britishautoworks.com). Their shop is about 12 miles from my house.
I removed the sway bar and the bent mounts as well as the bent tow hooks. Looks like the prior owner had driven into the parking lot curbs once too often.
I removed the wheel hubs next. I had to make a dust cap removal tool, as the dust cap is recessed deep inside the wire wheel hub. I used a5/16-24 rod coupling nut, a 2” washer and a 5/16-24 X 2” bolt. I screwed the nut to the dust cap stud then the bolt through the washer into the nut and pried with two screwdrivers to “pop” the dust cap free. In the process of dismantling the left front I found the fulcrum pin was worn and the eye of the kingpin was egg-shaped. I ordered new fulcrum pins and associated parts, and lined up a machine shop to re-bush the kingpin.
Things go smoothly with disassembly until find a bad brake line and this fulcrum pin is missing the grease plug and Zerk fitting. Also, the fulcrum pin is frozen to the kingpin and is worn inside of the A arm. Heating with a torch does nothing to relieve the condition and finally I take a die grinder with a cutoff wheel that just fits between the A arm and kingpin and cut the fulcrum pin on both sides of the mount. Fortunately, with an easy-out I was able to remove pieces of the fulcrum pin from the A-arm but it looks like the machine shop will have two kingpins to re-bush.
I ordered brake lines, grease plugs and Zerk fittings. I clean and paint parts while waiting for my order to arrive. Still waiting,so I wet sanded the paint with 2000- grit paper followed by a power buff with polishing compound and a wax job. It is a major improvement; it will still need to be repainted, but at least it no longer looks as if it were a junkyard car.
I inspect the rear suspension and order rear poly bushings, brake shoes, wheel cylinders, axle seals and drums. By now all my ordered parts have arrived except the rotors and drums, which are on back order. I send king pins and new fulcrum pins to the machine shop. They say it will be about a three-week turnaround. I install the front poly bushings; tie rod end caps, grease the wheel bearings and install rear poly bushings.
While waiting for the machine shop, I clean the inside of the car again, clean the trunk, paint the jack, remove the seats and find that the support webbing has rotted away. I make a temporary fix with twine. Pulling the carpet out, I wash pet hair off with a hose and the car smells better. Still waiting for parts, I inspect the lights, replace bulbs and fix contacts, order a fan switch, re-glue the lens of the hazard switch, wire a bypass to the dash dimmer switch, (now I actually have dash lights you can see at night). I removed the less-than-pristine radio and blown speakers and replaced the broken retractable antenna.
From the Suspension to the Shifter Knob
July 3: The king pins are done and still no sign of rotors or drums.I reassem-
ble the front-end suspension, fix the muffler support, and paint the steering wheel. Still waiting for rotors and drums, I dismount the tires and sandblast all five wire wheels.
Yippee, the rotors have arrived! I finished the front brake job with new pads, rotors and new rubber brake hoses. By removing the pistons, flushing with clean brake fluid, and reassembling, I cleaned the front calipers. The front end is done! I still need the drums that are on back order.
I try tuning the carburetor but I get nowhere. There is no change no matter what I do. So I clean out all the hidden crevices in the body and find lots of accumulated dirt under the hood.
The drums are still not in but I ordered U-joints as I found the originals were worn. I pulled the drive shaft and pounded out the old joints. The new joints did not want to go in. I even put them in the freezer for an hour hoping to shrink the diameter. Finally, rather than damage them, I took them to British Auto Works for a professional install.
Now waiting for drive shaft and drums to arrive, I put the rear wheel cylinders on and brake shoes, axle seal and Oring. Oops, the rear brake line is incorrect, so I have to order a replacement.
The drums, drive shaft and brake line all arrive. I bolt on the axle shaft-mounted drums, install the brake line, bleed brakes, put anti-seize on the wire wheel splines, mount the wheels, and go for a drive…with the top down, of course.
I find the shifter knob pops off when you go for reverse gear, seems the threads are stripped. I go to Ace Hardware and get an aluminum insert (they have everything at that store), a jam nut and some black screws for the loose trim panels. I drill out old threads, press in the insert with a bench vise, and reinstall the shift knob with jam nut to keep it from coming loose. I also replaced the missing trim panel screws.
I Heard a “Foomp”
July 22: I schedule a tune-up at British Auto Works. They said “put new gas in the tank and drive the car, as it has been sitting for awhile.”Each Mile it seems to run better than the last, but not great. With the sun in my eyes, I notice the lack of sun visors…something else to order.
The next day on the way to my appointment for the tune-up I hear a “foomp,” and the car quits on me. No luck restarting.
Luckily, my son was following me in his car. He got our truck and we towed the car the rest of the way in. Now it went from a simple tune-up to finding out why it doesn’t run. Those Stromberg carburetors weren’t the best so how about we put on this twin SU carburetor set I got off e-Bay the other day, and then tune it up.


The mechanic listened to my tale of how it quit on me and calmly stated, “You’ve just had the full English car experience. Welcome to the club. Oh, that twin carburetor setup you bought, it won’t fit in the engine bay of this car; it’s for the 1300cc Spitfire.”
I have faith the Midget will return to me running well. In the meantime, I dream of a biscuit-colored interior with leather Suffolk seats.
The EGR valve and Manifolds— Hours of Turning a Wrench
August 17: The Midget is still at the shop. It turns out a rubber fuel line rotted away and that’s why it quit. The mechanic replaced the line and added a fuel filter and got her running. Then he discovered that the intake and exhaust gaskets leaked as well as the no-longer-available EGR valve. He removed the manifolds and in the process the old rusted fasteners were found to be “wanting,” a polite way of saying good for scrap steel only. The EGR valve did not want to come loose even with heat. Wanting to move the job ahead, I asked what I could do.
August 18: The work list was to remove the rusted-in EGR valve, make plugs for the EGR holes in the intake and exhaust manifolds, and find new studs or bolts to remount the manifolds. I used grade 8 bolts 3/8-24 x 1 1 ⁄2 for the manifold and 3/4-16 x 1 1 ⁄2 cut down to 3/4 long with a die grinder to plug EGR holes. It took three hours of work to finally free the manifolds from each other and the EGR valve from the manifold so I could find out what size bolts to use. It took a 4-foot breaker bar and plenty of heat from my Oxy-acetylene torch to remove the EGR valve from the exhaust manifold.
August 19: I brought the manifolds and my tools to British Auto Works. I figure I can install the manifolds and have the MG running in a couple of hours. I discover that none of the manifold fasteners can be reached with a socket, they can only be turned 1/8 of a turn with a stubby wrench then you must reposition the wrench and make another 1/8 turn. I had to borrow the mechanic’s stubby wrenches. We checked the manifolds for warpage. They look OK, so we install a new gasket and mount the exhaust manifold.
Then, attempting to mount the intake manifold, it does not seat, and we can’t find out why. It seems like a bit of bad casting on the exhaust flange is interfering. I grind a notch on the intake to clear the obstruction. Now it mounts.
I hand-tighten all the bolts except for the two between the down pipe; I can’t reach them. Finally I put the wrench on the bolt heads like a nut driver, there is no room, a 1/2” socket will fit through opening but I need a 9/16” socket. I take 1/16 of a turn repositioning the wrench each time until the bolts are tight. It takes about 30 minutes for those two bolts alone.
The same issue occurs with bolting up the exhaust pipe to the manifold. Five hours later, we are able start the car. Now we can begin the tune-up process we started a month ago.
Timing is at 20 degrees BTDC (before top dead center), it should be at 2 ATDC. That explains the extra heat. The idle drops from 1900 to 1300;it’s getting better.We check for air leaks along the manifolds, OK; carburetor to manifold, OK; throttle shaft, OOPS. I remove the carburetor.
By the way, you can’t get your fingers to the carburetor nuts when installing or removing them. You have to hold the nut up to the stud with a wire hook then turn the edge of the nut with a flat-bladed screwdriver. With the carburetor at the workbench, the mechanic replaces two seals and finds the choke is hanging up. We have been at it for eight hours nonstop;it’s time to call it a day!I haven’t said a bad word. Amazing!
It Runs, Sort Of
August 23: The mechanic finished up the carburetor later in the week and we got it to pass DEQ (Oregon Department of Environmental Quality emissions testing). I had been driving little jaunts around Hagg Lake. The car runs well but seems very underpowered, it doesn’t want to rev very high. It may be leaning out with the K&N air filter on (that sometimes happens with MGBs).
As it is not “popping or sputtering,” maybe the timing advance is not working. I pulled the distributor cap off and by turning the rotor by hand it snapped back, meaning the mechanical advance should work and was not bound up. I took the vacuum retard hose (American cars have vacuum advance), applied a vacuum and the rotor moved. OK, that’s a good sign.
I performed dynamic testing with a timing light and the engine running. With the car at idle, I set the timing to the factory specification of 2 degrees After Top Dead Center (ATDC). I increased the revolutions and checked the timing. Hmmm, at high speed it only advances to 10 degrees Before Top Dead Center (BTDC). It should be around 24 to 36 degrees BTDC as a ballpark figure.
I pulled the vacuum retard hose off the carburetor port at idle and noticed the lack of vacuum at that port! I reconnected the hose to a manifold port, reset the timing and went for a fun drive. The problem was fixed.
The timing hose had been connected to the EGR valve port on the carburetor, not to a constant manifold vacuum source. This caused the vacuum retard/advance mechanism to be inoperable.
More Parts and the Hardtop
September: It is time to order more parts at British Auto Works’ fall sale. It should be enough to keep me busy over the winter. On the list are: new mirrors, wiper arms with blades, speedometer cable, transmission shifter cap, water pump, belts, hoses, radiator cap, door strap, seat belts, sun visors.
I ordered a carpet kiton eBay for less than half of Moss Motors price (mossmotors.com). I paid $175 with shipping.
November: I installed thebelts, hoses and water pump. I painted the radiator while it was out of the car and decided to do a severe cooling system flush.
With the cooling system reassembled, I put the flush chemicals in with water and ran the engine up to full operating temperature for 30 minutes every day for five days. Then, with the engine block drains opened, I power flushed the system with a garden hose. A lot of rust was removed and the system runs about 10 degrees cooler.
I start the car about every week now and let it come up to full temperature. It seems to run better the more it is started.
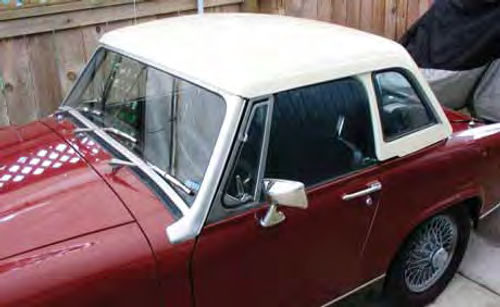
I began to strip the bubbling black paint off the hardtop. There are some minor cracks to fill and it should be ready to be painted in Olde English White. The hardtop is an English-made Denis Ferranti brand. I found an old advertisement for them from 1958. The hardtop and the roll bar, while not factory options, were considered dealer options.
Next, we’ll upgrade the interior, paint the MG and rebuild the Midget’s engine and transmission.


