A Restorer’s Story 1976 MG Midget, Pt. 2
It Runs Well Now…But Don’t Forget the Cell Phone.
Editor’s Note: Last month we started Neil’s restoration log with the acquisition of the Midget and initial project repairs. We’ll join him here as he works with the sports car’s interior.
SO MUCH FOR my dreams of a cashmere red and biscuit-colored leather interior. Due to budget limits I decided to keep the original black interior color.
December 2005: I Was able to pickup a pair of replacement black velour seat covers on eBay. (Paid $60 with shipping; beats $300 for OEM style.)Istripped off the old, cracked, torn seat covers as well as the foam, which was in good shape; just some minor re-gluing was needed.
The tilt mechanisms were then soaked in WD-40. After three days of soaking and attempting to move them, the seats finally recline. I wiped the frames with lacquer thinner then treated them with two coats of rust converter and spray painted them black.
After installing the new webbing, I took the seats to Kens Upholstery. He made replacement seat backs and installed my velour seat covers. It was $240 wellspent, as he steamed the foams back into shape. I went home and test-fitted the seats and new black carpet.It is going to look nice!
Repainting
January 2006: I was going to send the car out to be repainted, but cost is an issue as local shops are quoting prices higher than the value of the car after the repaint. To save money I have stripped off the bumpers, lights and trim. I completed filling in the minor door dings and have sanded the car readying it for paint.
At this point, my wife Donna said, “Why don’t you just paint it yourself, you have all the tools and your work is good.” (I love that woman!)
Pricing paint at the supplier, it is about $500 or one-fifth the cost of sending the car out. But wait, my neighbor works for an auto dealer and he says he’ll get my paint for half the cost.
Oh My! They don’t make Cashmere Red any more; let’s try Cessna Royal Maroon. According to the PPG representative it is the closest match.
I spent all day masking off the car and several days prior just cleaning the garage. What a way to spend the Christmas break.
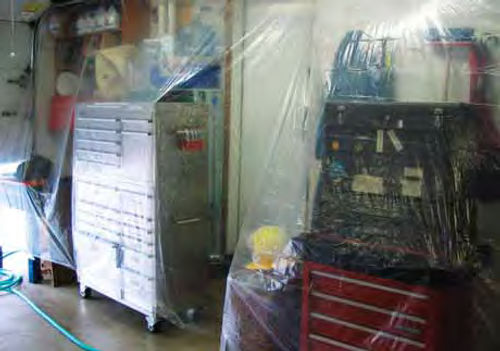
Donna and I hung plastic sheeting over garage shelves to help minimize the effect of the dust.
I will make an improvised spray booth by covering the back door with furnace filters and stretching plastic sheeting over the front garage door opening while leaving a hole for a ventilation fan.
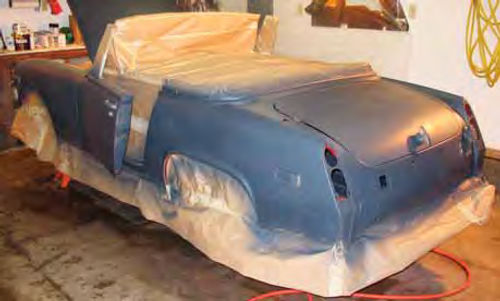
My extensive masking job will allow me to paint the boot (trunk), door jambs, under the bonnet (hood), and the car’s exterior at the same time.
There will be no need to re-mask between spraying the primer, color and clear coats. This is important as the paint is a “system,” and each coat must bond and chemically react with the coat under it while it’s still wet.
A Good Time…Then the Engine Died
The rest of 2006 was spent enjoying the new paint and interior while motoring about Oregon’s wine country sans the car’s top.
I placed the car in winter storage by mid-October 2006.
April 2007: I brought the car out from winter hibernation. Oh, what a beautiful day,sunshine, relatively warm, a perfect day for a drive.
I filled up the tank with fresh hi-test petrol then headed out to the countryside. A trip around Hagg Lake, over to Verboort, and finally to see my friends at the British restoration shop. Life is good; it’s time to head for home.
Boy, the car is really running well, going through the gears at 5000-rpm shifts; yep, it’s a sports car all right.
There’s a traffic light ahead; I bring her to a stop. The light goes green and I’m off. Bring her to five grand, hit second gear; five grand again, hit third gear; five grand again, hit…poof, putt, putt, clouds of smoke. What happened??
I pulled off on the side of the road and popped open the bonnet. For some reason, oil was pushed out the dipstick tube onto the exhaust system. Well, that explains the smoke, but why am I only running on three cylinders?
At least it is running,so after confirming there was enough oil in the crankcase, I limped her on home.
Diagnosing the Problem
I thought maybe I blew a head gasket. There was no water in the oil, but my compression test showed that number three cylinder was at 50 psi while the others were at 120 psi. After completely disassembling the top end to remove the head, I found the head gasket was in poor shape but no obvious signs of being blown. I spent $27 for a new head gasket kit, bolted everything back together and…no improvement.
There was excessive blow-by, smoke out the exhaust pipe, smoke coming out the valve cover. Hmmm? Must be there is something more going on, it sure seems like a piston ring problem to me. The only fix is to pull the engine and re-ring it.
Removing the Engine, Slowly
May 2007: My son Jared has “volunteered” to assist in removing the engine. I spent the prior week (about 25 hours) unbolting everything but the motor and transmission mounts.
Based on past experience with pulling engines for Fords, Chevrolets and Toyotas, we figured it would take about 20 minutes to unbolt the mounts and maybe another 20 minutes to lift the engine and transmission out of the car.
Silly me, I forgot this is a British car.
An hour and a half later, the motor and transmission mounts were undone. As it turned out, we could only turn the bolts a quarter of a turn at a time before having to reposition the wrench, there was no room for a socket and ratchet or even a ratcheting wrench.
OK, we should be able to lift it out quickly now…wrong. Can’t go up, the transmission gets stuck; can’t go forward the balancer gets stuck; can’t go sideways, the starter gets stuck.
I pulled the starter off and by wiggling left and right while lifting, we made progress. Eventually, the engine hung at a 45-degree angle and we could clear the balancer from the radiator mount. But the transmission was wedged, which called for more up, down, left, right wiggling and we freed it.
Hey, this wasn’t so bad; only five hours instead of 40 minutes.
Confirming the Problem
Once the engine/transmission was free from the car, it took us less than an hour to separate the engine from the transmission, mount the engine to a stand, and disassemble the engine with air tools.
It turned out that both compression rings on the engine’s Number Three cylinder were broken.
Careful inspection of the internal parts revealed that the prior owners might have thought oil was optional for the Midget. The bearings were worn to the copper layer, the ring grooves in the pistons were filled with sludge and blocked, and the cylinder bores were pitted from improper storage.

Rebuilding the Engine With High-Performance Parts
The repair will be a complete remanufacture project, not a simple re-ring job. Considering how difficult it is to remove the engine, I do not want to do it again if I can prevent it.
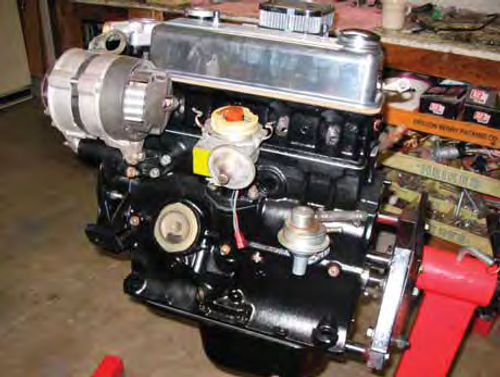
I wanted more oomph, so there are a number of high-performance changes being made both in part selection and machine work.
The list of parts: Weber two-barrel progressive carburetor, Canon aluminum intake manifold, Paceway headers, oversized exhaust pipes and a high-flow catalytic converter, aluminum hi-lift roller tipped rocker arm, aluminum hi-lift valve cover, 9:1 compression aluminum pistons, .020 oversized with rings, main and rod bearings; .010 undersized wrist pins; magnesium bronze valve guides; stainless steel valves, valve springs, pushrods and tappets; 274-degree camshaft.

I know more parts will be needed but I’m out of money for this month.
Hand Work
June 2007: I still do not have enough money to hire the machine work but there are many things I can do in the meantime to save a few dollars and move the project forward.
I ported and polished the intake and exhaust runners in the head. Continuing with the die grinder and a carbide bit, I removed the casting flash from the water jacket openings on the head and block. Casting flash was also removed from the oil return passages. The rods were smoothed and polished. The balancer shaft was turned smooth using my lathe, and I straightened the prior owner’s dented and warped timing cover and oil pan.
Machine Shop Work
July 2007: Dave at Precision Automotive will be doing the machine work. He has done a few of these British cars and I had him do my T-bird engine several years back. The plan is to: Hot tank clean all parts, bore and hone cylinders, .020 oversize; deck the block, install new core plugs, install new oil galley plugs, turn the crankshaft .010” and .010” undersized (main and rod journals respectively),surface the flywheel, install a new starter ring, surface the manifold face on the head, shave the head, install hardened valve seats, install valve guides, test valve spring strength, install new valve springs, media blast rods, resize rods, install new bronze bushings, ream bronze bushings, press in new rod bolts, balance the pistons, rods, crankshaft, flywheel, and front pulley,what is called the “rotating mass.”
Transmission Rebuild
July 19, 2007: Dave finished up all the machine work on time as promised. As I started to reassemble the engine, I realized that the transmission was probably as abused as the engine had been. It would be a smart move to have a look at it and a better move to have it rebuilt.
August 2007: I looked up Marty Ray, a guy I met at the spring British Auto Jumble, a combination car show/swap meet. As it turns out, Marty has been in the business for decades and is well known. Marty said he would rebuild my transmission for $750.
Later in the month Marty called,the transmission was done. It received a used, but better-condition cluster gear, new reverse idler gear, bearings,synchros,seals, and he painted it in the factory correct colors.
The rebuilt transmission’s new throwout arm pivot bushings were installed, and then the engine and transmission were married with a new clutch disc, pressure plate and throw-out bearing.
Having learned from the removal process, Jared and I were able to slide the engine and transmission back into the car in about an hour.
The only casualty during the installation was the reverse light switch in the transmission tail shaft. A new one was ordered and $10 later it was replaced.
The rest of August was spent putting all the connections back in place, routing new lines and straightening up prior owners’ spaghetti wiring.
Improved Cooling
As Rubber-bumper Midgets Seemed to have cooling issues, I began searching for a better way to make the cooling system work.
After many discussions with the road racers at Portland International Raceway (PIR), I settled on a design and wasin the process of making drawings to machine a new “filler overflow neck” to mount on the engine.
While visiting my friends at British Auto Works, I told Stan of my idea. His response was “that sounds like something Triumph did in the last year of production.” And, hidden in the used parts attic was the casting that I needed. With a slight modification of the cap and overflow tube I was able to eliminate the air trap in the original filler neck and the extra overflow bottle.
I have added a remote oil filter and oil cooler to the carso as to 1. Keep oil from overheating during high-speed summer driving. 2. Increase filtering capacity and, 3. Make changing the filter less messy. The filter now resides in a vertical position under the right front fender instead of the original horizontal,slightly downward dump-oil-on-the-engine position.
I do not fault the engineers at British Leyland for some of the shortcomings as this engine was built for the Triumph Spitfire body with its tilting bonnet as opposed to being shoehorned in a Midget.
Test-Fired and Back On the Road
September 2007: We started the engine with just headers, no exhaust or muffler. It’s very loud for a four-banger. I needed to save up for the exhaust system and fine-tuning of the Weber before I could run it though DEQ (Oregon Department of Environmental Quality emissions testing) to re-license it.
While Donna and I are on our annual camping vacation, I have booked the MG with British Auto Works to have an exhaust system installed and tuned for the DEQ.
October 2007: The car passed DEQ. I have new tags and still have a few weeks to enjoy and show off the car before the fall rains come.
It runs really well. We estimate that it is making twice the power as it did from the factory. Originally, it was rated at 51 hp, a twin carb model was rated at 70 hp, so it is very easy to bump up to the 100- hp range.
A Tow to the Shop
February 2008: After charging the battery overnight, I took the MG out of hibernation for a spin.
She had been running very well but considering there’s only 250 miles on the engine I would expect no less.
On the way out the door Donna said, “Do you want the cell phone?” “Nah,” I replied, “the car’s running good.”
Later in my trip, I called Donna from a pay phone. “Would you look up British Auto Work’s phone number? I’m Hoping they can pick up the car…’cause it quit.”
Bill, the owner, came with his ramp truck, loaded the car and we headed back to their shop. I thanked him for such a quick rescue. He replied, “It’s not good advertising to have you on the side of the road.”
After a thorough inspection by Simon it appeared the cap and rotor, which I had purchased elsewhere, were defective and had cracked. Simon popped on a new cap and rotor; the engine fired right up.
Bill then reminded me, “You always carry a cell phone with these cars.”
Engine Break-In
April 2008: There were a few days without rain this month and, fortunately, one was a Sunday. Donna and I took the Midget for a tour in the countryside and the Midget ran without a hitch.
May 2008: I have 500 miles on the engine and I can feel it is less tight and revs easier. It’s smooth, strong and there’s no vibration; the money spent on balancing was well worth it. So far I have not pushed the rpm to the 7200 redline but reaching 6000 rpm is effortless. Mostly, I keep it under 5000 rpm for the break-in period.
The wire wheels need truing,as proven by some spirited driving. The Midget shimmies at speeds over 50 mph and there is some wiggling through the turns.
I had hoped to purchase new alloy knock-off wheels this spring, but funds are not available for college and sports cars. I will order a $10 spoke wrench instead and try to bring the wheels back into shape myself.
Queen’s Rally
May 10, 2008: I entered this year’s Queen’s Rally, held by British Auto Works. My time was seven minutes longer than the course time but considering the first-place winner was four minutes over I wasn’t too disappointed. Not only that, I didn’t spin out as one competitor did and overall finished tied for 5th out of 14.