
Ruby, the Farm Truck, Pt. 6
We’ll Deal With Mouse Debris, Polish Lenses and Clean Gauges. Then We’ll Grease & Install the Speedometer cable.
Editor’s note: This month, our revival of a 1967 Ford F-250 farm truck shifts into heavy-duty cleaning mode. We’ll remove and clean the headliner, polish some chrome and the plastic taillight lenses, and clean the dash pad and gauge cluster. We’ll also install new seat belts and grease the speedometer cable. We’ve had a total of 30 images in the first five installments, so we’ll be starting here with Photo 31.
TO DEAL WITH a telltale bulge in the truck’s fiberboard headliner, I removed eight or 10 screws in a metal garnish surround and dropped the fiberboard. This allowed me to remove great clumps of mice nests from above the passenger’s seat (Photo 31). Obviously, a legion of field mice had taken up residence in the headliner while this truck was spending time in a nearly abandoned state.
With the headliner face-down on the garage floor, I whisked it clean with a broom. Flitz metal polish was aggressive enough to remove rusty patches from the garnish molding and gentle enough to polish up its tan paint. I polished the heads of the chromed screws at a floor mounted motor fitted with fabric buffing wheels before reinstalling the headliner.
At the same buffer—using tripoli on a sewn wheel followed by jeweler’s rouge on a loose wheel, for a fine finish—I also polished the inside door handles and window-regulator handles (Photo 32). Some light buffing returned a deep shine to the formerly flat-looking handles. I finished the job by hand, applying a protective coating of Flitz metal polish to keep the chrome bright against future neglect. Once Ruby’s done, I don’t expect to spend many Saturday afternoons detailing her.

The passenger’s inside door handle had to go because its internal splines had stripped out. This most likely occurred because someone lost or broke the screw that held it. Whoever rode shotgun in the truck used the handle repeatedly without making sure it was properly seated. Though made in China, the reproduction handle I bought from Dennis Carpenter had deep, rich chrome over smooth metal with none of the bubbling exhibited by the original old handle. No skimping here. The Carpenter handle even came with a new chromed screw.
I finished off cleaning Ruby’s original handles by using a toothbrush to work Formula 409 cleaner into the deep grooves of the plastic knobs, thereby removing all kinds of packed-in dirt. Armed with the same toothbrush and spray bottle of 409, I spent half an eternity cleaning the weather stripping on the windshield, rear-window and wing window, inside and out. Coaxed by many ounces of Windex and countless paper towels, the filthy glass eventually came clean, too.
Speaking of weather stripping, if I drive Ruby on the road often I’ll backtrack and replace her shredded door weather seals. It will undoubtedly cost me close to $100 and consume two or three hours of labor, which is why I’m postponing it for now.
Polishing the Interior Paint
I wiped down all the interior paint, including the dashboard’s, with a damp sponge in preparation for applying Meguiar’s Mirror Glaze No. 7, rubbing it in with a waxing sponge and wiping off the dried glaze with a terrycloth towel. The red paint on the lower half of the dashboard brightened up to look nearly new after I worked some Mirror Glaze No. 7 into the finish. I gave the same treatment to the painted metal on either side of the rear window.

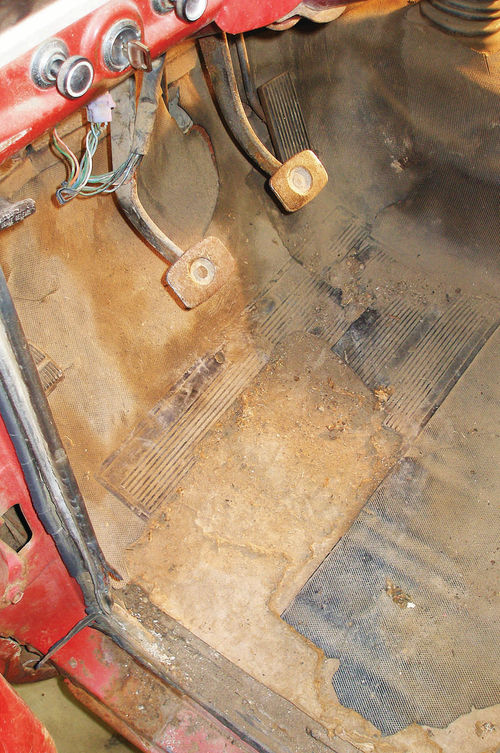
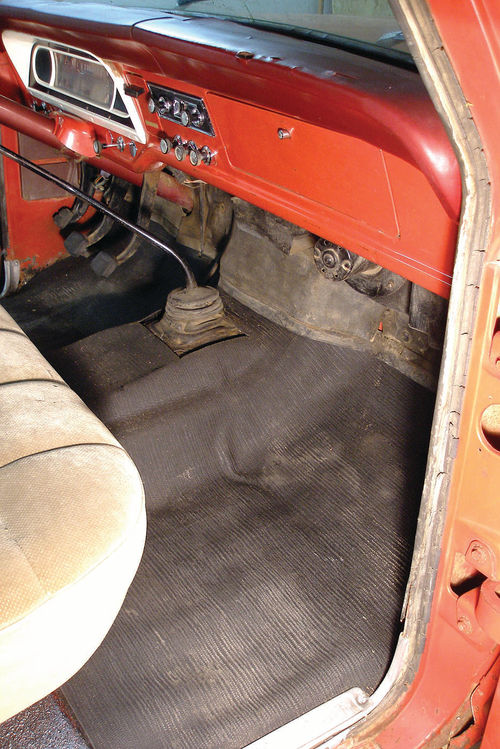
Before and after views show how easy it is to dress up an old truck cab by installing a new floor mat, polishing the paint and cleaning the vinyl dash pad (Photos 33 and 34).
Likewise, the Mirror Glaze improved the door-panel paint, which wasn’t as much weathered as dry, I’d say. At my tripoli and rouge buffing wheels, I cleaned up and shined the dozen or so screws that hold each metal door panel in place. I greased the remote-control door-opening mechanisms and the window-regulator units before reinstalling the door panels.
I found some pine needles in the thick layer of dirt that had collected in the bottom of both doors. I loosened the dirt with a screwdriver and sucked up all the junk with my shop vacuum.
When I saw how nice the dashboard and the rest of the interior looked and how neglected the jambs and door edges appeared by comparison, I knew what I had to do.
Using a sponge and warm water, sans soap (to avoid a sudsy build-up), I cleaned the dirty door openings and door edges, brightening the paint on both. It was an hour well spent, for the sill paint, never faded by the sun, still looks very good after all these years.
Removing two short Phillips screws, I lifted the button latch from the glove box door and soaked it in solvent.
That’s all that was necessary to remove the dirt and old grease or oil that apparently was causing it to bind.
I blew everything out with compressed air, then remounted the latch and sprayed it with powdered graphite, a dry lubricant, to help prevent any future binding problems.
Brightening Some Plastic Lenses

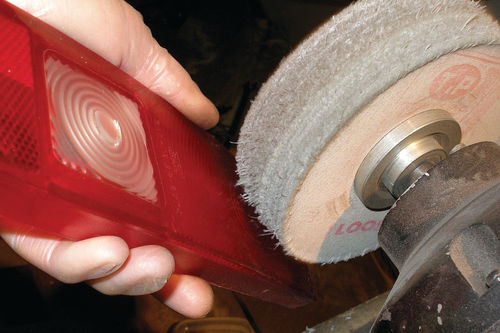
I polished out the dull red plastic taillight lenses on a loose buffing wheel I use exclusively for plastic parts (Photo 35). I lightly polished each lens at a wheel treated with a special compound for plastic. My buffing compound is a huge gray stick, labeled for plastic, that I bought years ago at a swap meet. I kept my touch light and moved the lens briskly to avoid overheating and melting of the plastic. Next, after buffing them, I applied two Meguiar’s products: Mirror Glaze No. 17 Clear Plastic Cleaner, which “removes fine scratches from clear plastics,” and Clear Plastic Polish No. 10.
A molded-in flange around the front parking-light lenses prevented me from power-buffing them. Instead, I brightened them by hand using just the Meguiar’s plastic cleaner and polish.
A few deeper scratches remain in the taillight lenses. I suspect I could have removed them by first sanding the lenses with 2000-grit sandpaper in a bucket of soapy water, followed, in turn, by the buffing wheel and the Meguiar’s cleaner and polish.
Although I was shooting for something well shy of perfection, I’d say that my results are nonetheless striking (Photo 36). Polishing at a buffing wheel transformed the taillight lenses from dull (background) to shiny (foreground).
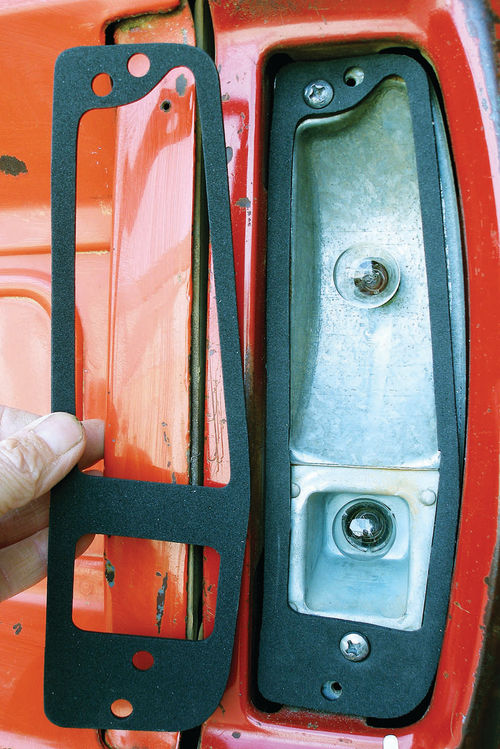
When I tried mounting the taillight lenses with new foam gaskets, I realized immediately that the gaskets didn’t fit a 1967 F-250. I modified each gasket by simply snipping out a horizontal strip near the bottom of the gasket. If I’d left this strip intact, the lens would have high centered as I tightened the hold-down screws at the top and bottom, possibly causing the lens to split open where it was high-centered. This was not a fate I desired for my original 1967 taillight lenses. I modified the taillight lens gasket by trimming the horizontal strip as seen in Photo 37.
Reviving the Dash Pad
The dusty, deep-brown hunk of vinyl atop the dashboard—which I’d thought was literally burned out from exposure to the sun—has, remarkably, come back to life. Now that it is clean, I can see it’s actually a medium red color. It’s not a perfect pad; I have two large cracks from the front to the back of the vinyl cover and some blisters elsewhere. But I credit POR-15’s Marine Clean for deep-cleaning the oxidation and dirt so I could lift it off of the old vinyl and follow that with POR-15 Boss Gloss vinyl protectant with which I was experimenting.
I worked the Marine Clean in mostly with a large nylon-bristled scrub brush I normally use to clean tires. I used an old toothbrush while working right next to the windshield and in other hard-to reach areas.
As a control, I used Formula 409 cleaner and the scrub brush on the left half of the dash and Marine Clean with the scrub brush on the right. The 409 alone didn’t clean as well as Marine Clean did. Therefore, I also cleaned the left half of the dash with Marine Clean, wiping regularly and being careful so that nothing would drip unnoticed. That’s because I’d observed that where Marine Clean ran down the front lip of the dashboard it had a tendency to discolor the vinyl, at least temporarily, much as bleach would do, at least until I scrubbed the entire area with fresh Marine Clean.
When the dash pad was as clean as I could get it, I applied Boss Gloss to a clean cloth and began rubbing it on the dash pad. In some places the protectant soaked in and dry spots appeared in the vinyl. Eventually, I poured some Boss Gloss into a bowl, dipped an old sock in the liquid and then soaked the vinyl with Boss Gloss, working it into one-third of the dash at a time.
I went through the sequence—right side dash, middle dash, left side dash— several times. It’s possible that someone cleaned the dash many moons ago, but I doubt that anyone’s ever bothered to apply protectant. Such neglect would explain why the vinyl was so thirsty. Twice the next day I reapplied Boss Gloss to the top of the vinyl dash until its surface became uniformly glossy.
Cleaning the Glove Box
Using a knife blade, screwdriver, file tang and even a small brass-bristled brush, I attacked the petrified mouse poop in the bottom of the glove box. I got most of it; my fear of punching a hole through the fiberboard floor of the box in the far left rear corner stayed my hand. The box of baking soda that I poured onto that spot should absorb the odor once and for all. Apparently the mice that invaded the headliner had used Ruby’s glove box as their summer retreat (Photo 38).
Some Rubber Parts & Seat Belts
I installed new rubber outside, in the form of fresh wiper blades, and new rubber clutch and brake pedal pads inside. Costing about $5 apiece, the made-in Thailand pads look good. If they wear decently, I’ll give them high marks. I found a wealth of reproduction parts, from pedal pads to an inside door handle, from three sources:

Auto Krafters, Inc., 214 E. Old Cross Road, New Market, VA 22844; autokrafters. com; .
Dennis Carpenter, 4140 Concord Parkway South, Concord, NC 28027; denniscarpenter.com; .
LMC (Long Motor Corp.) Truck, 15450 W.108th St., Lenexa, KS 66219; lmctruck.com; .
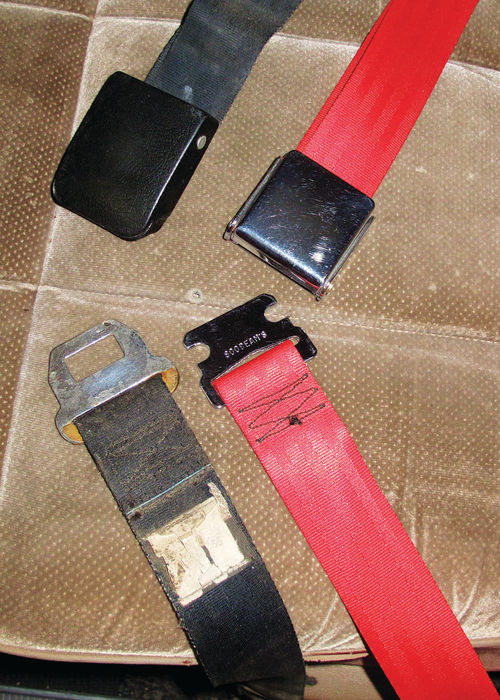
As a finishing touch inside, I installed new seat belts in place of the truck’s dusty and water-stained originals. Although I’ve managed to lose my receipt, the seat belts came from Andover Restraints in Seaford, Delaware andoverrestraints.com), whose website lists a variety of colors and styles of non retractable vintage chrome-buckle belts.
Because Ruby already had seat belt mounting points and hardware, the work was relatively simple. I used a 7/16-20 thread chaser to clean up the four bolt holes. At my floor-mounted wire-wheel buffer, I cleaned up all four original anchor bolts and the two washers per bolt. Only then did I discover that the holes in the new belts’ anchor plates were too small for my old anchor bolts. So I used the grade 5 bolts that came with the new belts and tightened them to about 30 ft.-lbs. Besides being safer than the weathered black originals, the new red belts add a splash of color to the interior (Photo 39).
Dust-Busting the Instruments
Finally, I removed eight screws and pulled the truck’s gauges from the dashboard for one very practical reason: they were so dusty I could barely see them. By removing a few more screws I lifted off the clear plastic lens (Photo 40).
Armed with two tools—compressed air and some discarded cosmetics brushes—I removed the heavy coating of fine road dust that covered the interior of the plastic lens.
Mirror Glaze No. 7 brightened up the black background paint on the gauge cluster. As to the clear plastic, I used the two-part Mirror Glaze Clear Plastic Cleaner and Clear Plastic Polish. The cleaner worked great, as usual. When it appeared that the polish was softening and etching the plastic, I removed it with all due haste. Only a second application of cleaner removed the sticky residue that the Clear Plastic Polish left behind. Because I’ve received excellent results from this same bottle of polish for the several years I’ve owned it, I can only speculate that it is chemically decomposing with age. It may be time to buy a new bottle.
Some Speedometer Rehab
The jerky action of the speedometer needle told me that its drive cable needed lubricating. Accordingly, I unscrewed a finger-tight nut to detach an armored cable from the back of the speedometer. Carefully, I withdrew the drive cable—a tightly-wound spring—from within. I cleaned this inner cable in my solvent tank and dried it gently with a rag.
If you feel the inner cable binding as you try to remove it—stop! Don’t force it or you’ll stretch or break the spring. Chances are the inner drive cable cannot get past a sharp bend in the armored outer cable; you’ll have to remove and straighten the outer cable in order to withdraw the inner cable.
If the armored outer cable is dry or contains gritty dirt, it will be necessary to remove it from the vehicle and clean it in solvent. Make a pipe cleaner by feeding a wire through the cable and wrapping a small piece of cotton rag around the end. Wet this rag with solvent and pull it through the armored cable, perhaps several times. Dry the armored cable with compressed air so the residual solvent won’t dilute your new speedometer grease.
I followed this procedure for lubricating the inner drive cable while simultaneously reinserting it into the armored outer cable:
1) After placing a dab of AC General Purpose Lubricant (other lightweight greases will work) in the palm of my right hand, I grasped the end of the armored outer cable with the thumb and index finger of the same hand.
2) I held the inner cable, neatly coiled, in my left hand.
3) Gently, I fed the inner cable from my left hand through the grease in the palm of my right hand as I loaded the inner cable into the armored outer cable.
It’s generally necessary to rotate the speedometer end of the inner cable so that its opposite end seats itself properly in the transmission end. If it just won’t drop into place, you’ll have to loosen and remove the nut that attaches the armored cable to the transmission, manually push the inner cable into place and then slide the outer cable down around the inner cable to tighten up the transmission-end nut.
In the next installment, we’ll wet-sand the oxidized paint and begin the project’s single biggest task: a complete brake job.


