Ruby,the Farm Truck, Pt. 4
We’re Going to Patch a Floorboard Hole & Brush On a Bed Liner. This Isn’t a Concours Approach, But It Works.
Editor’s note: This month, we’ll continue the revival of an old farm truck by modifying an exhaust hanger, patching a floorboard hole, installing a new rubber floor mat and applying a do-it yourself polyurethane bed liner. There have been 14 photos in the series so far,so we’ll start here with Photo 15.
I WAS EAGER to wrap up my exhaust work by quickly slipping in place the new muffler and tailpipe and tightening up their clamps. Alas, it was not to be. Only when I installed the new muffler I’d stockpiled for Ruby did I discover a measuring error.
The problem apparently arose because I’d driven Ruby’s twin, Old Blue, to the parts store when I’d bought the muffler, and used it for measuring purposes. Either my new muffler was shorter than Old Blue’s or the length of the exhaust pipe differed between the two trucks.
Take your choice, the result was the same: the stubby piece of new “tailpipe” I’d bought for Ruby was too short to reach the exhaust hanger immediately behind the muffler. Armed with the correct dimension, I ran out to a parts store to buy the correct length of pipe.
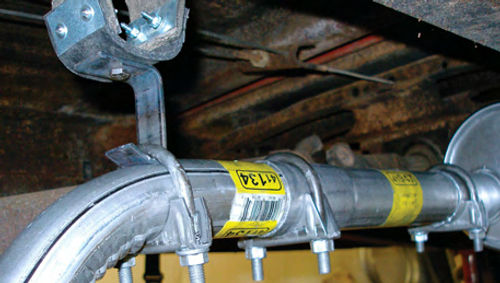
Even then, the worn-out exhaust hanger required some modifications before I could button up the exhaust system. To replace a section of rotten rubber, I cut a fresh chunk from a discarded truck mud flap. Because my longest 1/8- inch-diameter rivets were too short to penetrate two pieces of heavy rubber, the task fell to some small screws, nuts and lock nuts held by medium-strength Loctite.
I drilled a hole through the bottom of my new rubber loop and used a bolt to attach a flat strip of metal I’d bent into a hook (Photo 15). The result is similar, though not identical, to the factory hanger. I attached the tailpipe to the hanger’s hook with a 2-inch exhaust clamp (Photo 16).
“Built-Up” Floorboards
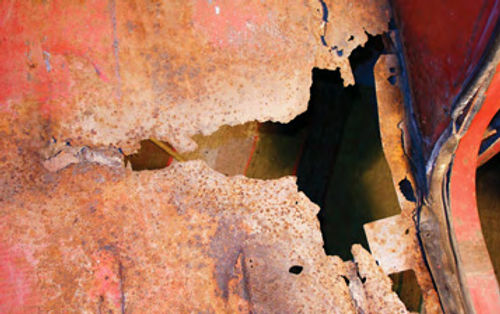
Next I turned my attention to some cleaning, patching and painting chores. The driver’s-side floorboard was solid. But “correctly” repairing a gaping hole in the passenger-side floor meant sand blasting the rusty area, cutting out rust-weakened metal and welding in a new panel. Whew! (Photo 17).
Even if I’d spend an hour or two masking the dashboard, I knew that sandblasting would more than likely clog the under-dash controls and involve a tedious amount of cleaning afterward, first with compressed air and later with a vacuum cleaner. Cutting, forming and welding in new metal is similarly quite time-consuming.
That kind of hard labor, I realized, met neither of the two goals I’d established for Ruby’s mini-restoration: 1) do it as quickly as possible and 2) do it as cheaply as possible. Thus I opted for the faster, cleaner option of creating a “built up” floor beginning with a base coat of a non-porous coating,silver POR-15, and Power Mesh reinforcing fabric.(Both Are products of POR-15 Inc.,P.O.Box 1235, Morristown, NJ 07962; por15.com)
Although POR-15 rust-preventative paint comes in several colors, the company says silver is best for weak metal because it “contains aluminum and can be used on badly rusted steel to fill small holes and add strength.”
Prepping the Floor
As instructed, I treated the floorboards with two solutions prior to using the POR-15 coating. First I mixed a degreaser and cleaner, Marine Clean, 1:1 with hot water and sprayed it everywhere I planned to paint. Besides the floorboards, this included the truck bed, bumpers, grille and wheels. I used a large sponge and a bucket of fresh water to remove the Marine Clean solution.
Next I used a POR-15 acid-etching solution, Metal Ready, which requires you to keep the metal wet for 20 minutes. Again I used a clean sponge and fresh water to remove the Metal Ready. It leaves a paint-bonding zinc phosphate coating on the metal.
Once the metal dried, I brushed silver POR-15 onto the floorboards, pressed a layer of POR-15’s PowerMesh reinforcing fabric into the wet coating and brushed more silver over the fabric to thoroughly saturate it. I let it cure overnight.
For subsequent layers, three times I mixed fiberglass resin and hardener from my aging inventory to attach another piece of PowerMesh fabric over the cured POR-15. Although the resin remained tacky for hours due to its age, it eventually hardened.
At the same time I was patching floorboards, I applied a do-it-yourself Herculiner urethane coating to the box bed, which I’ll describe in detail later. To avoid wasting the small amount of Herculiner that was left over after applying two coats of bed liner, I brushed the surplus over the POR-15 rust-preventative paint, PowerMesh fabric and fiberglass resin on the floorboards (Photo 18).
Patching With Aluminum
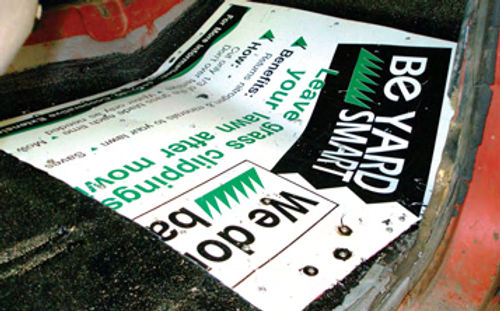
After allowing each coat of Herculiner to dry thoroughly over my floorboard patch, I began drilling holes in an aluminum patch panel—a discarded yard sign—in preparation for pop-riveting it to the floor.
First, however, I covered the area to be patched with some Leak Stopper, a “rubberized roof patch” in a one-gallon can I bought at a building-supply store. Filled with fibers, Leak Stopper is designed for use around chimneys, roof vents, skylights, vent pipes—and, now, 1967 Ford floorboards.
I positioned the aluminum sign atop the Leak Stopper tar (as I’ll call it) and began drilling and riveting it, beginning at the middle top and working down both sides alternately to avoid warping the panel. I used more than two dozen rivets (Photo 19).
A Measurement Mistake
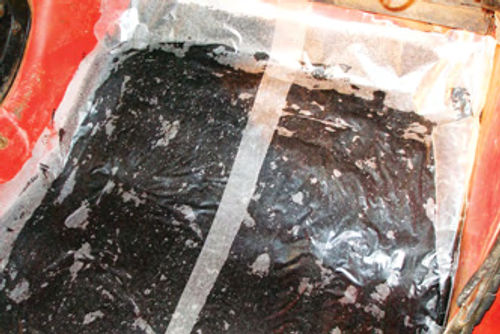
To top it off (literally), I dumped a whole lot of tar over the patch and used a paint stick, paint brush, rubber spatula and even my vinyl-gloved hand to spread the tar perhaps 1/4-inch to 1/2- inch thick over the entire right-side floorboard. I covered the sticky goo with strips of waxed paper so that I could fit my new JC Whitney floor mat without soiling it (Photo 20).
The fitting went well with one exception. I measured from the front center of the transmission hump 2 1 ⁄2 inches to each side and cut out a square opening for the rubber boot covering the floor mounted gearshift lever.
Unfortunately, I apparently failed to find the exact center of the hump. I say so because I had a half-inch gap between the right edge of the mat and the right-side kick panel. I solved the problem by cutting a bit more off the left side of the hole I’d cut around the gearshift-lever boot. This allowed me to pull the mat over a half-inch to cover the passenger-side gap.
Although I was left with an oversize opening for the transmission boot, the opening was uniformly oversize and thus unlikely to call attention to itself. However, I don’t recommend buying a floor mat from JC Whitney as this one has already begun to crack. Some of their products work out, however, including the Herculiner kit I bought through the venerable Whitney catalog (JC Whitney, 761 Progress Parkway,LaSalle,IL 61301; jcwhitney.com). After notching the mat for the truck’s clutch linkage and floor-mounted high-beam switch, I went to bed.
Preparing the Box Floor
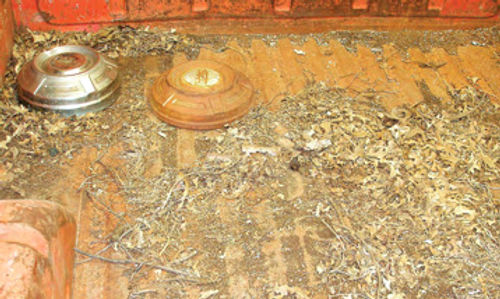
In this instance, when I say “I went to bed” I mean the rusty truck bed which was badly in need of freshening. A collection of pine needles, leaves and dirt had apparently held water against the sheet-metal bed, producing a heavy surface rust in the good spots and rust pits and even some small rust holes in the bad spots (Photo 21). It was just what you’d expect from a truck that had been used primarily for hauling trash to the dump.
To prepare the bed, I swept out as much crud as I could and vacuumed the rest. Next I used a wire brush to knock loose any rust scale which I then vacuumed. And then—as with the rusty floorboards—I treated the metal with POR-15 Marine Clean and Metal Ready.
Aside from the time that would have been necessary to mask off delicate parts and clean up afterward, sandblasting wasn’t a good option for Ruby’s bed. I could see that I’d rip holes in several rust weakened sections of the floor if I used my sandblaster.Besides, POR-15 instructions say it adheres better to rust than to bare metal. For someone like me, temporarily working in a tiny shop with no place to sandblast or spray paint, POR-15 is an ideal product.
The instructions with my POR-15 silver recommend applying two coats; I thought one coat would be adequate given that I’d planned to cover it with a brush-on rubberized bed liner. When I called POR-15 Inc. at ,the technician I spoke with agreed that one coat would do the trick for my purposes.
I had better luck filling the valleys in the corrugated bed metal with the silver POR-15 by pulling a small roller from side-to-side rather than from front to back (Photo 22).
I applied my single coat of POR-15 generously, making sure that for the best rust protection it flowed into the seams around the wheel wells and also the seams where the floor met the front and side walls of the box.
Painting the floor of a full-size pickup box by hand is a time-consuming chore. I used a one-inch paint brush to cut in where the floor met the box sidewalls and wheel wells and then my small roller elsewhere. I took some solace in knowing that had I elected to spray the paint, I would have likely consumed as much or more time masking the truck and cleaning a spray gun afterward.
A Do-It-Yourself Bed Liner
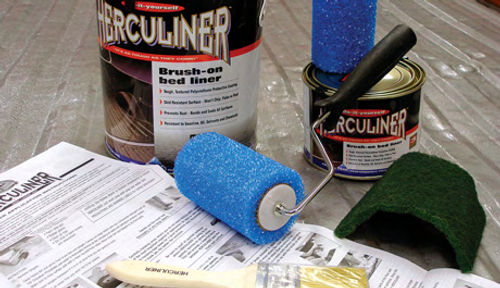
Several days later, once the POR-15 had ample time to cure, I broke out the Herculiner, a polyurethane-and-rubber bed liner that is readily available at automotive and department stores (Photo 23). My Herculiner kit contained liquid bed liner, bristle and roller brushes, a green scratch pad for roughing the surface and detailed instructions. Herculiner says its gallon can will cover a six-foot long truck box, including the sides and tailgate. I bought a gallon plus an additional quart, an amount the maker says will cover an eight-foot-long bed, sides and tailgate. I spent $90 for the gallon size kit and $30 for an extra quart—$120 total plus shipping.
First, I set aside the coarse green scratch pad that came in the kit and instead used a finer red 3M Scotch pad I had on hand. I wanted to improve adhesion by merely cutting the gloss on the POR-15 without actually cutting through the protective layer now atop my rusty truck bed.
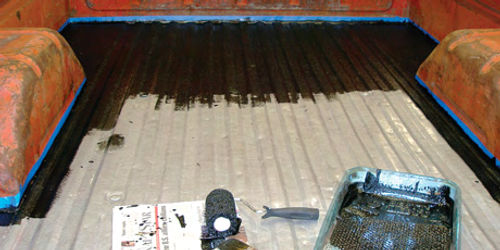
I taped the edges of the box about 1/4- to 1/2-inch above the bed. This, I hoped, would enable me to work the brush-on bed liner into the truck’s rust-prone seams and yet still have a clean edge. Following Herculiner Instructions,I Spent a brief five minutes wiping down the bed with xylene on a paper towel before setting to work.
I’d almost skipped the xylene step—I couldn’t imagine a cleaner bed, after all—but I decided that if I later ran into trouble I wanted to be assured that I had followed the instructions exactly.
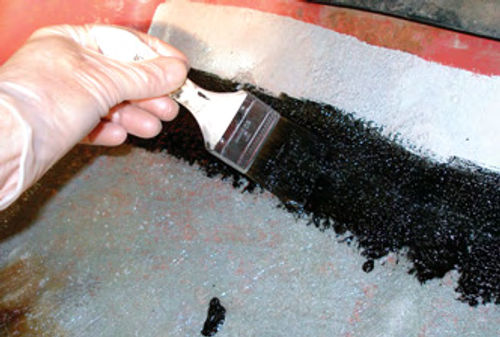
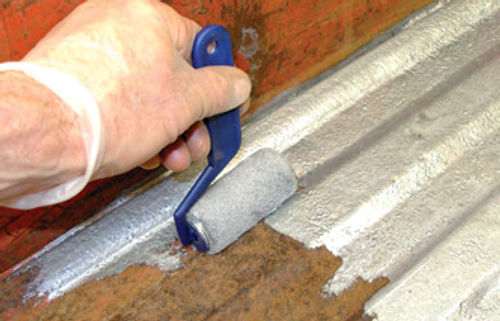
I used a paint brush in the kit to dab Herculiner around the perimeter of the bed, filling the seams completely. Although the instructions warned against spreading the bed liner as you would paint, I had to pull it along to get a smooth, even coating next to the tape, where the foam roller couldn’t reach (Photo 24).
Everywhere else,I used the kit’s foam roller exclusively,moving it from side to side—asI did with the silver POR-15—to work the Herculiner into the low spots between the peaks of the corrugated bed floor.Applying Herculiner too thickly or allowing it to pool can lead to “mud cracking,” the instructions warn. In fact, Herculiner recommends applying a light first coat to act as a primer for the wetter top coat.
Two Reservations On Herculiner
I have just two reservations about Herculiner—and neither involves its durability. Indeed, the product is tough as nails.
My First Reservation Involves Its Interaction with masking tape. Although I took great care in applying the blue masking tape near the floor of the bed, things went awry. The product’s thin base—the label reveals that it’s 30 percent xylene— allowed it to creep beneath the tape. Now I have an irregular line where I’d hoped to have a crisp one.
My second reservation is that I used nearly one gallon of Herculiner to roll two coats on just the floor of Ruby’s box: a light first coat followed by a more generous second coat. The instructions say five quarts is sufficient to apply a double coat to not only the floor but to the front, sides and inner tailgate surface of an eight-foot-long box. I’m guessing it would take two full gallons or more to achieve such coverage.
I’m pleased with the appearance and the protection that the bed liner offers. Furthermore, I think I’ve permanently cured problems by encapsulating the rusty truck bed with POR-15 and protecting the PRO-15 with Herculiner.The rubber coating keeps tools—and even five-gallon pails filled with gravel—from slipping and sliding, even when the truck traverses some steep and bumpy ground.
I know that because I loaded Ruby up for farm duty shortly after I finished her mini-restoration: a shovel, spade and post hole digger, three 60-pound sacks of concrete mix, several buckets of gravel,a plastic concrete-mixing trough, a wheelbarrow and some metal T-posts for barbed-wire fences. Any number of sharp edges poked and scraped along the coated bed, yet they left the cured Herculiner unscathed.
In the next installment, we’ll paint the bumpers, grille and wheels and shop for a set of used (yes, that’s right, used)tires.