Ruby, the Farm Truck, Pt. 2
Some Surprises Already Have Been Encountered In This Project. One Is His Attachment to What Was “Just a Truck.”
Editor’s note: This month we’ll continue reviving Ruby, an old farm truck, by replacing the front shocks, cleaning the gas tank, soldering a leaky float and otherwise getting the fuel system back in shape. We’re starting herewith Photo 6.
WITH THE TRANSMISSION,differential and engine oil changes behind me, I spent what little time remained during my first work session installing a set of front shocks on Ruby. The red 1967 Ford F-250 I rescued from a pasture would have to make do with slightly used gas-chargedMonroes; I’d removed them from Old Blue, my daily driver and an exact copy of Ruby, after just 3000 miles when I upgraded to better shocks. As such, they were a big improvement over Ruby’s grease encrusted front shocks—perhaps 45- year-old original-equipment parts?—that offered no resistance whatsoever to front spring movement (Photo 6).
I cleaned up the zerk, or grease, fittings at the top and bottom of each king pin with a small wire brush and did likewise with zerks at the tie-rod ball joints and universal joints.
When all the fittings were sparkling clean, I applied a pneumatic grease gun to each one without fear of driving dirt into the bearing behind it. Afterward, I wiped off all the zerks to prevent the new grease from attracting dirt. When fresh grease began leaking from three of the zerks, I replaced them with new ones.
Thus ended Day 1 of my Ruby revival efforts. In a trifle more than six hours, I’d changed oil, cleaned the oil-bath air cleaner, drained and refilled the tranny and differential, removed the wheels and tires, replaced the front shocks and lubed the chassis.
Upon reviewing the day, I dismissed my disappointment at accomplishing only a fraction of the truck’s needed repairs. My initial pie-in-the-sky notion of making all the necessary repairs in two days was just too fanciful, I realized.
Lessons From Day 1
I blamed my shortcomings at this point not on disorganization or a lack of effort but rather on my unrealistic expectations. My cleaning chores—the air cleaner, various filler and drain plugs and a number of zerk fittings(not once but twice)— had proven to be time-consuming. Furthermore,most of my first day’s work involved crawling around on the floor, which always hinders speed. I’d also handled a variety of tools, each of which I’d had to clean and put away afterward.
And then I reviewed some of the day’s time-wasters. Feeling cramped in the back of the shop, I decided at the outset to roll Ruby forward one foot.But to push her even this modest distance I needed to air up herlow tires.Could I find my air chuck? Of course not…until I’d spent at least 10 minutes searching for it.
Another repositioning caper burned up more precious time. Before I placed Ruby on jack stands and carted off her wheels, I wanted to make sure that I could remove both rear axle shafts, as required during brake repairs.
Because Ruby’s left side was particularly close to a wall, I ducked under the back of the truck to measure approximately 36 inches from the left rear drum to the center of the differential. This, then, is the gap I’d have to leave between the truck and wall to have enough clearance to remove the axle shaft. To move Ruby in my crowded shop, I raised her rear wheels slightly by placing a floor jack beneath her differential and then jerked the truck sideways.
It would seem simple enough, in theory, to remove a pair of worn-out front shocks. In practice, removing the front shocks had proven surprisingly troublesome: their upper 9/16-inch nuts had rusted to the threaded upper ends of the shock absorber shafts. When I tried turning each nut with a wrench, the shaft spun merrily with the rusted nut. The intermittent hammering of an impact wrench would have easily removed the rusty top nuts but I had no room to use this handy tool. Ultimately, I locked a Vise-Grip pliers to the top curved washer, which held the shaft stationary long enough for me to back off the nut.
While draining the transmission oil, I discovered that both the drain and filler plugs were heavily coated with old oil. The filler plug was almost engulfed by it. This necessitated a delay while, taking up an old screwdriver, I scraped the plugs in my solvent tank and then polished each one at my electric wire-wheel buffer.
A Gearbox Surprise: Chunks!
I was unnerved to reach into the transmission’s drain-plug hole and feel chunks of metal embedded in the black goop lining the bottom of the case. Some of the chunks—apparently chips from gear teeth due to a maladjusted clutch or careless shifting—were the size of the tiny crushed limestone used on playgrounds and bicycling trails.
Using solvent and a small brush with steel bristles, I cleaned the drain hole to remove as many metal particles as I could from the threads. Still, I could not reseat the drain plug and, for my efforts, even slightly damaged a thread at the plug’s tip. Over at my electric buffer, I used the coarse,stiff-bristled wire-buffing wheel to, in effect, sharpen the flattened thread. I then greased the plug and seated it in the drain hole with a 5/8-inch wrench. I filled the tranny, waited overnight and discovered no drips at the drain plug, which had evidently seated itself adequately.
Accepting “Ownership”
Repairs were progressing slowly for another reason. Given the time and money I was investing in Ruby’s revival, at some point the truck morphed from “just a truck” into “my truck.” Thus my desire to rush through the various repairs to get the truck back on the road has been tempered by the good habits of a longtime mechanic.
Ruby’s alternator provides a case in point. Eventually, I loosened the alternator lock bolt and the long pivot bolt so I could install and adjust a fan belt. I didn’t need to remove either bolt. But it’s my truck now: I wanted to buff up the bolts not only so they’d look nice but so I could apply anti-seize compound to their threads. Down the road when I need to replace the alternator, I’d like everything to come apart easily.
Cleaning the Gas Tank
During the ensuing days, I turned my attention to getting the engine running. This involved cleaning the gas tank, rebuilding the carburetor, replacing some engine tune-up parts and draining and flushing the cooling system.
Three bolts attach the top of the gas tank, which mounts vertically behind the seat back inside the cab. Two clips secure the tank’s bottom flange.Removing the tank for cleaning seemed to be simplicity itself until I discovered it still had gasoline inside it.
This surprised me, given that when I’d cut the rubber gas line directly beneath the tank only a few drops of gasoline had dribbled out. (The crimped, factory installed hose clamps revealed that the rubber line was as old as the 1967 truck itself.) Someone had either run the truck dry or siphoned the gas, I’d reasoned at the time. Now it seemed more likely that the metal gasoline pick-up tube inside the tank had merely lost its prime.
I say so because 7 1 ⁄2 gallons of gas, weighing about 60 pounds, remained inside the tank. Given that the tank itself weighs perhaps 15 pounds empty, I had to wrestle an ungainly 75 pounds out the truck’s passenger-side door from behind the seat in the cab.
Although the tank had an old-gas stink to it, the fuel had not yet broken down completely. The only varnish I found in the fuel system was a black coating on the sending unit’s brass float. Paint thinner melted this varnish.


I washed the tank with hot, soapy water for seven full minutes at a coin-op car wash. It turns out the brown gunk coating the bottom of the tank, as revealed by my flashlight, wasn’t rust at all but dirt, evidently from the gravel roads that Ruby had frequently traveled.
Ruby’s chromed Stant-brand gas cap was nearly new. Between the loss of her original gas cap and the purchase of the Stant Replacement, Ruby’s “gas cap” probably was a rag stuffed down the tank’s filler neck.
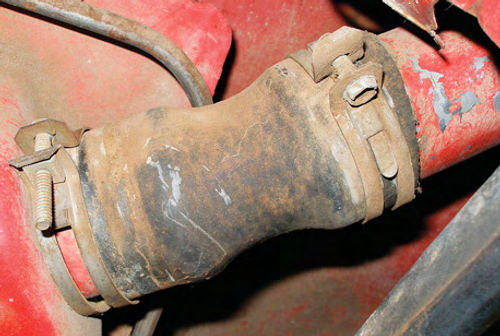
To make matters worse, while removing the tank I discovered that one of the two clamps on the filler-neck’s dried-out rubber hose had slipped off. This undoubtedly had allowed even more dust to enter the tank (Photo 7). Later, after drying the tank with a hair dryer and reinstalling it, I replaced the filler-neck hose and tightened both clamps securely.
Soldering a Brass Float
When it came time to wash the tank, I had first removed five cap screws and lifted out the gas-tank sending unit. It included an enclosed rheostat up top and, inside the tank, a brass float on the end of a wire arm. Like a toilet’s innards, the sending unit’s float rises and falls with the tank’s gasoline level. A dashboard gauge reproduces a signal from the sending unit to inform the driver of his gasoline reserve.
Incredibly, the sending unit’s cork-rubber composition gasket came off in one piece, thanks to some careful prying. It was pliable enough to reuse, albeit with a thin smear of clear silicone as a sealant.
The sending unit’s brass float snaps into a semi-circular loop at the end of a wire arm. When I removed the float, I could feel liquid and sediment inside it. These contaminants apparently entered through three or four pinholes in one small area. I used my electrical-testing probe to enlarge one hole to aid in flushing out the sediment. I then cleaned the float, first in hot, soapy water and then several times in my solvent tank. The cleaning removed all traces of gasoline and gas fumes.
Before soldering the holes, I tinned the weak area by applying a skim coat of solder. To do so, I gingerly locked the brass float in my shop vise and passed the blue flame of a small propane torch back and forth over the holes until the area was hot enough to melt several blobs of solder. I wiped the molten solder with steel wool to tin the float. Tinning is to soldering what priming is to painting—necessary for the adhesion of the top coat. Returning to the float, I trained the flame over the rust-weakened, newly tinned area and sealed the holes with just a dab of solder over each one.
Despite my repair, the truck’s gas gauge continued to hover around empty, no matter how much gas I put in the tank. I discovered why long after the fact—and quite by accident.
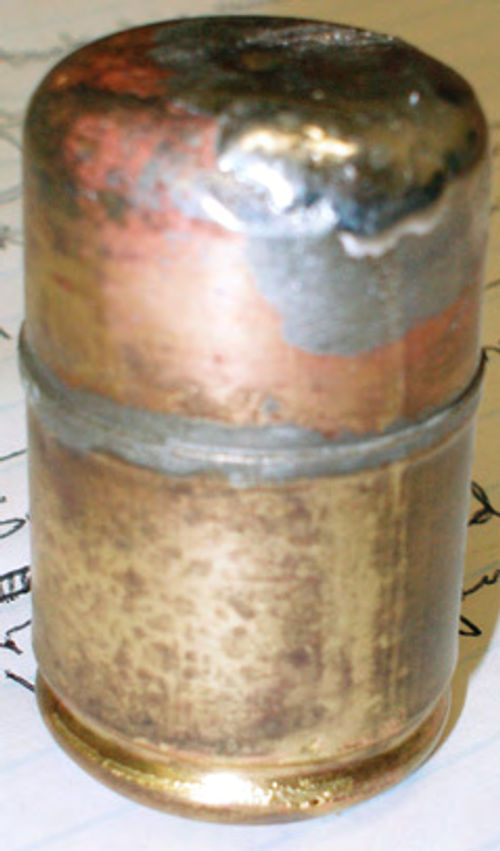
While editing a close-up digital photo I’d taken of the float, I discovered a pinhole that I’d missed at the time and neglected to plug with solder (Photo 8).
As it evolved, the float had once again filled with gasoline and settled comfortably onto the bottom of the tank. Lucky for me, an inexpensive replacement brass float was readily available through several suppliers of vintage Ford truck parts. It was a quick 10-minute repair to remove the tank’s sending unit,snap the new float into place and reinstall the sending unit.
Ruby’s dashboard gas gauge is working once again.


Reassembling the Tank Pieces
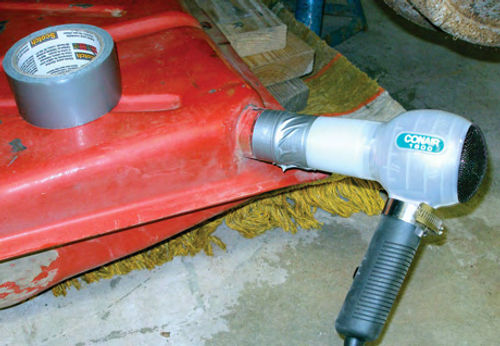
After flushing the tank with a pressure wand at the local coin-op car wash, I wanted to dry it thoroughly. Years ago I bought a hair dryer with a “cold” setting, one I use solely for drying gas tanks. Its snout fit tightly into the filler neck of the Ford tank; I added several wraps of duct tape to hold the hair dryer in place and then, while I worked nearby, ran it for a few hours until the tank was bone dry (Photo 9).
It took just a few minutes to reinstall the gas tank behind the seat. I’d assumed it would be simplicity itself to push a new hose through the filler-neck hole in the cab and slide it over the tank’s filler opening or snout. It wasn’t a straight shot, however, given that the tank was slightly ahead of the hole. I also had very little room to try to manipulate the tank end of the hose.
Ultimately what worked is this: I attached the upper end of the hose to the metal filler neck and used it as a prop to push the other end of the hose onto the gas tank snout. I ringed the tank’s snout with clear silicone so I wouldn’t have to worry about leaks at that point.
Belatedly, a question occurred to me: how far above the rubber body grommet—a weather seal—should the top of the metal filler tube extend? It should be obvious but it’s not. When I looked at my other two 1967 F-250 trucks, I observed that Old Blue has the top of its filler tube situated just above the grommet. This placement leaves the widest part of the filler tube positioned inside the grommet, ensuring the most weatherproof seal.
The metal filler tube in my other F250, by contrast, sticks up perhaps 11 ⁄2 inches above the grommet. Whoever replaced that tube—evidently just in time for the farm auction at which I bought the truck—didn’t pay much attention to how he had found it, I theorize. I opted to duplicate the tube position I found on Old Blue.
I used my index finger to smear petroleum jelly around the top of the tube’s exterior and then struck it with a rubber mallet to drive it down into the rubber grommet. I used clear silicone again to seal the union of the lower end of the metal tube and the rubber hose.
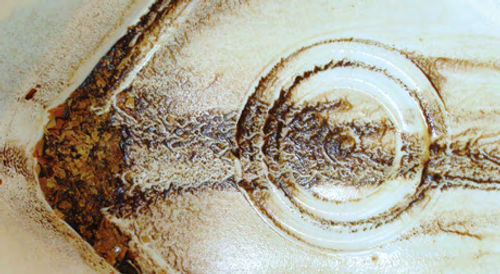
Despite the hassle of pulling and cleaning the tank, I’m certain that removing all the sediment I found inside saved me time in the long run (Photo 10).
In the next installment, we’ll rebuild both the carburetor and distributor and renew the cooling system on this vintage and veteran pickup truck.


