
Ruby, The Farm Truck, Pt. 9
Since Ruby’s a Working Truck, We’ll Test Four Waxes for Her Protection. Then We’ll Make Electrical, Seal and Pedal Bracket Fixes.
Editor’s note: This month we’ll test some synthetic waxes to seal Ruby’s shined-up paint. After that comes a flurry of small projects — from fixing electrical glitches to replacing U-joints — all necessary to put Ruby, a long-neglected 1967 Ford F-250 farm truck, back on the road.
AFTER POLISHING RUBY’S old paint (December), I wanted to preserve its luster by applying a long-lasting car wax. I tested four synthetic waxes (Photo 51). Of the four, only Nu Finish makes a claim of longevity. Its maker, the Reed-Union Corp. of Chicago, contends that “independent laboratory tests have proven (Nu Finish) to bead, shine and protect from sunshine, rain and humidity for a whole year. It’s so tough that even 52 automatic car washes won’t hurt the long lasting Nu Finish shine.”
The makers of Nu Finish and Turtle Wax Ice both claim that, unlike conventional car waxes, their products can be applied to hot surfaces in direct sunlight. Nu Finish doesn’t say it’s synthetic but contends it is “better than wax” in addition to offering “5 times more protection than any wax.”
Turtle Wax Ice, Mothers FX SynWax and Meguiar’s Nxt Generation Tech Wax all claim to protect against damage from the sun’s ultraviolet rays. Likewise, Turtle Wax and Meguiar’s assert their products won’t leave behind the powdery residue typical of conventional waxes.
Turtle Wax Ice was more expensive than the other waxes but, like Meguiar’s, its package included a wax applicator. Turtle Wax was the only one of the four products to include a microfiber cloth for removing and buffing the wax. It claims one other advantage: “With Ice, you can shine all exterior surfaces of your car including rubber moldings, plastic trim, door handles, headlight and taillight lenses with no white residue left behind.”
Doing Four On One
How would I apply four waxes to one truck? I drew three quick sketches showing the top and both sides of the truck and then assigned each of my waxes to spots on the drawings. I split the hood and cab roof to make sure I could try Mother’s, Meguiar’s, Turtle Wax and Nu Finish on a horizontal surface, exposed to not only the heat of the sun but the fury of upcoming spring rains.
I used blue masking tape to test the four waxes side-by-side on Ruby’s various sheet metal panels. Nu Finish, which leaves behind a white residue similar to conventional waxes, was by far the hardest to buff off. I had to wet my cotton towel and polish very hard in places to remove stubborn white specks that the Nu Finish left behind. If the product can actually survive 52 car washes, however, I’d consider the extra work involved in applying it to be a fair trade-off.
I should note that my wax applicator turned a rusty red with Meguiar’s and Mother’s, which were apparently cutting through some remaining oxidized paint or residue. The applicators remained cleaner with the other two products.
I liked Turtle Wax Ice best of the four waxes because it seemed to leave such a deep, rich shine. But that was under fluorescent lights inside my shop. Truthfully, once I stepped outside I couldn’t see that any one product outshone its rivals. The one that holds up best will become my favorite synthetic wax. However, it’s unlikely I’ll identify that product for quite some time because I started parking Ruby inside shortly after I got her running once again.
Sealing Drilled Holes
Even so, Ruby will occasionally get caught out in the rain. Therefore, I used self-tapping stainless-steel screws and rubber washers to plug 13 holes in her body: three in the hood, where someone had installed a hood ornament; six in the driver’s door; and four in the passenger’s door.
I discovered that three of the holes in the passenger’s door, drilled for fitting a long-lost mirror, were too large for my self-tapping screws. For them, I used a stone on my Dremel tool to grind down their raised edges and simply plugged them with clear silicone, trying to be very neat about it.
I removed both door panels so I could hammer-and-dolly some of the other holes, bumping their raised edges flat so my screws would fit. For two large holes in the driver’s door, I used machine screws, each backed by a washer and a nut. Now I won’t have rainwater dripping onto the engine or running freely into the doors.
A Turn signal Malfunctions
Ruby still had a number of minor issues — many of them electrical — that I needed to correct before I could consider her roadworthy. For instance, her left rear turn signal, which was working when I bought the truck, had since conked out. When I installed a new bulb for the heck of it, nothing changed.
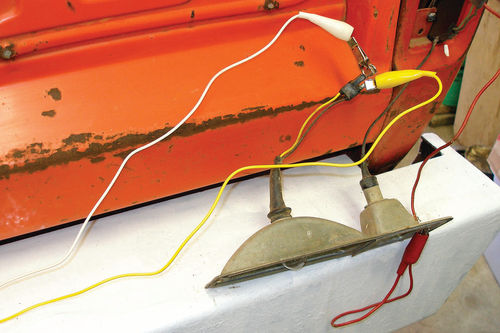
Was the socket bad? I couldn’t actually swap the left and right taillight assemblies to check: each taillight assembly was anchored by a hard-wired socket for the back-up lights. But I achieved the same effect by disconnecting the two wires (parking light and turn signal) feeding the left taillight. By using long jumper wires, I connected these two wires to the right taillight assembly (Photo 52).
When I got identical results at the right taillight — the parking light works but the bulb doesn’t flash when I activate the turn signal or emergency flashers — I knew that my left bulb and socket were fine and the problem lay elsewhere.
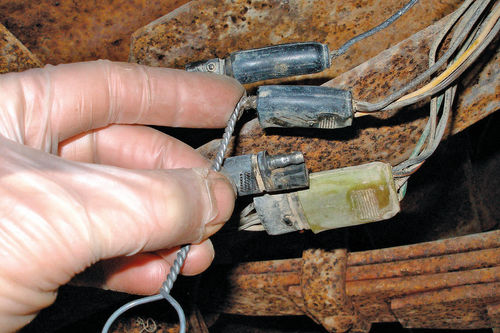
Accordingly, I followed the taillight wiring forward, cleaning connections and looking for frayed or broken wiring as I went (Photo 53). I worked all the way up to a very clean plug beneath the master cylinder and then followed it up under the dash. My discovery made me wish I’d started my search under the dashboard: I spied the shiny end of a wire from the steering column that had pulled loose from its connector.
The wire was one of several in a harness that hangs down dangerously low near the pedals. Because the left turn signal worked when I first got the truck, I am evidently guilty of snagging the wire and pulling it loose. When I shoved the wire back into its plug, the left rear turn signal began working once again. To conclude Ruby’s electrical revival, I cleaned all light sockets and bulb bases and coated them with dielectric grease to prevent future corrosion.
Dark Lights and a Silent Horn
My next electrical problem was in the same vicinity as the left taillight. I’d spliced the lead to my new license-plate light into the truck’s wiring harness and taped the splice with care. But when I pressed the light into its hole in the rear bumper, it wouldn’t work. Popping the light out again, I quickly learned why: paint and rust clogged the inside edge of the hole so that the light wasn’t grounding properly. I solved this problem by simply scraping off the POR-15 WhiteCote and leaving a strip of bare metal around the hole.
Another problem — the intermittent operation of Ruby’s back-up lights — was more puzzling. I originally blamed the electro-mechanical switch atop the truck’s Warner T-18 transmission. Before I could test this switch, however, I began driving Ruby. One night, after I’d put about 100 miles on my “new” truck, I moved the gearshift lever from neutral to reverse several times. The back-up lights popped on, right on schedule, every time. I theorize that by driving the truck I flushed out some crud that had been blocking the plunger of the electro-mechanical switch and rendering it inoperable.
Another intermittent mystery involved the horn, which worked fine when I attached it directly to a car battery. Ruby was missing the chrome horn button from the center of her steering wheel when I got her. I borrowed that piece from a 1968 Ford parts pickup, along with the spring-loaded brush that allows you to maintain electrical contact even while you’re turning the steering wheel. I bought a reproduction of the three-pronged plastic plate that grips the chrome horn button.
When I tested the horn after I cleaned all the electrical contacts beneath the button and reassembled it all, it wouldn’t work. By spraying some electrical contact cleaner between the steering wheel and the steering column, I think I cut through some corrosion. Immediately afterward, the horn worked. A few days later, the horn fell silent once again. This time, even spraying generous amounts of contact cleaner into the horn-blowing circuitry had no effect.
It took a Ford-enthusiast friend of mine all of about 15 seconds to troubleshoot this problem. He noticed what I had somehow overlooked — despite the hours I spent crawling around beneath the truck. A rusted-out cab mount had allowed the driver’s side of the cab to settle slightly.
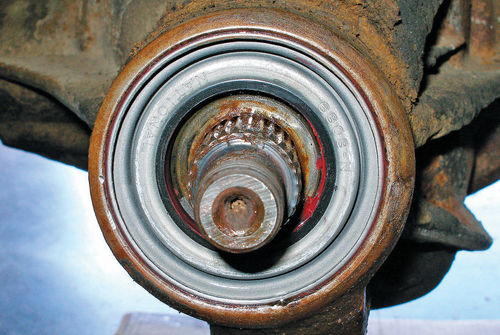
Because the outer steering column — the part you see — is clamped to the dashboard, it settled with the cab. Some up-and-down movement is possible in the steering column’s internal shaft, however. The steering wheel bolts to the top end of this internal shaft. Because the internal shaft’s lower end bolts to the frame-mounted steering gear via a vibration-dampening flexible “rag joint” coupling, the internal shaft maintained its original height as the outer steering column settled around it. The result: a half-inch gap opened between the steering wheel and the top of the steering column (Photo 54).
I believe the gap increased slightly as I began driving Ruby and the cab settled further. And the newer, and therefore stiffer, rag joint that I installed in place of the broken-down old fabric joint also increased the gap (Photos 55 and 56). It got to the point, therefore, where the center horn button was no longer making electrical contact to sound the horn.
In a related development, the internal mechanism designed to automatically cancel the truck’s turn signals had stopped engaging and I had to manually cancel the turn signals. This, again, was due to the half-inch gap that the broken cab mount had introduced between the steering wheel and steering column. Therefore, I soon will need to repair the cab mount.
On to the Differential Seal
Some other problems cropped up as I prepared to put Ruby back on the road. For instance, everything was fine while Ruby was up in the air on four jack stands. Shortly after I finished my brake job, reinstalled her wheels and lowered her to the ground, however, I found a three-inch-diameter oil puddle beneath her differential, alerting me to a bad differential seal.
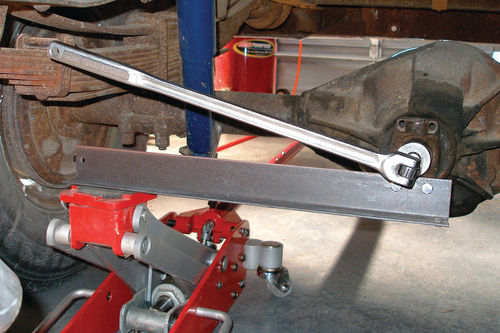
To reach the seal, I disassembled the rear universal joint and lowered the rear end of its driveshaft to the ground. Next, I had to remove a large, rusty nut holding the U-joint yoke to the differential pinion shaft. If I’d had a large enough impact socket, I would have used an impact wrench on the nut. As it was, I used a regular socket on a long breaker bar handle that I planned to whack with a 4-pound dead-blow hammer.
But I was sensitive to the damage the shock of those repeated impacts could have on the differential gears. Accordingly, I bolted one end of a piece of angle iron to the U-joint yoke and supported its free end with my floor jack. That protective tool would prevent my pounding from transmitting to the U-joint yoke and the gearing attached to it (Photo 57). The set-up allowed me to remove the yoke nut (by turning the breaker bar counterclockwise) without damaging the differential gears. It worked. I drilled three holes in the worn oil seal, threaded in self-tapping screws and used a slide hammer to remove the seal.
Driving in the new seal was tricky. Because of the differential’s protruding pinion shaft, I couldn’t simply place a 2-by-4 atop the new seal and strike the wood squarely with a hammer to seat the seal. Instead, I selected a huge socket from my 1-inch-drive socket set, one deep enough to fit over the pinion shaft and large enough to be just slightly less than the diameter of the new oil seal. I centered it carefully on the seal, struck it squarely with my dead-blow hammer and drove the seal neatly into place (Photo 58). A newly installed seal should prevent Ruby’s differential oil from leaking.
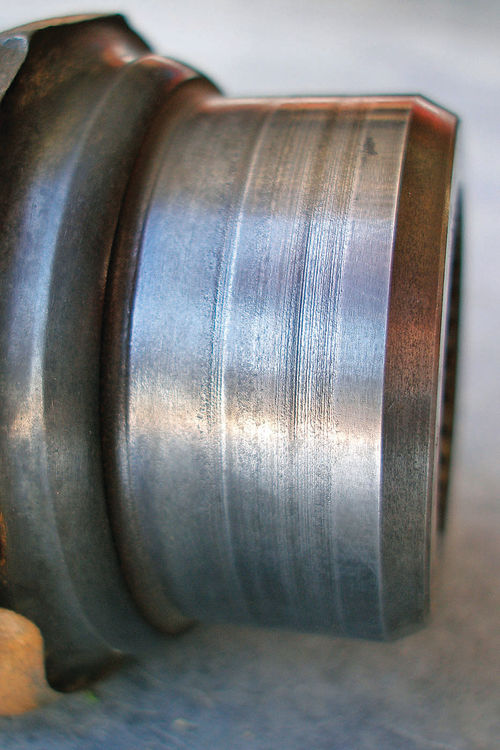
Chances are my old seal needed replacing because it dated from 1967. The light rust pitting and grooves on the mating surface of the U-joint yoke could have contributed to the seal’s failure, however (Photo 59). I had the option of buying a Speedi-Sleeve, which would slip over the worn area and present a smooth surface to the new oil seal. I was in a hurry, however, so I reassembled the driveline as I found it, hoping that the slightly roughened U-joint yoke won’t damage the new differential seal.
I noted another potential problem in that the tip of the pinion shaft seemed to have an abnormal amount of play in it: perhaps 3 ⁄16- or 1 ⁄4-inch of movement, in fact. Before I’d suctioned out Ruby’s old differential oil, I recalled, I’d stuck my finger through the filler-plug hole to discover that the fluid level was about two inches low, presumably due to the leaky seal I’d just replaced. Had the low fluid level burned out the differential front pinion bearing? I hoped not, because replacing the bearing would mean tearing into the differential, something I’m disinclined to do at the moment. But I will be watching — and listening — for differential trouble down the road.
Ruby’s twin driveshafts mesh at a slip-joint, which is supported by a metal-and-rubber bushing. The front driveshaft has a front U-joint; the rear driveshaft has front and rear U-joints. Since I had the rear of the back driveshaft disconnected, I removed its forward end and the front driveshaft, too, enabling me to replace all three U-joints. The work is simple — merely unscrewing four nuts at each joint, replacing the old U-joints with new ones and then tightening the nuts. I made sure the new U-joints contained grease fittings so I could keep them well-lubricated.
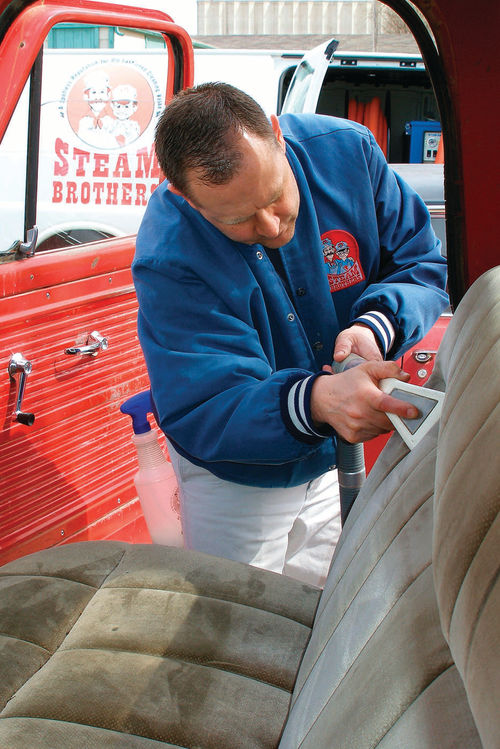
Steam-Cleaning Ruby’s Seat
There are many do-it-yourself products for cleaning upholstery. Impatient to get Ruby back on the road and wanting the best job possible, I opted to eschew the home remedies and call on a professional to steam-clean Ruby’s seat. The “fragrant” seat was truly the last vestige of the “old” truck.
Kevin Hestermann of Steam Brothers has a truck-mounted $19,000 cleaning machine that heats water to 190 degrees F., removing dirt I couldn’t touch. Hmm, looks like I’ve found the right man for this dirty job. After pre-treating some grease spots with a spray bottle, Hestermann fired up the big machine to deep clean Ruby’s seat (Photo 60).
A steam cleaner might destroy an antique car’s cotton or mohair upholstery, Hestermann said, but it works well on synthetic seat covers backed by foam rubber cushions. His approximately 30-minute cleaning ministration cost me a hefty $65. And yet I consider it a fair trade given that Ruby’s interior now smells fresh and new, helped marginally by the strawberry air freshener I’ve since hung from a dashboard knob.
That is, it smells clean to me. My Scottie dog Emmett, a mouse enthusiast, chewed out a 2-by-6-inch section of the firewall fiberboard above the accelerator pedal when I left him alone in the truck for five minutes on a cold day. Because he’s not wantonly destructive, I’m certain that mice had once burrowed into the firewall, leaving their scent behind. When I turned on the heater’s blower motor, even I could detect the pungent odor of mice.
I could tear out the firewall padding and disassemble the heater and its related ductwork. Of course, I could simply leave the windows down and let the truck gradually air out. I wonder: which option should I choose?
Repairs to the Pedal Bracket
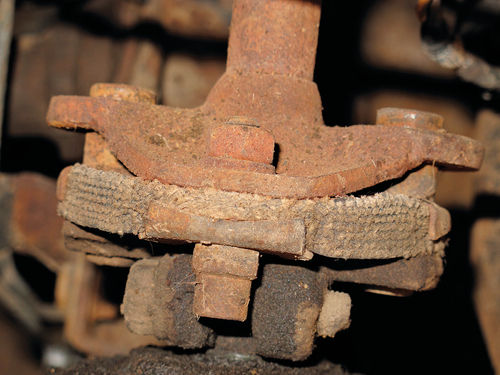
Ruby’s clutch and brake pedals pivot on a shaft suspended from a heavy stamped-steel bracket beneath the dashboard. Over the years, the crimped anchors had broken away from both ends of the shaft, wearing oblong holes in the bracket and introducing slop into the action of both pedals. What time is it? It’s repair time (Photo 61).
Looking through my buckets of scrap tubing, I found three sizes of old piston wrist pins with which I could possibly fashion a new anchor. I measured the original set-up with a micrometer and hole gauge; one of the wrist pins, remarkably, had an internal diameter just about .010- or .012-inch smaller than I needed. No problem!

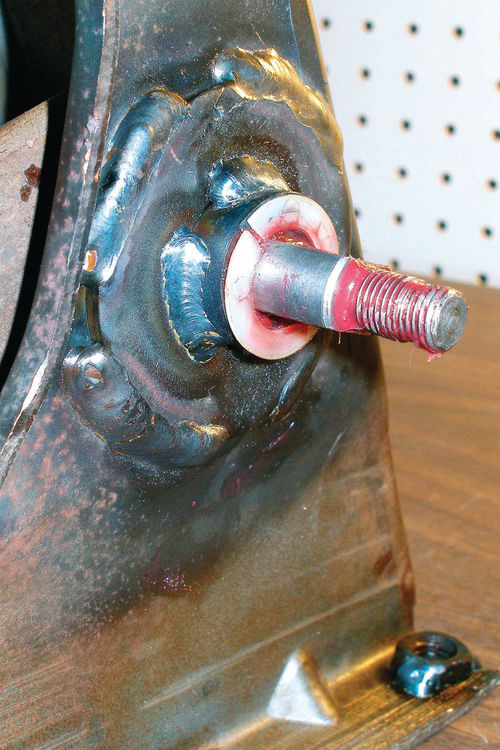
I cut two short sections to serve as my new anchors. Then, with a barrel-shaped grinding stone on my Dremel tool (a handheld electric high-speed motor, similar to a dentist’s drill), I enlarged the wrist pins so their bores would accommodate both the shaft and the nylon bushing that cushions the shaft inside each anchor.
I dashed out to a local hardware store for two heavy flat washers. In just a few minutes of grinding with my Dremel tool, I machined their internal diameters so they fit tightly over the piston pins. In preparation for welding, I sandblasted away the surface rust near the bracket anchor points; I also sandblasted the two new washers to remove their zinc coatings, which could otherwise spoil a good weld.
Finally, I installed the clutch and brake pedal shaft to ensure that the two sections of wrist pin would align properly. Then, with everything clamped securely, I MIG-welded the outer edges of the washers to the bracket. Wrapping up, I welded the sections of wrist pin securely to the centers of the two heavy washers, thereby creating new supports for the brake and clutch pedal shaft (Photo 62).
Because of the nylon bushings on each end, Ford made no provision for greasing the pedal shaft. I decided to fit my bracket with a zerk fitting, however, to guarantee smooth pedal action. Accordingly, I center-punched and then drilled a hole in the center of the tubing attached to the brake pedal. (The shaft that is attached to the clutch pedal passes through this chunk of tubing.) Because I inadvertently overbored the hole, I had to weld the zerk in place, which ruined the spring-loaded valve that normally allows grease to flow into a zerk but prevents it from flowing out. I’ll seal the tip of this damaged zerk with a vacuum cap in hopes of holding the grease in.
Next time, we’ll take Ruby on an uneasy test drive, trace the source of an engine noise, repair a broken accelerator linkage and seal cracks in the windshield weatherstripping.


