
Ruby, the Farm Truck, Pt. 3
Muscle Power Was Needed to Move This Part of the Project. Also, Be Sure to Test a Thermostat Before Its Use.
Editor’s note:This month we’ll rebuild the old farm truck’s carburetor and distributor. Also, an unusual overheating problem arises despite improvements to the engine’s cooling system. We’ve had 10 photos in the series so far, and will start here with Photo 11.
IT WAS TIME to dive under the hood, where I soon discovered that the he-man who had cranked the front wheel lug nuts down so tightly had evidently performed similar feats of engine-compartment strength. For instance, I couldn’t budge the fuel-filter can that sits atop the fuel pump. If I hadn’t found an old chainsaw glove, crisscrossed with beads of sticky rubber, I wouldn’t have been able to remove the can by hand.
As I suspected, all the gas had either evaporated or drained from the fuel-filter chamber. I used six or eight cotton swabs to remove rusty sediment that filled the three compartments inside the top of the fuel pump.
What’s more, contrary to standard procedure, someone had sealed the filter by placing clear silicone on the filter-can gasket. Like the oil filter gasket that it resembles, the fuel-filter gasket is typically self-sealing. Using a small screwdriver, I pried around the entire circumference of the gasket to free it. To finish up, I installed a new piece of rubber fuel hose between the truck’s metal gas line and the fuel pump.
Modifying the Battery Cables
During the same session, I removed and replaced the rear shocks, struggling only slightly with rusty mounting hardware.
As a precaution, I also installed new battery cables. Eventually, I even replaced the disreputable-looking solenoid-to-starter cable just to besafe
I’ll relate my battery cable escapade to illustrate how time-robbers can delay even the simplest repairs. My off-the shelf battery cables were correct for length only; I had to modify both cables to fit properly.
The hole in the solenoid end of the positive cable was a bit too big for the nut that held it to a stud on the starter solenoid. Without great difficulty, I found a flat washer with the proper outside diameter to securely hold the cable end. But Then I had to lock it in a bench vise and drill it out to achieve the correct inside diameter.
That done, I removed the bolt where the old negative battery cable attached to the left side of the engine block. I soon realized that the corresponding hole in the block end of the new negative cable was—you guessed it—too small for this bolt. My largest drill bit was too small to enlarge the hole by simply drilling a new hole. Therefore, I wasted many minutes running a drill bit in circles within the hole to eventually enlarge it that way.
Engine Starts but Sputters
While the gas tank was still out of the truck for cleaning, I started the engine by connecting a small gas can to the carburetor. Although it roared to life readily enough, the engine sputtered and gasped, apparently running way too rich, and died when I attempted to leave the cab so I could work the throttle manually.
As I exited the truck, I heard something splashing on the floor beneath the engine. Antifreeze leaking from a cracked block? Gas Spilling from a defective fuel pump? Well, it was gasoline, in fact, but it was pouring down the carburetor and exhaust manifold and, from there, splashing to the ground, where a puddle the size of the truck cab had already formed.
Most likely some particles from the dirty gas tank had slipped past the fuel filter and hung up the needle valve, allowing raw gas to pour unimpeded into the carburetor’s float bowl. Accordingly, I called the local NAPA store, which ordered a carb kit that I installed without incident, having performed the task many times during the nearly three decades I’ve owned the mechanically identical Old Blue (Photo 11). Ruby’s engine will run better with a clean, properly adjusted carburetor (bottom). The carb at the top in the photo, a spare, is as dirty as Ruby’s was.
I chided myself for not having the kit on hand, given that a carburetor rebuild is preventative maintenance for any vehicle with a tank full of stinky old gas. While removing the carb, I noticed that someone had used a piece of baling wire to attach the accelerator return spring to the truck’s right-side frame rail. From my long experience with 1967 Ford trucks I knew that this farmer’s fix was unnecessary: there’s an attaching point for the spring right next to the carburetor.
Rehabilitating the Distributor
Brawn bested brains under Ruby’s hood in several areas where I’d least expected problems. For example, I soon learned that the Titan who cinched the lug nuts way too tightly had performed similar feats of strength to vital engine parts. The twin carburetor-mounting nuts had been a bear to loosen, for instance.
Likewise, inside the distributor, I discovered that the two screws holding the contact points were way too tight. It was by mere luck that nothing strippedwhen I removed the screws.
After Removing the distributor from the engine, I cleaned it thoroughly inside and out at my solvent tank and then wrapped it in a rag to lock it gently in my workbench vise. There, aided by plentiful elbow room and light, I replaced the breaker points, condenser, cap, rotor and spark plug wires with good used parts from Old Blue, another 1967 Ford pickup I own.
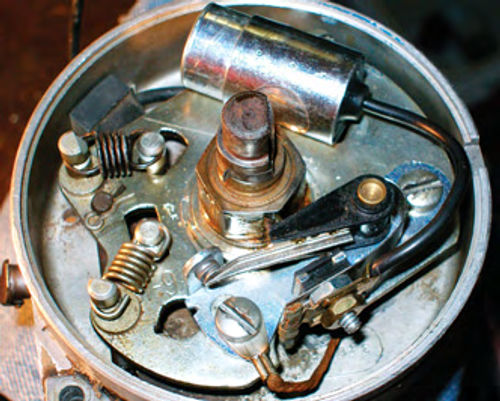
I also applied a thin smear of distributor-lobe grease to the cam that opens the breaker points and lubricated the distributor shaft by placing a few drops of motor oil in an oil cup. Fresh from the solvent tank, properly lubricated and sporting clean used parts, Ruby’s 1967 distributor is ready for many more miles (Photo 12).
My low-tech test of the distributor’s vacuum chamber—sucking on it— revealed a leak in its rubber diaphragm. I again turned to NAPA for a new part.
Draining the Cooling System
Having revived the old truck’s fuel and spark-delivery systems—that is, the fuel pump, carburetor and distributor— I turned my attention to the equally vital cooling system. This meant draining the old antifreeze, using a commercial cleaning solution and back-flushing the radiator and engine block with a professional flushing gun that incorporates both compressed air and water.
I opened its petcock and in short order drained the radiator into a 5-gallon pail. Next, I needed to unbolt the water-outlet elbow at the front of the engine to remove the thermostat in preparation for back-flushing.This proved difficult,if only because my oxyacetylene torch was unavailable.
Because my handheld propane torch couldn’t heat the two water-outlet bolts red-hot, I fully expected them to break as I removed them. Nonetheless, I gritted my teeth and continued pulling on the wrench: either they’d come out or they’d break. Fortunately, it was the former.
Once a gap appeared between the bolt head and the outlet elbow, I doused the area with penetrating oil, some of which apparently reached the bolt threads.
Similarly, the water jacket drain plug— low on the block’s right-hand side—was extremely tight. My problem here was getting enough leverage to loosen it, even using my breaker bar. I succeeded, however. Although rust pits scarred the plug’s inner edges, after I’d cleaned it on my wire-wheel buffer, all was well with that part of the world again.
When I had peered into the truck’s radiator, the deep-green tint fooled me into thinking the antifreeze was rather fresh. I couldn’t have been further from the mark. Much more revealing is what emerges from the lowest part of the system, I learned. Once I’d freed the block’s drain plug, the two or three inches of sludge that drained into a pail was a putrid, dirty brown; thick with rust and sediment.
Flushing the Radiator & Block
To flush the system, I replaced the block drain plug, water-outlet elbow (without the thermostat installed) and radiator hoses, in addition to closing the radiator petcock.
I then poured in Zerex Radiator Super Flush by Valvoline, added water,replaced the radiator cap and, following directions, ran the engine for 10 minutes after it reached normal operating temperature.
When the engine had cooled, I drained the cleaning solution and removed the upper and lower radiator hoses from the block and the cap from the radiator. I then back-flushed (flushed in the direction opposite the normal flow of coolant) through the radiator and block until the water ran clear. It is vital that you remove your thermostat for this step; otherwise, back-flushing the block is impossible.
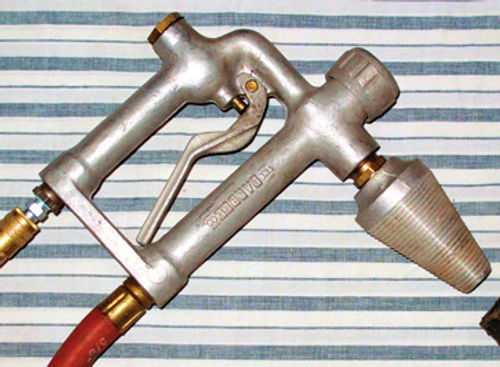
My Barbee aluminum flushing gun allowed me to inject compressed air into the water stream at 5 or 10 psi, which helps loosen rust scale (Photo 13). This Barbee flushing gun combines low-pressure air through its upper hose with water through the lower hose (The Barbee Company, Inc., 418 E. Breckinridge St., Louisville, KY 40203; barbeecompany.com).
I drained the system by once again opening the radiator petcock and removing the block drain plug. A few bursts of low-pressure compressed air from the flushing gun helped remove residual water from the engine’s water jacket.
After flushing, the radiator passages still looked fairly clogged, causing me to wonder if the Zerex did much good. The engine hasn’t overheated since I started driving the truck, however.
Next, I installed a new thermostat and gasket under the water-outlet elbow at the front of the block and installed a new lower radiator hose. Because the upper radiator hose supplied by my local NAPA store was too short, I returned to the store to xchangeit. Although the NAPA catalog listed the hose as fitting my engine, it didn’t. Had I forced it into position—a possibility—the strain over time would probably have damaged the radiator top tank.
But NAPA’s counterman neatly sidestepped the problem. He took the original hose I’d brought with me, eyeballed his inventory of new hoses and selected a close match. I only had to nip five inches total from the substitute hose, a bit from each end, to get a good fit.
An Unexpected Hot Result
When all was ready, I filled the cooling system with a 1:1 mix of antifreeze and distilled water, started the engine and waited until—it overheated! This was not the plan, of course.
When the engine cooled, I started and ran it a second time. Again it overheated, which prompted me to wonder: Had I installed the thermostat backward? Its thermostatic coils are supposed to point downward, thereby preventing coolant from flowing until it reaches a designated temperature inside the engine’s water jacket. The engine warms up quickly because the coolant is trapped inside the block. Once the hot coolant trips the thermostat, the water pump and radiator work in tandem to maintain an ideal operating temperature.
Although my heater hoses felt hot, I noticed that the heater wasn’t producing any hot air, another sign that the thermostat was either upside-down or simply bad. Either way, it had to come out. When it did, I discovered that I had, in fact, installed it properly.
How About a $5 Thermostat Upgrade?
At a nearby parts store, I paid $5 for what the counterman called a “better quality” thermostat than the ultra-cheap one I’d installed in the truck. He told me that, yes, even brand-new thermostats can be bad. When I fired up the engine a third time, the new thermostat opened when the dashboard temperature needle reached the normal range. The heater began pumping out hot air, too.
What of the suspect thermostat?
Suspending it in water inside an old saucepan, I heated it on the stove top and monitored the temperature with a digital thermometer. Even at 213 degrees F, one degree above the boiling point of water, the thermostat’s butterfly valve would not budge. The defective thermostat had caused my engine to overheat not once but twice and I’d wasted 2 1 ⁄2 hours of my time dealing with the fallout.
My new rule: Before installing a thermostat, even a new one, heat it in a saucepan of water to make sure it opens at its specified temperature. Only then should it be installed.
Before closing the hood on my mini restoration project, I also installed a nice, though used, fan belt, adjusted the carburetor’s idle mixture, and set the engine’s idle speed and ignition timing.
As with so many engines, it is necessary to adjust Ruby’s alternator to tension the fan belt. I don’t own a pry bar of the proper shape for this task. Instead, I placed a long 2-by-4 against the bottom of the alternator and then used a floor jack to apply some gentle pressure, thus stretching the fan belt to its proper tension.
An “Exhausting” Repair
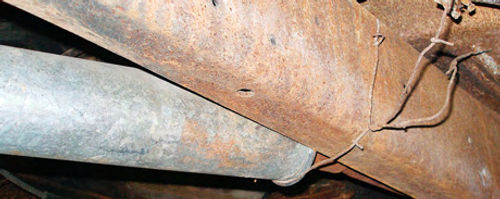
Like the rest of the truck, Ruby’s exhaust system showed signs of neglect (Photo 14). A wired-up muffler typified Ruby’s haphazard care. Partly due to a leak where the exhaust pipe joined the manifold, I decided to remove all the piping from the manifold on back to repair what I could and replace what I couldn’t.
Once again I missed my oxy acetylene torch, which I’d judged too heavy to transport to my heated shop. Because the torch can heat metal red-hot in seconds, it makes removing rusted nuts a snap. With my handheld propane torch—a poor substitute—I attempted to heat the two frozen nuts holding the exhaust pipe at the manifold.
I spent three, four and five minutes at a time heating the outermost (right-side) nut. This allowed me to crank it about three times with a wrench before the nut cooled enough to stiffen and begin squealing. Given that I was also working while lying on my back beneath the truck, it’s no wonder that it took me 30 minutes to remove the outboard nut and longer to remove the nearly inaccessible inboard nut.
With the muffler still attached, I snaked the liberated exhaust pipe out toward the back of the frame. Although the pipe had some rust around the flange gasket seat, it was solid enough to keep. Just for fun, however, I called a parts store to learn that a new pipe would cost $55, and shipping for the oversize part would nearly double the cost. All the more reason to keep the old one, I thought.
Best Thread Repair: None!
Now I needed to clean up the threads of the two studs where I’d justso laboriously removed the nuts. My awkward, twin-handled die holder wouldn’t fit in he confined space next to the engine, however. Therefore, I bought a hex shaped die for a 7/16-14 threaded shaft— that is, for a stud measuring 7/16-inch in diameter and accepting a nut having 14 threads per inch. The new die fit nicely in my 1-inch socket, which would allow me to dress the threads using an extension on my ratchet handle.
That was the theory, anyway. In reality, I couldn’t get the hex die to start cutting on the studs, which had evidently hardened due to repeated heating. I considered attaching the exhaust pipe using brass in place of steel nuts, confident that the soft brass would readily distort to conform to the damaged threads of the studs. That idea flopped because the local hardware store didn’t carry 7/16- inch nuts in brass.
Despairing of breaking the studs while trying to remove them, I settled upon a different option. Fitting the old exhaust pipe to the manifold using a new doughnut gasket, I clamped the pipe at the engine hanger and intentionally forced the steel nuts back over the studs. I had just enough room to whack the right-side nut with a hammer to start it. Grease I’d rubbed on the stud helped lubricate the cutting of new threads.
Unable to swing a hammer against the inboard nut, I simply pressed it hard against the stud with my socket wrench and extension. Both nuts threaded on quite normally and cinched the exhaust pipe flange tight against the new gasket.
I don’t advocate the frequent use of such shade-tree repair techniques as forcing nuts on studs—a shortcut justified only by my twin goals of cheaply and speedily repairing Ruby. After all, I’ve merely postponed dealing with damaged studs until the new exhaust-flange gasket fails.Here’s hoping my day of reckoning will come many, many years from now.
In the next installment, we’ll rebuild an exhaust hanger, patch a floorboard hole and test a do-it-yourself polyurethane bed liner.


