How -to Battery Maintainers, Pt.3
We’ll Look at Three More Units and Update an Experiment. Then Readers Will Talk About Their Experiences.
WHEN PUTTING TOGETHER the articles on battery maintainers for the April and May issues, I stated that there “seems to be an endless selection of battery maintainers to choose from.”While we can’t cover every maintainer out there, we’ll continue to report on them as units come to our attention. In this instance, here are three units that offer dual-voltage capability and are worth adding to the mix.
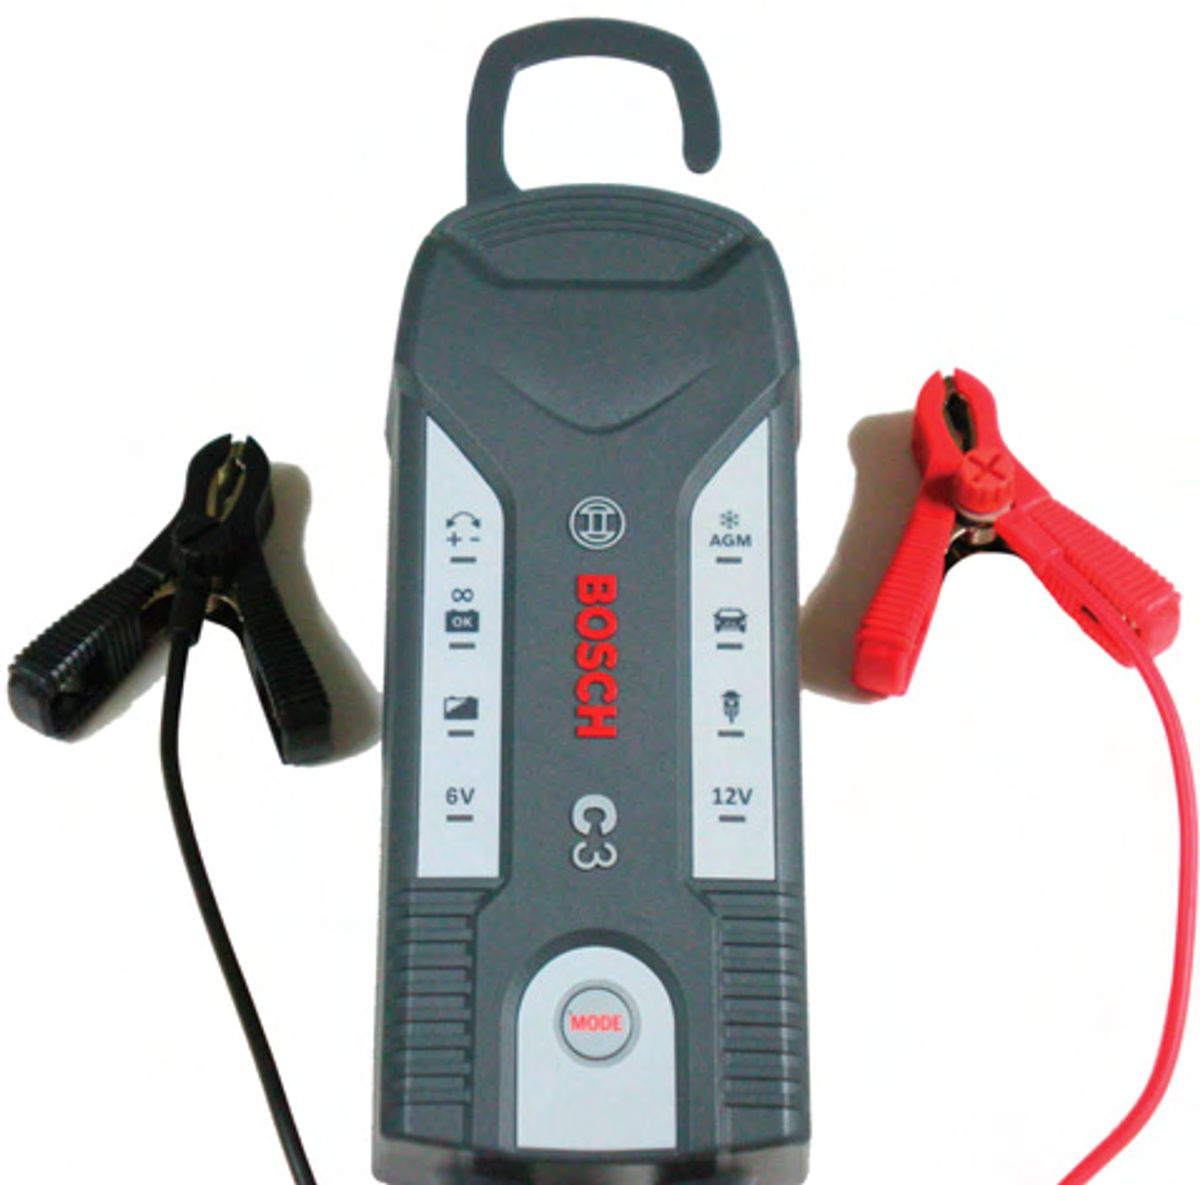
1. Bosch C3 Battery charger/maintainer. Bosch has two relatively new entries, the C3 and the C7. The first one to be discussed is the C3 charger/maintainer. This unit will work with 6- and 12- volt batteries, a big plus for the occasional user that has both 6- and 12-volt vehicles. If, however, you intend to keep a maintainer on a vehicle 100% of the time, you will still require more than one unit.
The instruction booklet starts out with the usual safety warnings. You might get the impression that more protection is required for battery service than when welding. Nevertheless, take the time to read them, even though you’re probably aware of most of the points covered.
If you look closely at the C3 in Photo 1 you’ll see there are two columns with four symbols on the right and four on the left, as well as a mode bottom located (centered) below them. A light below each symbol will confirm the mode of operation.
Mode button; this allows the user to turn the unit on and off as well as navigate through the symbols in the right column.
Right column, starting at the bottom:
12V; will automatically light up if connected to a 12-volt battery (when more than 10.5 volts is detected).
Motorcycle; Small batteries, less than a 14 Ah rating.
Car; Batteries greater than a 14 Ah (amp hour) rating.
AGM; for AGM batteries (Absorbed Glass Mat; another type of sealed battery), and batteries greater than 14Ah in cold weather conditions.
Left column, starting at the bottom:
6V; will automatically light up if connected to a 6-volt battery.
Battery symbol (that is diagonally half light, half dark). When this light is flashing, it indicates the battery is being charged or the state of charge is being checked.
Battery symbol(OK), indicates the battery is completely charged and now in the maintenance mode.(Bosch refers to this as “Trickle charging.”) “The charger will monitor the battery and keep it at a high charging level without risk of damage.”
A double-headed arrow with + - below it; indicates your connections to the battery are reversed.
Use the mode button to select the desired battery size/type on the right, and the C3 will indicate what it’s doing through the symbols on the left. Once connected to the battery and plugged in to electricity, you are ready to begin. Press The mode button, it will light green, and with a 12-volt battery it will initiate charging in the motorcycle mode. If you press the button again within a second or two, it will then move to the car mode; and once more will bring you to the AGM mode. Pressing it a fourth time will shut the unit off and the button will then turn blue. If you delay for a few seconds and then press the mode button, it will shut the unit off.
6-volt mode—there is only one. It has a charging rate of 7.2V/0.8 A. As with the other modes, once the battery is charged, it will enter the maintenance mode.
The C3 has a “Pulse charging” function. In the instructionsitstates, “This Is an automatic function of the charger and cannot be selected manually.” When it recognizes a 12-volt battery to be heavily discharged and have greater than 8 but less than 10.5 volts, it automatically goes to this mode. “This enhances the charging process and ensures a better condition of the battery.”
I had a weak battery with voltage just above 10V, so I decided to observe the C3 at work. The battery charging symbol flashed rapidly when in this mode, and no other symbols, including the 12V symbol, were lit. Once 10.5 volts was reached, it entered the normal charging cycle and the 12V symbol and motorcycle became lit.
The Bosch C3 comes with a bracket so you can hook the unit under the vehicle’s hood like you would with air conditioning gauges during A/C service. This mounting hook also could be used as a wall mount, secured with three screws, although the 6-foot leads will make it difficult or impossible to reach the battery in many vehicles. The charging rate is 3.5 amps maximum for 12V, and 0.8 amps for 6V.
It’s manufactured in China, has a power consumption of 1.2 amps, and carries a two-year warranty.It’s currently available from Amazon for $69.99.
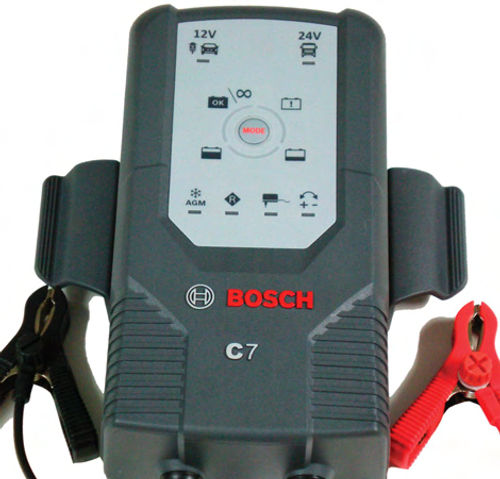
2. Bosch C7 charger/maintainer. This unit will charge and maintain 12- and 24-volt systems. Photo 2 shows the C7 with a mode button located in the center of the unit. This button functions similarly to the Bosch C3 charger/maintainer, but there are a few different options. I don’t have a 24-volt vehicle, so all of my references, unless otherwise noted, are for a 12-volt system.
Once connected to the battery and plugged into an electrical outlet, the mode button will light up blue indicating that power is present. Press it once and the unit starts in the 12V Car/Motorcycle mode (14.4V/6A) and the mode button light will become green.
You will notice a second ring of lights that become active around the mode button. These indicate the battery’s state of charge. They start out red, then yellow, and finally green progressing clockwise around the button.
There are actually a total of nine lights; three in each color range that progress sequentially around the mode button. Red = 25-49% state of charge; Yellow = 50-74%; Green = 75% and above; Green flashing = fully charged and in maintenance mode.
The battery symbols positioned around the mode button reflect the same progression. For example, red lights are located next to the “empty” battery, while green lights are next to the “OK” battery. When connected to a fully charged, good battery the colors will progress fairly quickly to the green flashing maintenance mode. Should a battery be less than fully charged, the indicator lights will remain in a certain color range, depending on the battery’s condition. This indicates the battery is being recharged, and the color (as mentioned previously) will indicate to what degree. As the battery charges, the lights will progress clockwise around the mode button until finally the battery is charged, and then it enters the maintenance (Green flashing) mode.
When the unit is initially activated, pushing the mode button again quickly will navigate you through other options. These would be:
AGM (Absorbed Glass Mat; another type of sealed battery): for AGM batteries 14.7V/6A.
Regenerative: This is a 16-volt Boost mode, “suitable for regeneration of batteries after short-term extreme discharge.” The instructions indicate the battery should have a capacity of 14Ah or more, and be disconnected from the vehicle’s electrical system during this process. This would certainly be to avoid possible damage to onboard computers and other sensitive electronics equipped on more modern vehicles.
During my conversation with a Bosch representative I was advised that in this mode the C7 also has the ability to desulfate a battery if necessary.
Constant current: charger delivers a constant 13.6V/5 A current to DC clips at all times. Reverse Polarity protection doesn’t function in this mode, nor will the unit turn off once the battery is fully charged.
This mode can also be used to supply continuous power to a vehicle’s electrical system while the battery is being replaced. Press and hold the mode button for 3 seconds to enter this mode. This mode can be used in conjunction with a test light for checking switches and other electrical components without concern about high voltage often delivered by most conventional chargers.
On late-model computer-controlled vehicles it’s handy for retaining the computer’s memory, as well as things like the radio’s presets, clock, etc. Connect the charger’s negative clip to a good ground, and the positive to the positive cable.If there’s a starter relay that’s easy to make this connection with or even the battery positive stud on the rear of the alternator, those might be a better choice, reducing the chance of the positive clip becoming disconnected while removing the battery.
Once connected, plug the C7 into electricity, press and hold the mode button for three seconds and the indicator will light. Remember that the positive cable will remain “HOT” during the removal, so be cautious to avoid accidental contact with ground. Once the positive clamp is loosened and removed, wrap it up tight in a rag to insulate it until the new battery is in place.
24-volt mode offers two selections to choose from:
24V Truck; @28.8V/3.5A; when fully charged, will enter maintenance mode.
AGM;@29.4V/3.5A;when fully charged, will enter the maintenance mode.
The C7 will automatically choose either a 12- or 24-volt charging rate, and if no other input is given, it will choose a safe (low) charge rate, and once fully charged, go into the maintenance mode.
It includes a slide-on bracket that can be wall mounted, but again, it might be difficult to stretch the leads to reach your vehicle’s battery.
Charging rate is 6 amps maximum for 12V, and 3.5 amps for 24V.
Also made in China, it has a power consumption of 2.4 Amps, and has a two-year warranty. It is currently available from Amazon for $129.99.
C3 & C7 Common Traits
There are several shared traits between the Bosch C3 and C7:
Both the Bosch C3 and C7 will automatically choose the proper battery voltage, 6/12V, or 12/24V respectively, and they will automatically verify if the battery is fully charged and then enter the maintenance mode. If a battery is discharged, it will enter a charging mode, and once fully charged, the battery will then go into the maintenance mode. As with the smaller C3, the C7 also has a Pulse charging function for heavily discharged batteries. This is an automatic function that cannot be selected manually.
While neither the C3 nor C7 are temperature compensated, the MCU (MicroComputer Unit) monitors the battery electronically to avoid overheating during use. As they state, “automatic monitoring and intelligent charging at all times.” (One personal tip I’d like to pass along here is that while I have never had any maintainer create an overheated condition with a battery, I still put my hand on the side of the battery’s case when charging and maintaining to sense its temperature. If it feels warm to the touch, it is greater than our body temperature. If it feels very warm or hot, it is likely above 125° F, and is too hot!)
Getting back to the shared traits, it would be hard to mistake the positive and negative clips on these Bosch units. As you can see in Photos 1 and 2 the positive lead and clamp are bright red, while the negative, of course, is black. Each metal clip is completely insulated with a plastic exterior, making accidental contact with an unintended object next to impossible. The leads are connected to the clips via terminal connectors and a thread-in post. These terminal connectors have a 1/4” diameter hole, so you wouldn’t be able to use them, for example, to connect to the larger studs typically provided on a deep cycle/marine battery. The leads are 6’ long, fuse-protected and detachable, with their own unique disconnect. Whereas all the other maintainers reviewed use the same style (universal) disconnect, Bosch chose to use its own design, a high-quality connection that’s O-ring sealed. However, it won’t allow interchangeability with “ends” from other maintainers.
These chargers can be laid down flat during use, but there is no rubber coating or cushions to keep them from sliding around or to protect the surface they would be resting on. Both also have a reverse polarity indicator should you accidentally reverse your connections.
Be aware that if incoming AC power is interrupted, these units will not automatically restart. The mode button will return to blue, ready to be manually reactivated. Keep this in mind if you are maintaining a battery and it’s left unattended for long periods of time. Where I live we are subject to frequent power interruptions, making this a very annoying feature. With 15 batteries currently on maintainers in my garage, the only ones requiring a manual restart are those connected to the Bosch C3 or C7.
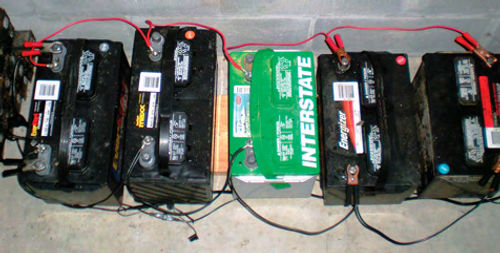
When speaking with a Bosch representative I was advised that either of these units is capable of parallel maintaining more than one battery. The user would, however, need to make their own parallel connections. (See Photo 4 to get some ideas on this.)
Warranty: Both units are covered for two years, with no hidden fees. Defective units are simply replaced with a new one. Return it to the place of purchase with your receipt.
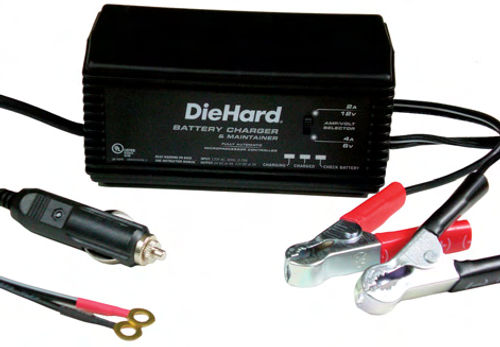
3. Sears DieHard (#71219) charger/ maintainer: This unit was brought to our attention by Auto Restorer subscriber Ken Norman. He stated that he has eight of them in use, and has been well-satisfied with their performance, and only experienced one failure over many years of service. This is also a dual-voltage unit, and its ease of availability through Sears and Kmart certainly makes it worth including here.
Shown in Photo 3, there is a manual switch on the unit that allows the user to choose either a 2 Amp 12V or 4 Amp 6V charging rate, but beyond that it’s fully automatic with what they call “Intelligent Charge Technology, Microprocessor controlled, multi-stage charging for added precision, safety and battery life.”
There are three indicator lights that are plainly marked: Charging/Yellow; Charged/Green; and Check Battery/Red. Once connected to the battery and initially plugged into an electrical outlet, all three indicator lights will flash for a moment, then there’s a pause, followed by starting in the Charge mode. Once the battery has been fully charged, the Yellow light goes out, and the Green “Charged” light becomes lit. This Green light also means the battery is in the maintenance mode. Should power to the battery become interrupted (momentary absence of AC supply, or possibly a clamp becomes loose); it will automatically restart and this cycle will be repeated again. If the Red “Check Battery” light is lit, this indicates a battery that will not charge properly. This could be as simple as a connection problem with the battery, or possibly a bad battery.
The instructions mention that it’s not designed for recharging heavily discharged large batteries and using it to do so can reduce a battery’s capacity. There is nothing said in the instructions about temperature compensation, however they do mention there is a desulfation mode. “If the charger detects a sulfated battery, the charger will switch to a special mode of operation designed for such batteries. If successful, normal charging will resume after the battery is desulfated.”
By comparison, the Xtreme charger/ maintainer by Pulse Tech. Corp. and the BatteryMINDer by VDC Electronics Inc., (both reviewed earlier) are full-time desulfating mode charger/maintainers. In fairness, they are also considerably more expensive.
Also, this maintainer has no rubber feet or cushioned base to keep it from sliding around, so be careful on any painted surface. It included 6’-long detachable leads with three options for connecting.
Battery clips: These are excellent, probably the best of any of the maintainers that have been reviewed.
Terminal connectors:Thesehave 1/4” diameter holes, making them too small to use to connect to a standard deep cycle battery’s studs,so if that’s a requirement, the terminal ends will need to be cut off and replaced with larger ones.
A 12V accessory plug allows the user to connect through a 12V power outlet in a vehicle. You will need to make certain the 12V outlet will function with the ignition off. If your vehicle is old enough that you still call these outlets “cigarette lighters,” it will almost certainly work.
This unit is manufactured in China with a power consumption of 0.79A, and it comes with a 3-year warranty. Most will agree that Sears is very easy to deal with on any reasonable claims. (If your dog chewed off the cord, don’t push it.) Keep your receipt and the exchange is done at the store on the spot. It’s priced at $29.99 but often can be found on sale for less.
Desulfator Experiment Update
For those that remember and are curious about the status of the “zombie battery” that we resurrected with the Batteryminder desulfator (May); it was left idle for over a month and still passed the carbon pile load test.
Since that time I have attempted to save three more batteries. Two were deep cycle/marine batteries that were too discharged (and evidently heavily sulfated) for a conventional battery charger to recharge them. One had a beginning voltage of 5.73V, while the other was 9V. Both were less than a year old.
It took several days of each battery individually being connected to the BatteryMINDer, but they both came back, and after a two-week period of sitting idle, both passed the carbon pile test without any problem.
The most recent attempt was a five year-old tractor battery. Supposedly it was an unused battery that had sat around for years, never being put into service. A visual inspection of the battery’s case would tend to make you think the story was true.I don’t recall with certainty what the beginning voltage was for this battery, but believe it was in the 7V range.
After several days of desulfating, the voltage had come up to what would appear to be normal, but when looking down into the cells with the battery caps off it was evident something wasn’t right. Even before checking the specific gravity with a battery hydrometer it could be seen that five of the six cells were bubbling and active, while the one closest to the positive post looked dead. The hydrometer confirmed the same. Five cells had bounced back to life all with a specific gravity reading of 1:270, while the last cell didn’t even register on the scale. In such a case go no further; there is no need to apply a carbon pile load.
What’s a Carbon Pile?
If you are not familiar with a carbon pile tester, it simulates a load like that of the starter attempting to start the engine to see how a battery will stand up. More specifically it will apply an exact load, measured either in amps or what is called cold cranking amps (CCA rating). This test information is usually listed on the top of the battery. The load is applied for 15 seconds, and the battery must maintain a minimum voltage, which depends on the battery’s temperature. The most common reference is 9.6V @ 70° F.
A carbon pile test is the “Last Word” when it comes to a battery’s condition. Most carbon pile testers have one meter to register the battery voltage, and another to indicate the applied amperage load. If you are preparing to test a battery that has just finished charging, there will be what is called a “surface charge” on the battery. This will give you a false reading during testing. You can either apply a 300 amp load for 15 seconds to remove the surface charge, and then apply the specified load for testing, or if time isn’t an issue, let the battery sit idle for 24 hours and then test it.
Carbon pile testers are available through professional tool distributors like Snap-on and Mac, or inexpensive imported versions can be purchased at stores like Harbor Freight. Better yet, check the automotive swap meets. You can often find a used quality tool made by Sun or Stewart Warner for less than the cost of a new import unit, and it will retain its value.
BatteryMINDer versus the Xtreme
Some readers might be wondering why I continued to use the Battery MINDer for these experiments, and not the Xtreme. Well, there are two reasons. The first is that the Xtreme is a “plug in and you’re ready to go” type unit, which makes it fast and easy to use. Because of that, I keep it connected to my daily driver. The other reason is that the BatteryMINDer gives you the option of a considerably higher amp charging rate, and you can be sure that these deep cycle batteries were in no hurry to come back to a full state of charge.
Parallel Maintenance With the BatteryMINDer
Toward the end of the battery maintainer comparison articles I mentioned the ability of oneBatteryMINDerto parallel maintain up to six batteries. Photo 4 shows five batteries connected in such a manner. There are a total of three deep cycle/marine and two conventional starting batteries.
The charger/maintainer is connected via clips to the battery at the far left. Its temperature sensor is connected to one of the threaded studs on the same battery. These parallel connections were made using 12-gauge red wire for the positive, black wire for the negative, as well as terminal connectors and clips. All the connections were soldered together; this was just my preference. Starting from the left, terminal connectors were used for the first three batteries, and then clips were used for the last two. Prior to connecting them together, each battery was fully charged, and had been in a maintenance mode. Now one unit is taking care of all of them.
Reader Feedback
A number of readers have contacted us regarding their charger/maintainer encounters. If you’ve had favorable or not-so-favorable experiences with a maintainer, why not weigh in as well and let us know.
6-Volt Maintainer Experiences
I have read with interest your series on battery maintainers and am pleased to see this information. So many could be saved so many problems if they just would use the maintainers.
Regarding 6-volt experiences: I have used 6-volt maintainers (Battery Tender, Walmart, Harbor Freight, etc.) for decades on my 356 Porsche and Model A Ford. I use Optima Red Top 6-volt sealed batteries and have essentially been able to forget about battery problems. I hardwire the maintainer plugs (which they all seem to come with) into a convenient location so I do not have to get to the battery. As you know, the battery location in a Model A is inconvenient to say the least.
I also have made up a “jumper” battery out of a Red Top and keep it charged with a maintainer. There are no 6-volt jumper packs that I know of and I find this one convenient when needed for an extra boost or helping others.
I enjoy your publication, keep it up.
John Young San Antonio, Texas
In the July Auto Restorer you asked those of us having experience with 6-volt charger/maintainers to write in. I have had a 6-volt Battery Tender Jr. for several years which is used on a 1939 Buick Special. The car is driven weekly but sometimes sits for a month during the winter. The Battery Tender Jr. has worked perfectly and I would recommend it.
I also have a 12-volt Battery Tender Jr. which has been used on a 1983 Rabbit GTI for about two years.Same experience.
I have no connection with this company other than I have bought two of its products.
James A. Foster Dayton, Ohio
In the July issue reader Mike Calistrat asked for recommendations regarding 6- volt maintainers. I use the Schumacher microprocessor-controlled Automatic 1.5-amp Battery Maintainer/Charger because it maintains a number of different types of batteries, including 6- and 12-volt units.
It’s available through JC Whitney for $39.99 (jcwhitney.com).
Leo E. Wood Mead, Washington
Newer Vehicles Have Special Maintainer Requirements
My name is Chase Clarke and I work for Deltran Corp., manufacturer of Battery Tender products. There was a letter in the July issue from reader Gary Thomas regarding a AAA Battery Tender Waterproof 800 that would not complete its charge cycle and show a green light to indicate full charge.
There is one thing I would like to clear up about the AAA Battery Tender Waterproof 800 and its application. In his response to the letter, Auto Restorer contributor John Armstrong touched on the answer as to why it would not complete the charge in that “there is an electrical drain somewhere in your vehicle causing the problem.” This is almost always going to be the case with newer model Corvettes, as well as BMW, Lexus, and any other high-end luxury automobiles, and it’s not necessarily a problem with his electrical system or a glove box light accidentally left on.
The Battery Tender Waterproof 800 has an output of 800mA. The parasitic load (from the numerous and sophisticated electronic components) on many of these luxury cars is too great to overcome with an 800mA output. This is why, as a manufacturer, Deltran recommends the AAA Battery Tender Plus with an output of 1.25 amps for luxury cars. This unit has enough power to overcome the key-offload of the 2008 Corvette and allow the Battery Tender to complete its charge cycle.
I wanted to write to let you know that there is a good chance that Gary Thomas’ 2008 Corvette has a perfectly good electrical system and a perfectly good AAA Battery Tender Waterproof 800. However, there is a more ideal charger for his application. The AAA Battery Tender Plus (PN# 021-0128-AAA) would be the recommended unit for newer model Corvette owners, and AAA members can purchase it through their local AAA Club or online at www.aaa.com.
Chase Clarke Deltran Corp. Deland, Florida
I noted in the July issue a couple of comments regarding readers with 2008 Corvettes and battery concerns. Since these owners do not drive their Corvettes regularly they are experiencing dead batteries.These Corvettes (C4-5&6) are built with several onboard computers for the many conveniences designed into the electrical system for creature comfort. Because of that, there is a continuous draw on the battery to power the memory of these computers. You can let the car set for 30-45 days and restart the engine but any longer and you will discharge the battery completely requiring its replacement.
The Battery Tender or a similar device should be used to help keep these systems powered and the battery topped off. The reason the charging device will not show a charged system is because of the draw from the onboard systems. It’s still doing its job but the draw is greater than the tender is designed to put out. I use a Battery Tender and a Battery Minder. Both show they are in the charging mode (yellow light) and never get to the fully charged (green light) mode.
I would not recommend disconnecting the battery just to keep it charged. You disable all the internal systems in the electrical system and require a reprogram of all the computers i.e. radio, seats, mirrors, engine monitor systems, etc.
I do not have any battery problems with my C6 or any of my other Corvette batteries. They will set for 1-2 months on occasion before I can drive them again (snow gets too deep for Corvettes in the Rockies). They always start.
Dennis Kazmierzak RMC Ltd. Via email
Gary Thomas may have one or more of several problems, either due to design or added accessories that have constant current draws and could exceed the output of his maintainer. Security systems, entertainment devices and engine electronics need uninterrupted power for memory functions and any electric systems require clean connections without extra resistance caused by dirt or corrosion.
Actually, the first suspect on electrical gremlins should be the vehicle ground system; it is easily forgotten.
When modern electronics were new, a number of owners reported that they had starting problems if the vehicle sat unused for more than a few days.
On older cars, I do always detach the ground cable for long-term storage to be sure no electric leakage in the car drains the battery.
Spare batteries with boosters connected seem to stay good indefinitely, at least for more than 12 years of doing this. Do check the water level occasionally on lead-acid batteries just to be safe. Now that I have boosters on long-term storage cars—with the ground in the car detached for storage, my cars have always started within one to two seconds of turning the key (or pushing the start button).
So I am sold on the use of boosters, of course, keeping in mind that modern cars need electronics powered and cannot have the ground disconnected.
Yes, these things are worthwhile.
Peter Harding Gardnerville, Nevada