
Battery Maintainers, Pt.4
Just When We Think We’ve Tried All the Maintainers Out There… We’ve Found More and a Linking Device, Too.
WHEN WE STARTED to test and review battery maintainers early last year, we didn’t expect the series to run over such a period of time. But as manufacturers have recently introduced several new entries, we’ve continued to gather them up and try them out in the garage.
The Eastwood Company is the most recent to introduce two of their own maintainers, The Battery Sustainer, and Battery Sustainer Plus. Some of the features shared by both of their units are:
A Microprocessor which produces a pulsing current to provide full time battery desulfation while monitoring the battery’s charge acceptance rate to avoid overheating it.
Eastwood describes both units as offering enough power to recharge a discharged battery and then maintain the battery without overcharging it.
Positive and negative clamps are easily identifiable, and though not fuse-protected, the lead ends are detachable. (Note, the Sustainer Plus is equipped with heavier, “copper washed”clamps.) Each also includes lead ends with large 3/8” diameter terminal connectors, and a 12-volt accessory port plug. The power cord and leads are each 6 feet in length.
Both have an eyelet for mounting that would allow each unit to be secured to a wall, but keep the 6’ lead length in mind if you decide to do so. More than likely an extension wire would be required for the leads.
They use their own special disconnect plug, but do offer an optional adapter (#13536) that will allow the user to utilize other manufacturer’s(such as Battery Tender) lead ends and extensions if desired.
The instructions are short and to the point. They include the usual safety warnings,set up & operation, specifications, troubleshooting and Eastwood contact information.
Both will automatically restart should there be a power interruption.
They are covered by a five-year warranty, no hidden fees and are backed by Eastwood’s 100% satisfaction guarantee.
Let’s Look at Each One
In the photo on this page, Eastwood’s Battery Sustainer #13537 is on the left. This is a 12-volt, 2A maintainer. It was recently brought up in reader discussions (September 2011 issue of AR) that some late-model vehicles require a higher amperage maintainer to overcome the “parasitic” draw some of their high-tech systems put on a battery. This 2-amp East- wood unit should easily handle the task.
The Sustainer measures roughly 3” wide, 6” long and 2” thick. The plastic maintainer body has no rubber feet on the bottom, so be careful if you dare to place it on your vehicle’s painted surface.
To use the unit, make the connections to the battery using the lead ends that best fit your application. Next determine the type of battery that’s connected (either Lead Acid or Gel) and position the switch accordingly. These are the only decisions that the user needs to make. Now plug the Sustainer into AC power. It has three colored indicator lights that will all momentarily light when it’s initially plugged in. They are: Charging = Amber (solid) Standby = Amber (flashing) Charged = Green Short = Red (Flashing red means disconnect immediately. It indicates an abnormal condition such as crossed polarity or an internally shorted battery.)
Once the Sustainer has verified the battery is fully charged, it will enter the maintenance mode, and will keep the battery at full charge, without overcharging it.
This is available for 12-volt systems only, and power consumption is rated at .48 amps. It’s made in Taiwan and has a suggested price of $34.99.
On the right in the same photo on this page is the Sustainer Plus #13538. This 12-volt maintainer has a 2A and 10A charging rate, the highest charging rate of any maintainer that we have reviewed. This is a big “Plus” when recharging Deep Cycle/Marine batteries, or if you frequently have the need to revive heavily discharged batteries. The body measures roughly 4” wide, 8” long, and 21⁄2” thick. Look again at the photo and notice the control panel on the Sustainer Plus. At the top is a row of five indicator lights; below that are two red buttons, one for “Battery type” and the other for “Current setting.” Each button has two indicator lights to confirm the settings.
The indicator lights are all marked, but here is a quick rundown:
“Power” indicator; located top left in the row of lights. It will remain solid Green anytime AC power is supplied to the Sustainer Plus.
“Charging” light; which is located just to the right. It will remain Red during the charging process, and will go off when the unit enters the maintenance mode.
Next are two state-of-charge indicators, 60% and 80%. When the battery reaches a specific level of charge, the corresponding light will flash Yellow. Only one indicator will light at a time.
90% & Charged; this is located at the far right in the row of lights. It will flash Green when the state of charge is determined to be 90%, and once fully charged, it will be solid Green. This also indicates the battery is now in the maintenance mode.
To put the Sustainer Plus into service, make your connections to the battery, and then plug it into AC power. It will automatically start in the Lead Acid battery mode, and 2A charge rate. If you need to change the setting to Gel-type battery or the 10A mode, press the appropriate button momentarily. (The Sustainer Plus must be plugged into AC power to change these settings.) It will then reset itself, and proceed to charge and verify the battery again. This will happen anytime you change a setting. You might also notice an unexpected sound when the unit starts. This unit has a cooling fan. Don’t be alarmed, it will take several hours to shut off, even on a fully charged battery.
The Sustainer Plus includes four adhesive foam pads to be positioned on the base of the unit to act as feet. This will reduce the chance of it sliding around or damaging paint. It’s only available for 12- volt systems, and power consumption is rated at 2.55 amps maximum. It’s made in Taiwan and priced at $59.99. To purchase either of these maintainers, visit eastwood.com.
A Maintainer "Multiplier"
A new product has been introduced by PulseTech, makers of the Xtreme maintainer (which we reviewed in the April 2011 issue).
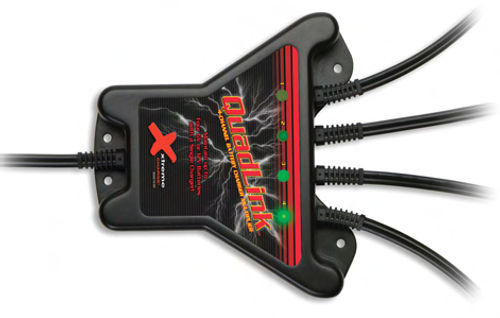
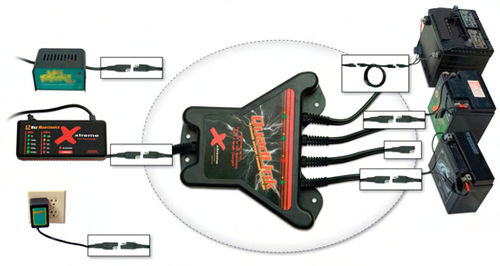
The new PulseTech offering is called the Quadlink, and it’s a four-station battery maintainer multiplier. In other words, it allows one battery maintainer to maintain up to four batteries.
It connects to any maintainer (6V or 12V) with the “universal” disconnect used by most manufacturers. For example, it will fit all the previously reviewed maintainers with detachable leads except for Bosch and Eastwood; however, Eastwood’s (optional) adapter #13536 will allow it to be used.
Here is how it works: The output lead from your maintainer is plugged into the 14” input lead of the multiplier. This is the single lead at the bottom of the unit as seen in the photos on this page. There are four 10” output leads exiting at the top of the Quadlink. Each is numbered 1 through 4 and has an LED indicator light that will blink green to confirm which channel is currently being used. The unit includes four 5’ extension leads, and in most situations they will likely be required to reach each battery as well as distance the Quadlink from the potentially corrosive environment. A 25’ extension lead (Part #100X825) is also available separately and, of course, you can always make your own. Next the connection is made to each battery. The Quadlink includes four fused lead ends with large 3/8” ID terminal ends, but no clamp-on type connectors. You can utilize the one set that came with your maintainer, then purchase additional ones (part #100X827) or make them.
When connecting the Quadlink, it makes no difference which channels are utilized. You can leave one or two open, and it will distribute the charge to the ones that are connected. Once your maintainer is plugged into AC current, the Quadlink will distribute a 10-minute charge to the first battery in line. When that time has expired, it will move to the next connected chan- nel and repeat the same. Thus each battery receives a 10-minute charge interval, and then sits idle while the remaining batteries in line receive their charge, 10 minutes at a time. This cycle repeats continuously. If you have a channel that’s not being used and desire to increase the length of charge to one of the connected batteries, connecting two channels to one battery will double its charge time.
For example, if you have a large deep- cycle battery and two “conventional” car batteries that need to be maintained, connecting output channels #1 and #2 to the deep cycle will yield a 20-minute charge to it, while the two remaining batteries connected to #3 and #4 will receive the normal 10-minute interval.
Working With the Quadlink
My motorhome with two deep-cycle (coach) batteries and one conventional (chassis) battery is a good subject for this test. I chose the Xtreme XC-100 maintainer to connect to the Quadlink. Channels #1, #2, and #3 were used, and #4 remained “open.”
The maintainer performed as it normally would, monitoring the battery’s state of charge and confirming functions with the multitude of flashing lights. Initially each channel started in the 50% or 75% charged mode, and progressed to the maintenance mode. When the time had expired, it moved to the next channel and repeated the same procedure. It made no difference how long the batteries had been connected; the Xtreme maintainer (as well as probably any manufacturer’s maintainer) would go through the “qualifying” stage(s) before entering the maintenance mode.
This is the only difference between using the maintainer alone, versus adding the Quadlink. When using the Xtreme XC-100 maintainer by itself, once the battery reaches the maintenance mode it will remain there, unless it’s disturbed for some reason.
Use It for Maintenance
It’s best to make sure that all the batteries are fully charged before using this device, regardless of which maintainer is being used. Think of the Quadlink as a maintenance tool, not a battery recharging tool. It’s rated at 8A max input. This might make you think that it can’t be used with Eastwood’s Sustainer Plus, not so. That maintainer has a manual switch for 2A and 10A charge rate, so as long as you have the #13536 plug adapter, and the unit is set in the 2A position (which is the default setting anyway), it can be safely used without worry of overloading the Quadlink.
Pulse Tech also states “the four-way switcher is capable of charging the batteries whether they are individually connected or connected as a group in a 24-, 36-, or 48-volt series.” The instruction booklet illustrates how each series of batteries is connected to the Quadlink.
In case anyone is unclear about the terms “Series” and “Parallel” when used in reference with automotive batteries, here is what it refers to:
Series: This is when two or more batteries, usually each of the same volt- age, are connected together to obtain a greater voltage. The negative terminal of one battery is connected to the positive terminal of the other.
Now if a voltmeter is connected to the two remaining unused terminals, you will read the combined voltage of the two batteries. This is how most flashlights work, stacking in one battery after another, with the opposite end of one making contact with the next battery. Each additional battery will increase the total voltage. Batteries connected in series can be found in some motorhomes where two 6V batteries are connected to produce 12V for the coach. Personal mobility carts (scooters) typically use two smaller 12V batteries connected in series to produce 24V to power the drive motor. Golf carts and forklifts may also use batteries in series.
Parallel: This is where two or more batteries of the same voltage are joined together for greater capacity. Like terminals are connected together, positive with positive, and negative with negative. The voltage remains unchanged, but the capacity has been increased. This is also found in some motorhomes. My motorhome has two large deep-cycle 12V batteries joined in parallel. Two batteries will mean the 12V accessories and lighting will continue to work longer before requiring recharging. Back in the early ’80s GM used two batteries joined in parallel to start the diesel engines in at least some of their vehicles.
Quadlink Vs. Your Own Parallel Connections
So how does the Quadlink compare to making your own parallel connections and using one maintainer to maintain multiple batteries as we did back in the September 2011 issue? Is it less work for the consumer but greater expense?
Well, there is more to it than that. Making your own parallel connections works well when the batteries are lined up next to each other, but a bit less practical when trying to maintain several batteries installed in different vehicles. The Quadlink equipped with the optional 25’ extension leads (#100X825) handles that well. There is also the advantage that your maintainer will have full function on one battery at a time, so it monitors each battery individually. For example, if you notice that one of your batteries never reaches the maintenance level of charge, this might be an indication that it’s getting weak and nearing the end of its life. This would allow the battery to easily be identified and removed from the group for further testing. Also, it allows the mixing of large and small batteries without concern that one might be overcharged. When using the Xtreme XC-100 maintainer, no special setting adjustments are required for Gel or Lead acid type batteries, so they can be mixed without worry as well.
The Quadlink comes with a 5-year warranty and ispriced at $99.95. You can contact the company at pulsetech.net. It’s also available at the specialized.net Web site.


