
How -to Battery Maintainers, Pt.1
With a Maintainer, Your Vehicle Will Be Ready When You Are. Here’s a Look At Several Types of Units.
ARE YOU TIRED of wondering if your vehicle’s battery will respond when called upon? If so, then a battery maintainer might be the answer—especially if your vehicle sits idle for any length of time. A maintainer can maximize the life of your battery, and make sure it’s charged and ready when you are. These are also useful for lawn tractors, motor homes, motorcycles or anything else with an idle battery. I even have one on a trailer where a battery is used for interior lighting.
Some maintainers can be mounted “on board” and permanently connected to the battery (if desired), but most are made to connect like a traditional battery charger. Their current draw is minimal, so as long as there is electricity somewhere around, a light duty extension cord will carry the load. There are even solar battery maintainers for when electricity is nowhere to be found.
A Few Things to Keep In Mind
There seems to be an endless selection of battery maintainers to choose from, but in this review I will cover eight different units, six of which I have worked with myself.
I will even perform an experiment to see if a desulfator/maintainer can bring a battery back to life.
For the most part this review reflects how units have performed in daily use over a period of time. All the observations made using volt and amp meters were performed at 80° F, as a means of comparison.
Throughout this article you will read the words: “float-; storage-; standby- or maintenance-mode.” Essentially these all mean the same thing; the battery is at full charge, and this is the finals tage of maintaining the battery without further charging. Different manufacturers accomplish this differently, and I tried to follow their choice of vocabulary.
When it comes to warranty issues, it’s safe to assume that none of the manufacturers will cover items that show signs of tampering or abuse. And unless otherwise noted, all units were manufactured in China.
Most of these maintainers will also recharge a battery, and a few even claim to desulfate. A quick reference chart at the top of page 17 of this article will help you to keep track when comparing different units.
Before you get started, make sure the battery is in good serviceable condition. If you are in doubt, have it checked with a carbon pile “load tester.” In addition, if the vehicle is known to have electrical problems that lead to discharging of the battery, repair that first. Remember that the maintainer is designed for the purpose of keeping a “good” battery at the proper level of charge, thus extending its life. Hooking up a maintainer to a worn-out battery, or to a system with an electrical drain will overwork the unit, and you may end up with a prematurely worn-out maintainer.
Besides, it’s unreasonable to expect any of these products to be able to resurrect a worn-out battery. Well, maybe there might be an exception to that statement, and we’ll look into that later.
With that, here’s a look at the maintainers I’ve worked with.
Chicago Electric 12-volt automatic Battery Float Charger (item #42292). Sold by:Harbor Freight Tools(Photo 1).
This Is a maintainer only, and will not recharge a discharged battery. Simple and inexpensive, it appears to maintain a constant voltage of 13 volts(+-) regardless of temperature. It has one indicator light that confirms correct polarity, and also that power is connected.
An observation here—you must pay attention when connecting the clips, as they have a tendency to pop off because the mating surfaces of the clips are all flat, without any curve. The working components are contained in the large transformer-like plug, which makes it weighty and easily knocked around if connected with an extension cord. The length of its cord is 7.5’ to the end of the clips. I have had two of these in use for over a year without any complaints, even after accidentally dropping one of them several times onto a concrete floor. Power consumption is rated at 14 watts (.12 amps). They have a 90-day warranty and retail for $10, but are often on sale for less. To order, visit harborfreight.com.
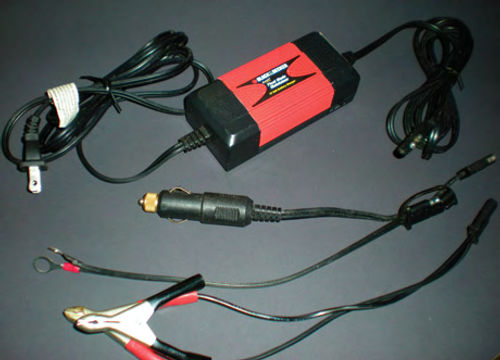
Black & Decker SmartBattery Maintainer (Photo 2). This unit also has been marketed under the name “Vector.” It has two modes. There is a 2-amp setting that will slowly recharge a battery, and 1 amp used for the maintenance mode.
It has three indicator lights: Red = bad connection or possibly reverse polarity; Yellow= correctly connected and unit is “charging;” Green = fully charged battery, and the unit is in the “float” mode.
When used in the maintenance mode, it will activate and start charging the battery once it senses the voltage has dropped to 12.8 volts (+-). It will continue charging until it reaches 14 volts (+-), and return to “float” mode. So the voltage is always slowly ascending or descending as it repeats this cycle over and over.
It comes with three detachable lead options for hook-up. It includes an automotive power outlet adapter, the usual clips, and terminal connectors that can remain permanently connected to the battery. The battery leads are 7.5’ in length. Power consumption is rated at .5 amps. The unit pictured here is approaching five years old, and at the time it came with a five-year warranty. I have two of these units. Three returns have been made for repairs under warranty without a hassle, with the only cost being the shipping to the manufacturer. You can contact the manufacturer at blackanddecker.com, and amazon.com currently offers it with a two-year warranty for$22.
Schumacher Electronic Corp. “on board” 1.5 amps Battery Charger/ Maintainer (SE-112S). It comes with a mounting bracket that allows you to mount it on a fender well or other location close to the battery.
Photo 3 shows it mounted for use in my motorhome. It measures 5 x 31 ⁄2 x 1 1 ⁄2”. One purchased today may have a slightly different appearance.
This unit starts to charge at 13 volts, with an initial rate of .7 amps. (This rate may vary depending on the battery’s state of charge and condition.) The amperage quickly tapers off and when the unit reaches 13.7 volts, it stops charging and goes into a “float” mode. When the voltage once again drops to 13 volts, the cycle will be repeated.
It has two indicator lights: Green on/Red off = AC power is present, and the maintainer is charging the battery.
Green on/Red on = battery is fully charged, and unit isin the “float” mode. Power consumption is rated at .4 amps.
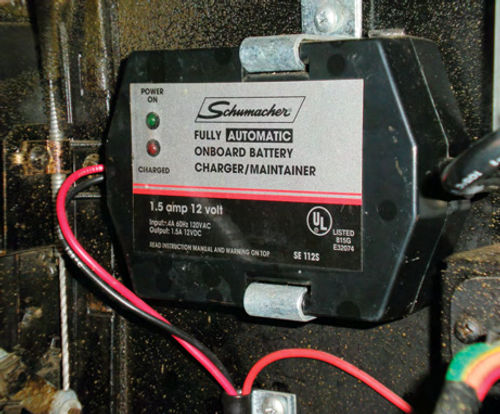
It’s equipped with terminal connectors for a permanent connection, but on this application the battery has side post terminals so they were replaced with clips. The lead wires are short, 2’(+-).It comes with a two-year warranty. I have three of these working all the time, and have never had any problemsunder warranty.
It’s available online at amazon.com for about $26. Contact the manufacturer at: Schumacher Electronic Corp, 801 Business Center Dr., Mount Prospect, IL 60056; visit batterychargers.com.
Battery Tender, a 4-Bank Charger/ Maintainer (Photo 4). A very recognizable name to many people, this particular unit is designed for charging and maintaining up to four batteries simultaneously. It’s listed as having a charge rate of 1.25 amps. The manufacturer states that it uses “a 4-step charging program (initialization, bulk charge, absorption mode, and float mode).”
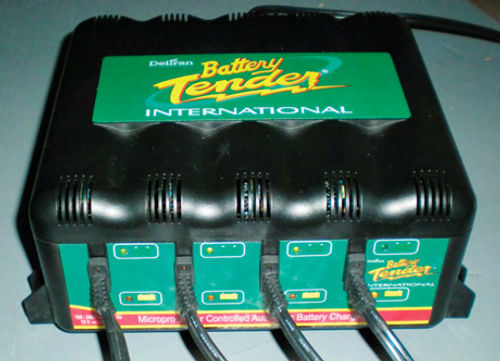
Basically, each bank will apply full power and constant current until a specific value has been reached, then increasing voltage with decreasing current until it determines the battery has reached a fully charged condition. In other words, each bank will fully charge its battery, and then go to a “float” mode maintaining 13 volts(+-)80°F.This may be an oversimplification of the process, but you get the idea.
It includes both clips and terminal connectors that are detachable and fuse protected. It is equipped with (internal) temperature compensation “to ensure optimum charger voltage according to ambient temperature.”
While the unit is actually four separate chargers/maintainers, there are no “on” & “off” switches. You simply plug in the number of leads you need to use (1-4 depending on the number of batteries) then attach the leads to the batteries. Now plug the unit into electricity and that’s it. All four banks will come to life regardless. Leads extend a total of 6’ in length. Optional 25’ extension leads can be purchased separately making it easy to reach batteries in use in separate vehicles. Each bank has both a Green and Amberindicatorlight to confirmitsstatus. I am not going to list all the possible combinations here, but will say if you have one or more banks that are not being used; the amber light will continually flash (for that particular bank)indicating that it’s not connected. The unit is very lightweight; less than three pounds. Power consumption is rated at a maximum 2.0 amps.
Some Unexpected Fees
This Battery Tender unit was purchased from amazon.com in June 2009. After nine months of continuous use, one bank quit working. The unit has a two-year warranty, but upon calling Deltran Corporation (the manufacturer), I was advised there was a $25 “evaluation fee.” I remarked that this was a warranty claim, and was informed that there was an evaluation fee regardless, and this information was posted on their Web site. This is worth noting because I was not expecting to pay for warranty service and you may not either. The instructions that came with the unit listed the warranty period for it (and their other units) and below that it stated to visit their Web site (batterytender.com) for more information. The web site lists free repair for all their units for the first 90 days, and after that you pay. The fees varied depending on the unit. For this 4-bank International there is a $25 fee anytime after 90 days, within the two-year warranty period. After The warranty expires, repairs then cost $25 plus parts. Some models you also have to pay for parts under warranty; I’m not kidding. For example, the 5 and 10 bank shop chargers (which come with a 3-year warranty) were $25 + parts after 90 days. The same fees apply beyond the warranty period, or even without a receipt. Confused? I still am. This warranty information printed out onto a single sheet of paper. It would have seemed simple enough to include this important information with the instructions for anyone not Internet Active. For someone like myself, who has made what seems like a career out of obtaining lifetime warranted parts for my cars, warranty is a big deal. So am I trying to discourage people from purchasing this? Of course not. But I am encouraging prospective buyers to visit their Web site to become aware of the warranty before making a purchase as I did.
At The time of this writing it’s available from amazon.com for $136.
To contact the manufacturer: Deltran Corp., 801 International Speedway Boulevard, Deland, FL 32724; visit batterytender.com, as noted above, or phone .
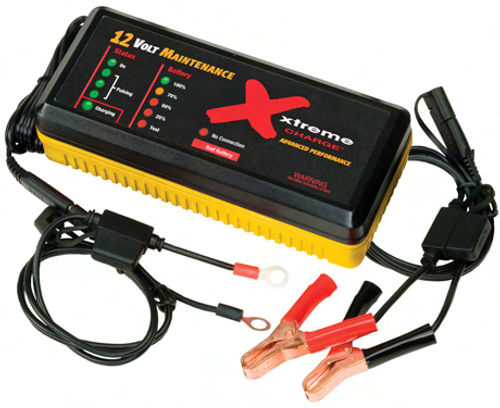
Xtreme Charger/Maintainer model XC100 (Photo 5). This unit claims to charge, maintain and desulfate. According to their Web site, sulfation build up on a battery’s lead plates is the leading cause of battery failure. However, sulfation can be effectively removed by using the Xtreme XC100 maintainer with its “Patented Pulse Technology.”
This is the first charger/maintainer evaluated to this point that claims to desulfate a battery.
It’s labeled for indoor and outdoor use. I noticed when unpacking this charger that the lower half had a rubberized base. This must be part of the “protection” for outdoor use. In addition, this base also keeps the charger from sliding around when placed underneath the hood or on an uneven surface. And if there is no option but to place it on a nicely painted surface, this coating is better than a fender cover, because it won’t slide off as they typically do. Overall, that was good thinking on the part of the manufacturer.
The maintainer includes two sets of fuse-protected leads along with clips and terminal connectors.Connecting issimple: hook up to the battery and then plug into the electricity.
With this unit you don’t need to translate what the flashing lights are trying to tell you, as the maintainer’s 12 indicator lights are all plainly marked.
When the unit is initially connected to my daily driver, all 12 indicator lights come on for just a moment. This must be a confirmation mode to the operator that all the indicator lights are operational. This is followed by both the green “ON” light & red “TEST” light for a few seconds.The “ON” statuslightremainslit from here on as long as the maintainer is connected to incoming power. The “TEST” light will come on momentarily about every 20 seconds as the unit checks the battery’s status. One of the indicator lights marked 25%, 50%, 75% or 100% will remain lit indicating the battery’s state of charge.
While the unit is charging the battery, a green light marked “CHARGING” will remain lit, and three green “PULSING” lights will sequentially flash until it’s determined that the battery has reached a full state of charge. At that time the 100% charge light will be lit, and the battery is now in the maintenance mode. The charging light will go off, but the three green “PULSING” lights will continue to flash.
Being curious I monitored its performance with a voltmeter and induction amperage meter. When connected to my daily driver it went through its normal sequence as mentioned above, then indicated a charge rate of 25%, and quickly increased to 50%, during which the voltage was slowly and continually increasing. I noticed that once the 75% charge light was lit, the voltage increased rapidly, and when it reached a voltage of 14.36, it then began to fluctuate rapidly between 14.18 and 14.36 volts. When I returned a moment later to check on it, the 100% charge light was on. Again checking the voltage, it seemed to be randomly “bouncing” around between 13.54 – 13.60 volts. We’re talking minor variations measured in 1/100ths of a volt. At the same time the induction amperage meter indicated random readings anywhere from zero (too low to register) to .3 amps. I assume this is what they refer to as their patented “Pulse Technology.”
None of the previously mentioned battery maintainers perform like this.
There are two other lights that I haven’t mentioned:
“No Connection”: Need I say more?
“Bad Battery”: This light will come on if a battery it’s connected to has less than 7 volts, or hasn’t reached the 100% charge level within 24 hours. (The manual states 24 hours, while on the base of the charger it states 72 hours.) I’ve encountered Deep Cycle (RV) batteries that have indeed taken longer than 24 hours to return to full charge. Personally, if the battery in question were a Deep Cycle, and a “Bad Battery” indicator light came on, I would unplug the Xtreme charger for a couple of minutes, then reconnect it for a second attempt. With typical car and truck batteries this wouldn’t be an issue.
I hadn’t read anything with regard to battery temperature during operation, so I asked PulseTech about it. Their reply was “What we do is monitor the voltage and amperage acceptance. As amperage acceptance decreases caused by internal resistance or a more full state of charge (which we also know creates heat), the XC100 will back off on its chargerrate to avoid overheating.”This maintainers for charging/maintaining one battery at a time, at 2.5 amps, which they say is actually a 5 amps effective rate.If you have the need to charge multiple batteries at the same time, consider the X2 (100X200); it will separately charge, maintain and desulfate two batteries at the same time. Its suggested price is $190.
PulseTech also offers many other chargers, whicheven include solar options. Visit their Website (pulsetech.net) for a complete listing.
Their XC100’s power consumption is rated at .373 amps(45 watts) maximum.
It’s available on their Web site for$100, with a 30-day satisfaction guarantee. The warranty is for five years, and is very clear: repair or replacement at no charge.
As of this writing it’s available through amazon.com for $76. To contact the manufacturer, call or visit pulsetech.net, as noted above.
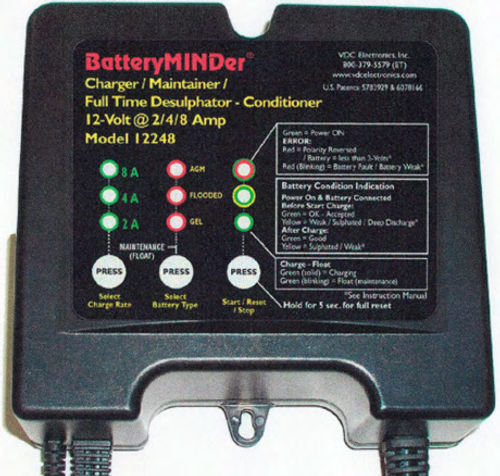
BatteryMINDer Charger/Maintainer, #12248 (Photo 6). This is a charger + maintainer + desulfator. Now don’t be misled by the American flag on the front of the packaging. It’s manufactured in China like most of the others.
Beyond that, the first impression upon opening the blister pack container was that this unit was a bit more involved than the previously mentioned maintainers.
For one thing, there are three function control buttons, where with most units you simply connect to the battery and plug into electricity. This would seem to be confirmed by its 36-page (all in English) instruction booklet that can also be viewed online at their Web site. I found the instructions to appear redundant and confusing at times. Consider Statements like the one on page 16 where they describe using either clips or ring terminal connectors for connecting to the battery, followed by “however never to use both assemblies at the same time for any reason whatsoever.” You can only plug in one at a time anyway. My wife made the comment that maybe they didn’t want you to modify the connector and wire both in together. That would seem to go without saying, but if that’s the case, why not just say “make no modifications to any connections, or other part of the charger.” That being said, you will want to take a few moments to study the instructions before jumping into things. Don’t be intimidated by them.
The instructions call for the use of a battery hydrometer or a digital voltmeter to verify your battery’s condition. These tools are relative inexpensive, and if you don’t own them, you should have them in your tool collection anyway.
The charger has an adjustable charge rate of 2, 4 or 8 amps which you choose, and the connecting leads are 8’ in length. They include fuse-protected terminal connectors and clips.
Here’s how to hook it up and put the unit to use:
1. Connect the charger to the battery’s positive and negative terminals as you normally would, but don’t plug it into AC power yet.
2. Press The“ Select Battery Type” button to choose the type of battery you’re preparing to charge. I imagine most of us have the Lead/Acid type, which is considered “Flooded.”
3. Press The “Select Charge Rate” button and choose between 2-, 4- or 8-amp charge rates. Most passenger car batteries can safely be charged at the 8-amp setting without fear of overheating. If you are not sure, and just want to play it safe, start with the 2-amp setting; it will just take a little longer to reach a full charge.
4. Now plug the charger into AC power.
5. Press the “Stop/Restart” button to activate the unit. The “Charge-Float” LED light (closest to the button) will light Green, indicating that it’s charging.
6. A Blinking Green LED indicates the battery is fully charged, and has switched to the float mode.
There are other LED light combinations and colors. These are plainly marked on the front of the unit as well as described in the instructions, so I will leave it at that.
What would happen if you simply connected the unit to the battery and plugged it into the AC (asI initially did) before making the settings? Nothing bad, thankfully; the unit will automatically start in the Gel 2-amp charger mode. This is because (they say) Gel batteries require a slightly lower charging rate than others, so it’s always a safe start for any battery type.
Next, we’ll look at a few more battery maintainers, consider the BatteryMINDer claims regarding the unit’s abilities to dissolve sulfates, do a desulfating experiment and discuss some conclusions from our work with these units.


