OVERHAULING THE LAST OF THE QUADRAJET CARBURETORS

There Can Be a Lot More to a Complex Carb Project Than a Rebuild Kit. Let’s Follow Along as This Unit Is Really Refurbished.
Some of the topics to be covered in this series are:
• Basic carburetor rebuilding.
• How to make the special gauging tools that are seemingly unavailable.
• Inspecting and repairing the throttle body by reaming and fitting it with shaft bushings.
• Gaining access to the sealed mixture needles.
• Drilling out the old leaking fuel bowl plugs and replacing them with threaded plugs and special sealer.
• Parts used…sources and cost.
• Replacing and adjusting the secondary air valve spring.
• Replacing the secondary metering rod cam.
• Making the final bench adjustments using an angle gauge or drill bits.
• Testing the choke thermostat and idle stop solenoid with a Power Probe or equivalent.
• On-vehicle adjustments using a dwell meter, tachometer and scan tool.
The Last of a Well-Known Breed
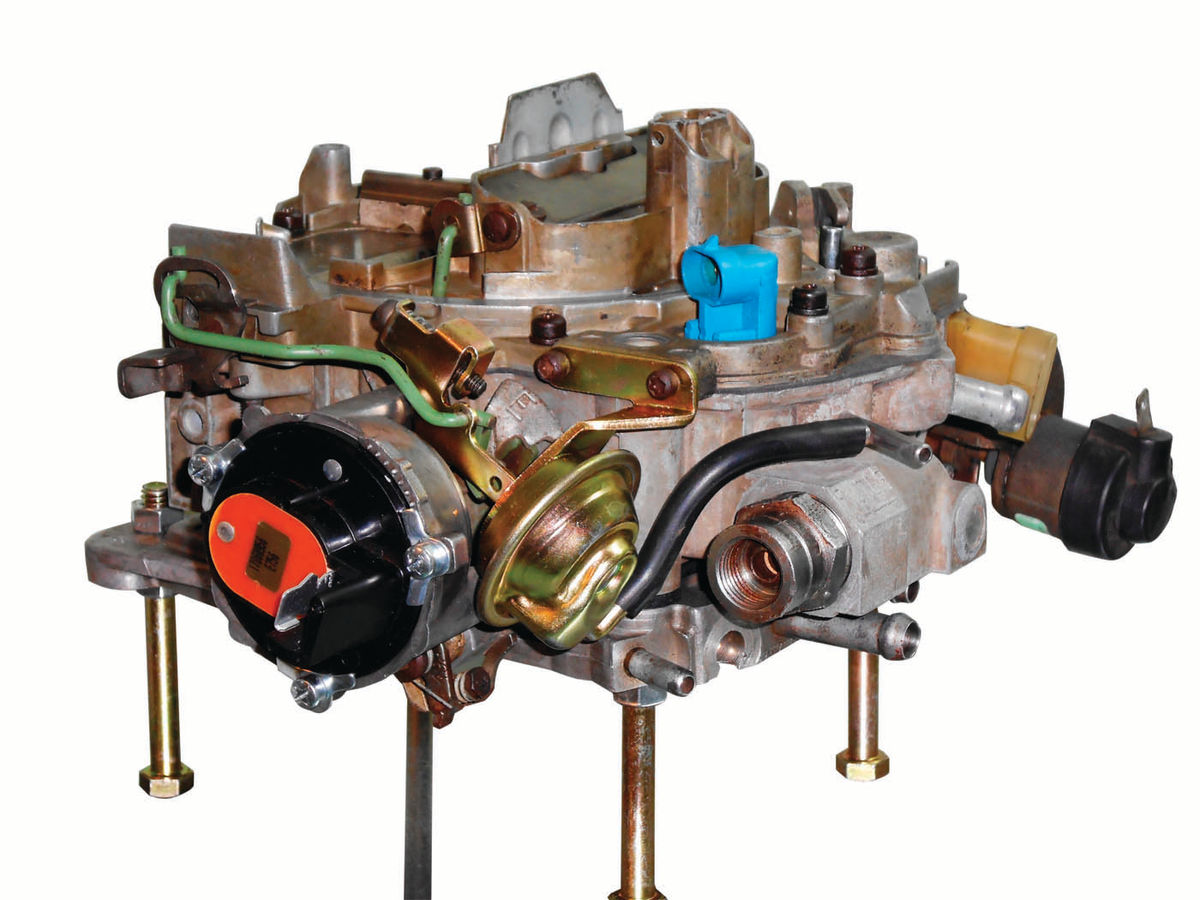
GM used the Quadrajet 4-barrel carburetor for a quarter century. The last versions that were used in the 1980s were designated as GM’s Computer Command Control carburetors. That’s it in the article’s introduction photo.
This model with electric choke is designated as the E4ME. In a sense this was a temporary bridge between carburetion, throttle body injection, and port injection. These differ from the early Quadrajet with the addition of a throttle position sensor, a metering control solenoid and information fed to and from the vehicle’s computer, sometimes referred to as a feedback carburetor.
Access to the idle mixture screws has been plugged to eliminate the chance of anyone tampering with the adjustment in the field. Servicing this version also requires some special tools and gauges.
It’s easy to spot, and the basic appearance hasn’t changed much over the years.
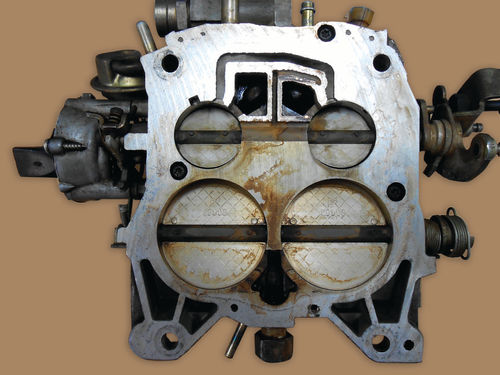
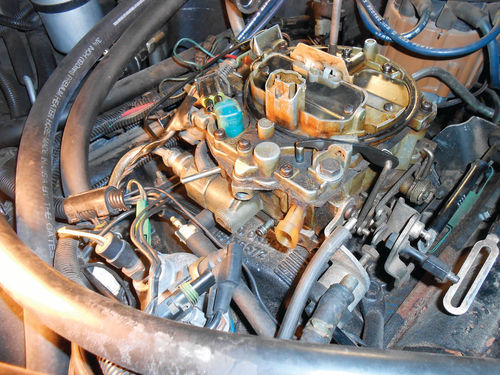
Even just a quick glance at the bottom of the throttle body (Photo 1) immediately identifies the Quadrajet from other carburetors, with its small primary and huge secondary bores.
Our 1986 Chevrolet Caprice had been having drivability issues and the overall performance had gradually degraded over time. The most disturbing problem was hot engine restart. If the vehicle had been driven until it was warm and then parked, the manifold would load up with fuel while the vehicle was sitting. When attempting to restart after a brief stop, say, at the grocery store, the engine was then flooded. So when restarting the accelerator pedal had to be held firmly to the floor and a puff of black smoke could occasionally be seen exiting the tailpipe when it started. This was caused by leakage from the carburetor fuel bowl plugs. The problem had been addressed several years earlier by applying a special gas-resistant epoxy made by JB Weld over the plugs. That repair held up for a little while, but gradually the hot engine restart problem reoccurred.
The carburetor is well overdue for a complete overhaul. So with the service manual and several other references in hand, it’s time for that overhaul. A more thorough repair of those fuel bowl plugs will be performed using a repair procedure and kit from Cliff’s High Performance in Mount Vernon, Ohio (cliffshighperformance.com).
Rebuild It Yourself or Purchase a Rebuilt?
If you’re thinking why not just purchase a rebuilt carburetor and be done with it, two reasons come to mind.
First, there is the satisfaction of doing the repair yourself. That’s the reason for this magazine and the same reason most of us are involved in the old car hobby anyway.
Second, in my experience the purchasing of rebuilt carburetors has had a poor success rate and reputation. A while back my wife and I were in the midst of a very major home renovation with more projects than time to complete them. So in an effort to make the best use of my time, I discounted both the reasons just mentioned, and decided to purchase a rebuilt carburetor for the Caprice. I did this despite my feelings about it, but was wise enough to keep my original carburetor and paid the core charge.
The first one I purchased drove excellent, with performance I had forgotten the Caprice was capable of. However, it wouldn’t idle properly. It was as though it had a mind of its own, with the RPM raising and lowering when it felt like it. This had not been a problem with the original carburetor, and after checking to make certain there were no loose vacuum hoses or leaks, it was exchanged for a second replacement.
Drivability or idle could never be judged on the second rebuilt carburetor due to fuel leaking from the fuel filter nut. These carburetors come complete and ready to go. In other words, the fuel filter nut had not been removed. The first thought was that either the nylon washer that fit onto the end of the nut was missing or out of place. This nylon gasket seals inside near the base of the filter nut threads so it’s not visible like on the earlier Quadrajet. Once it was removed all looked OK, so it was reassembled and properly tightened.
Unfortunately, it was still leaking. Removing the nut again and looking closely at the threads inside the bowl indicated that there had been a thread repair using a HeliCoil or something very similar. It appeared that the threads were not installed deep enough, not leaving the needed recess to seat the nylon gasket on the filter nut.
Ultimately, the original carburetor was reinstalled. Even in its present condition it outperformed the two rebuilt carburetors. While certainly not as peppy as the first rebuilt, it idled fine and there was no external fuel leakage. After explaining the problem to the rebuilder he asked what I wanted to do. At this point any confidence of obtaining a reliable rebuilt from them was lost; so it was returned for a refund without any hassle. At least that part of the process was painless. The amount of time wasted during this event could well have been enough to rebuild the carburetor myself. Why these things happen is anyone’s guess. Naturally not all experiences will be so frustrating and no doubt there are certainly many excellent, reputable rebuilders out there. If you should choose to go that route, do your homework first and compare the competition. Make sure to find out how they handle problems should you encounter some yourself, and know who is giving the answers to your questions. It’s also an excellent idea to retain your original carburetor whenever possible. Some rebuilders will even allow you to return your original core for a refund months after your purchase.
Ask first to know all your options and get the exact details. In making your decision whether to rebuild or purchase a rebuilt, consider that there are certainly more procedures to follow, and adjustments to make than with the older, “non computer” Quadrajet. So if you have previously rebuilt early models keep in mind this will take more time. Even more important is that there are some special tools that you will need to purchase, and a couple of gauging tools that are impossible to find. It’s as though they have vanished from planet earth. I had mistakenly thought that one of these special gauge tools was included with the OTC adjusting tool, and didn’t discover it wasn’t until later. Don’t be discouraged by this, just be aware of it. Making these two special gauging tools is covered in depth in this article, so you can decide if making your own tools is appealing to you, and you will know exactly what these hard to find items are. This gives you the option to do your own search for the needed gauges, or make them prior to committing to the rebuild project.
Do It Yourselfers, Follow Me
It’s never a bad idea to have a backup re-buildable core, and the fact that I had plans to shop a large auto swap meet in South Georgia was perfect timing.
So, while looking for my usual list of “absolutely must-have things,” why not be on the lookout for another rebuildable carburetor to fit the Caprice. For that matter, a second TBI unit for my ‘87 El Camino wouldn’t be a bad idea either. There is a model identification number stamped on the linkage side of the fuel bowl just above the secondary throttle shaft; #17086004 in this case. Here it is in Photo 2 and this is the original carburetor that came on the Caprice. The stamping below it “3085 JMY” gives you production information. The first three digits “308” represent the day of the year it was made. So that should place it in the first week of November. The “5” is the year of production; thus 1985 in this case, and “JMY” is a code indicating the assembly plant where it originated.

From the information in the factory manual, #17086003 should also work. While you could do some research to check interchangeability to find other model numbers that work, there is no question if either of these numbers are found they are correct.
Within the first 10 minutes at the meet I located the correct TBI for the El Camino. About three hours later I found a match for the Caprice carburetor as well. Wow, what luck, and both at very reasonable prices.
The TBI is very open and airy, so you can see most everything, and just assume the injectors will be replaced. The carburetor is entirely different. There could be a $100 bill stuck inside the bowl wrapped around the float and you would never know it. Unfortunately, that wasn’t what was found. While the outward appearance looked pretty normal, once back home the inside of the bowl gave up its secret. This poor carburetor must have been stored outside in the weather, and moisture found its way inside. There was the beginning of rust on the few internal metal parts, and a rusty residue everywhere inside the bowl, so it was likely holding water like a swimming pool at some point. This was an unwanted surprise. It’s questionable whether the bowl can be cleaned sufficiently to be rebuilt, and certainly the internal electrical components didn’t tolerate the water well. A good educated guess would say that at the very least there will be added time and expense to rebuilding this core.
I decided to go forward and tear down both of these carburetors at the same time and see what’s encountered along the way. If it turns out that the swap meet carburetor can’t be saved then it will be set aside and used for parts. The primary focus will be on the Caprice carburetor, and there’s no need for redundancy, so unless there are different issues encountered with the swap meet carburetor, it will remain in the background. From here on each will be referred to as the Caprice or swap meet carburetor.
Carburetor Removal
Removing the carburetor holds little mystery. First, though it’s not necessary, it’s a good safety practice to disconnect the negative battery cable. In the unlikely event someone tried to start the vehicle while the carburetor is off, you avoid the danger and mess of fuel being pumped all over the place.
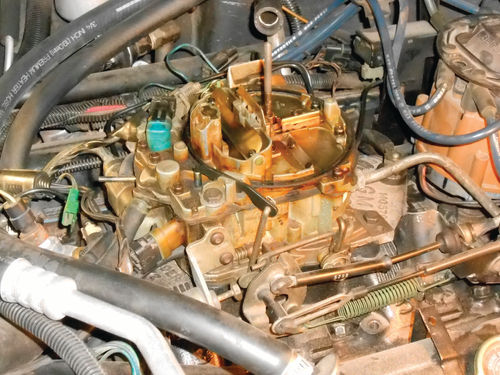
As long as the carburetor remains bolted to the manifold, there is no specific order in which things must be disconnected or removed, so let’s start by getting the linkage out of the way. There are four connections to the throttle shaft of which three of them are easy to see in Photo 3. The accelerator cable (top) and the cruise control cable (below) are retained with identical clips. These can be removed by simply grabbing with your thumb and index finger, or a pair of needle nose pliers. Pliers are usually the best choice to ensure these clips don’t take flight somewhere. The return spring below is stretched slightly until it’s free of the throttle shaft. Hiding behind that is the transmission detent cable. While holding the throttle shaft to keep it from rotating; pull forward on its plastic connector on the cable’s end. It will pop off the shaft and all the linkage is free.
There are numerous vacuum hoses, steel lines, and electrical connectors that need to be documented and then removed. In actuality each electrical plug will only fit the proper corresponding connector; the same can’t be said with regards to vacuum hoses. Even if you feel confident you will remember where everything goes, take a couple of minutes and make a reference diagram or tag each vacuum hose and corresponding connection port. This is time well-spent, and doesn’t require much effort. It also can save you from wasting time later trying to locate the correct vacuum diagram for the vehicle.
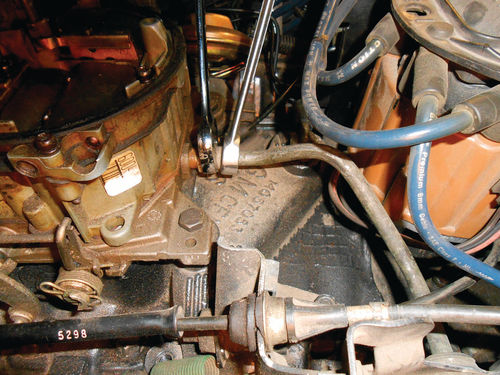
Removal of the fuel line as well as the steel line to the vacuum brake booster (shown here in Photo 4) require the use of a 5 ⁄8" flare nut wrench and the proper backup wrench to keep the fitting (or fuel filter nut) from rotating. Once these lines are removed, loosen the fuel nut and that rear fitting. It’s much easier to do this while the carburetor is still bolted to the manifold versus flopping around on the workbench.
In Photo 5 notice front and center that the large bowl vent tube pulled out when removing the hose. It stayed with the hose which is lying on top of the idle stop solenoid in the photo. It also appears that the bore it came out of may have a small crack at the top. A closer inspection confirmed that it’s just a casting mark, and there is nothing to be concerned about. The vacuum hose located in the bowl just below the Throttle position sensor (TPS) connector also pulled out its steel tube. That’s the vertical plastic connector on the left front of the fuel bowl. These will both be reinstalled later with a sealant as we near the end of the project. The Idle Stop Solenoid (ISS) mounted on the left forward side is the last item to be removed by using a T-25 Torx driver. All that remains is to remove the four retaining bolts and lift off the carburetor.
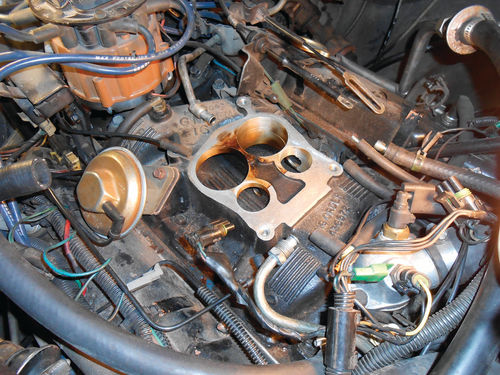
That staining seen on the intake manifold in Photo 6 was caused by gasoline, and is the additional confirming evidence of a long-term fuel leakage from those bowl plugs.
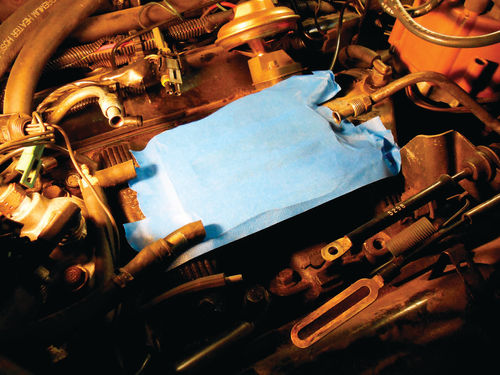
Wasting no time, Photo 7 shows the intake manifold is sealed off with masking tape to avoid anything accidentally falling in. Additionally, the fuel line will also be plugged. A short length of 3 ⁄8" fuel hose plugged with a snug-fitting bolt and secured with a hose clamp is then slipped over the fuel line flare and clamped.
Some Necessary Tools
The tool list will be ever-increasing, but here are some of the basics to get the project started.
First, make certain to have at least a pair of safety glasses…preferably goggles or a full face shield for when spraying carburetor cleaner. The spray always seems to bounce off the carburetor in an unexpected direction; that’s usually at your face and eyes.
Also, rubber gloves to protect your skin. I use the thin disposable style and double or triple them on each hand. A source of compressed air is almost considered essential to blow out passages in the carburetor and more.
The instruction sheet that’s included with your carburetor kit may be helpful, but is insufficient. Make sure to have a factory service manual that covers your particular carburetor in detail.
Cameras are great for reference images during disassembly. It’s a good practice to take photos of anything you feel uncertain about and even things you think you fully comprehend. Many times the reference photos that are the most valuable are just the “garden variety” that seem likely to be of little value. So with almost limitless space on an SD (secure digital) card, don’t hesitate to take those photos you don’t think you’ll need.

A set of Torx drivers or a magnetic tip set and driver like those in Photo 8 will remove most of the screws. Remember the usual hand tools like needle nose pliers; straight blade and Phillips screwdrivers; a small cleaning brush and a scraper tool to remove stuck gaskets.
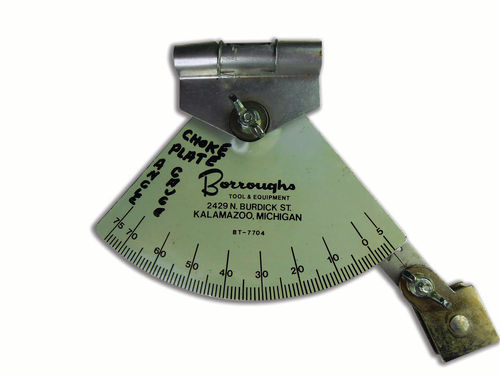
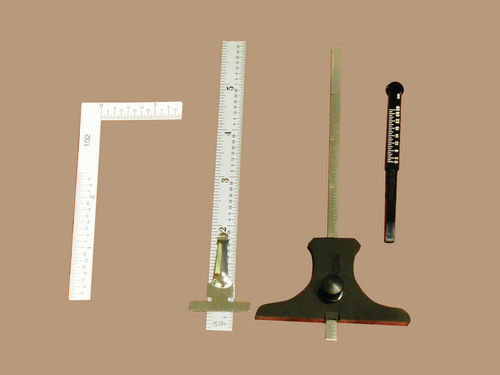
An electric or battery-powered drill and a set of fractional and evennumber drill bits will be very helpful. Additionally, drill bits in these sets are useful as gauges for checking certain other measurements if you don’t possess an angle gauge. Photo 9 shows an angle gauge that is attached via a magnet to the choke valve for measuring several carburetor adjustments. This was an inexpensive flea market purchase that has been sitting in the toolbox waiting to be put to use. You will need a measuring scale calibrated in 1/32” or smaller for measuring the float height. While they do make specific gauges for measuring float height, they can be difficult to locate or are part of a much larger gauge set. Photo 10 shows several options. To the far left is a simple paper gauge that was included in the Standard Hygrade carburetor kit. Let’s just say it’s better than attempting to use your old wooden grade school ruler. Next is a precision scale with a sliding horizontal clip. The clip is useful, but too short. You can improvise with something and accurately lengthen the ears of this clip making it reach across to the edges of the bowl’s fuel chamber. This would then work fairly well. Next is a Starrett #237 depth gauge. This is an excellent choice for measuring the float height. It easily bridges across the fuel chamber and is calibrated in 1/32” on one side, and 1 ⁄64" on the other. The knurled nut can be adjusted to apply only light friction, allowing the scale to be slid and adjusted as needed or locked firmly in place. If you like this idea, but don’t want to spend the money for a USAmade Starrett, there also are less-costly versions made by General and others that will certainly get the job done. The last gauge was purchased through Summit Racing for $9…Standard Motor Products, Hygrade #CT10. While listed as a float gauge; it will have two functions. It’s a handy gauge used for measuring the metering control (MC) solenoid plunger travel, also referred to as the rich mixture adjustment. This gauge is actually referenced in the shop manual for this purpose. Also it’s used for measuring float height on the late-model Quadrajet, however it’s used while the carburetor is installed on the vehicle and the engine running. It’s inserted through and read against the edge of the air horn opening. This will be used at the end of the overhaul to confirm the float height.
A hacksaw or Dremel tool with cutoff wheel and a small cone-shaped stone are needed to access the idle-mixture screws, and then a small diameter punch, center punch and hammer to break out the hardened plugs.
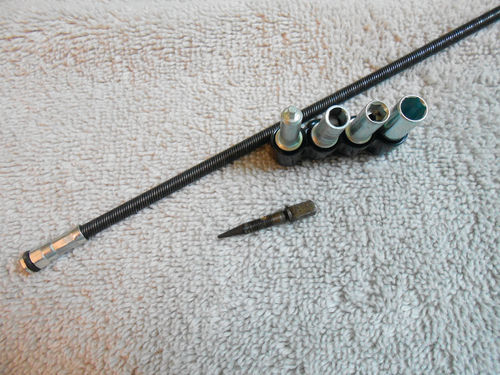
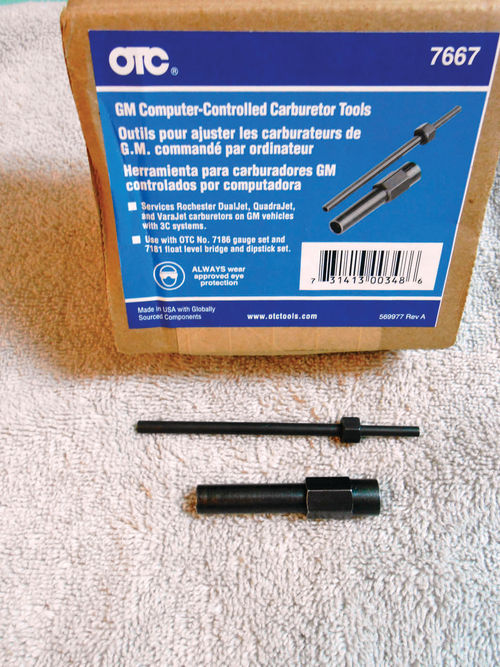
Once those plugs are out of the way a special carburetor adjusting tool will be needed. Pictured in Photo 11 is the Lisle 55250 carburetor adjusting tool with flexible shaft and interchangeable tips. Just below the tips in the photo is one of the idle mixture screws. It’s flat on opposite sides and rounded on the remaining, earning it the name “Double D” mixture screw. These interchangeable tips can also be fit onto a ¼" Allen wrench, or onto a ¼" Allen socket and then used with a ratchet, or solid shaft nut driver. The tool’s total length is 15.5" while the flexible shaft is 11.5". It’s a little long when using it with the carburetor on the bench, but not when back under the hood. There are also solid shaft driver sets available, often s old in a set of six, each with a specific-style tip. Photo 12 shows OTC #7667, “GM Computer Controlled Carburetor Tools.” The long end of the top tool in the photo is for making both the rich and lean mixture adjustments for the (MC) solenoid. The short end will handle making the (TPS) adjustment (if needed). Below, the deep end of this tool fits over and removes those tall jets, while the stubby side can be used to rotate the rich mixture stop screw from the underside of the air horn. This tool package costs in the $60 to $70 range.
Both the Lisle and OTC tools were purchased through Amazon, but are also available from suppliers like www.tooltopia.com and local auto parts stores. Several precision tools were used, 0-1", 1"-2", and a depth micrometer, but you have options. A hand vacuum pump, multi-meter and dwell meter will be required, however many of the tasks can be handled by a scan tool.
Gathering Carburetor Parts
I had purchased a Standard Hygrade carburetor repair kit from Rock Auto a while back and purchased an additional overhaul kit from the aforementioned www.cliffshighperformance.com, 20579 Berry Road, Mt. Vernon, Ohio 43050.

Photo 13 shows their “Bottom Plug Kit” for dealing with those leaking fuel bowl plugs. This includes the threaded plugs, instructions, special marine epoxy, and was $21.95 at the time of this writing. Cliff’s carburetor overhaul kit additionally included the float, fuel filter and spring, cam and spring for secondary air doors, and the complete accelerator pump assembly. A look at Photo 14 compares the differences in the accelerator pumps. To the left is the original one removed from the carburetor, center is the complete replacement from Cliff’s High Performance; and right is the Standard Hygrade pump cup, garter spring and assembly guide. As you can see, with this you will need to reuse the pump body and springs. This would be a problem with the swap meet carburetor because those components were rusty. You wouldn’t want to reuse them unless there was absolutely no other option. It’s only fair to mention that the instruction sheet included with the Standard kit has larger, easier-to-read print with the adjustment illustrations and exploded view. Regardless, a factory service manual will be required. The cost of Cliff’s carburetor kit was $49.95 at the time of this writing.
These are the parts we know will be needed, but there will certainly be more as we progress. When that time comes, we will list the additional parts as well as the suppliers that have been used.
To make working on the carburetor easier, there is a special stand available to support and elevate it. While not quite as nice, you can accomplish the same using (4) 3" x 5/16" bolts and (6) nuts. If you’re like me, you probably have them laying around in your hardware department.


Thread a nut down to the end of the threads on each bolt, and then insert two bolts up through the mounting holes in the rear of the throttle body, and secure them with the two remaining nuts. The remaining two bolts are inserted up into the front two mounting holes. Photo 15 shows the results. Notice it gives you adequate clearance so the throttle shaft flange, as well as all other protrusions will clear your working surface. This works fine as long as the carburetor isn’t lifted up, as the front bolts are free to fall out. An easy solution for that is to wrap the threads with masking tape as seen in Photo 16. It’s easiest to wrap too much, and remove tape until the bolt fits snugly into the front holes of the throttle body. Avoid getting any carburetor cleaner spray on these tape-wrapped bolts or they will become a gooey mess for sure. So do any cleaning before taping or remove these bolts.
Having access to a bucket of carburetor cleaner to submerge the parts would be ideal, but it’s highly unlikely most of us would have that. Whether that potent cleaning stuff we used to have in a 5-gallon bucket 40 years ago is still available I don’t know. And if it is, it would certainly be impractical to purchase unless you’re going into business. The next best thing is carburetor or throttle body spray cleaner. This, with the aid of a small brush, will do a good job. Also, a can of Acetone purchased from the local hardware store can be helpful in cleaning. It’s ideal for soaking small parts.
Remember when using carburetor cleaner or Acetone that rubber components can’t tolerate it. That includes things like the vacuum break (sometimes referred to as a choke pulloff) which has a rubber diaphragm.
Reference Materials
Chevrolet: 1987 Caprice, Monte Carlo, El Camino Service Manual
GM product service training:
1981-88 GM Computer Command Control Carburetors (carburetor fundamentals and adjustments).
Mitchell: 1986 Engine Performance Service & Repair
Motor: Auto Engine Tune-Up and Electronics Manual 1985-89, professional edition
Delco: April 1981 E4ME–E4MC Service Manual
Snap-on Tools publications


