How -to Restoring Car Seats, Pt. 1
Years of Use Can Leave Seats Compressed and Uncomfortable. So, We’ll Start By Firming Things With New Foam.
I KNOW MY years are starting to add up, and they say that you shrink in height as you get older, but my line of sight dropping closer and closer to the steering wheel had less to do with my age, and more to do with aging seat foam.
It was easy to procrastinate rather than do anything. After all, I am a nuts and bolts guy, much more at home underneath the vehicle than working on the interior. Peeling back the fabric covering the seats was a bit different and intimidating. In addition, the driver’s side power seat had quit working, and the reclining passenger seat would, on occasion, slip a notch from its upright position if someone large was occupying it.
Well, no more procrastinating, it was time to do some seat maintenance.
The vehicle in this project is my 1986 Chevrolet Caprice Classic. This four door sedan is in nice original condition, but certainly not a highly sought after vehicle. Therefore, aftermarket seat covers would likely be impossible or very difficult to locate, and a trip to the local upholstery shop isn’t in the budget right now. Besides, the original fabric actually looks pretty good; the problem is comfort. Lack of any resistance in the seat cushions and sitting lower and lower in the seats are the major complaints.
Let’s Do Some Seat Maintenance
The focus of this article is to restore some life to the front seats with minimal expense and time while reusing the existing covers. The car’s rear seat has seldom had passengers so it still feels very good and won’t need to be a part of this project.
Initially I had wondered if springs in the front seats had started to sag, thus creating these problems. Boy, was I surprised to discover that there were none.
But I’m starting to get ahead of myself, so let’s begin this project by removing the seats from the vehicle. Be sure to make note of the sequence when any trim and parts are removed, you will be glad of it later.
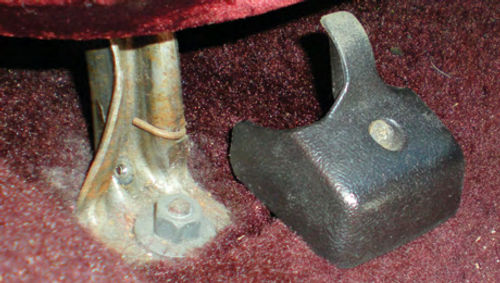
In this car, each front seat is mounted to six studs protruding up from the floor. A 13mm wrench is required for removing the retaining nuts, but first a plastic cover must be removed that conceals each nut. The cover shown in Photo 1 is used on the front of the passenger seat and is held in place with one screw. The driver’s side looks a bit different, and slides in place.
Due to the power seat controls not working correctly, access to two of the nuts located in the rear was a bit of a challenge. An open end wrench was the only option in this case, but once the nuts were loosened sufficiently, I was able to spin them off the rest of the way with my fingertip. All applications will vary somewhat, but in most cases removal isn’t too difficult.
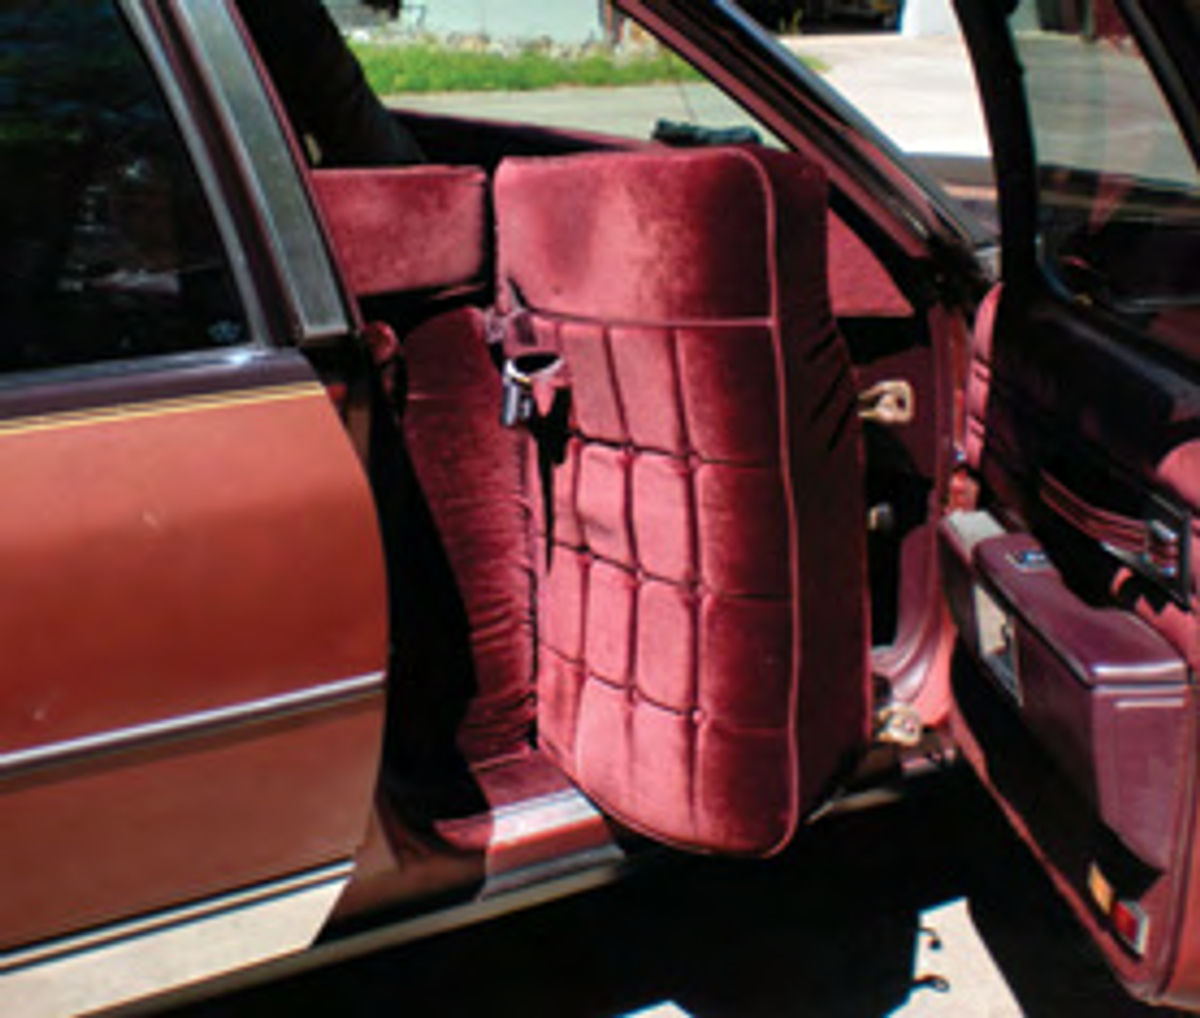
The passenger’s seat requires the disconnecting of the seatbelt where it’s mounted to the driveshaft tunnel. A Torx T47 socket is used in this application. This is not an issue on the driver’s seat, as the belt comes up along the side of it. Once free, the only thing remaining was to disconnect the electrical connector to the driver’s power seat motor. For removal, the seat was turned sideways and taken out through the driver’s door. (The “introduction” photo at the beginning of this article shows the larger passenger’s seat rotated and ready to exit the vehicle.) It never hurts to have an assistant handy for seat removal, and had this been a one-piece bench seat, it definitely would have required two people for the task. Be careful during removal, because the studs protruding upward from the floor could easily snag and tear the upholstery, or injure you if you forget they are there.
A tip: While the seats are out, take advantage of all that space. If there is any wiring or under dash work you’ve been putting off, now is a great time to do it. In my case, that will include looking at wiring for the cruise control and the trunk release. So plan your down time accordingly to allow for any unrelated work.
Once the seats are out of the vehicle, a comfortable work area will be needed. I chose an old six-foot banquet/lunchroom table and put a section of carpet over it.
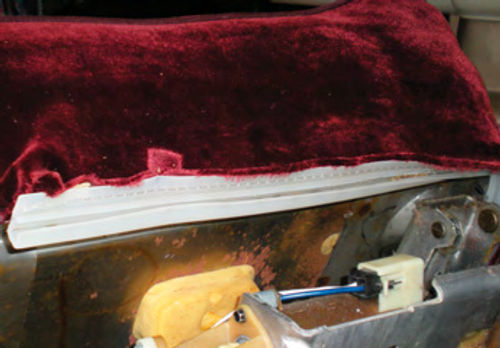
With the seat on the table and tilted back, Photo 2 shows the hog rings that secure the cover to the right side and about halfway around the front of the driver’s seat frame. As shown in Photo 3, the remainder of the seat cover has a plastic “lip” stitched to it that tucks up and under, retaining it to the seat frame. Seats In your vehicle may not have this plastic lip, but will almost certainly utilize hog rings. A check of the local auto parts stores for new hog rings was unsuccessful.National Parts Depot, which has several locations throughout the country (Florida location or npdlink.com), carries them as well as the special pliers needed to work with the rings. An Internet search would certainly locate additional suppliers.

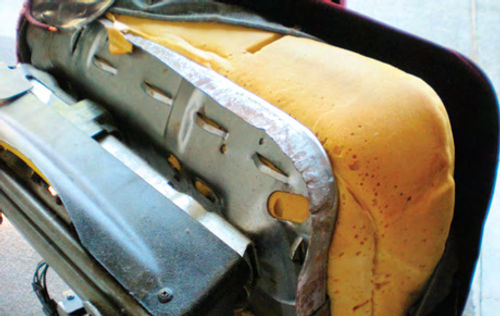
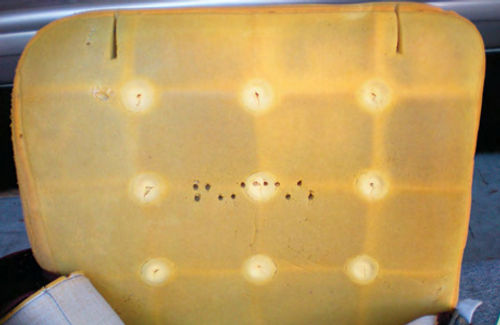
Removing the lower aluminum trim section located on the left/entry side of the seat was the first task. This is secured with two screws. Before starting to remove any of the hog rings, the locations where they pierced the fabric were marked with a Sharpie. This will prevent the making of any additional holes when it comes time to replace them, and will maintain the seat cover’s orientation with regard to the seat frame. The hog rings can be removed by cutting them with side cutters, or spreading them open. Photo 4 shows the seat cover pulled back, exposing the cushion. This photo also gives an excellent view of where the hog rings connect to the frame. A close inspection will show six connecting points; four horizontal and two vertical, and each is about one inch long. This is where I also discovered that this type of seat doesn’t use any sort of springs. Look again at Photo 4 and notice that the foam seat cushion simply fits into the steel shell of the seat frame. That’s it, nothing else. I must be the last person on the planet to have discovered this.

In Photo 5 the seat cover is pulled almost all the way back and this is as far as it will need to go. The original seat cushion is still holding its form and not falling apart,so a new layer of foam will be added over it, but how thick should it be? It must be thick enough to restore the comfort level, but not so thick that it won’t fit under the seat cover. The easiest way to approach this is to go to a store and check out the selection. This way you can judge how much the foam will compress, as well as how much additional comfort it will yield. Before going shopping, make certain you have all the required measurements, and when you make your foam selection, purchase a littlebit extra.
Jo-Ann Fabric and Craft Stores (joann.com), and certainly other fabric stores as well carry foams of various thicknesses, and even of varying density. High density foam is the best choice. I found it available in 24” widths; in lengths up to 8’, and sold by the foot. It was easy to determine that the 2” thickness would fit without any difficulty, but would it be enough of an improvement? A 3” thickness, on the other hand, was quite comfortable and compressed enough that I felt certain the seat cover could be pulled down over it. This is a judgment call that you will have to make with regard to your own seats. Remember, once it’s cut, you own it, and this stuff isn’t exactly cheap. The price I found for 3”-thick high-density was about $43 per yard. An important thing to keep in mind is that they often run sales that will yield considerable savings. When this purchase was made they had a 50% off sale. A good plan is to check with your local store before getting started, see what they have, and ask about sales. The clerks should know how much the sale price usually is, and how frequently the products go on sale. You also can put yourself on “Jo-Ann’s” email list, to be advised of upcoming sales.

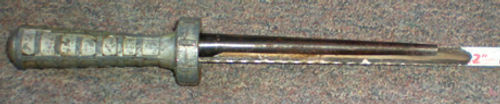
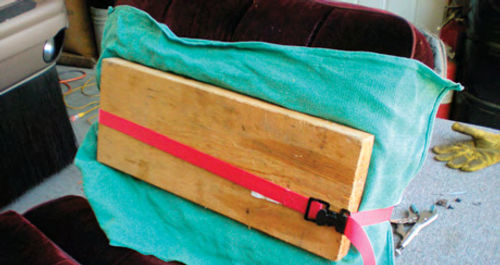
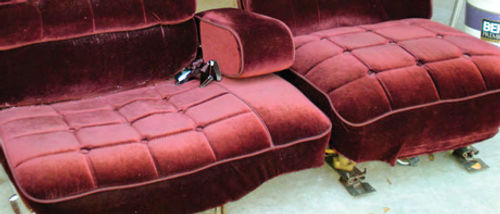
In Photo 6, the newly cut section of foam is placed over the top of the original cushion. The hacksaw tool shown in Photo 7 was used to cut the foam as well as round the corners. Cutting the foam a little on the “fuller” side and trimming it down if it won’t fit properly is the best approach. The first cut that’s shown in photo 6 was slightly narrower than the original cushion, and once the seat cover was pulled over it, there was a “pucker” dead center on the left side of the cushion. Two inches was added to that width, and it filled out perfectly. Due to the thick new foam, assistance was needed to pull down the seat cover enough to connect with the seat frame. In Photo 8, a block of wood and a strap are used to do just that. Once all the hog rings were reconnected, this portion of the project was complete. Photo 9 shows the driver’s seat placed next to the passenger seat for comparison. You may notice the fabric appears a bit loose on the seat portion of the passenger side. That shows how much the original foam cushion had compressed.
So, what was learned to this point?
1. My seat covers were not in as great a condition as I had thought. The upper portions looked very good; however, weak spots and some small tears were discovered around the area of the seat frame. While all was still solid enough, a closer inspection of the upholstery around the seat frame area would be done next time.
2. No springs were used in the front seats.
3. Cutting the new foam slightly larger, not smaller, is the way to go.
4. The foam fit more easily than I had anticipated.
Now, the Passenger Seat
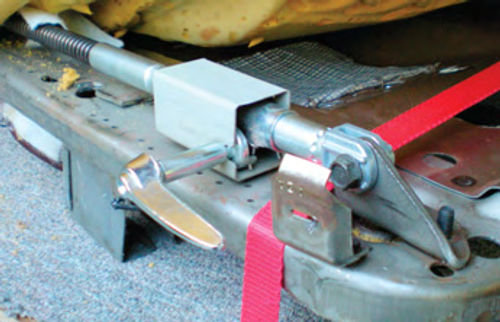
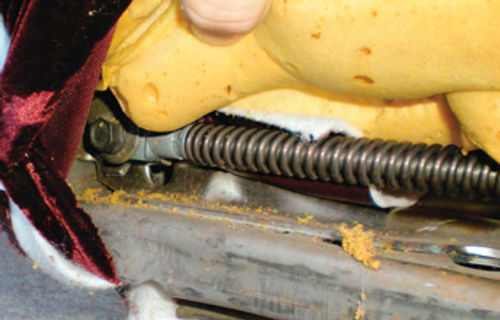
The procedure is basically the same when it comes to adding new foam to the passenger seat’s cushion, but before getting into that, I wanted to investigate why the manual reclining mechanism would sometimes slip from the full upright position. One screw retained the hand lever to the recline mechanism, and two more retained the lower chrome trim section to the base of the seat. Just as was done with the driver’s side, the hog rings were removed and the fabric pulled back. In Photo 10 the foam cushion is lifted exposing the mechanism. (If you are wondering about the red strap going over the metal seat frame, it was used to secure the seat to the table, allowing it to remain upright and not tip backward.) Photo 11 shows the rear attaching point, connecting it to the seat back. Removing two horizontal bolts frees the mechanism from the seat. Take the front bolt out first, let the seat lay back and then remove the rear bolt. Photo 12 gives a clear view of the mechanism once it’s removed. I didn’t know what it was going to look like, but didn’t expect anything like this. It’s basically a completely sealed mechanism. It quickly became apparent that this was not intended to be a serviceable unit, and attempting to do so wouldn’t be easy. The first of several calls was placed to the local Chevrolet dealer only to find that it was a discontinued item, and their search to locate one remaining on a shelf some where was unsuccessful. After giving it some thought, the decision was made to lubricate and reinstall it.
Since it functioned properly 99% of the time, it was not a big issue. Had it been a bigger problem, I would likely have gotten adventurous and cut the tube open to investigate the inner workings. It could certainly be welded back together. And if all else had failed, it could be secured in the full upright position.
So, let’s get back to adding seat foam.
Other than the incorporation of the armrest, the passenger and driver side seats are essentially the same.
However, the armrest did create some complications. I paused before cutting the new section of foam, wondering if it should cover the portion of the seat cushion the armrest lays upon. Extending new foam up to but not over this area would result in fabric bridging over from the new foam, and sloping off to the height of the old seat cushion. In other words, there would be an area of the fabric that would have air under it. That “tent effect” certainly wasn’t desirable.
Had there been a good means of smoothly tapering the foam so that it wouldn’t be as thick below the armrest, I would have done it. Attempting this with the hacksaw tool would most certainly have resulted in unevenness that could have shown through the fabric.
Consequently, the entire seat cushion was fitted with an additional section of foam. The new foam was cut and deeply angled where the armrest hinges, tapering the foam down toward the hinge. This was done to encourage the armrest to be less springy when in use. The seat’s fabric was then pulled back over the cushion and secured with hog rings as was done with the driver’s seat, completing the seat bolstering project.
Next, we’ll troubleshoot the driver’s power seat mechanism.


