
Pursuing an Engine Coolant Leak, Pt. 1
Finding One Leak On an Engine Doesn’t Always Solve the Problem. Sometimes You Must Then Do Some Automotive Detective Work.
WHEN IT COMES to fluid leaks, the smaller leaks won’t show up until the more major ones have been repaired. With automobiles, this is especially true regarding the cooling system.
For those readers who are just tuning in to my cooling system woes, the vehicle being worked on is a 1986 Chevrolet Caprice with a 305 Chevy engine. In the past year the cooling system was flushed and the thermostat replaced; just some routine cooling system maintenance. It was then discovered that the top hose neck on the radiator was leaking. The radiator was covered under a lifetime warranty through NAPA, so it was replaced, but the smell of antifreeze remained. There were no obvious puddles or drips on the ground to indicate where to look, so the next step was to pressurize the cooling system. Unfortunately, the radiator pressure tester I have owned forever and used many times over the years on this vehicle would no longer fit. My new plastic radiator was different in more ways than one would have imagined. The inside diameter of the fill neck was slightly smaller than the OEM radiator. Photo 1 points to the portion of the pressure tester that’s designed to fit down into the neck, but no longer could. The rubber seal portion fit without any problem. Totally frustrated and not wanting to modify the pressure tester, or spend additional money on some special adapter, the wait-and-see approach was used.

Ultimately the smell of antifreeze was coming from a small puddle on top of the intake manifold next to the thermostat housing. As it turned out, the threads in the aluminum manifold were stripped, and a HeliCoil repair was made (see AR July 2013). This eliminated the leakage from the thermostat housing, but occasionally there still was the familiar smell of antifreeze, and a diminished coolant level in the overflow reservoir.
Eventually a noisy water pump bearing exposed a leaking water pump. Replacing the pump had some complications along the way, but ultimately the lifetime-warranted pump as well as hoses and belts were all replaced.
That should have been the end of the cooling system leaks, and for a while it appeared to be the case.
Occasionally, though, the smell of antifreeze would again catch my attention. One time the Caprice was parked in a shopping center parking lot when I noticed the smell. But there was a vehicle parked alongside that looked somewhat neglected, so the antifreeze odor was dismissed as their problem, not mine.
Eventually, however, the smell was noticed in the one-car garage attached to our home, so there was no denying it was my problem! Looking under the vehicle a drop of green antifreeze was noticed on the bottom of the oil filter, but all else appeared dry. The first thought was that the engine’s rear casting plugs (also referred to as freeze, expansion or core plugs) might be leaking. The vehicle has been in the family since it was new, and none of the plugs had ever been replaced. With over 280,000 miles and 28 years on the engine, it certainly wouldn’t be surprising to find them starting to rust through.
If the rear plugs were indeed the culprit, all the casting plugs would be replaced. If one is leaking, then the others can’t be too far behind. There are two on each side; two up front and the two located at the rear of the engine. These rear plugs are the most difficult to access, requiring removal of the transmission, but I’m getting ahead of myself.
Start By Locating the Leak
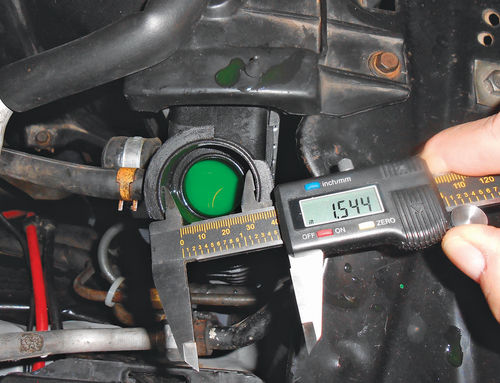
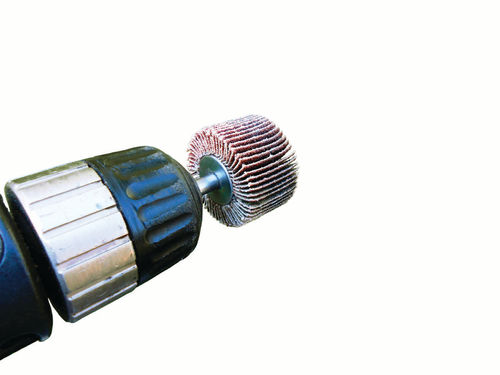
The first thing is to find out for sure where the antifreeze is exiting the engine, and pressurizing the cooling system is always a good place to start. The decision had been made not to modify the tester, nor spend more money on an adapter, so that left one option, make the radiator neck fit the pressure tester. Using a 6" electronic caliper, the measurements of both the shoulder inside the pressure tester’s cap (pointed to in Photo 1), and the inside diameter of the radiator fill neck seen in Photo 2 were taken. There was a difference of around .015" to .020". Not wanting to butcher up the fill neck I looked at my options and decided to use a 11 ⁄2" diameter 80-grit flap wheel mounted on a 1 ⁄4" mandrel chucked in an electric drill. That’s it in Photo 3. Essentially this consists of a bunch of individual pieces of 80-grit sandpaper mounted to a wheel. Slightly smaller than the neck diameter, it should work.

To keep any of the plastic dust or abrasive from getting into the radiator, a 11 ⁄2" diameter circle was cut out of a piece of thin cardboard and placed down into the neck, blocking entry to the core.
The small overflow hose to the reservoir was then disconnected and the sanding began. Wanting to remove only enough material from the neck to allow the tester cap to fit called for first doing a little work, and then checking the progress. It took about five separate attempts before the measurement was adequate. While holding the cardboard securely in place with my fingertip, compressed air was used to blow the dust out of the fill neck and tiny overflow neck as well. That did it, the tester now fits beautifully, and there are no telltale signs of what has been done. And should anyone be noting the measurement shown on the caliper in Photo 2, this image was taken after the neck was enlarged. Removing such a minimal amount had no negative effect, and for that matter, it was very possibly not manufactured to specification anyway. Will it pass the visual inspection when it comes time to warranty the radiator again, you bet!
Radiator Pressure Testing Equipment
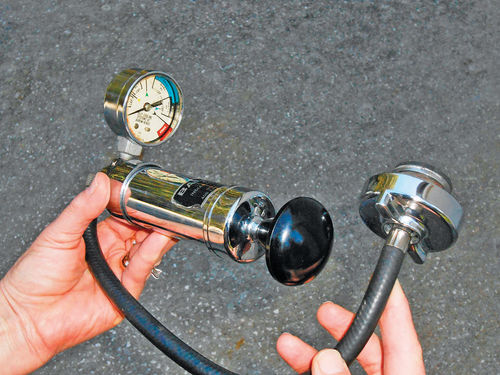
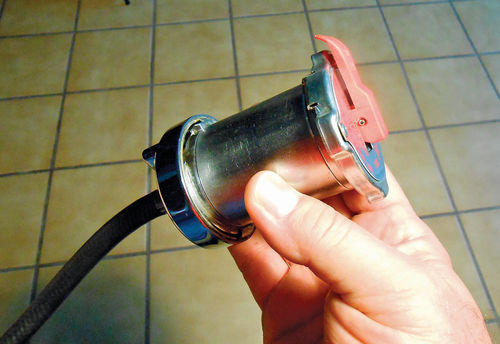
The radiator has a 16-pound pressure cap, so the system was pressurized to the same. If you are unfamiliar with radiator pressure testers, take a look at Photo 4. This unit is made by Stant and happens to be marketed by NAPA under the Balkamp name. Stant has been around for ages, and is a supplier of thermostats and radiator caps. This is basically a hand pump with a gauge, and an adapter to fit the radiator. Back in the late 1970s the adapter on the end of the hose fit most everything except imports. That’s not the case today as Stant offers a bunch of different adapters to fit most domestic and import applications, including the pressure cap. Photo 5 is a look at the pressure gauge. It’s pretty self-explanatory. When testing radiator caps the needle should reach into, but not beyond the colored zone for that cap and maintain pressure. The yellow range is for 4-lb. caps; green for 7 lb.; blue for 13-14 lb., and black for 15-17 lb. To pressure test a cap, wet the rubber seals of both the cap and the pump adapter, and then attach both to the cap adapter as seen in Photo 6. Now build pressure with the hand pump and observe the gauge. That’s all there is to it.

When the tester is connected to the radiator, pressure is built with the pump until the needle reaches the correct color arrow for that system. Each of these arrows is slightly beyond the cap testing zone, as you can see in Photo 5. The tool is simple to use, easy to maintain, and repair parts (should you need them) are readily available from the manufacturer. Before connecting to the radiator, make sure the coolant level is full. If there is a lot of air space in the top of the radiator, it will compress and you will be pumping forever. If the system has an overflow tank like the Caprice, it should be full to the top anyway. Should you have a system like my ’66 Malibu, the normal level for a cool radiator is about an inch down from the top of the neck. This allows for coolant expansion within the tank of the radiator. In that event, after the testing has been completed, a syringe can be used to remove excess coolant that’s been added to the radiator.
Before crawling under the vehicle, all the potential leak areas were again inspected up top. This included the thermostat housing, intake manifold gaskets, all hose connections, and the heater control valve. Everything was dry. The heater core would naturally be another area of concern, but it was replaced not too many years ago, and the passenger side carpet was dry, so it passed inspection.
After rolling under the vehicle, the bottom end of the radiator was dry, and there was no leakage from the weep hole in the water pump. You wouldn’t expect a new pump to leak, but it has happened to me. Initially no dripping was spotted, but the left side of the torque converter cover, behind the oil filter, had a few dots of antifreeze on it. Removing this inspection cover would allow the use of a flashlight to see if there was leakage coming from the direction of either casting plug. Four 10mm bolts secure the cover, so it’s quick and easy to remove. When the inspection cover was taken down, it was dry on the inside, and so was the rear of the engine. That’s not what I had expected to find, and for the moment that seemed like good news.
Is That Some Dampness I See?
Looking at the left side of the block, there was a drop of antifreeze on the block drain plug, and the immediate area was damp. Maybe the plug hadn’t been tightened enough the last time it was removed? A 9 ⁄16" socket on a 3 ⁄8" drive ratchet was used to see if the drain plug was loose. It wasn’t, so I decided to dry the area off, and then check the pressure tester to see if it needed a couple of additional pumps.
Back under the vehicle again the focus was now clearly on the drain plug. The plug was doing just fine, but antifreeze could be seen weeping through the cast iron in an area about 1" long extending rearward toward the oil filter.
Yes…a crack in the block! In Photo 7 a mark was made with a silver Sharpie to show about where the crack is located.
Searching for the Cause and Solutions
So what caused this to happen, and what are the options? The vehicle started its life in Connecticut, and it’s been in Florida approaching 18 years. There have never been any issues of the block freezing, and the drain plug has been removed numerous times over the years for routine service without any problem until now. Possibly there was just a weak spot in the casting and it was aggravated by tightening (but not over-tightening) the drain plug.
In short, I probably will never know for sure.
One option would be to replace the engine with a new one from Chevrolet, or a used one of known condition. A new engine from Chevrolet sounds like fun, but unfortunately the funds aren’t available for going that route. However, a good candidate is available for a transplant. It’s probably two or three years older than the Caprice, and was purchased new from a Chevrolet dealership I had worked for back then. It was used for a while, and then removed before letting go of the vehicle. It has managed to stay with me (although that’s not hard), and the crankshaft is rotated probably twice a year. Certainly all the rubber seals would be replaced, and putting on a new timing chain and gear would be a good thought. There would be some time and expense before even starting the transplant procedure. It is certainly a solution, but also a lot of work for what at least appears to be a small leak. Having the crack TIG welded might be a consideration, but I can’t forget what the welding instructor at the local technical school said with regard to welding cast iron. It wasn’t very favorable. There are block sealers out there, but I haven’t tried doing that since the teenager years. The parts clerk at NAPA said he had heard good things about a liquid block sealer produced by Blue Devil. If my attempt fails, that will certainly be considered.

Maybe a New Cap… Or a Brass Plug…
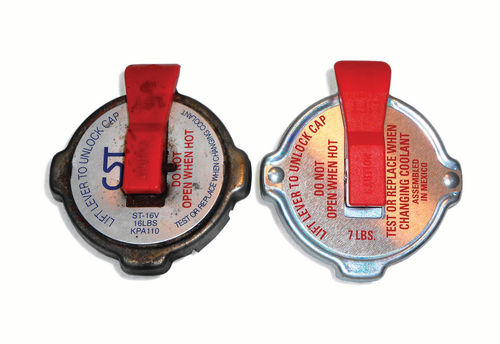
Engine operating temperature and cooling system pressure certainly play a part in whether, or how much the block leaks. The pressure can be reduced by switching to a lower pressure radiator cap. Instead of the 16-pound cap, a new 7-pound version was purchased as you can see in Photo 8.
There is, of course, a trade-off. With a 7-pound pressure cap the boiling temperature will be less than it was with the 16-pound cap. I normally run close to a 70% mixture of antifreeze, so that in itself helps to maintain a higher boiling point. As for protection from freezing temperatures, this is a Florida vehicle, and neither it nor its passengers travel north during the cold months.
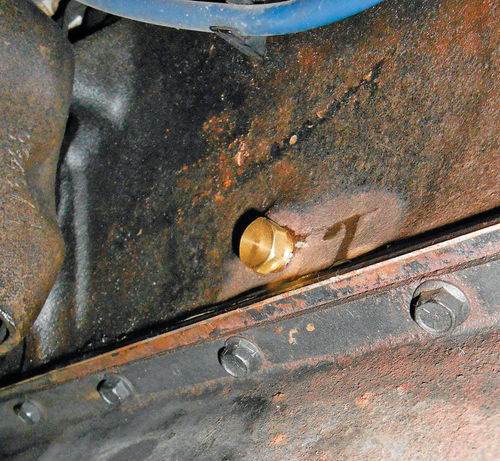
There isn’t much that can be done about the engine operating temperature, at least not without some major changes. It never has overheated, but it will naturally run hotter during the summer months. There is no reason to change the thermostat. Changing to a lower temperature thermostat will only assure that the engine will not run any cooler than the stamped rating on the thermostat. So a thermostat marked 180° or 195° will maintain that as the minimum temperature, but it has no control over the maximum temperature. The drain plug itself has a 1 ⁄4" pipe thread. Pipe threads have a slight taper, so as the plug tightens, the larger portion of the threads are squeezing into the threaded hole, creating pressure on the threads. Instead of using the original steel drain plug, a softer brass plug with an application of Permatex on the threads will be used in its place. Photo 9 shows the new brass plug compared to an old steel one. The thought is that this may seal with a little less pressure on the threads. The greater the pressure, the more likely it would be to spread this crack open; at least it sounds logical. The total cash expenditure to this point is $7.40 for the cap and brass plug.
The New Plug’s In… Let’s Start the Engine
There isn’t much to describe about switching out the steel plug for the brass one. With the engine cool and the radiator cap on, the steel plug was loosened to the point that it could be removed the remainder of the way by hand. Permatex #2 hard-setting sealer was applied to the threads of the new brass plug. With a drain pan in position, I was able to extend my left arm from the front, fitting it through the narrow space in between the oil pan and frame cross member. The index finger on my left hand was in position to temporarily plug the hole, stopping the flow of antifreeze, once the drain plug was removed. The old steel plug was removed and the new brass plug threaded in with my right hand. The total loss of antifreeze was probably not more than half a cup, although it felt like more, and my right arm received a good rinsing in the process. The plug was then gently tightened. That’s it. With such a minimal amount of coolant loss, it wasn’t an issue at this moment so the cap remained on the system.
Next was to start the engine and get it up to operating temperature and watch the area. The immediate area was cleaned with denatured alcohol to make it easier to check for leakage.
Unfortunately, this attempt was a failure as can be seen in Photo 10. The next logical choice is to try a chemical sealer and hope for better luck. There are several manufacturers of block sealers to choose from, but the parts clerk at NAPA seemed pretty strong on this Blue Devil product, and that name just seemed to keep popping up.
Advance Auto Parts had the Blue Devil cooling system sealer in stock (Photo 11), priced at $63.99 for the 32-ounce size. They offer a smaller 16-ounce size as well that’s marketed for four- and six-cylinder engines. The bottle indicates that for 4.5-gallon (18 quart) cooling systems you should use the large 32-ounce size. The Caprice is listed as having a 17.4-quart capacity and this didn’t seem like the time to be cutting corners, so the large bottle was purchased.
If you are wondering why I had initially spoken with the folks at NAPA and then made the purchase at Advance, there were several reasons. I never like putting all my eggs in one basket and Advance had it in stock whereas NAPA did not. And I had a coupon.

Next, we’ll give the Blue Devil treatment a try.


