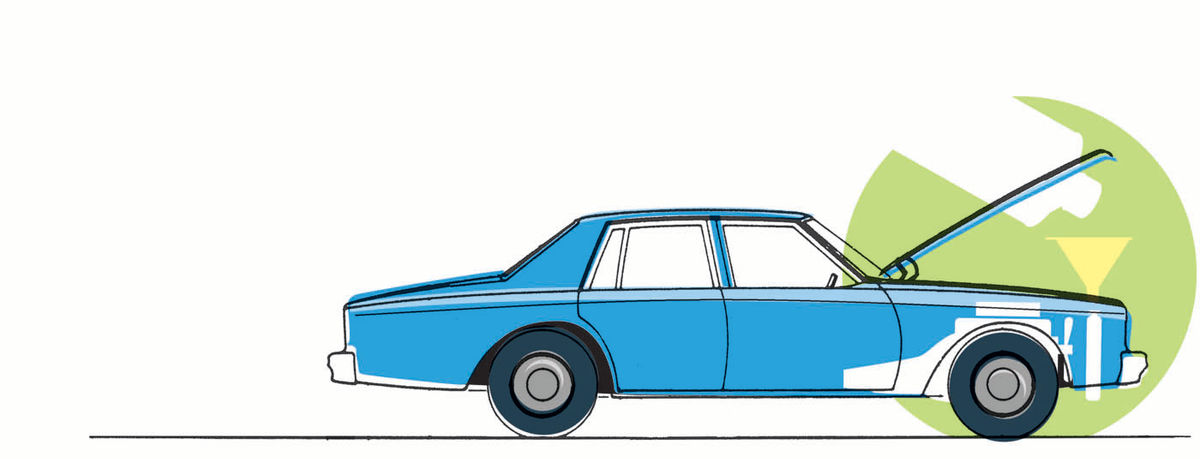
Pursuing an Engine Coolant Leak, Pt. 2
We’re Going to Try a Sealer Product to Stop That Leak. But There’s More to It Than Just Emptying a Bottle Into the Radiator.
Editor’s note: In the April issue we started the search for a coolant leak in a 305 cid Chevy V-8. We found a small crack in the engine block next to the drain plug but weren’t able to stop the leaking. So we purchased some Blue Devil sealer and decided to give that a try. There were 11 images with the first installment, so we’ll start here with Photo 12.
AT $64 PLUS tax you wouldn’t say Blue Devil cooling system sealer is inexpensive. However, if it works and stands up for several years then indeed it is inexpensive when you think of the alternatives. Personally I wouldn’t use any chemical repairs to deal with head gasket issues, leaking casting plugs or similar conditions, preferring to deal directly with the problem. A crack in the block, though, only leaves you with a few options.
This product is also available directly from the manufacturer on amazon. com for $60, and a variety of reviews are there as well. There were a lot of success stories, but keep looking and you will also find those who hated the product, claiming that it caused engine damage. However, after reading some of the negative reviews I couldn’t help but think that their engine damage had already occurred and was most likely not the result of using this product. Furthermore, it’s unrealistic to expect that it can work successfully in every situation, but if some folks are having success with it sealing leaking head gaskets, then there should be a good chance of it sealing the small crack in my engine block.
And if the pistons go flying out of the engine after using it, AR readers will be the first to know.

Studying the Instructions
The 305 Chevrolet engine in question could use a set of valve stem seals, but it runs great and is otherwise healthy, so there was no hesitation with regard to using the additive. Besides, the bottle states “permanent repair, guaranteed,” so I entertained the idea of pursuing a refund or credit toward other products if it failed to stop the leak.
In the reviews one person mentioned following the instructions to the letter. This made me wonder exactly what the instructions were. As it turns out, there is nothing too special. The information is available on their website gobluedevil. com as well as on the container.
Essentially the cooling system must be clean and “free flowing” before adding the sealer. That makes sense. Start by draining the cooling system and remove the thermostat. With the thermostat removed, flush the cooling system using Blue Devil radiator flush (or a comparable flushing agent), and then flush again with water. Then refill the system with water leaving enough room to add the treatment. “IMPORTANT: ENGINE MUST BE COLD BEFORE YOU BEGIN. Remove the radiator cap and start the engine while cold, then turn on the heater to max. IMPORTANT: POUR SLOWLY! With the engine idling, SLOWLY POUR Blue Devil into the radiator (take 1 minute pour time for the entire bottle).”
It goes on to say allow the engine to idle with the radiator cap on for 50 minutes, and that there is no need to flush the system again. After test driving, allow the engine to cool, install a new thermostat and fresh antifreeze.

Other than them stressing that the engine must be cold before adding the product, and to add the product very slowly, nothing jumps out as unusual. Cooling system flushing is always more effective with the thermostat removed, and replacing it with a new one is always a good inexpensive practice at that point. Normally, though, there isn’t a concern about refilling the engine while it might still be warm. So that will be logged to memory, and the vehicle will be allowed to sit until the engine reaches ambient temperature. This may have to do with the product bonding somehow to the engine and components; safety issues, or both. Anyway, it’s easy enough to follow the directions and there is no rush. Naturally the time when all of this was being performed was in between the Christmas and New Year’s holidays, and when I happened to call Blue Devil (888-863- 0426) they were closed for observance of the holiday season. So any questions would have to wait.
Let’s Start the Process
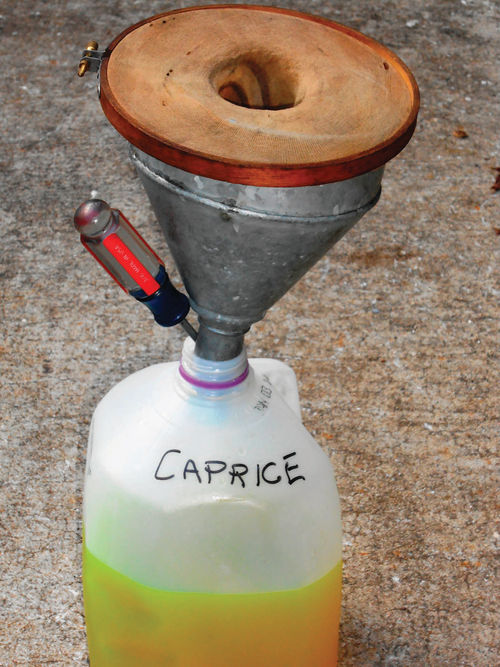
It’s now time to return to the hands-on portion of our project and start by draining the cooling system. This antifreeze is only weeks old and is clean, so it will be recovered. You can be certain it will pick up dirt and grease clumps off the engine and frame on its way to the drain pan, so a filter is used to catch the junk.
An inexpensive filter can be made using an embroidery hoop and a section of nylon stockings or something similar. Photo 12 shows a hoop being used as a frame for the filter material. Craft stores and even Wal-Mart will have the embroidery hoops. The one in use here happens to be 6" in diameter, but you can make it larger if you desire. While it is taut in this photo, it will be loosened up so that the nylon will sag down into the funnel before pouring. If you don’t do that, the antifreeze will go cascading off as though you were pouring it onto a sheet of glass.
Just pour slowly when emptying the drain pan, and if you are pouring into old antifreeze jugs or clean milk jugs, the container must be vented to allow air to escape from it.
Photo 13 shows the use of a screwdriver alongside the funnel for venting, but you also could puncture a small vent hole in the handle. The downside to that is when the container is tipped, it’s no longer leakproof. But if you don’t allow for air to escape from the jug, the antifreeze will slowly be “gulped down,” and if the jug is empty, the top-heavy funnel will very likely tip the container over. Yes, I’ve been there. Keep in mind that with milk jugs you have the advantage of seeing how full the container is so you can avoid overflowing, but they tend to be more prone to leaking if used for long-term storage.
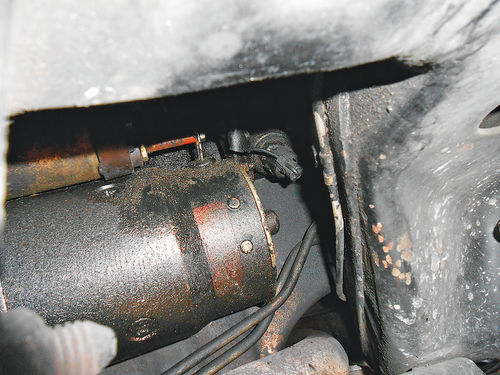
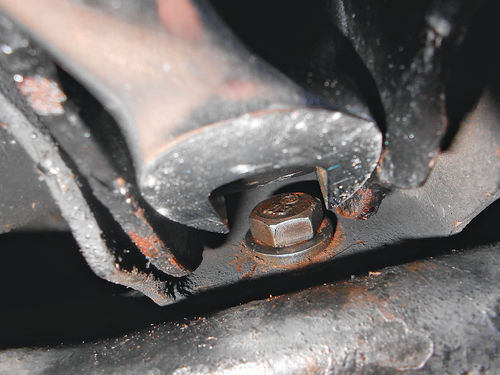
Now, back to the project. The radiator drain valve was opened, emptying most of the radiator, and then the lower hose was removed from the radiator neck to dump out any remaining antifreeze. Wanting to retrieve as much of the antifreeze as possible, the brass plug was removed from the block, draining the left side, and once finished, it was replaced. On the right side there is a knock sensor located in the threads where the drain plug would typically be on a pre-computer vehicle. Years ago, when removing an identical knock sensor from my 1987 El Camino, it disturbed the sensor’s function, requiring it to be replaced. They are quite sensitive, and it’s possible it might happen in this situation as well. Time will answer that question.
The sensor is located just behind the end of the starter, above the oil pan, and it’s a pretty tight area to work in as can be seen in Photo 14. There are two “ears” that hold the connector plug onto the switch. To remove it, squeeze the plastic connector at the widest point and pull it straight off. There are two raised bumps, that’s what you squeeze.
With the connector removed, a 7 ⁄8" socket will fit the switch. However, this did not turn out to be an easy task. No doubt this was the first time anyone had tried to remove the switch, and it felt like it had been driven in with a high-torque impact gun.
Access was another issue. Using a ½" drive ratchet and extension would have been desirable, but straight-on access wasn’t possible because the cross member was in the way. A smaller diameter 3 ⁄8" wobble extension with a long-handle ratchet worked, but there was a lot of flex in the extension, and a pop could be heard when the switch finally broke free. Photo 15 shows the switch once it was removed and cleaned up a bit. The switch threads into the water jacket of the block, but it’s not exposed to antifreeze. In other words, the threaded end is solid. The flare on the end of the white plastic is what the ears of the wire connector hold on to.
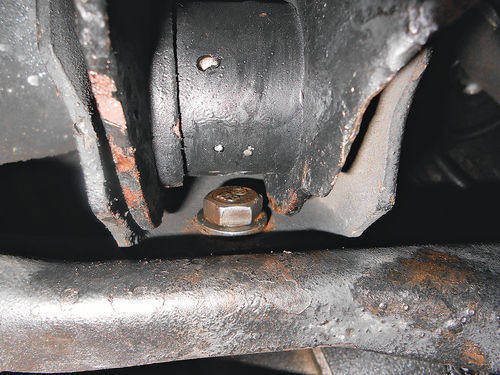
Once that side of the block had drained, it was time to replace the knock sensor. This turned out to be a very frustrating task as well. Looking at it, you think “no problem,” but just because you can see where you want to thread something in, doesn’t necessarily mean you can easily achieve it. Attempting to use the same extension to get it started didn’t work. The wobble joint didn’t yield the control needed, and a regular extension was again hitting the cross member. Care was taken to avoid the possibility of cross-threading. Installation by hand was the only safe way, but there were too many obstacles, and my arm couldn’t push my hand where it needed to go. If my forearm had an extra joint or two, the switch would have already been in. To gain the needed space the starter could be removed, or there is a cross brace that’s blocking things. The brace seemed like the simplest thing to remove. It bridges diagonally between the frame and cross member, and is also bolted to the rear bracket for the lower control arm. An 18mm wrench and 18mm socket on a ½" drive ratchet were used to remove it. The box end of the wrench was fit in through access holes in the frame to hold the nut, while the ratchet did the rest. All went fairly well until it came to the central bolt connected to the lower control arm bracket shown in Photo 16. What you are looking at in this image is the brace in the lower portion of the photo; the bolt going through the control arm bracket securing the brace, and the control arm with bushing inside the mounting bracket. The bolt was positioned with the nut and threads facing toward the engine. Working in between the transmission cooler lines and exhaust crossover pipe required the exact length extension, but no problem there. The head of the bolt was another story. There simply wasn’t enough room to fit the box end of the wrench on it, and the open end could just barely get the smallest grab. The narrow channel of the control arm wasn’t wide enough to allow the wrench to fit completely as you can see in Photo 17. In addition, it was so close to the bracket that the wrench couldn’t be fit completely in between the two. There was nothing wrong; it’s just the way it was made. Certainly when the vehicle was new, and the bolt threads were nice and clean it wouldn’t have been a problem, or at least not much of one.
At the time the vehicle was being supported with jack stands under the frame and the thought occurred that supporting it under the lower control arm instead would raise the lower arm up, and maybe put it in a more favorable position. Unfortunately, that didn’t change the closeness of the fit. Had I wanted to grind down the ears of the wrench, making the width (not the thickness) smaller, it would have fit. It would also take away much of its strength, and even Craftsman might not like it if it needed to be replaced. I didn’t modify the tool, but instead used a copper hammer to give it several good bumps, forcing it in, allowing it to grab a bit more of the bolt head. That in conjunction with a bath in WD-40 finally got it loose. During all of this, I couldn’t help but think how easy the starter is to remove by comparison.
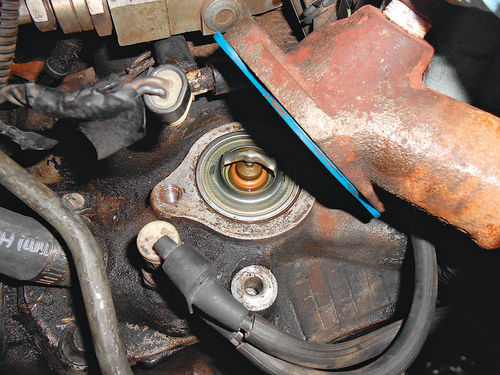
Next the heater hoses were disconnected from the engine, and the antifreeze blown out with low-pressure compressed air. Blowing air through the larger ¾" hose and catching the fluid exiting out the heater core is also back flushing the core, and will help dislodge any rust if there is any. Note that draining the engine block and heater core is not a requirement by Blue Devil; it’s my choice, and will recover more of the reusable antifreeze. Finally the heater hoses are reconnected; the radiator drain valve closed, and the lower hose once again reconnected and the clamp tightened. All that remains is to remove the thermostat. The upper radiator hose is removed from the thermostat housing, and then electrical connections and vacuum hoses were disconnected and moved out of the way giving clear access to removing the thermostat housing. It’s a good idea to label any hoses and wire connectors that are disconnected to avoid confusion, or draw a sketch mapping out what goes where. Moreover, it’s not just about knowing what goes where, but also being able to keep from accidentally forgetting to reconnect something. Two bolts secure the thermostat housing to the intake manifold; a 9 ⁄16" socket with an extension and 3 ⁄8" drive ratchet is a good tool choice for the task. Once the thermostat housing is lifted off, the thermostat is just sitting there waiting to be lifted out as can be seen in Photo 18. That blue thing stuck to the base of the housing is a dry seal gasket, so there is no scraping needed, and it can simply be reused for the flushing. It’s probably not encouraged, but I have reused this gasket several times without any leaks. The housing is then put back in place, and the bolts tightened.
It’s Time For the Actual Flushing
Fresh water was poured into the radiator until it was visible down inside the tank. Then two containers of Prestone radiator flush were added, and the engine started with the heater on the max setting as per instructions. Additional water was added, and once the level stabilized, it was filled to the top, and the radiator cap was replaced. The fact that the thermostat has been removed allows any air pockets to easily escape from the engine, so the water levels off quickly. The product instructions say to run the engine for 10 minutes once it’s reached operating temperature. Of course with the thermostat out, it never will reach actual operating temperature, so it was simply allowed to run for about 30 minutes and then shut off.
The engine was allowed to cool a bit, and then the lower hose was disconnected from the radiator, allowing it to empty. Next it’s time for the rinse. With the lower hose reconnected, the radiator was filled with fresh water and the radiator cap replaced. It was allowed to run for 10 minutes with the heater set to maximum, and then drained again. Wanting to make certain the system was rinsed as well as possible, I went rogue and implemented my own method. The lower radiator hose was again replaced, but the clamp was left loose. The system was filled with water, and allowed to run with the cap off. After a few minutes the lower radiator hose was pulled loose allowing the radiator to empty while the engine was still running. This took only a few seconds, and then the hose was replaced and the radiator again filled. This process was repeated several times. Note this extra rinsing isn’t required by Blue Devil. The next step is to allow the engine to completely cool, they use the word “cold” in the instructions, so the vehicle was allowed to sit overnight. That gave me time to think things over, and I decided to change my approach. Initially the entire cooling system was to be drained of the Blue Devil sealer treatment. This meant that once again the drain plug and knock sensor would both come out, and if I wanted to go after those last few ounces, the heater core would again be blown out. Instead I decided to drain only the radiator, replace the thermostat, and then refill the radiator with new antifreeze. There were a couple of reasons for this change of direction. First, there was the possibility that removing the drain plug might disturb the crack. If that happened, this entire project would be a waste of time as well as money. Next, the manufacturer states that its product can remain in the system and doesn’t need to be flushed out. Certainly the majority of people do just that, and don’t completely drain the block. Maybe having some of the product remaining in the system an extended length of time might help. Right or not, that’s the road that would be taken.
Bring On the Blue Devil
The next morning it was time to add the treatment. Making sure the lower hose was clamped tight and the radiator drain valve was closed, water was then added to the radiator while allowing space for the quart of product.
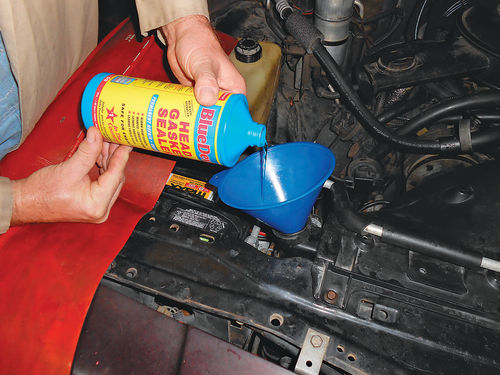
The vehicle was started and the heater again turned on to maximum as instructed. The product was added very slowly to the radiator, taking over one minute to add 32 ounces of treatment to the radiator as seen in Photo 19. The radiator was then filled to the top, and the radiator cap replaced. The engine was allowed to idle for 50 minutes, and during that time the crack was inspected from a distance and appeared to be dry.
While it didn’t seem necessary, the instructions state to test drive the vehicle. This is most likely directed at those with head gasket problems, but it wouldn’t hurt anything, so a 15-mile test run was made.
Once back in the garage, the crack was again inspected and appeared dry, and the knock sensor appeared to have survived being removed and replaced. No additional service was needed on the right side of the block, so it’s time to replace that brace. The threads of the nuts and bolts were chased and then oiled. Installation was a breeze. The engine had cooled enough to allow draining the radiator once again, and the thermostat was replaced using the same dry seal gasket. The radiator was then filled with new antifreeze. The Caprice will be driven like this for a few months, and during the summer the radiator will be drained and refilled once again with new antifreeze, upping the concentration to increase the boiling temperature. The new 7-pound radiator cap remained in use; there was no need to push my luck.
Now, Why Did That Light Come On?
The next day a 25-mile round trip was taken with the vehicle to the grocery store. On the way there all went fine, but on the return drive home the service engine light came on.
I didn’t immediately check the code, but was willing to bet that it had to do with the knock sensor. As you’ll recall, when it was removed it made a “pop,” and that made me suspicious if it had survived.
The next day the code was read, and it shows why I’m not heading to Las Vegas anytime soon. It indicated a code #53, EGR-related. This code appeared a few years ago and at that time the problem was a completely restricted EGR passage in the intake manifold. To check specifically for that problem is easy. Once the engine is up to temperature and idling, the ERG valve is manually opened. If the intake manifold passage is open and free-flowing as it should be, the engine should stumble and stall. If there is little or no effect, the passage is blocked. Just place your fingers inside the valve and with the pressure of your fingertips squeeze the diaphragm up toward the vacuum port (the only direction you can go with it). If the vehicle has been driven or the engine has been running for a while, the valve may be hot, so use a rag or wear protective cloth or leather gloves to avoid accidentally getting burned. The Caprice passed the test, so that’s not the problem. Ultimately, the step-by-step diagnostic chart in the shop manual will be followed to find the culprit for this code #53.
Let’s Drive For a While and See What Happens
After a few days the crack was again inspected, and Photo 20 shows how it appeared. The area was completely dry, but there were two vertical white lines. This must be residue from the Blue Devil sealant seeping through the crack in those areas. This made me think that possibly replacing the new 7-pound radiator cap with the original 16-pound cap might not be such a bad idea after all. As you know, there is still some Blue Devil sealer remaining in the cooling system, so maybe the higher pressure cap will push it deeper into the crack, ultimately sealing it better. If more of the white residue lines show up, but the area remains dry I will have to assume that’s what has happened, and it was a good move. Time would tell.
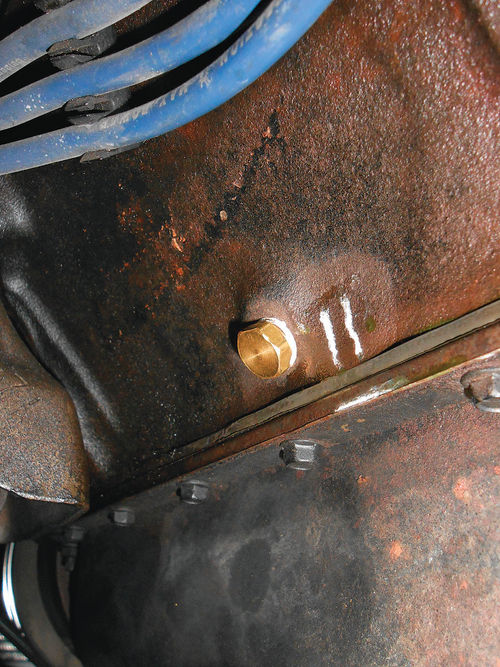
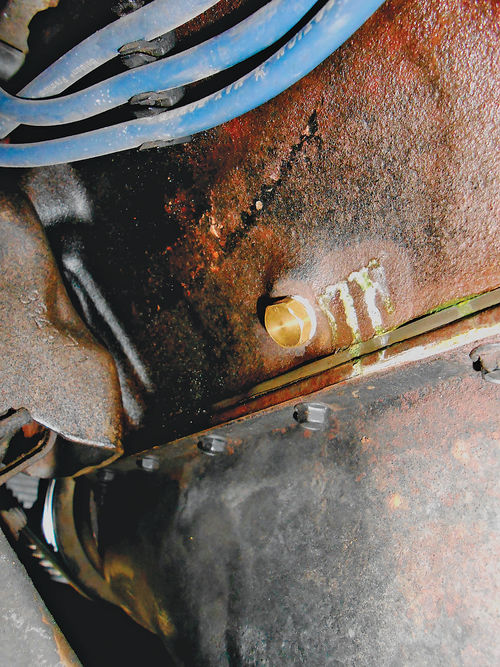
After a few weeks and several hundred miles of driving with the 16-pound radiator cap, Photo 21 shows what the area now looks like. It appears that a bit more did indeed seep through the crack, although the area remained dry. It will be driven a bit more, and then the 7-pound cap will be put back into service.
The coolant level will be watched as it normally would, and every few weeks the crack will be inspected until I am completely confident in the repair.
Contemplating the Drain Plug’s Future
You might be wondering if that drain plug will ever be removed again. When I finally spoke with Keith, one of the techs at Blue Devil, he didn’t believe that removing the drain plug would cause any problems. So, if it makes it five years to the next cooling system service the answer is yes. At that time the system will be completely drained, and if it leaks once again, I will cross that bridge then.
When I asked Keith about the value of leaving the product in the engine, he indicated that it should essentially do all it is going to do during the initial heat cycle when the product is added. He also stated that as long as a vehicle didn’t lose in excess of one quart of water during the 50-minute Blue Devil treatment, the product should be able to take care of the leak. In the case of the Caprice, the loss would have been measured in drops, not ounces, so that left me with a good feeling.


