Diagnose & Replace a Faulty Water Pump, Pt. 1
When the Pump Starts Groaning, Chances Are Something’s Wrong. Let’s Check It and Make Sure It’s Defective.
IF YOU HAVE read some of my articles regarding the various cooling system leaks experienced with my 1986 Chevrolet Caprice, at this point you might be saying “quit chasing those cooling system leaks and get a new car.” Well, in all fairness the water pump replacement covered here was completed prior to the discovery of the crack in the engine block.
In my two-part series, “Pursuing an Engine Coolant Leak” in the April and July issues, there were a couple of references to the noisy and leaking water pump, and its having been replaced. I had mentioned that there were some complications along the way, and as you will see, indeed there were.
So now let’s take a couple of steps backward to the water pump adventure.
I Think I’ve Heard That Before…
When you have been driving the same vehicle for years, it doesn’t take long to recognize uncommon sounds coming from under the hood. When it’s a sound that’s been heard before, you also have a pretty good idea what it might be.
In this case, the sound I am referring to would best be described as a “groaning.”
It was unnoticed unless the air conditioning was being used. With the engine off, the first thing to check was the water pump. There had been some unexplained coolant loss, but no traces of coolant had been visible on the ground. (Regarding my references to antifreeze and coolant…they are essentially the same thing, ethylene glycol. So don’t let my choice of vocabulary confuse things.)
This was a very minimal leak, and after driving the vehicle sometimes I might smell antifreeze, and other times I wouldn’t.
Pressure testing the cooling system would normally be the first option, but if you happened to read my July 2013 article on repairing damaged threads, you might recall that the pressure tester would not fit the new replacement plastic radiator. Its neck was actually smaller inside than the original brass design, but not by much. The thought of spending money for an adapter, or altering the tool itself didn’t appeal to me at all, so I took the wait and-see approach. Meanwhile, keep in mind that a leaky water pump isn’t always noisy, and a noisy pump doesn’t always leak. Those might sound like some lyrics from a country-western song, but it’s true.
The Hunt Begins
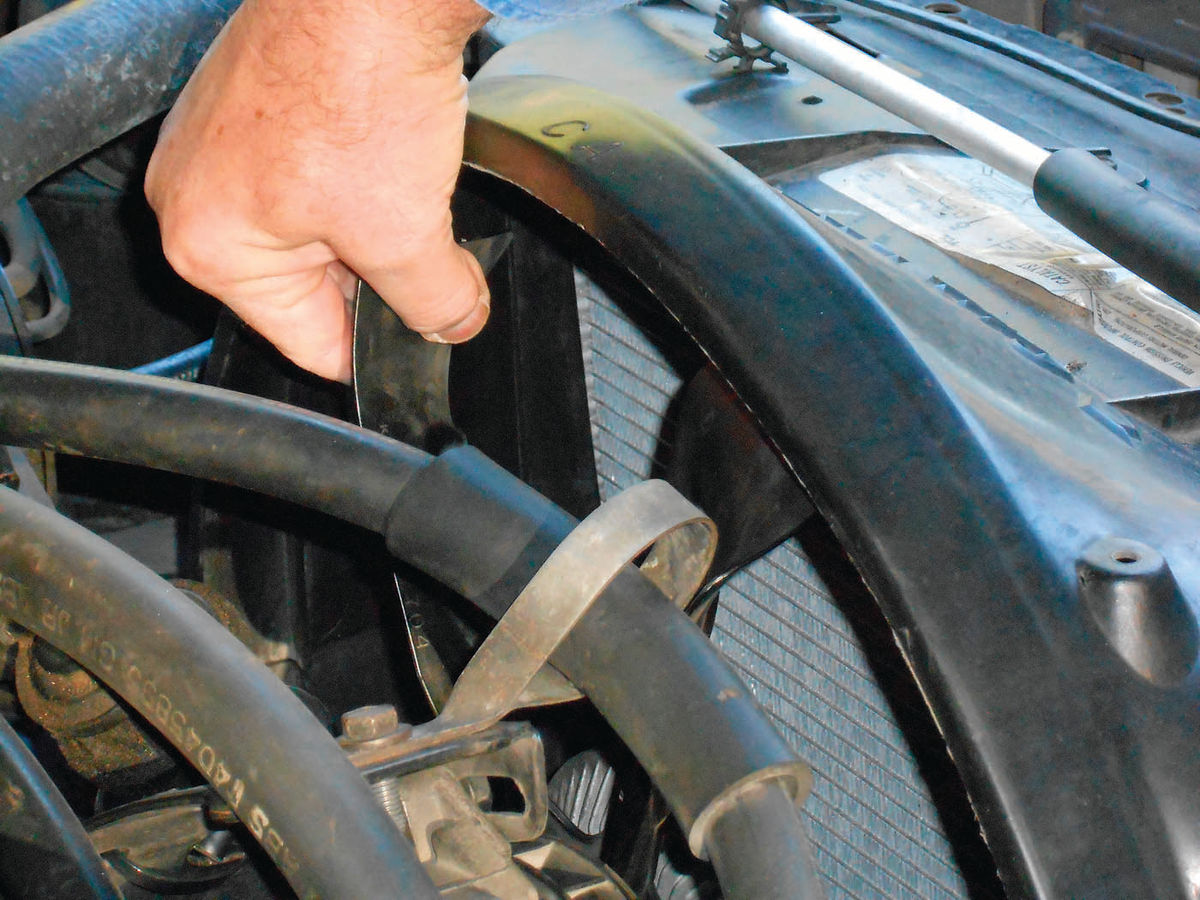
A good place to start is by grabbing a fan blade as seen in Photo 1 and trying to wobble the fan. There definitely was movement, and its origin was at the pump pulley. This quickly revealed looseness in the pump bearing. Pay attention to where the movement is coming from, as it’s possible it also could be an indication of a worn fan clutch.
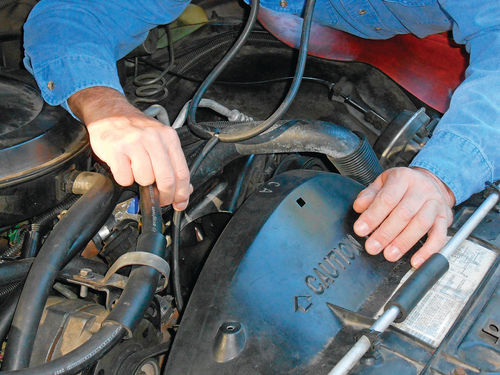
To verify the pump bearing is where the noise is coming from, a stethoscope can be used. Start the engine and carefully position the end of the stethoscope hose on the nose of the pump, just behind the pulley as shown in Photo 2. This will put you as close to the bearing as possible, and the resonating sound should be easily detected. Listening with the air conditioning on and then off will also help verify this is or isn’t the location of the noise. An assistant would be helpful for doing that. Be careful, you wouldn’t want to get caught up in the moving belts or fan blade.
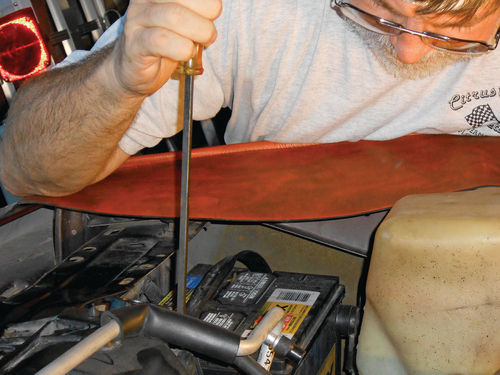
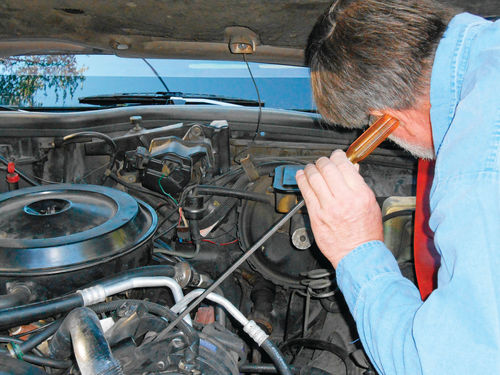
Don’t have a stethoscope? Take a look at Photo 3. If a long-enough screwdriver is available, it can do the job as well. This is one of those extra long screwdrivers generally used to reach lower radiator hose clamps, and not too much else. Place the tip of the metal blade on the nose of the pump as before, and place your ear up to the plastic handle of the screwdriver. It will transmit the sound too. Maybe not as well, but it will work. Just remember that regardless of what you are using, the engine is running and the fan is spinning, so be cautious. While you are at it, you can check the alternator and any other components for unwanted noise.
Project Preparation
Over the past 17 years I have replaced this lifetime-guaranteed water pump probably five times, and the sound of the bearing failure is all too familiar. Even if there was some other noisemaker under the hood, the fan wobble test alone is enough to say it’s time to replace the water pump.
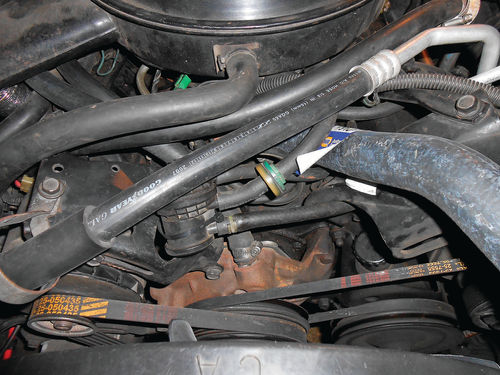
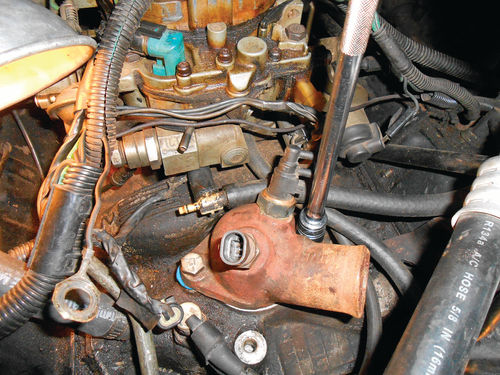
The vehicle is our daily driver; it’s a 1986 Chevrolet Caprice Classic with a 305 Chevrolet engine under the hood. Replacing a water pump on a small block Chevy engine isn’t in itself difficult, but the journey you take to reach the pump (as seen in Photo 4) can be intimidating to some. But if you approach it as a sequence of small procedures, it becomes more manageable.
Most pump manufacturers want you to flush the cooling system prior to installing their new pump. This is by no means a bad idea, and should there be any debris from the bearing failure, hopefully it will all be rinsed out in the process.
(A note about tools & torque: In many of the photos you will see me using box wrenches for most of the tasks. This is primarily because they photograph better than a ratchet and socket, taking up less of the photo, making it easier to see the surroundings. Ratchets, sockets and air-powered tools would normally be the choice for many of these tasks, so use what’s available to you and feels most comfortable.)
I didn’t list torque specifications for any of the fasteners. The torque value for any of these items, however, would not be considered critical. The simple rule is less is more, so don’t over-tighten. For that matter, I have never seen anyone using a torque wrench when installing a water pump. If you feel better knowing, the fastener size can be used to determine the torque range if specifications can’t be found in the service manual. For example, 3 ⁄8"-16 would be 22-32 ft. lbs.; 5 ⁄16"-18 = 14- 20 ft. lbs.; and ¼"-20 = 6-9 ft. lbs. I found this information in the introductory pages of a Haynes automotive manual, but it wasn’t clear if the higher torque value was for a grade 8 or 5 bolt, so to be safe, I wouldn’t exceed the lowest shown torque value, and to me even that seems high.
I will mention the metric or fractional size of the fasteners being removed as well. Use this as a guide. A fastener I describe with a fractional size may be considered a metric fitting by Chevrolet, however either wrench will fit.
Supply list: Put together a list of the needed items. This will include the water pump, cooling system flush, antifreeze and thermostat & housing gasket. Also inspect the belts and hoses. The belts will all be off, so they will be easy to inspect and there’s no additional time required to replace them. Turn them inside out, and flex them. Inspect for cracks; missing chunks of rubber and oil saturation. Many of the hoses will either be removed or disconnected at one end, so they can be inspected as well. Look for things like oil saturation on the exterior (usually an issue with the lower radiator hose), abrasions caused by rubbing against something, and closely inspect the end (cross section) of the hoses where they connect to the radiator or engine. If you see small cracks or if the rubber is separating from its reinforcement cord, replace them. Squeeze the hose. Does it feel firm, or is there a mushy feel to it? In some instances hoses may become stiff, almost rock hard. Look inside each hose while flexing and squeezing with your fingers. If you notice small cracks, replace them. Certainly it’s added expense, but if there is the slightest question, now is the time to take care of it, and the added labor is minimal. If you decide to replace belts and hoses, remember to hold onto the old ones until all the work has been completed. If the old take-off belts are good enough, they can be tucked into the trunk and retained in case of an emergency.
System Flush
A liquid flush sold by Prestone will be used. You can find it at auto parts and discount retail stores. If your cooling system has a lot of rust in it, check with your local auto parts store for their recommendations on what brand of flush would be best.
There are basic flushing instructions on the container’s label, but my method has a few slight variations to it.
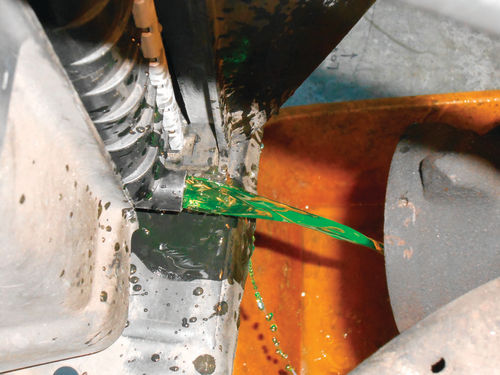
Start with the engine completely cool, remove the radiator cap and drain the radiator. Some radiators have a drain valve like the one you see “in action” in Photo 5, but if there isn’t one or it won’t open, carefully remove the lower hose from the radiator and catch the coolant in a pan.
First the lower radiator hose clamp must be loosened. Depending on its positioning and the surroundings, sometimes approaching from underneath works best and sometimes leaning over the fender is the only good approach. If the clamp’s orientation allows you good access, remember which direction the screw head is facing, even take the time to make a note. If you forget, and the clamp is put on backward, facing in the opposite direction, it may be difficult or even impossible to easily reach it for re-tightening.
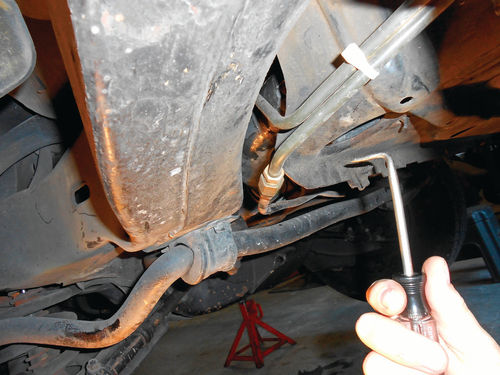
That long screwdriver used earlier as a listening device is now the tool of choice to reach that lower clamp as seen in Photo 6. The clamp is loosened until it falls away from the screwdriver’s tip. Now it can be slid back over the hose, so that it’s out of the way. The hose will typically bond to the lower neck of the radiator, and if you’re not careful the radiator can be damaged during removal. It’s best to use a hose removing tool to aid the process, but this will be more easily accomplished from underneath. There isn’t enough space to crawl under this car, much less do anything, so the front of the vehicle was elevated and jack stands were placed under the frame rails just behind the front wheel on each side.
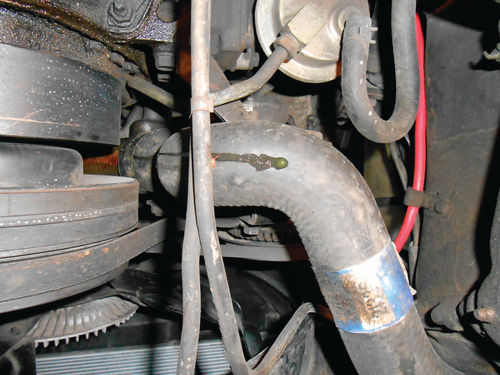
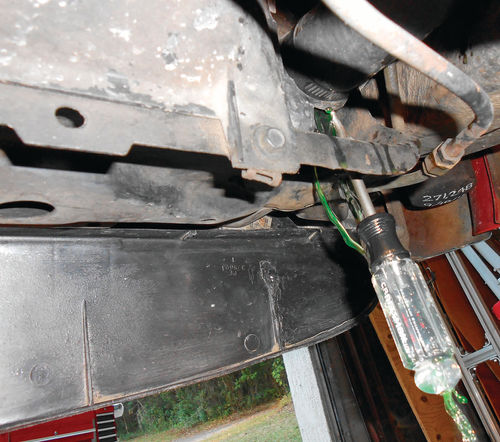
The first thing I noticed once underneath was that the pump was indeed leaking. Photo 7 is a view from the ground up at the lower radiator hose. Notice the track of antifreeze coming down from the pump and ending in a droplet on the lowest point of the hose. If you look closely and follow that antifreeze trail up to the left, you can even spot some rust on the bottom of the pump, so this has been leaking for a while. This doesn’t change anything, it just confirms that a water pump can be noisy and leak, as one might expect. It’s also most likely the end of my cooling system leaks once it’s replaced.
Getting back to the tasks at hand, this Craftsman cotter pin removal tool works great for hose removal too, as seen in Photos 8 a&b. Slide the bent pick portion of the tool in between the hose and neck, and then gently move it around the perimeter of the radiator neck loosening the bond. Once the hose turns freely, a slight twist back-and-forth while pulling the hose straight away from the radiator will remove it. Just be careful not to end up getting drenched in coolant; proceed slowly. Once it has finished draining, replace the hose and snug the clamp, or tighten the drain valve. Additionally, if your engine block has an easily accessible drain plug or plugs, they can be removed to drain out as much old coolant as possible. Naturally, drain plugs are located low in the block, and on most V-8s will be somewhat centered on the sides. If you remove the plug(s) and nothing comes out, there probably is a skin or rusty build-up on the inside of the block. Use a small screwdriver or something similar to poke through and open up the drain hole. Once drained, the plug(s) can be replaced, but first apply Teflon tape, or use a quality sealant around the threads.
Remember antifreeze/coolant (ethylene glycol) is poisonous, and animals are attracted to it, so don’t leave it sitting around in an open container. Transfer it into old milk jugs or some other suitable containers and take it to a collection center for disposal.
Back Flushing the Heater Core Is an Option
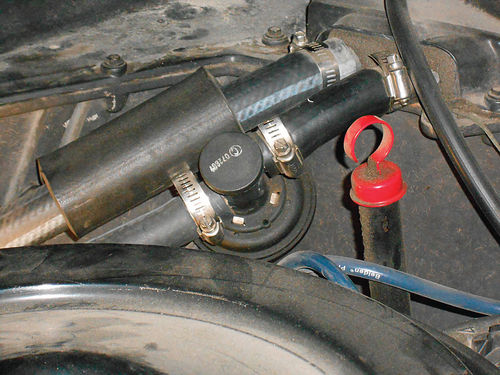
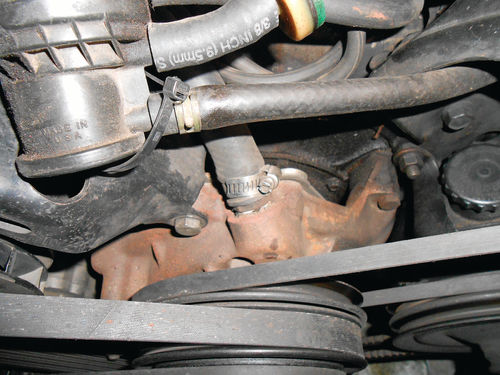
If you want to go a step further, disconnect the heater hoses and flush the heater core with your garden hose. This will rinse out more of the old coolant. Start by disconnecting the heater hose from the engine and the other from the water pump. If your system includes a heater control valve like the one shown in Photo 9, loosen the hose clamp and disconnect the valve from the hose on the heater core side. The short 3" section of heater hose will remain connected to the heater core. You don’t need to disturb the hose that’s connected between the heater control valve and the intake manifold unless it needs to be replaced. The heater hose used on the control valve side of the core is 5 ⁄8" ID, and is the inlet to the heater core. A larger ¾" ID hose exits the core. This is the “return hose,” and if you look through the maze of hoses and belts you can see it clamped to the top of the water pump in the center of Photo 10. On some other vehicles the return hose might not connect directly to the water pump, but right next to the housing where it’s mounted. If it is not connected to the pump, the return hose will always be the heater hose closest to the pump.
Start by placing an old milk jug over the end of the short 3"-long hose to catch the discharged coolant. Secure the jug so that it won’t go flying off when the rush of water hits it. Take the garden hose, and if you have one of those vintage-style straight brass hose nozzles, it can be fit into the ¾" heater hose that was removed from the pump. Turn the nozzle on completely and wrap a rag around the connection to help contain some of the water that will want to squirt out at you. Have someone turn on the water while you hold the nozzle in place. Run fresh water through the heater core until the discharge is clear. This will back flush your heater core, and the sudden reverse flow of water will help dislodge any rust buildup in the core. It also will likely improve your heater’s performance as well. When it appears that the water is flowing clear, reconnect the heater hoses. Stopping and repeating this procedure a couple of times will sometimes flush out even more rust.
Remove the Thermostat for a Better Flush
To increase movement of the chemical flush through the system, you should remove the thermostat. There are a number of wires and vacuum hoses in the way before the thermostat housing can be seen, much less reached. Even if you are confident you know where they will all reconnect, take a moment and tag each hose and wire, or simply draw a map indicating where a wire or hose comes from, and its connection. Avoid trying to leave things connected and working around them. In the long run it’s quicker and easier to label, disconnect, and move things out of the way. While you are handling these vacuum hoses inspect their condition. These small hoses usually don’t get replaced until there is a failure of some kind, and replacing ones in poor condition now might avoid that situation. The hoses should be flexible. If they are found to be stiff or oily and mushy, replace them. There are different-size vacuum hoses; 5 ⁄32" is a common size under this hood, but if you’re uncertain, bring hoses needing to be replaced with you to the parts store. Remember to label and plainly identify any removed hoses.
Once the path is cleared, the rest is very straightforward. Loosen the hose clamp and remove the upper radiator hose. The neck of the thermostat housing isn’t delicate like the radiator necks, so there is little concern about possible damage. A hose removal tool can still be used to break the bond and make life easier. In Photo 11 a 9 ⁄16" socket with extension is used to remove the two bolts and then lift off the thermostat housing. Once removed, the thermostat is simply lifted out as seen in Photo 12. In this application the thermostat simply sits into a slight recess, but that’s not always the case. Some thermostats twist and lock into the housing, so when working on different vehicles, check the manual if you’re uncertain how the thermostat mounts.

Reassemble without the thermostat but with a new gasket (the old one can be re-used if it remained intact), and reconnect the hoses and wiring, but keep any references you have made with regard to routing.
With all the hoses reconnected, all the clamps tightened, the drain valve closed, and any drain plugs replaced in the block; it’s time to add the chemical flush. Follow the directions on the flush bottle’s label.
With the radiator filled, start the engine and turn the heater on maximum. There will immediately be strong water movement within the radiator because the thermostat has been removed. If the level drops, bring it back up to the proper “cool” level then replace the radiator cap to the completely closed position. Since the thermostat has been removed, the engine won’t generate the normal amount of heat, and some chemical flushes need that heat. To help compensate, a restriction can be created by partially blocking the radiator with a section of cardboard or old blanket and increasing the flush time a bit. The upper radiator hose can be felt by hand to determine if the restriction has raised the temperature.
When enough time has passed, shut off the engine and allow it to cool. Once it has cooled down, repeat the same draining process we did earlier. Remember when working on the cooling system to never remove the radiator cap while it is hot. The system will be under pressure and there is a good possibility of getting burned. Reclaim the drained fluid and turn it in to your local recycling center with the old coolant recovered earlier. Local landfills often accept this. As noted earlier, plastic milk jugs work great for disposing of old coolant and flushing solutions. If you have some old antifreeze jugs from a previous service, they are better yet.
Next, we’ll remove the old water pump.


