
Restoring a small suv Part 2
It’s Time to Assess the Scope of the 1991 Geo Tracker Project, Detox the Interior, Free a Frozen Door Handle and Replace a Parking Brake Cable.
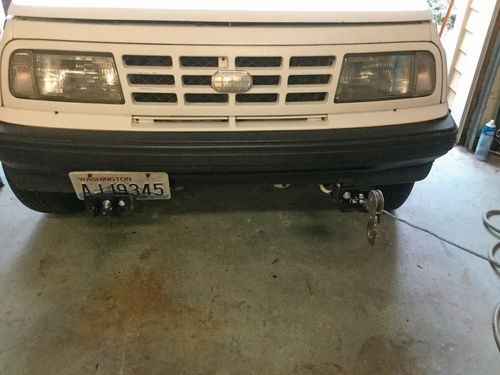
Our current project vehicle is a low-mileage 1991 Geo Tracker 4-wheel drive mini-Sport Utility Vehicle that was once well cared for, but had fallen on hard times. I got the little SUV road ready and towed it to my home shop, where the hard work could begin. Last month had 14 photos, so this article will start with Photo 15.
A Thorough Cleaning
The very first thing I did once I had the vehicle safely home was to thoroughly clean it outside and under the hood. This would allow me to assess the condition better, and also make it more pleasant to work on. There was a significant amount of tree needles and debris that had collected in and around the cowl vents and the nooks and crannies of the body. I removed those first, then cleaned and unplugged the drain holes in the cowl, then flushed them with water until they ran free (Photo 15). When the cowl drains become plugged, the rain water has nowhere to go, and so it starts backing up through the heater assembly and drips into the interior and soaks the carpets.
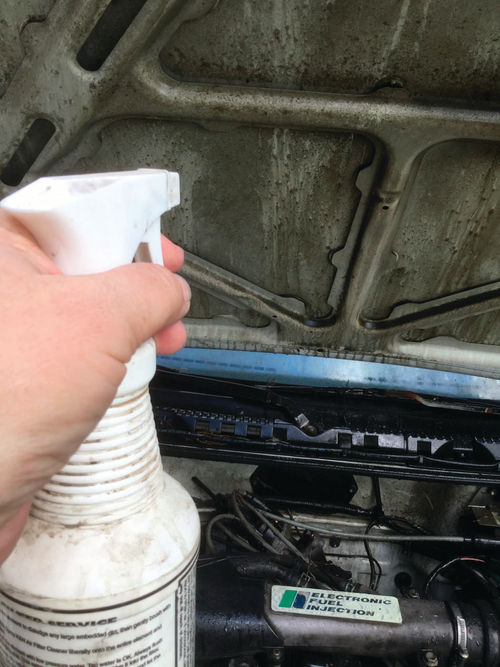


This was followed by cleaning the engine compartment. Everything in the engine bay was coated with a layer of grime and oily residue. I sprayed the underside of the hood and engine bay with degreaser, followed by low pressure water from a garden hose (Photo 16). I was careful about where the water was sprayed, but at this point I was not overly worried about getting the engine wet. The critical components are sealed, and besides the engine had been exposed to high moisture for a very long time. Photo 17 shows before (left) and after (right).
I completed the cleaning job by giving the exterior of the Tracker a thorough hand washing using car wash soap and water. I was generally pleased with how the little truck cleaned up (Photo 18).
Assessing the Vehicle’s Condition
I know that the SUV had been reliable college transportation on the other side of the state for several years, but started having drivability issues. The clutch was slipping, and had been replaced. A short time later, the truck suffered a catastrophic breakdown as the driver was pulling away from a stop sign. He heard a loud bang, then the engine revved to redline and the Tracker slowly coasted to a stop, dead on the road. Something had completely let go between the engine and the drive wheels, and it would not move in any gear. The only way to know what broke would be to pull the transfer case and transmission.
The body of the Tracker was rustfree and very straight, with only a few very small scrapes and dents. The paint is a single-stage white enamel that is heavily oxidized and weathered on the hood. There is no shine at all, and the paint is very rough to the touch, like fine sandpaper. The roof and fender tops are moderately weathered, and the remainder of the paint is still fairly shiny with only minimal oxidation. The paint on the hood may be beyond saving, but I am cautiously optimistic that wet sanding and buffing will bring it back. If not, it will be repainted. The rest of the paint will polish to a nice shine. The plastic bumpers are faded, but are not cracked and should clean up well.
The left rear brake became stuck while sitting for the last two years. I freed it up well enough to tow across town, but that brake is still dragging and needs to be fixed. The other brakes will be cleaned and inspected and have the fluid flushed. The Tracker had a complete 4-wheel brake job shortly before the breakdown, so hopefully the brakes will be found to be in good condition. The tires are nearly new.
The engine has low miles, and I personally heard it run two years before, but it no longer ran. I had replaced the battery and positive terminal end prior to towing. The engine cranked over, but there was no spark. Apparently, something had broken down from sitting. I hadn’t spent much time diagnosing the engine problems before towing it home, but hoped that the repairs would be straightforward. I learned later that the engine had a history of setting the check engine light and had intermittent drivability issues that could not be resolved. That sounded very concerning.
The interior was another story entirely. The upholstery had been in fairly good condition when parked, but the Tracker had gotten wet inside and the carpets soaked up water. The truck had been covered with a tarp to prevent future water leaks. Unfortunately, this created the perfect breeding ground for mold and every part of the interior was covered. Not only the fabric and vinyl were moldy, but even metal and glass surfaces. While this might seem like a cosmetic issue, mold can be toxic and restoring the interior was going to be a significant part of this job.
Making a Good Plan…
Initially when I considered taking on this project, my approach was going to be simple. I would tow it back to my workshop, get it up on jack stands, and tear down the drivetrain until I found the broken components. Then I would make the necessary repairs to get it back on the road. At that point I would get the engine running well, identify and fix any other problems, and then do a good cosmetic restoration. That would have been a great plan if the driveline was the only problem, but unfortunately that turned out to be unrealistic given the Tracker’s condition.
…And Then Came Plan B
My military friends like to say any plan is good up until the first shot is fired, and that was certainly the case here. My original plan went out the window as soon as I discovered that the engine would not start and the interior was infested with mold. Since mold can be toxic, this problem would have to be dealt with before any others. Also, I felt it would be much smarter to get the engine running first, then properly diagnose the driveline issues before jumping headlong into the transmission removal. This proved to be a much better approach.
The Dangers of Mold
Mold is not only unsightly and smelly, but it can also be very dangerous. Mold is a fungus, and some species are quite toxic. When you breathe in air infested with mold spores, the spores get into your lungs and can make you extremely ill. Mold is a living organism, and thrives on dark, wet environments. I am certainly not an expert on mold, but I have learned a lot about it while working on this project.
Molds are typically broken down into three groups:
• Allergenic molds, which can cause allergic symptoms but unlikely to cause illness.
• Pathogenic molds, which can cause infection in people with weak immune systems.
• Toxic molds, which can may be toxic to anyone who comes into contact with it.
Keeping this in mind, no one was allowed to enter the Tracker without wearing a respirator and latex gloves. In the first article I discussed how I aired out the interior in the hot sun, wore protective gear and wiped down all surfaces with disinfecting wipes. I also installed a dehumidifier over a period of several weeks to dry things out and lower the relative humidity below the point where mold can grow. By the time the Tracker was at my house, the first round of detoxifying had been completed on the driver’s and passengers’ seats. However, there was a lot more cleanup to do. Every afternoon during the work week I opened the doors for a few hours to let the interior air out in the hot sun. This seemed to help quite a bit.
Opening the Back Door—A Lesson In Safe Cracking?
This Tracker is a 2-door model, which also has a swing-open door in the back. Opening the rear door was vital to completing the interior detox procedure. However, the rear door latch was jammed and the door could not be opened from the outside. To add insult to injury, the rear door has no interior door handle, as it was only intended to open from the outside. Although the task seemed daunting, getting the door open was actually quick and easy. I put on a respirator and protective clothing; then climbed into the back seat facing the back door. Reaching over the rear seat back I was able to remove enough fasteners from the rear panel to work the panel loose, allowing access to the latch assembly.

A quick exam with the flashlight showed the door release rod was readily accessible. I was able to pull the release rod with my fingertip, and the door popped right open (Photo 19). The Great Houdini would have been proud. Actually, in the interest of full disclosure, the previous owner had opened the rear door the same way once before, so I knew it could be done.

Once the door was open, I fully removed the rear panel and inspected the mechanism. The issue turned out to be very simple to resolve. The door latch mechanism, door handle and lock assemblies were all in excellent condition and functioned as they should. However, rust had built up on the pivot end of the outside handle latch rod, causing the rod to bind up in the hole (Photo 20). This held the outside handle in a partlyopened state, not quite relaxed and not quite pulled. When the door lock assembly was turned with the key to the unlocked position, the lock mechanism jammed the door handle mechanism from opening. It was odd that the lock had jammed this way, but very easy to resolve. I realigned the mechanism to clear the jam and get things working again. I removed the rust off the end of the pivot by wet sanding with 400-grit sandpaper and WD-40. I lubricated all joints and mechanisms with WD-40 to discourage future rust. Now the door works like new. The only parts I needed were a few new panel fasteners to replace the ones that broke while they were being removed.
Getting Rid Of Toxic Mold With Vinegar
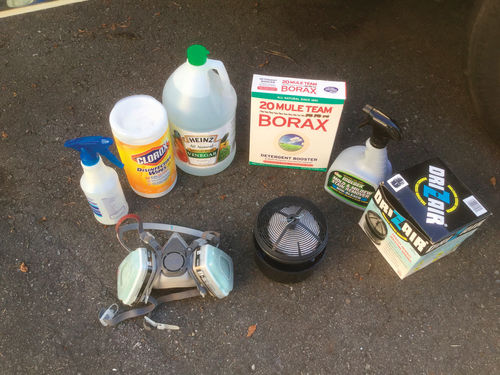
In order to permanently get rid of the mold from the interior, I armed myself with a number of cleaning products and got to work (Photo 21). First up in my moldkilling arsenal was white vinegar. It is reported to kill over 82% of mold species on contact, and is safe and natural. Vinegar is much more effective at killing mold than bleach, as it gets to the roots of the mold rather than just killing off the surface mold. I like the sound of that!
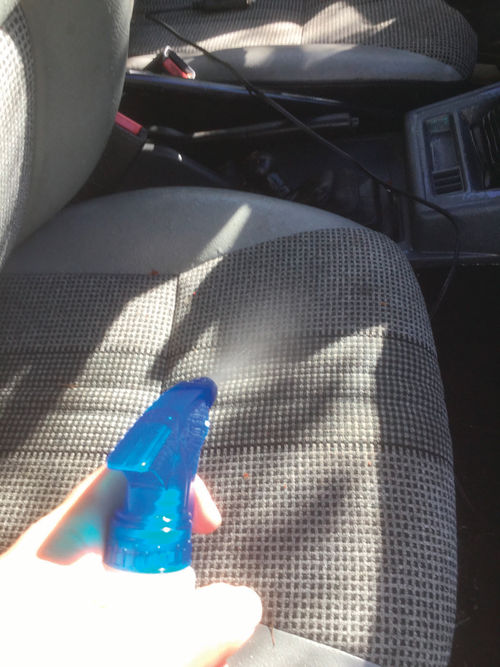
I loaded a spray bottle with vinegar at full strength, donned my respirator, and got to work. Vinegar is mildly acidic, and creates an environment that mold can’t live in. I sprayed down the interior surfaces, including the headliner, seats, dash and carpets. I re-sprayed the worst areas, then let everything sit for a full hour without scrubbing or agitating. The idea is to let the vinegar kill all the mold without releasing new mold spores into the air, which could cause a reinfection (Photo 22). After the hour was up, I donned my latex gloves and respirator again, then went inside with the vinegar, a scrub brush, and a roll of paper towels. Going a section at a time, I sprayed, scrubbed and wiped down all of the surfaces. This did a pretty good job of removing the surface mold. I know at this point some of you are thinking “OK, but what about that funky vinegar smell?” Believe it or not, the smell dissipates fairly quickly as the vinegar dries, and once the interior was dry the smell was pretty minimal. I let the Tracker sit in the sun with the windows and doors open and the smell slowly dissipated over the course of the afternoon.
Next Comes Borax

The next step I used to clean the interior was Borax. Borax is a natural mineral, which is similar in appearance to baking soda and can be purchased in the laundry section of grocery and hardware stores. Borax is safe to use (unless you mix it with water and drink it, so don’t do that!). Note that Borax is NOT Boric Acid, which is extremely dangerous and not something I would care to work with. Borax is very alkaline, so it also kills mold by creating an environment that mold can’t live in. A side benefit is that it is also an effective odor eliminator. I sprinkled borax powder over the carpets and seats and left it in place to take up smells and kill any remaining mold. After about a week I vacuumed it out with my shop vac (Photo 23). Many people mix borax with water and apply it with a spray bottle, then wipe all surfaces down afterward. Since I still have a round of cleaning left to do I may give that a try next time.
Using a Commercial Mold Cleaner
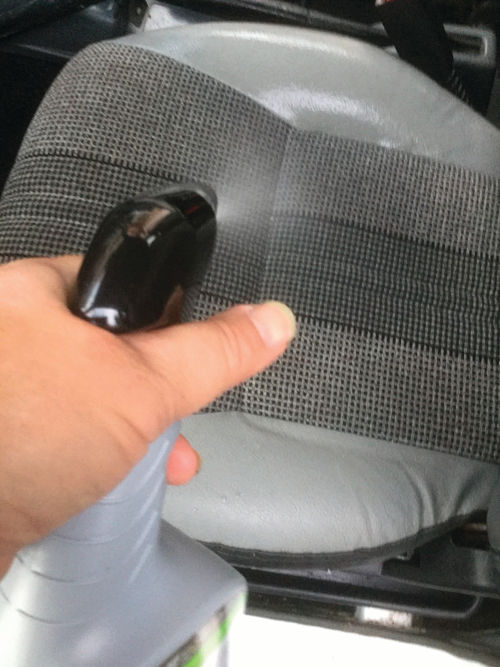
The last step in my mold-killing trifecta was to use a commercial mold cleaning spray and a scrub brush. I concentrated on the seats to begin with, spraying the product on all vinyl and cloth surfaces (Photo 24). I used a stiff bristled scrub brush and worked the product in well, then wiped clean with paper towels. I am not a fan of scrubbing vinyl with a bristle brush, but it seemed to work well without damage. It was not easy work, but the seats cleaned up good. By this point I felt that the interior of the Tracker was sufficiently cleaned up to allow me to work inside safely. At the end of the project I plan to detail the interior one last time to bring everything up to top condition, and probably replace the carpets. For now, I am declaring victory on the interior cleaning project.
Moving-In Day
It was finally time to move the Tracker inside the workshop. It is a gentle uphill slope from the driveway, which would require some muscle power to get the little SUV into the shop. Ordinarily it would not be much of a problem, but the slope combined with the dragging brake was too much to overcome. However, I made easy work of it by using a come along winch attached to the towing hook and the other end attached to the tow chain hooked to a ring bolt in the shop. It was fairly quick to pull the truck in, dragging brake and all (Photo 25).
Fixing That Dragging Brake
It was time to get after that dragging brake so that the Tracker could be moved around easily. I jacked it up, placed it on jack stands, then removed the wheel. The first challenge was getting the brake drum off, which can be a problem when the brake shoes are pressing on the inside of the drum. I removed the four nuts that attach the drum to the drive axle. I carefully pried outward on the drum against the backing plate, taking caution to not bend the backing plate assembly. This allowed the brake drum to move out a fraction of an inch, which was enough to slip the tip of a screwdriver between the drum and the drive axle through the center hole. I was able to work the brake drum off by alternately prying on the brake drum in the center, the outside, and rotating the drum using a pry bar between the lug nuts. It was heavy work, but I was able to get the drum off without causing any damage.
Replacing the Parking Brake Cable
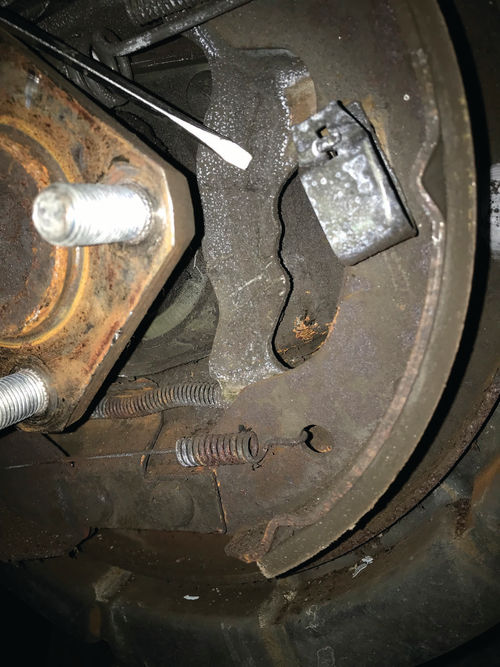
When the Tracker was stored, the wheels were chocked and the parking brake had been set. I suspected that the parking brake cable had rusted and was not releasing. After I got the brake drum off, I was able to confirm that was indeed the problem. By inspecting the parking brake arm, I could see that the cable end was pulled forward in the “applied” direction. In Photo 26 the screwdriver tip is pointing to the stuck parking brake lever. I pried the parking brake arm back into its “off” position and test fit the drum. It slid over the shoes easily and the drum rotated without dragging.
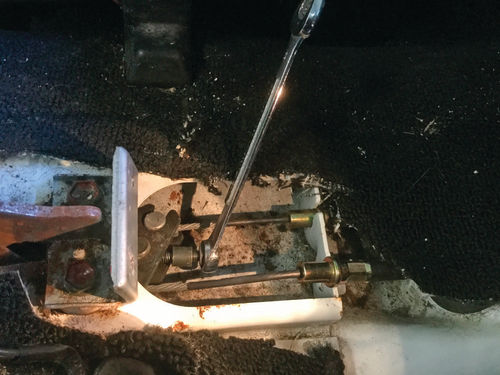
I obtained a replacement brake cable, then set to work changing it. Starting from the interior, I removed the trim cover to expose the hand brake assembly. I loosened the adjusting screw from the brake handle until I had enough slack to remove the balance bar and release the cable end (Photo 27).

Moving on to the wheel, I removed the brake shoes, clips and springs until I was down to the backing plate. Removing the brake cable from the backing plate requires pressing in four spring-loaded “fingers” that pop out to hold everything in place. The trick I have learned for how to do this is to tighten a small hose clamp on the end of the cable housing to press in the fingers enough to let them slide back through the hole in the backing plate. At that point, I pulled firmly on the parking brake cable and it slid out of the backing plate (Photo 28).
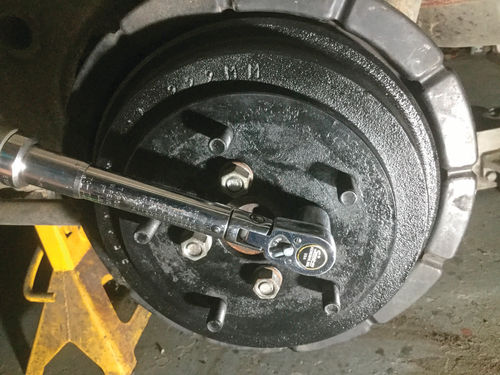
Working from under the truck, I removed all of the clamps holding the brake cable, then pulled it free. I compared the new and old cables to make sure they were identical, then installed the new cable. I cleaned up, inspected and reinstalled the brake shoes, springs, clips and adjusters, then reinstalled the brake drum. Going back inside the truck, I connected the top end of the cable to the parking brake balance bar, then tightened the adjuster until the slack was gone and the parking brake would fully apply when pulling the handle up “7 clicks” as recommended in the factory service manual. The brakes were then bled to ensure that there was no trapped air, then the wheel was reinstalled (Photo 29).
The parking brakes now work well, there are no more dragging brakes, and the foot pedal is very firm.
Next time, I’ll go after that engine that will not start.


