Restoring a small suv Pt. 6
Tackling the Interior on the Geo Tracker Involved Everything From Repairing the Dome Light to Fixing a Door Handle and Installing Carpet.
The interior of our 1991 Geo Tracker came to us with a significant mold infestation caused by improper storage. In Parts 1 and 2 I thoroughly cleaned and de-toxed the interior before it was safe for anyone to go inside of the Tracker. I then turned my focus to fixing the wiring, engine and drive train. Now that our little SUV is running and driving, it’s time to turn attention back to the interior. We have shown 68 pictures so far, so this month we will start numbering at 69.
The Interior Door Release Handle
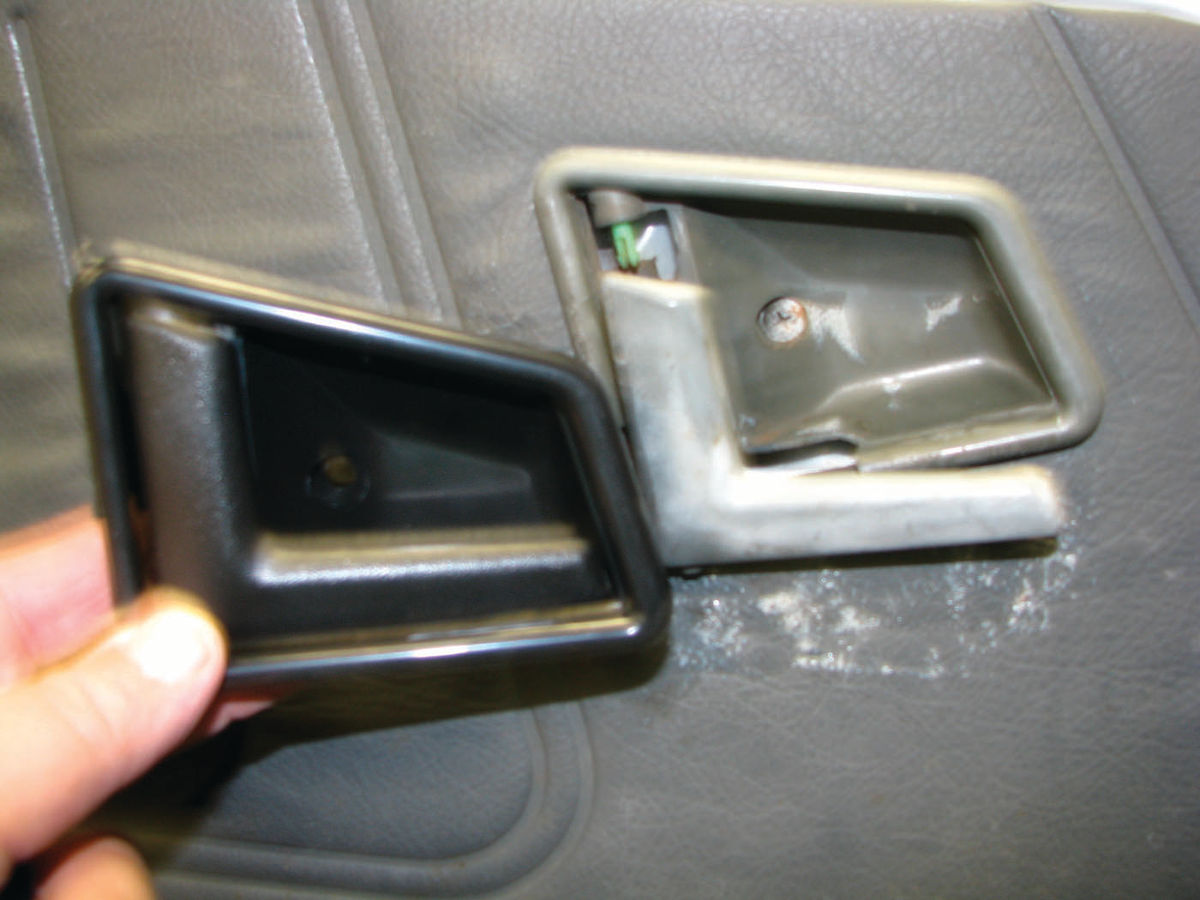
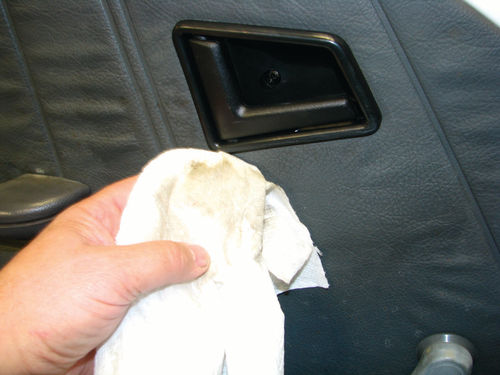
The driver’s door panel had a significant amount of Gaffer’s tape around the interior door latch handle. Initially I thought the tape had been put on to cover up a tear in the door panel, so I was prepared to recover or replace the door panel if necessary. However, when I removed the tape I found a completely different problem than what I had been expecting. I found that the interior door handle, which is made from plastic, had broken at the hinge. The previous owner had used gaffers’ tape as a “field repair” to make the door handle work rather than replace the broken assembly. Like many field repairs it was temporarily patched together, but never permanently fixed (Photo 69). I did a quick parts search on the Internet and found several sources for replacement handle assemblies, which were surprisingly affordable. The passenger’s door handle was in good working condition, but the plastic had a very weathered appearance. I ordered replacements for both sides so that they would be the same color and match from one side to the other. I removed the tape and the door handle assembly, and then used lacquer thinner and a rag to remove the sticky tape residue from the door panel. The door panel cleaned up well and was in excellent condition (Photo 70).
Installation was very quick and easy. I spent a few extra minutes and repainted the screw heads semigloss black to make them look like new before reinstalling. All told the repairs took about 30 minutes for both sides. The time and money to make a proper repair was hardly more than the cost of the field repair, reinforcing my belief that it is better to fix things properly the first time.
Grounding the Dome Light

The dome light did not work in the Tracker, which is one of those minor problems that can be somewhat irritating in a regularly driven vehicle. I started by troubleshooting using a digital volt meter at the dome light assembly. I measured voltage between a ground screw and the power input at the input connector where it plugs into the light assembly. I found good 12-volt power at the connector. I also checked power to the positive side of the light bulb itself, and again found 12 volts (Photo 71).
On this model, as with many other cars, the dome light works by having constant power to the light bulb. The ground side of the circuit goes through the dome light switch, then to either ground or through the door pin switches depending on the switch position. Since we have good power to the positive side of the bulb, the problem was somewhere in the ground circuit. I used a jumper wire to connect directly from a good ground to the light bulb, bypassing the switch and all electrical connections on the ground side of the circuit. The dome light lit up when I applied the jumper directly from the grounding screw to the negative side of the light bulb. This meant that there was at least one bad connection between the grounding screw and the light bulb. I removed the light assembly and checked it on the work bench using my volt meter set to the resistance (ohm) setting. I found that every electrical connection on the ground side had gone bad due to corrosion between the riveted connections. The switch tested out good and worked properly.
To repair the light, the easiest fix would have been to purchase a good used replacement light assembly, but I wanted to try to fix this one. It would require cleaning up and soldering all of the riveted connections to make a good electrical connection between them. The body of the light assembly is made from plastic, so the challenge would be to get the connections hot enough to melt solder without melting the plastic housing.
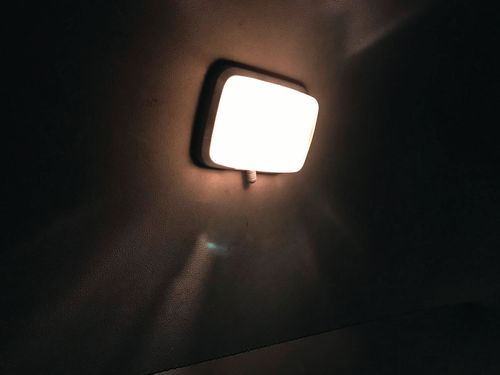
My first attempt to repair the light was a failure. I discovered that my 20-watt soldering iron did not have adequate power to heat up those heavy connections enough to melt the solder. I bought a more powerful soldering iron and while I was able to get the connections hot enough to make a good solder connection I learned that the soldering was a little more difficult than I had expected because of the plastic housing. The temperature of melting solder and melting plastic were close enough that I had trouble with contamination of the solder joints. By cleaning the joints as well as possible and heating carefully I was able to get good solder joints. If I were to do it again, I think I would just buy a replacement light assembly and be done with it (Photo 72). Reinstalling the light assembly was quick, and the dome light works well in all switch positions. Initially the dome light only worked from the switch, but did not work when opening either of the front doors. I found that both of the door pin switches had corroded from lack of use. I cleaned them using WD-40 and a Scotch Brite pad. The dome light is now working properly (Photo 73).

Removing the Old Interior
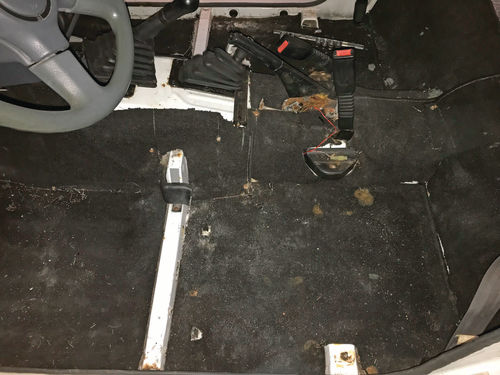
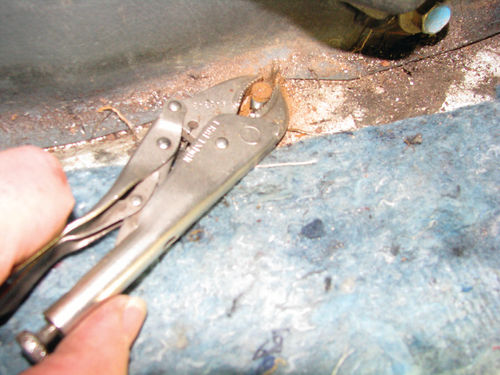
The seats were in pretty good condition overall, but were very dirty and stained. The interior had an old musty smell to it. The seat tracks and steel brackets had a significant amount of surface rust caused by the wet carpets and high humidity inside the interior. The carpets were heavily stained and discolored and the edges and seams were pretty frayed. The best approach to restoring the interior was going to be to remove and replace the old carpets, clean and refurbish the seats, and sand and repaint all the metal components (Photo 74). I started by removing the back seat and brackets, and the rear carpets. The rear carpet was held in place by a trim piece along the tailgate and eight Philips screws along the sides and front. Several of the screws were rusty and could not be removed with a screwdriver because the heads were too damaged. I had good success by cutting the carpet around the screw with a utility knife, and then pulling the carpet straight up and over the screw head. After the carpet was removed and out of the way, I went back with a set of Vise Grips to grab the stripped screws by the head and twist them out. That was very effective and I did not need to drill out any of the stuck screws. I also took several measurements for locations of fasteners and hardware and made a few sketches for later reference (Photo 75).
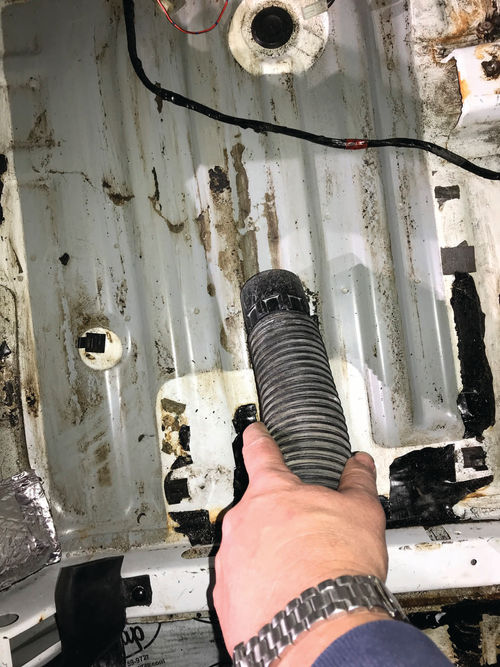
Next, I turned my attention to the front. I removed the driver’s and passenger’s seats and set them aside for cleaning and restoration. I removed the consoles and seat belt anchors, and then I removed the carpets. I saved all of the old pieces of carpet for reference if needed until the new carpet was installed. I also removed the shift levers from the transmission and transfer case. Once again I used nitrile gloves stretched over the shifter holes to keep debris out while the carpet is being installed. The nitrile gloves were a perfect fit to seal up the open holes. All of the hardware was bagged up and set aside to be cleaned and painted before reinstallation.
Floor Preparation and Sound Deadening
The best feature of our Tracker is the rust-free body, and that included the floor pans which were in perfect condition. I cleaned and vacuumed up the floors to remove the loose debris, scrubbing where necessary to get the floors clean (Photo 76).
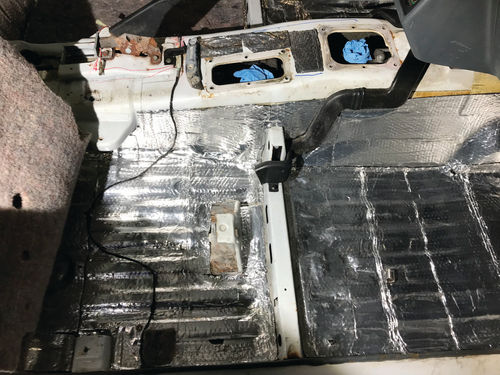
I had decided that I wanted to put sound deadener on the floors before installing the new carpet to help reduce road noise and provide a little bit of heat insulation. There are a number of benefits to installing sound deadener in a car. It helps muffle the high frequency sounds that make a car sound “tinny” and can help eliminate “oil canning” on large surfaces like floors and inside doors. It can also help protect the metal from corrosion if installed correctly because it protects the sheet metal from oxygen and water, which are the two main ingredients of rust. Surprisingly, it is not necessary to cover 100% of the surface to get a measurable amount of sound deadening. Applying sound deadener over 60-75% of a large flat panel can provide a significant noise reduction. However, I feel that applying installation fully from corner to corner with no gaps is the best way to go overall. After all, if you are going to do a job you should do it right.
The product I used is a 2 mmthick butyl rubber and foil sound deadening mat. It is self-adhesive, so no additional glue is needed. The product is installed by peeling off the protective paper and sticking it in place, then firmly adhering it using a roller or similar tool to attach it to the metal floor panels. This particular product is embossed on the aluminum face, which helps with the installation process. You know it is properly installed when it is rolled out to a smooth surface and the embossed pattern has been eliminated. I have used a few different products over the years with good results, and I was pleased with this product. The sound deadening comes in sheets that are 29.5” by 19.5” and are pretty easy to handle when they have the protective paper in place.
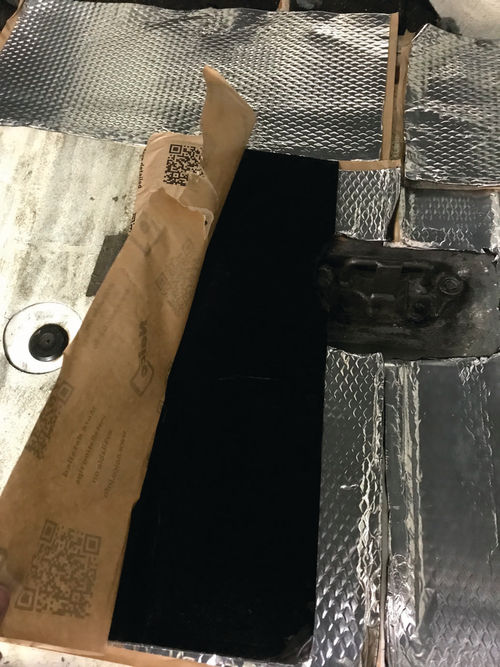
I prefer to install full sheets where possible, trimming around the edges and corners as needed. Start by laying a piece of insulation in place with the protective paper still on. Mark any edges and corners that need to be trimmed. You can mark directly on the sheet with a marking pen, or by lightly scribing with a pencil, awl or similar tool to indent the aluminum on the cut line. The product can be cut using sharp scissors or a utility knife. I do not recommend cutting in place with a knife unless absolutely necessary because the cut lines score the underlying paint or undercoating and give rust a place to start. Keep any cut scraps and little pieces because they will be handy later. Once the piece has been cut and trimmed to fit, peel the protective paper back a few inches from one end, exposing the adhesive. Align and stick the piece in place, adjusting if necessary. Once the piece is lined up properly, carefully pull of the remaining protective paper and gently press the piece into place (Photo 77). The product needs to be firmly rolled into place to fully adhere it to the panel. I found that a J-roller, like you would use for installing linoleum, does a good job. Steel rollers work better and faster than rubber rollers. A heat gun is also helpful to get the product to stretch and stick in tight areas. The hard plastic of a screwdriver handle worked very well for curved areas and inside corners. I also fashioned some tools from hardwood for smoothing out the material, especially in ribbed floor channels. I worked methodically placing sound deadener pieces in place in large pieces where possible, and smaller pieces as needed. I found that it is OK to overlap the product in corners or at seams where it would be covered by carpet. At this point, all of those small trimming scraps come in very handy to fill in little gaps. In a few hours I was able to fully treat the floors of our Tracker from firewall to tailgate (Photo 78).
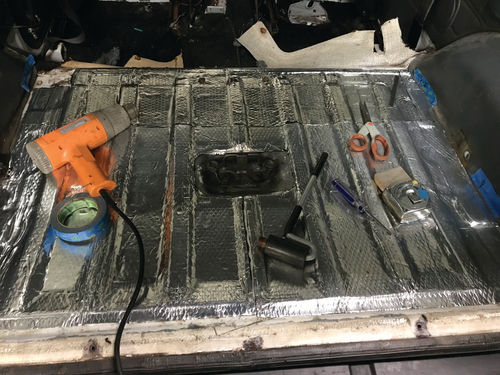
The sides and top of the transmission tunnel on this particular model are a significant contributor to engine and drive train noise coming into the interior. The factory had applied sound deadening in this area, but it had become brittle and was coming off in big pieces. I scraped off the old material with a putty knife, and applied two layers of the sound deadening in those areas. The extra effort was worthwhile, and the insulation made a significant difference. The Tracker is much quieter on the road now with the sound insulation in place. I feel it was very worthwhile (Photo 79).
Installing New Carpeting
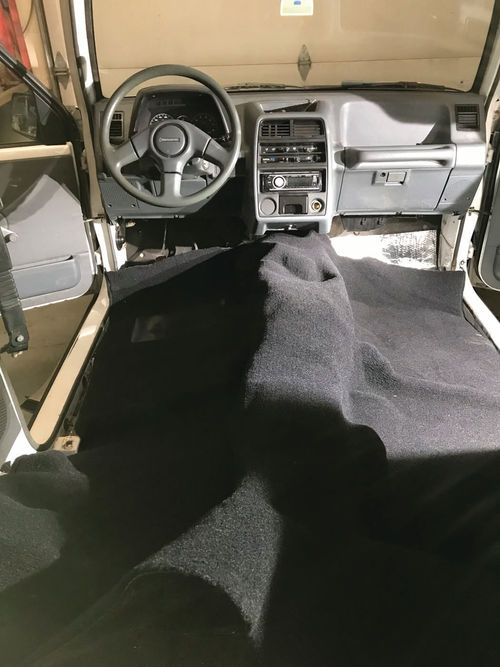
The carpet kit that I bought was OEM quality, and was molded to fit the shape of the floor and transmission tunnel. When it was shipped, it had been folded up and placed in a large box. The first thing that I did was to remove the carpet from the box and lay it out flat, allowing the wrinkles to work themselves out. The carpet manufacturer recommends setting the carpet out for a minimum of several days. I set mine out for a week to ensure it was ready for installation. Some of the areas that got wrinkled in the box did not want to lay out flat, so I stacked books in strategic places to weigh the carpet down to its correct shape. The carpet relaxed and returned to its original shape by the time I was ready to install it. Carpet installation is pretty straightforward and can be installed by a single person, although an extra set of hands can definitely speed up the process. I enlisted the help of my friend John to put in the new carpet. We started by laying the carpet roughly in place to see how everything fit. Lining up the toe board/floor corner and the seat mount bump-outs, it was easy to see where the carpet was supposed to sit. On the first test fitting, the carpet was sitting too far back by about 6 inches due to interference at the top front of the transmission tunnel. We measured the area that needed to be trimmed and marked it with blue painter’s tape. We then removed the carpet, made the necessary cuts, and tried again. We went slowly and carefully, sneaking up on the final cuts that allowed the carpet to drop into place on the third try (Photo 80).
Once the carpet was set in place, we were able to take measurements and cut the holes for the transmission shifter, the 4-wheel drive shifter, and emergency brake. These cuts were made in place, working carefully to not cut the hole too large. Next was to align the seat mounts and seat belt brackets and mark the holes. By working methodically, the carpet steadily was fitted into place. The fit was excellent.

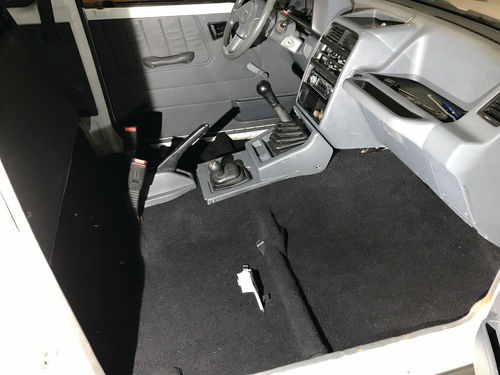
Once the trimming was completed, the carpet needed to be permanently mounted. On this Tracker the carpet is not glued into place, but rather is held in place with screws and trim washers. I referred to my sketches made during removal of the old carpet for the location of the screw holes. I used a sharp dental pick tool working from the outside where possible, piercing the carpet through the old hole into the carpet. Once the hole was located and marked inside using blue painter’s tape, I removed the pick and inserted a new screw from the interior, the same as the original installation (Photos 81 and 82).
In some areas I was not able to work from the outside, so I worked from the dimensions I had written down during disassembly. I used the pick from inside the Tracker to find the screw hole. A little patience can really help, and before long all of the screws were installed. The carpet fit very well and looks very nice.
Follow along next time when we turn our attention to restoring the seats, completing the interior, and reviving the paint on the hood of our Tracker.


