How -to Cooling System Maintenance, Pt. 1
Problems May Be Developing Even If Everything Seems OK. So, Take This Advice to Help Keep Things In Order.
IT’S OFTEN TEMPTING to go with the theory “if it’s not broken, don’t fix it,” but that's poor advice when it regards your engine’s cooling system. Over time it can get a build up of rust and lime deposits. This acts like insulation inside the engine’s water jackets. It can reduce the ability of the coolant to absorb heat from the engine and in severe situations even create hot spots. Coolant also has a certain life expectancy, and just because it looks “good and green” doesn’t equate to it still being effective. When mixed properly with water, modern antifreeze serves several important functions; the most obvious is within its name, protection from freezing. In addition, it raises the boiling temperature to help prevent overheating, and has rust inhibitors.
In times past, it generally was considered normal service to change your coolant every two years. Then came products like “DEX-COOL” that were rated for 5 years or 150K miles. However, this particular antifreeze has a reputation for finding casting porosity and seeping around gaskets. In the shop manual for my 1997 Chevy P32 chassis they note using “coolant tablets” when replacing the DEX-COOL for normal maintenance. These are a “vegetable formula” (GM #12378254) and are simply added in with the fresh coolant to help prevent leakage. It seemed to perform OK in my newer motor home, but when I switched over my ’86 Caprice, the 305 engine ended up with small leaks around the intake manifold gaskets. I lived with it for a while until I noticed that Prestone had introduced its own 5 year 150K mile antifreeze for all makes and models. This has performed well in all my vehicles, with no leaks. I imagine there are still some manufacturers making a two-year product, but there is no reason to settle for it, considering the importance of your cooling system.
To Protect and To Service
To help you protect and get the most from that system, this series will cover:
1. Inspecting for system leaks. This will include checking the water pump, radiator, heater core, hoses, casting plugs, heater control valve (if equipped) and internal leakage as well.

2. Draining & flushing the system. Back flushing the heater core, and reverse rinsing the engine block.
3. Hose inspection and replacement.
4. Replacing the thermostat; refilling with the proper mixture of new coolant.
Note: The term “Coolant” refers to a mixture of antifreeze with water. Don’t think of it as diluted antifreeze.Water acts as a catalyst when mixed with it and actually makes antifreeze far more effective.
Do Some Visual Inspections Before Getting Started
If there is a leak in the cooling system you will need to find and repair it before fresh coolant is added.
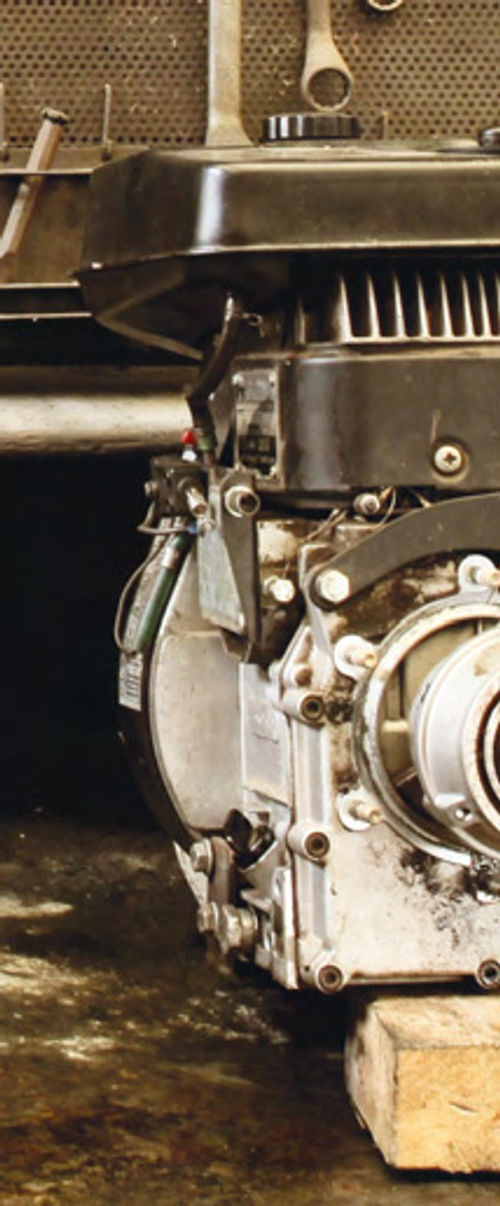
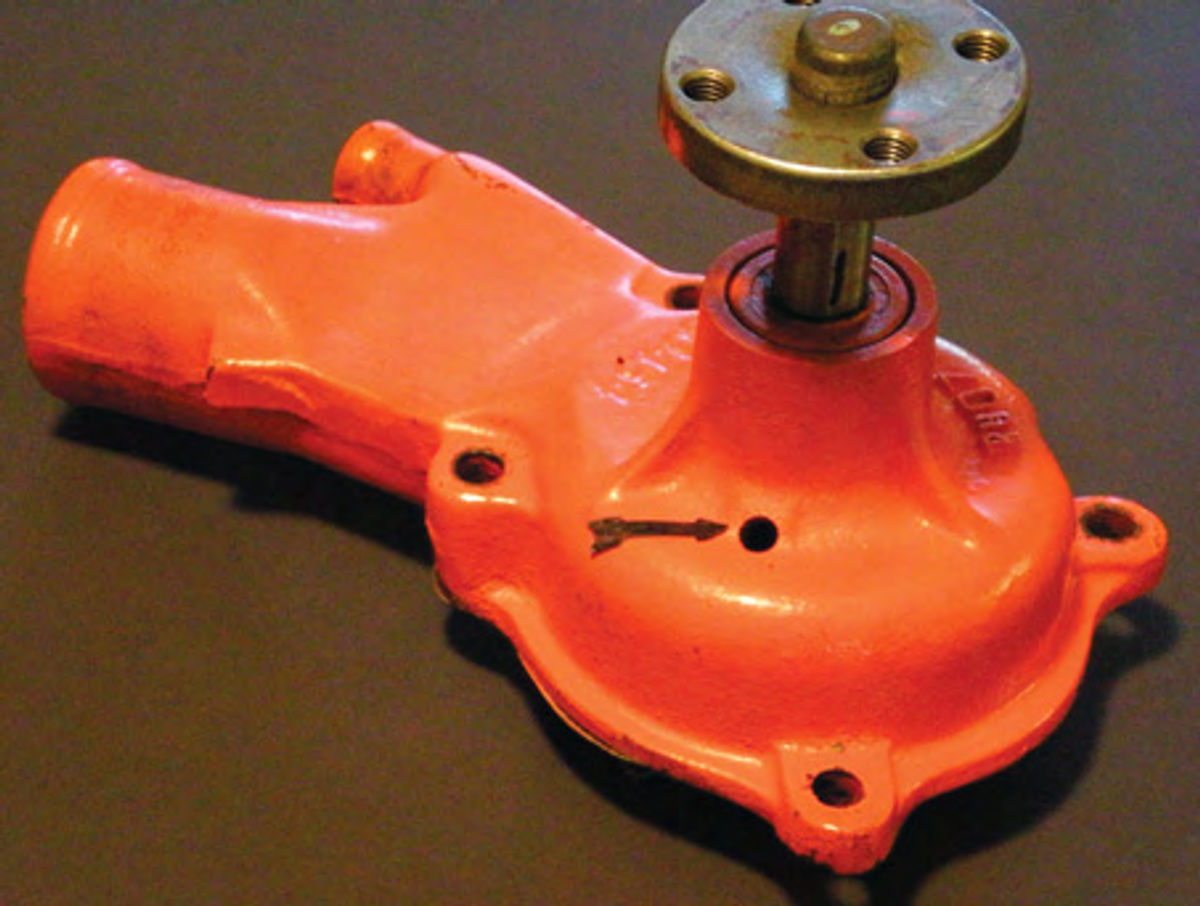
If your water pump is leaking, flush the system first, and then replace the pump. The same would hold true if it were the radiator. Water pumps have a vent hole in the neck as shown in Photo 1. When the seal starts to fail, leakage will be seen here. Sometimes stains can be seen on the lower radiator hose leading up to the pump, also indicating that there has been leakage. Be aware that pump bearings can fail prior to any signs of leakage. If the fan is attached to the water pump, grab the blades and try to flex it back and forth. If excessive looseness is visible in the pump shaft, or if the pump is beginning to get noisy, this means it’s time to replace or rebuild the pump.
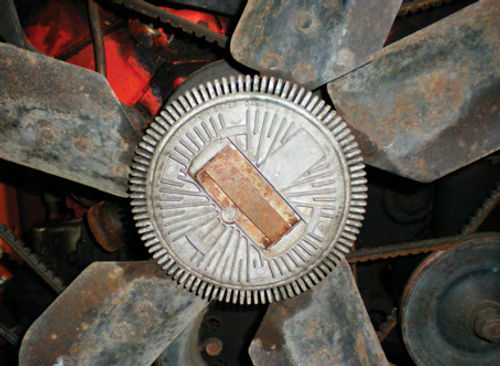
Fans: Older vehicles generally used a rigid, stamped metal fan. These often were two metal stampings riveted together to create a four-blade fan. Later on, flexible fan blades were introduced on some vehicles. These were designed so that the blade pitch would lessen (becoming flatter) at higher engine speeds thus reducing drag on the engine when the fan wasn’t needed. Typically, with these fans multiple blades are riveted to a solid metal center hub. Clutch Type fans like the one in Photo 2 also came about for the same reason. There are several different styles; a Bi-metal strip thermostatically controls the one seen here. Others use a coiled Bi-metal spring. Both of these designs sense the radiator temperature and operate to engage and disengage the fan as needed. Clutch operation can usually be verified by starting the (cool) engine and listening. As the engine approaches operating temperature you will hear the sound of the fan change. Continue to listen and you may hear it change again as it cycles. How often it cycles will depend on the engine and ambient temperature. Sitting at idle for any length of time will, in most cases, keep the clutch engaged.
If your vehicle has a clutch fan but there is no strip or spring, it is likely a centrifugal type. These respond to engine rpm, not temperature, and were generally less-expensive after market replacements.
Regardless of the type, inspect any rivets for looseness and the blades for damage. Either of these could be dangerous and also create engine vibrations.
Finally, there are electric fans. These are used in vehicles where the engine is transverse mounted; custom applications; and also where additional air flow through the radiator is needed. Motor homes, large (slow-moving) equipment, and taxicabs are some examples. Installed by the manufacturer or available as after market “add-ons,” these fans can be located on either side of the radiator for a “pull or push” operation. Most utilize a temperature sensor in the radiator to turn the fan on when needed. This also means that the fan can be energized when the engine has been turned off and the temperature of the radiator rises. So, be cautious if you must perform any work near the fan while the engine is still warm. Be aware that it might cycle. Consider unplugging the fan, but don’t forget to reconnect it.
Usually, electric fan operation can be checked by temporarily restricting the airflow through the radiator to raise its temperature. Once the thermostat has opened and enough heat builds in the radiator, the fan should turn on. If your vehicle is equipped with a temperature gauge, watch it with relationship to the fan coming on. Otherwise feel the temperature of the upper radiator hose. You don’t want to overheat the engine if, indeed, the electric fan is malfunctioning.
Heater Control Valve: Many vehicles don’t use a heater control valve, but if yoursisso equipped, it may look similar to the one in Photo 3. This one is located in the heater hose, but some also thread directly into the intake manifold. Visually check it for leaks, (though this seldom is a problem) and then check its function by simply feeling the heater hoses. With the heater temperature control set to COLD, and the engine at normal operating temperature, the hose from the engine to the valve should feel warm or hot, while the hose exiting the valve should not. Now move the temperature setting to HOT, and both hoses should feel warm to hot as the valve opens to allow flow to the heater core. If no change in temperature is detected when feeling the hose exiting the valve, you most likely have a defective heater control valve. You will need to verify that it’s receiving the signal from the control panel. With most Chevrolets a vacuum signal is sent to the heater control valve when the temperature is set to cold, keeping the valve closed. Moving the temperature lever to any position other than “full cold” eliminates the vacuum signal and allows the valve to open. Check your vehicle’s shop manual to verify that it operates in the same manner. The condition of the heater core will determine how hot the hoses get. If it’s flowing freely, hoses on both sides of the control valve, as well as the one returning to the water pump, will behot.
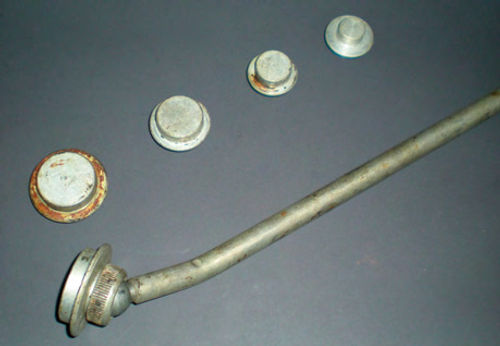
Engine Casting Plugs: These tend to be forgotten. Often referred to as “freeze plugs,” these steel plugs can rust out from the inside causing a slow loss of coolant that often goes undetected.
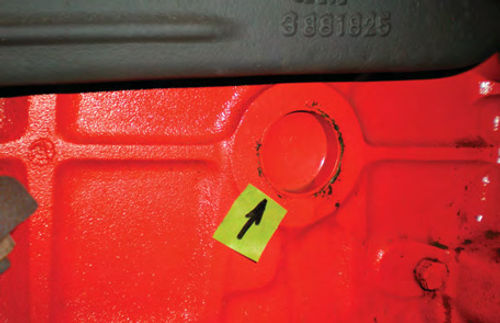
Photo 4 shows the easily visible casting plugs on a Chevy in-line six-cylinder. This engine also has some small plugs in the cylinder head, hidden beneath the manifold gasket. “V”-type engines may have them hidden behind engine mounts. You also can expect to find them located on the rear of the engine behind the flywheel. Typically, the plugs lowest in the engine will be the ones to rust out. Since they’re often oily and dirty, the first step is to clean these plugs so you can see them. Do they appear rusty and weeping coolant? If so, they obviously need replacing.
Use a small screwdriver or pick tool and, using only the force of your hand, poke at the plugs. Take jabs at the center and around the perimeter. If you break through you found a problem that was just around the corner. (Note: have a catch pan handy in the event old coolant comes “streaming” out.)
Once the old plug has been pried out, clean the inside edge of the block that it seals against. If it can be reached with a small wire wheel mounted in a drill, or something similar, that’s a great way to clean up cast iron, but I wouldn’t recommend it on aluminum. Otherwise, use a small section of sandpaper or steel wool and clean it by hand. Whenever possible, use replacement casting plugs made from brass and you won’t have to be concerned about them rusting. Before installing, coat the edge of the plug with a sealer. Probably any kind will do, but I usually use hard-setting Permatex #1 that comes in a tube. Locktite thread sealer also can be used as a sealant around the edge.
Replacement isn’t too difficult but sometimes the plug’s location can complicate things. Snap-On made the tool seen in Photo 5. This is a great aid in installing hard-to-reach casting plugs. It has various size ends that thread onto the shaft. They have a larger diameter outer edge to avoid setting the plug too deeply into the block. The shaft’s end is then struck with a hammer to install the plug. You may still be faced with removing an engine mount or starter to gain access, but this tool will get you into areas where you wouldn’t have room to swing a hammer, or “straight-on” access to install the new plug.
If your plug is easy to access like the one in Photo 4, generally a socket the same diameter as the plug is used for installation. If needed, consider using an extension and strike it with a brass or other “soft” hammer. There is one other option; however I would only use this in a pinch. That option is rubber expanding-type casting plugs. These come in various sizes and once placed into the casting hole you tighten down a nut to seal it. It’s actually a piece of rubber being sandwiched between two sections of steel as the nut is tightened. My biggest dislike with these is the appearance. It’s obviously not factory original, but could be used in an emergency situation, and replaced later.
Radiator and Heater Core: Before performing any cooling system service, visually inspect the radiator. Check the seams where the core and tanks connect. Pay attention to where the radiator core tubes themselves connect. This is normally where leakage will appear. Next, look at the core. It’s unlikely you will notice any damp spots or leakage in the central area of the core unless it was struck by something. This would typically be something like a small rock that got kicked up, but it could also be accidental damage caused when working near the core. It’s good practice to cover the radiator core surface with a section of corrugated cardboard for protection when performing work close to it, such as removing the fan or water pump.
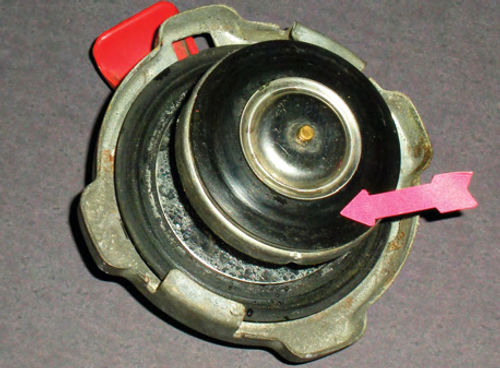
While checking the radiator, don’t forget to check the cap. Photo 6 shows the rubber seal. Often found cracked and breaking, this is usually the first thing to fail. They are also designed to hold pressure to a specific value, which is indicated on the top of the cap. This can be verified with a pressure tester, but if one isn’t available and you are suspect, simply replace the cap with a new one.
A leaking heater core will usually produce a wet carpet on the passenger side of the floor, and quickly fog up the inside of the windshield when the defroster is turned on. Pull back the carpet to actually have a closer look for traces of coolant leaking down behind it. If indeed it has, you will want to clean up the carpet and dry everything out completely. A leaking heater core will require removal and replacement.
Not getting enough heat inside your vehicle? Assuming the heater control valve (if equipped) is functioning properly, the problem may be the core is restricted internally. We Will Discuss This later in this article when back-flushing the heater core.
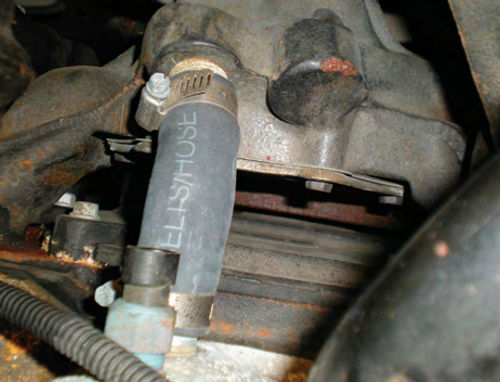
By-Pass Hoses: If your vehicle has a “by-pass” hose like the one seen in Photo 7, I recommend that you replace it any time you are servicing the cooling system. (The by-pass hose allows the coolant to circulate within the engine block when the engine is cold, and the thermostat is closed. With some vehicles the by-pass is built in to the pump, so there is no hose.)
These by-pass hoses are subject to quite a bit of heat and are prone to fail, especially if the hose is designed with sharp bends in it.
Internal Leakage: This most commonly results from a blown head gasket, but could also be from a cracked cylinder head or block. Indications would be overheating and loss of coolant with no signs of external leakage. The engine’s performance would be very poor, and in the case of a blown head gasket, a compression test would show two adjacent cylinders having equally low pressure readings.
Some Tools To Help You Spot Leaks
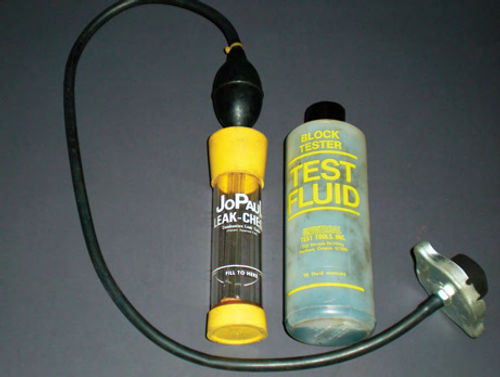
Photo 8 shows a combustion chamber leak detector. This tool combines vapor from the radiator with a special chemical that will change color if exhaust gases are present.
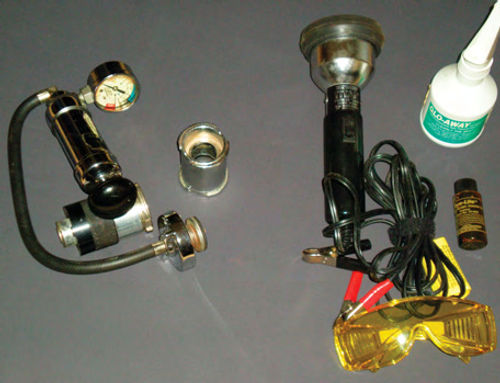
In the left portion of Photo 9 you see a typical cooling system pressure tester with the adapter for testing caps. It will do as the name implies and pressurize the cooling system to assist in exposing leaks. It also can be connected to the radiator with the engine running and the gauge can be monitored for pulsation. This would indicate internal leakage.
On the right in Photo 9 is a fluorescent leak detector “kit.” A special dye is added to the coolant and after the engine has been run for a while you use the ultraviolet light and special eyewear to spot any fluorescent leaks. The beauty of this tool is that it’s not necessary to clean off or even dry the surfaces you are inspecting. The UV light will only illuminate leakage that contains the special dye, so previous spills or leaks of coolant are unnoticed. These are great tools for finding leaks, and as you might be aware are useful in finding leaks in other systems as well. They are also rather expensive. Cooling system pressure testers, on the other hand, can usually be purchased used at auto swap meets for minimal cost, and most of the time will get the job done.
Creating a Project Shopping List
1. You know you will need antifreeze, usually 2-3 gallons depending on the size of your system and the level of concentration you desire (we will discuss this later).
2. Demineralized Water, probably 2.3 gallons (enough to mix with the antifreeze for the final fill).
3. Purchasing a cooling system flush is a good choice. Even if you don’t have rust in the system you likely have lime deposits, and water alone won’t remove them.
4. Definitely purchase a new thermostat and two gaskets to go with it.
5. Possibly you found some items needing replacement in your preliminary check, like a radiator cap. If you have decided to go with all new hoses, don’t forget new clamps if the old ones can’t be reused. Otherwise, you can inspect the hoses more closely as we start working on the cooling system and make that decision later.
Next, we’ll back flush the heater core, replace some hoses, rinse the block and replace the thermostat.