
Milt’s Tune-Up Advice
"This collectible vehicle smokes out of the tailpipe." stated the owner. "I'm ready to to sell it. I just bought this car because it looked clean and it is a convertible.”
Concerns
Sensing his concerns, I asked several more questions. How does it start? (“quick”), how much oil does it burn (“lots”), what kind of gas mileage does it get (“poor”), how much pep does it have (“fair”), and does it smoke. (“There’s lots of white smoke!”)
The owner had the overhead valve seals replaced in an attempt to stop the smoke. No luck! (“It still smokes.”)
The owner had also had the oil and filter changed. No additive was installed. He was concerned about a small oil leak out of the right rear section of the engine block.
The vehicle in question is a 1962 Rambler American equipped with a 196 CID overhead valve engine, a one-barrel carburetor, and a PCV valve. The odometer showed 78,000 miles.
Tune-Up
Visual checks: Starting with the visual checks, the oil was dark. It had just been changed and was 1 quart low after driving 100 miles. The automatic transmission fluid was dark (with a slightly burned smell). I recommended a fluid change. The shift from 1-2 and 2-3 was “very firm” and I believe normal.
The “open” PCV (positive crankcase ventilation) system was plumbed up with “water heater hose.” I recommended a PCV hose the owner could purchase at an auto parts house. The open part of the PCV system is the oil fill cap open to atmosphere through a mesh filter.
Oil: The crankcase oil had just been changed. I recommended changing the oil and filter again every 100 miles to help clean up the “innards.” I do not recommend any oil additive. Just clean 20-50 weight oil.
Oil Leaks: The valve cover gasket had been replaced and was not leaking. The oil leak appeared to be at the fuel pump mounting on the right rear portion of the engine block. The fuel pump bolts were tightened. I wiped these and the surrounding areas including the side engine cover. The side cover bolts were loose.
Battery: I recommended installing new #4 gauge battery cables for the 12-volt system because the connectors were the universal type and looked very ragged. I cleaned and retightened the connectors.
Battery Performance: The cranking voltage was 10.4 volts and the battery ground was 0.18 volts during cranking. These readings are normal. The starter sounded energetic, but no need to start up yet. Lots more “tune-up” to perform first.
Engine Condition: The engine was cranking with a very uneven rhythm. The compression measured: cylinder 1 – 95, cylinder 2 – 110, cylinder 3 – 100, cylinder 4 – 95, cylinder 5 – 75, and cylinder 6 at only 50 PSI. A wet compression check on #6 yielded only 55 PSI.
The cranking vacuum was an unsteady 2” during cranking.
Spark Plugs: The spark plug inner porcelain surfaces were tan. This was a clue the fuel mixture was OK and that I was not dealing with a rich fuel mixture (no sooty plugs and/or black smoke, just white smoke).
New specified plugs were gapped at 0.035” (specification), threads lubed with anti-seize, installed to seat contact, and torqued to 1/16 turn past seat contact.
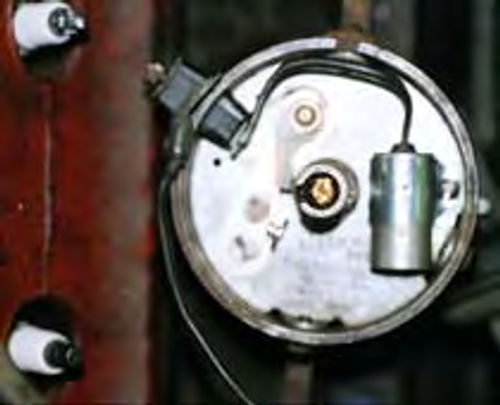
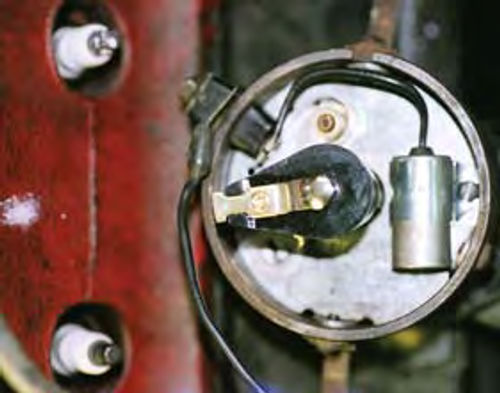
Distributor Service: The distributor was removed for service. (See Photo 1.) The distributor plate was removed. The mechanical advance was free, oiled and tested for no binding. New points and condenser were installed. The point contact was “square and concentric." The gap was adjusted to 0.019" and measured the same on all distributor cam lobes. This is 0.002-inch over specs to allow for “wear-in” of the ignition point rubbing block. (See Photo 2.)
Equal gap at each cam lobe helps to provide the same dwell angle for all cylinders resulting in a smooth idle. The point cam was lubed with new grease.
Previously, the point contact was not concentric (offset) and not contacting squarely. This causes rapid contact point wear and poor electrical contact. There was lube on the distributor cam surfaces.
Vacuum Advance: The vacuum advance mechanism rotates the distributor rather than the distributor plate. The diaphragm was tested by holding my thumb over the vacuum tube port, twisting the distributor mounting plate, then letting go of the tube port. If OK, you will feel suction holding the plate and then a “pffft” as you let go. The vacuum advance chamber was OK.
We’ll test the vacuum advance chamber again, on the engine after start-up.
Carburetor: I tested the accelerator pump with two openings of the throttle. Both times showed a strong squirt. The carburetor mid-section screws were loose and were tightened. If the mid-section is left loose, the leaks can cause a rough idle and low-speed surge due to vacuum leaks.
The choke closed and the spring tension was light.
Since the spark plugs were “tan” inside on the porcelain, I opted not to service the carburetor. We’ll check it out for “drip” during the running tests.
Fuel Lines: I recommended the fuel flex line from the frame to the pump be changed. These lines are usually very old and will swell up inside and show cracks on the outside. This is caused by old age, not the current gas.
Running Tests
Equipment: Before the startup, hook up a voltmeter at the battery (+ and -), “tee” in a vacuum gauge at the intake manifold port, and hook up a “kilovolt” tester to measure spark plug voltage. See Equipment section for kilovolt tester resources.
Startup: The engine started up within 5 seconds, sputtered and ran rough in the first 2 minutes.
Remember the uneven compression and the reading on #6 cylinder was only 50 PSI? We’ll check this out (valve tappet clearance) as we proceed on with the tune-up.
Spark Plugs: The spark plugs’ firing voltage measured from 710 kV (7000-10,000 volts) at idle and 15 kV when tromping on the gas. This verified no ignition misfire and that there were no “open” plug wires.
Dwell: The point dwell measured 34°.
Timing: The “base” timing was adjusted using the “power time” method and with the distributor vacuum line hooked up.
One way to perform the power time procedure is to loosen the clamp bolt on the distributor. Start the engine and idle. Twist the distributor opposite the firing order rotation. Advance the timing to maximum manifold vacuum and a rough idle (too much advance). Then rotate the distributor towards retard. The engine RPM will drop and the manifold vacuum will drop off from max vacuum.
The trick is to retard the distributor until the manifold vacuum drops off around one inch from maximum idle vacuum. At this point the max idle vacuum was around 18” (fair). We retarded the timing until the idle vacuum measured 17”.
Vacuum Advance: The vacuum advance was working by observing distributor rotation when tromping on the gas. For us “old guys,” this AMC distributor rotates just like the old “stovebolt” Chevrolet 6 cylinder distributor.
Engine Condition: At this point we measured the manifold vacuum of 18” at 2500 RPM steady (fair), and 24 inches during a quick throttle closing from a steady 2500 RPM. This deceleration measurement verified the engine is a “good pump,” but the engine still idled rough.
Idle Mixture: The idle speed was adjusted to 800 RPM in neutral and around 650 RPM in drive. The idle mixture screw was adjusted half-way between lean and rich. The idle was slightly rough after the idle mixture adjustment.
Carburetor Drip: The next check was for drip out of the accelerator pump discharge port and out of the main carburetor circuit discharge tubes. Wear goggles for this check at idle. During idle, the top of the throttle blade should be dry. There should be no drip out of the accelerator pump discharge port and the main circuit discharge nozzles.
There was no drip on our ’62 Rambler.
If drip occurs during this test, service the carburetor looking for high float level, leaking float needle valve, and inoperable or stuck accelerator pump check valves.
Rough Idle Still Exists: At this point the engine was still idling slightly rough, plus it was smoking moderately during engine acceleration.
Valve Adjustment: The valves on most cylinders were “tight.” On number six (low of 50 PSI pressure, cranking) the valve clearance was next to zero!
On this cast iron engine the valve tappet clearance specification was molded onto the top of the intake manifold portion of the head; reading 12 and 16 thousandths clearance on the intake and exhaust, respectively.
On this engine the self-locking adjustment nuts can be turned while the engine is running at idle.
With a warmed-up engine, insert the feeler gauge between the rocker arm and the valve stem tip.
Adjust the rocker self-locking nut (9/16 open end wrench) until the feeler gauge “just slips through” the specified clearance without changing idle RPM.
Results: After correct valve adjustment the ’62 Rambler purred like a kitten! The engine idled very smoothly and the idle vacuum increased from 17 to 20.5 inches!
The car ran very well at cruise and was very peppy in 2nd gear at full throttle. There was no pinging and no hesitation on take-off from the stoplight.
Smoke: The smoke was reduced but not gone during acceleration.
I urged the owner to change the oil 3 times every 100 miles to see if the smoke would reduce from driving the car. His wife called and reported less smoke than prior to the tune-up.
Recommendations
I urge all of you to perform a complete tune-up on your vehicle as described herein. If you find one thing wrong with your collectible vehicle tuneup, repair it or adjust.
Do not stop. “Plow ahead,” and continue repairing and adjusting all tune-up items to specification. The results will amaze you.
The Solution
Several weeks later the owner called to report the smoke had decreased.
However, the smoke out of the tailpipe still bothered him and his wife.
They opted to have the engine overhauled. Upon engine removal and disassembly, cylinders 2, 4 and 6 were “pumping oil.” The combustion chamber and the piston tops were “oily.” This was most likely caused by poor piston ring sealing.
The other cylinders showed dry carbon-like deposits in the combustion chamber and on the piston tops. The dry carbon buildup is normal.
Engine Overhaul
The engine was re-bored and new pistons, rings and rod bearings were installed. The crankshaft was re-ground and new main bearings were installed. The head was replaced due to a large crack in number 3. The valves were reground and then installed with new seals. The timing gears and timing chain were replaced.
Results: No more smoke! Equipment
kV testers can be purchased through automotive parts houses and/or retail stores that stock automotive tools and equipment.
On this case history vehicle I used a Smartach+ meter manufactured by General Technologies Corp. in Canada. This kV tester can be purchased through CarQuest auto parts stores, part number XSHTA100.


