
How -to Cooling System Maintenance, Pt. 3
Now We’ll Back-Flush the Block, Inspect the Radiator Hoses, Replace the Thermostat and Fill the System.
SO FAR, WE’VE inspected the system, gathered tools for the project, drained, prepped and flushed the cooling system, back-flushed the heater core and changed heater hoses. There were 17 images in the first two installments, sowell start this final installment in the series with Photo 18.
Back-Flushing the Block
Connect your garden hose as previously shown in Photo 14 (September), only this time connect it to the opposite heater hose, going the opposite direction. The hose that connects to the intake manifold, cylinder head, or block will be used this time, and the garden hose will be back-flushing the engine block instead of the heater core. Disconnect the lower hose from the radiator. By doing this, any rust that’s stirred up won’t end up in the radiator.
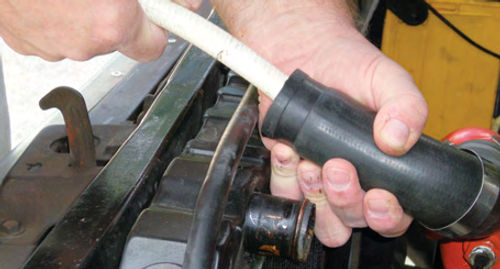
Now turn on the hose nozzle and watch the discharge from the radiator hose. If it’s rusty, continue flushing until it clears.Let’s go a step further by using a clamp on the lower hose as we have in Photo 18. (These are inexpensive, manufactured for Craftsman and purchased at Sears.)
Next, disconnect the upper radiator hose at the radiator. Once again turn the water on. This will allow the water level to build up in the block and potentially remove some more “junk.” Let it back up until it is spilling out the upper radiator hose, then remove the clamp allowing a sudden rush of water to exit the block. Repeat this several times until the discharge is clear.
Seeing as you’re no doubt wet by this point anyway, take the garden hose, insert it into the upper radiator hose and turn it on as in Photo 19. Again, use the clamp on the lower hose to allow the water level to build up in the block and then release it.
This Is The reverse direction of normal coolant flow and may dislodge more rust particles.If the buildup is severe, you will never be able to completely free the block of accumulated rust, but all of these steps will yield the best results. On the other hand, if the block is fairly clean this regular maintenance will keep it that way.
An engine with an extremely severe rust buildup in the water jackets will require disassembly, and the block “tanked” (chemically cleaned) or “baked.” This service would be performed by a machine shop, or they would advise you where to take it.
Judging the Hoses
Should you replace your hoses with new ones? There are a number of factors to take into consideration when making this decision. Let’s assume we are working with a five-year service interval for the cooling system. How often is the vehicle driven or how many miles do you put on it in a year? My Malibu logs about 4000 miles per year. The hoses are easy to locate so I will replace them all at the next service interval. If your vehicle is only driven on the weekend, then there are fewer hot and cold cycles and the hoses may still have useful life in them.
Visually inspect the hoses for such things as oil contamination as well as abrasions caused by rubbing against something, and look closely at the end of the hoses where they connect to the radiator and engine. Can you see small cracks or separation from its reinforcement cord? If you can answer “yes” to any of these, replace them.
Squeeze the hose. Does it feel firm, or is there a mushy feel to it? In some instances hoses may become hard and stiff. When the hoses are disconnected from the radiator, look inside them while flexing and squeezing them. Are there small cracks visible?
Ultimately the decision is up to you. If you are unsure, replace them with new ones. When you figure out the cost over a five-year period it’s so insignificant you might just decide to replace them.
Replacing the Thermostat

Unbolt the thermostat housing and discard the gasket. Make sure both surfaces are clean; and center the new thermostat in the recess. If you look back at Photo 12 during the thermostat removal (September), you see the spring portion sits in toward the engine block. Photo 20 shows the opening temperature of the thermostat stamped on its bottom. Remember that this will always sit in toward the engine block. Once it’s in place, replace the housing using a new gasket. I use gasket sealer; some people don’t. Tighten the housing evenly, going back-and-forth between the two bolts.
On many engines the thermostat is mounted vertically. If the thermostat twists and secures into the housing, then simply replace the gasket as mentioned above. If, on the other hand, it sits in a vertical recess, use the gasket and quick setting adhesive such as 3M Super WeatherStripping Adhesive (the yellow stuff) to hold it in position. Apply a very light application of adhesive on the gasket. Hold the thermostat in place while placing the gasket over it. The gasket will maintain the position of the thermostat until the housing has been replaced and secured. Remember to do this or you risk cracking the thermostat housing when it’s tightened should the thermostat fall out of place. If the bolts that secure the housing extend into the water jacket, coat the threads with a sealant like silicone. Steel bolts threading into an aluminum surface should be coated with an anti-seize compound.
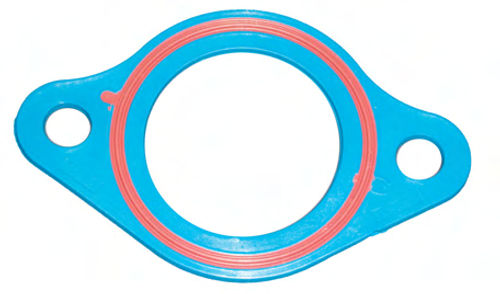
If you have experienced seepage around the thermostat housing as I did with my 305V-8 Chevrolet engine, consider using this special gasket made by Fel-Pro (Photo 21). Instead of the thin paper-style gasket, this appears to have a foundation made of plastic, 1/8” thick with a raised silicone seal on both sides. It is applied without sealant. This will compensate for any distortion in the mounting surfaces and seal it up. My problem evidently was the mating surface on the intake manifold. I made several attempts to seal it, but I wasn’t successful until I switched to this gasket. The Fel-Pro #35562T fitsGMV-6&V-8 engines built for 1955-95 (at least according to the package).Certainly this is available for other applications as well, and the cost was under $10. And just in case you are wondering, no, I don’t, nor have I ever, worked for the company.
Once you have this back together, replace or reconnect the hoses. Make sure to close the radiator drain cock, drain out any water remaining in the block, and replace the engine drain plugs, remembering to reseal them using Teflon tape or something similar. If you chose to put on new hoses, you can re-snug them in a few weeks after they have gone through several heat cycles. Remember To inspect your fan belt as well and make sure it has the proper tension.
Filling the System and Finishing Up
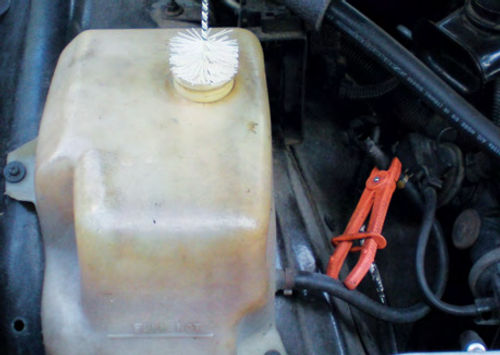
If your cooling system has a recovery (overflow) tank, take some time to rinse it out. Disconnect the tube that connects it to the radiator and catch any fluid that may be in it. Add this to the collection of spent coolant to be recycled. Sometimes a small amount of bleach with water and a bottlebrush will do a good cleaning job (Photo 22). Simply pinch off the tube to keep the solution in the tank. Let it sit for a while then use the brush to scrub at any tough spots. It doesn’t have to be perfect, and once you’re satisfied with the job, free the hose and drain the solution.Now rinse it a few times and you’re done; just reconnect the hose. If the tank is particularly dirty, consider removing it for a better cleaning. They usually are only secured with a couple of screws.
Look in your shop manual to determine the capacity of your particular cooling system. You will want a mixture of 50% to a maximum 70% of antifreeze mixed with water. According to the label on the Prestone container, a 50% mix in conjunction with a 15# pressure cap will lower the freezing point to -34° F and raise the boiling point to +265° F. A70% mix would be -84° F and +276° F. I doubt if many of us will need the protection to minus 84° F, but we might desire the highest possible boiling point that a 70% mix will yield.
To determine how much antifreeze is required, take the system capacity and multiply it by the desired consistency. For example, let’s say your cooling system holds 17 quarts; 17 x .7 = 11.9 quarts. So you would need slightly less than three gallons to achieve a 70% mixture. Don't increase the concentration any more than 70% because it will become less effective. Water acts as a catalyst when mixed with antifreeze. I remember hearing years ago that pure antifreeze will freeze at 0° F, but I have never substantiated it as fact. It is a fact, however, that adding water to pure antifreeze will lower its freezing temperature until it reaches a certain point where it will start to rise again.
Start adding antifreeze until the radiator appears full, then start the engine and turn the heater on. The level will drop down and allow you to add more or, if all the antifreeze is in, start adding de-mineralized water
Down- & Cross-Flow Radiators
Most of us will be dealing with either a “down-flow” or “cross-flow” radiator.
Down-Flow Radiators: The core tubes run vertically and the radiator cap usually is centrally located.
Fill it until you have just covered the core and maintain this level. These radiators tend to “burp” out air pockets more easily than the cross-flow design. Most down-flow radiators don’t utilize a recovery tank, so they require room for expansion within the top tank of the radiator. For my ’60s Chevrolet applications the manual states the level should be 1” down from the fill neck when cool. This translates to just covering the core tubes. “Hot” would be close to the top, maybe 1/4” below it. It’s best, however, to do the final fill when the radiator’s cool. Check your shop manual to verify your “fill level” requirements.
Cross-Flow Radiators: The tubes run horizontally, with the tanks on the sides, and the cap is usually located off to one side. Start the engine and when the level drops, maintain it to where you can just see the coolant, probably about 8 inches down inside the tank. (It helps to use a flashlight to sight down into the tank.)
No need at this point to be concerned about it being full.If you do, it will overflow and end up on the ground. There is a lot of air in the system to work out before worrying about that. (Note: Some engines have avent plug, usually located at a high point in the intake manifold. It can be temporarily removed during the filling procedure, and will eliminate most of the trapped air from the system. The service manual will confirmifthereisone.)
When the thermostat opens, the system will start to purge some of the trapped air. Watch for rapid movement of coolant inside the radiator; this means the thermostat has opened. Also feel the upper radiator hose. Initially it will be ambient temperature, but when the thermostat opens it will feel hot. Once opened, the level will drop and you can add additional antifreeze, still maintaining the low level within the radiator. Note: If you start to see the coolant level rising to where it is about to overflow, quickly replace the radiator cap. If you encounter this situation, don’t be alarmed, it’s only “burping” air from the system.
Once the system is completely cooled down, remove the radiator cap and fill it to the proper level, and if it’s equipped with an overflow tank, make sure to maintain its proper level also. The next several times the vehicle is driven, make sure to recheck the level once it has cooled. This is not about leaks, but some air may have still been trapped in the system.
A Recovery/ Overflow Tank
If there is a coolant overflow reservoir, the radiator will discharge coolant into it (either due to normal expansion or trapped air) and draw it back in when the engine cools down. Air can also escape, but as long as the proper reservoir level is maintained, it cannot reenter the radiator. Fill the radiator to the top when cool, and then add coolant to the recovery tank, bringing it to the “full cold” level.
Sometimes, Not All the Antifreeze Fits…
There may be some instances where you are unable to add the amount of antifreeze needed to obtain the desired concentration. This typically happens when you were unable to completely drain the water remaining in the engine’s block. If this is the case, run the engine until it has reached operational temperature, and the antifreeze and water have had sufficient time to thoroughly mix. Turn off the engine, and when it has cooled you can drain off enough “coolant” from the radiator and replace it with the remaining antifreeze. The concentration will be somewhat less than what you had desired, but how much less? This depends on how much antifreeze you were unable to originally install, the capacity of the cooling system and the concentration you are trying to achieve.
The easiest way to check is by using a quality antifreeze tester that will show both freezing and boiling temperatures. Again, run the engine until it reaches operating temperature to completely mix the coolant. When it has cooled sufficiently, use the tester and take a reading. If the concentration doesn’t yield the desired reading, you will need to drain and add additional antifreeze.
Keep any fresh coolant you removed and put it into a properly labeled container for later use. Utilize it to top off the radiator or overflow tank later on.
Now, unless you have an unexpected failure like a water pump giving out, your system is set to go and won’t require maintenance for another five years.
Resource
Fel-Pro gaskets
Federal-Mogul Corp.
26555 Northwestern Hwy. Southfield, MI 48033


