A Closer Look at Wheels & Tires
There’s More to the Rubber & Metal Than Looks and Durability. Let’s Consider True Diameter, Width, Offset & Bolts.
FINDING THE RIGHT wheels and tires for your old ride can be a daunting task. Do you need a narrow wheel and a skinny tire or a wide wheel and a fat tire? Do you need wheels with a four inch bolt pattern or ones with a four-and a-half-inch bolt pattern? Or do you just need something to fit a Ford or a Chevy?
Maybe you’ve even been thinking that any old wheel will do for your ride as long as it’s round.
That might not be far from the truth if you are restoring a vintage road sled to its original condition. Back in the ’40s and ’50s, cars came with 14-, 15- or 16- inch diameter wheels, most of which were either five or six inches wide, and all you needed to know about the bolt pattern was the make of the vehicle.
Other than that, the only available wheel options were that it was painted the color of the car or painted black, and it wears hub caps or full wheel covers. Simple enough, it would seem. The problem today is how do you find the correct wheel if you are scouting a “pull it yourself” salvage yard or you’re ready to make the switch to something a little fancier?That’s also easy.You just need to know a few basics.
Wheel Rim Diameter Vs. Bead Diameter
If you stretch a tape measure across the center of a wheel from rim to rim chances are the wheel you think is a 16- inch wheel may actually be a 15-inch wheel. Why is that? True wheel diameter isn’t measured from rim edge to rim edge. It is measured from bead seat to bead seat, which may be more than an inch shorter than the measurement taken from edge to edge.
So how do you figure out if the wheels you found at the “pull it yourself” salvage yard are going to fit the tires you selected? You start by determining the actual diameter of the wheels you found.
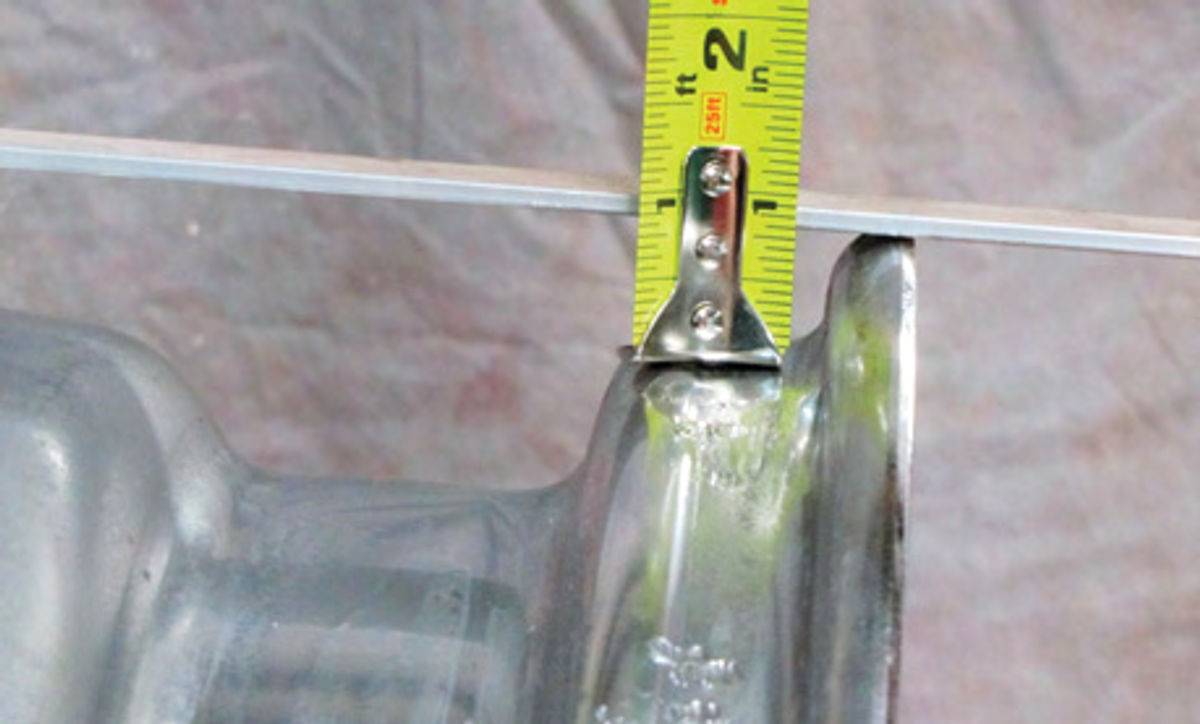
To correctly establish the diameter of a wheel you first need to measure the outside diameter of the wheel from edge to edge. Then you need to determine the bead height of that wheel. The bead is that narrow band of metal around the outer edges of a wheel that prevents the tire from coming off. These beads, or wheel lips as they are often referred to, are typically a half-inch to an inch tall as measured from the inside of the wheel (Photo 1).

Once you know the outside diameter and the bead height of a wheel a formula exists that you can use to determine the true diameter of a wheel.
That formula is: Overall wheel diameter minus twice the bead seat height equals true wheel diameter.
In shop terms this means you start by measuring the overall diameter of a wheel, such as 161 ⁄2 inches, then you double the bead height, such as 3/4 inches times two which equals 1 1 ⁄2 inches, then subtract 1 1 ⁄2 inches of bead height from the overall diameter and you get the actual wheel diameter, which in this case is 15 inches.
Figuring the Tire Diameter
Finding the diameter of a tire is a little more cut and dried. If you measure the diameter of the inside opening of a tire, that measurement will give you the correct wheel diameter that fits that tire. I fit measures 14 inches, you need a 14-inch wheel. If it measures 15 or 16 inches, then that’s the size wheel needed for that tire.
Deciphering the Code…
In the absence of a tape measure, you can always refer to the size code printed on the side of the tire. That may be like reading the instructions and is done only as a last resort, but the size code is there and it can tell you a lot about the tire.
For example, if you look on the sidewall of any tire you will find a letter-and number code such as P225/60R15. I’ll explain the rest of the code in a moment but for now pay attention to the last two numbers, the 15. That tells you this particular tire has an inside opening diameter of 15 inches and, therefore, fits a 15-inch wheel.
As for the rest of the letters and numbers stamped on the side wall of a tire let’s stick with the example of P225/60R15 and finish explaining what they represent.
The P means this tire is meant for passenger car use. The 225 designation is the full width of the tire in millimeters when the tire is mounted and properly inflated but with no vehicle weight added. (I’ve included a millimeters-to-inches conversion chart below to help you determine how wide your tires are in inches.)
The 60 designation is the aspect ratio, which is basically the height of the tire as measured from the mounting bead to the top of the tread in relation to the width of the tire as a percentage. For example, a 60 series tire would be six inches tall from the mounting bead to the top of the tread if that tire were ten inches wide.
R means the tire is a radial, and as I have already stated, the last two numbers indicate that the tire is meant for a 15-inch wheel.
Millimeters to Inches Conversions
205mm = 8.1 inches
215 mm = 8.5 inches
225 mm = 8.9 inches
235 mm = 9.3 inches
245 mm = 9.6 inches
255 mm = 10 inches
265 mm = 10.4 inches

Wheel Width as It Relates to Tire Width
When restoring an old car back to original, the decision of rim width may already have been made for you. The vehicle may have come from the factory with 14-, 15- or 16-inch wheels that are six inches, seven inches or maybe even eight inches wide.
If that’s the case, the only thing you need to do when purchasing tires for that ride is to specify that the rims you are using are of a specific diameter and width. The tire dealer will refer to the tire maker’s specifications to be sure the tires you have selected will fit those wheels.
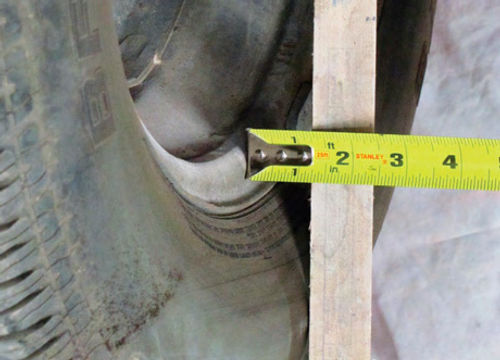
So, what if you don’t know the rim width? Rim Width Is easily determined by measuring the distance between the inside edges of the wheel beads(Photo 2).
Why do you need to stick with a tire made for a specific width wheel? With a little effort you can force a tire that is too narrow or too wide to fit on just about any width wheel.
But what you end up with is a tire that is going to prematurely wear out because the tread area of the tire is forced to conform to an incorrectly sized wheel and no longer meets the road the way the tire manufacturer intended.
Think of an over-inflated or underinflated tire. The over-inflated tire will show excessive wear at the center of the tread while the under-inflated tire will show excessive tread wear near the sidewalls. These same conditions will develop on tires mounted on wheels that are either too narrow or too wide for that particular tire.
Wheel Offset
I have to throw in the issue of wheel offset because people like to see wide, deep-dish wheels on ’60s muscle cars.
Wheel offset refers to the location of the wheel’s mounting plate in relation to the centerline of the wheel. Here is an example: A wheel that measures seven inches from mounting bead to mounting bead and has its mounting plate located three-and-a-half inches inboard of the inside bead is said to have a zero offset (Photo 3). That’s because if you flipped this wheel over and measured from the mounting plate to the outside mounting bead that measurement would also be three-and-a-half inches.
If we were to take this same wheel and move the mounting plate closer to the inboard bead, the wheel would have a negative offset. In the old days we referred to these wheels as “chrome reverse.” You may know them as “deep dish” wheels. Some people like wheels with a negative offset because the tire is actually pushed outboard giving the vehicle a wider stance and a more aggressive look.
However, there are consequences to using a wheel with excessive negative offset. The worst of these consequences is steering wheel kickback as you come out of a turn. Instead of the steering wheel gently drifting back to the center position as you exit a hard turn, the steering wheel wants to push its way back. Other problems with these wheels can be premature failure of the ball joints and wheel bearings due to an extended leverage effect at the spindle.
On the flip side of negative offset is positive offset where the center of the wheel has been moved outboard. You see this type of wheel on just about every front-wheel-drive vehicle out there today.
Positive offset doesn’t offer any improvements to or detractions from the handling characteristics of front-wheel drive vehicles; it’s just that a strut type suspension, sideways engine, and hub locations dictate the use of positive offset wheels on these vehicles.
Wide Tires and Offset Wheels
As I’ve already mentioned, old car guys love negative offset wheels. They also love wide tires. Let’s face it; wide tires and negative offset wheels look good on just about anything.
The problem is that a lot of older vehicles have limited wheel house space, particularly in the rear, to tuck those wide tires away. This results in scuffed sidewalls and ruined tires. To prevent this problem you have to consider the width of the tires, the width of the proposed wheels, and, of course, the offset of those wheels before making a purchase.
As I mentioned above, the cross sectional width of a tire is basically the overall width of the tire when mounted and properly inflated but with no vehicle weight added. You need to know this because mounted tires are always wider overall than the wheels they are mounted on. Photo 4 is a good example. As you can see, this tire is almost an inch and a half wider than its wheel. This is critical if, for example, you opt to install a negative offset wheel on your car and that wheel only has an inch of clearance between the edge of the rim and the wheel well of the car. Obviously, any tire you mount on that wheel is going to rub the wheel well. The way to prevent that rubbing isto select a wheel with less negative offset in order to move the tire inboard and away from the wheel well.
How does that work? Let’s say I have 10 inches of clearance between the brake drum and the inside edge of the wheel house. If I consider that the tire I will be using takes up an inch and a half of that space and I want at least a half inch of space between that tire and the wheel house lip, the widest wheel I can use is a 10-inch-wide wheel with a three-inch negative offset.
How did I arrive at those figures? The tire I plan to use is going to overhang the wheel by an inch and a half (see Photo 4) and I want at least a half-inch of clearance between the tire and the wheel house. Now I’ve used up two inches of the 10 inches of space. That leaves me with eight inches.
The wheel I selected is 10 inches wide. With a zero offset that wheel will take up five inches of the eight inches I have left. If I opt for a 10-inch wheel with three inches of negative offset that uses up the remaining three inches of space. Can I use a wheel that isn’t quite so wide? I could. Going with an eight-inch-wide wheel, for example, would give me even more clearance between the tire and the wheel well.
A Tip: When making decisions on wheel width and wheel offset, I like to mount a wheel with zero offset on the vehicle to check for clearance. I can determine fairly quickly whether a particular wheel is going to work in the space that I have.
Note: In the old days we took a body hammer and banged wheel well flanges flat in order to gain more clearance to get wider tires into small wheel wells. Evidently the younger generation has been picking the brains of the older generations because as of late I’ve hammered down the wheel well flanges on just about every Mustang that comes into the shop.
What’s Your Bolt Pattern?
Once you know what diameter and what width wheel you have or need, you then need to know the bolt pattern.
I’ll go with five-bolt wheels since these are the most common wheels out there. But the four-bolt,six-bolt, and eight-bolt wheels you’ll encounter will use this same determination method.
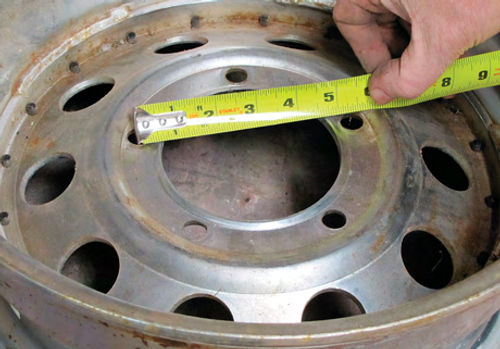
Start by designating one of the bolt holes on the back of the wheel as the first hole. Then measure from the center of that hole across the bolt pattern to the center of the bolt hole that’s farthest away (Photo 5). In this case, the measurement is 5 1 ⁄4-inches. That’s a wide pattern and typical of Fords produced in the ’40s.
To be sure the wheel you have will fit the vehicle you are restoring, you can repeat this measurement step on the vehicle itself by using the same across the-pattern measurement only this time measuring from the center of the first bolt to the center of the farthest away bolt on the brake drum or axle hub.
A Tip: Something often overlooked when selecting wheels is the diameter of the center opening of the wheel compared to the diameter of the center hub of the axle. Even if the bolt pattern is correct, the center hub of the axle may be too large for the center opening on the wheel. If so, the wheel will not seat against the mounting surface of the hub or brake drum.
When Tires Are Showing Their Age
I wanted to touch on tire age for one reason: safety. Tires get old, they crack, and they can blow out. I often see vintage vehicles with tires that have been on the road for 10 years or longer. In most cases those tires are perfectly fine because the vehicle was garage kept and will give several more years of good service before they need to be replaced.
Thatsaid, if the tires on your ride have been there a while and they tend to leak down after a few weeks it may be time to consider replacing them.
So how do you know if your tires are old? Fortunately, that data is stamped right on the tire.
Photo 6 shows a tire constructed prior to the year 2000. Look near the wheel and you’ll see that it has a stamping of DOT ADUL 2MM 134.
Of all these numbers and letters, the only ones of importance to us are the last three, the numbers “134.”
What these numbers tell me is that this tire was made during the thirteenth week of the fourth year of the decade. Which decade? In the olden days tires were thought to last only a few years at best. Since the last set of numbers is only three digits long this tire was made during the first week of April, 1994.If you are riding on tires this old they may already be showing signs of cracking between the treads and if so you should consider replacing them.

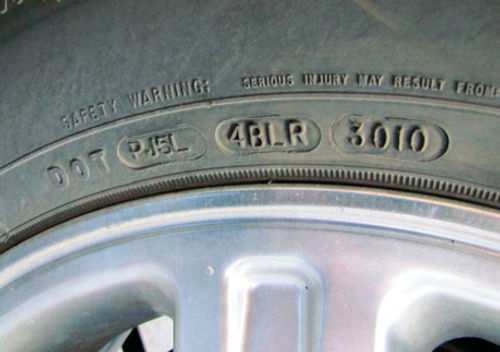
By comparison, Photo 7 shows a tire constructed after the year 2000. It is stamped DOT PJ5L 4BLR 3010. Notice that the last set of numbers contain four digits instead of three. That is how you know this tire was made after the year 2000.Pre-2000 has three digits. Post-2000 has four digits. The 3010 indicates this tire was made during the 30th week of the year 2010.
Finally, this is a subject I touched on back in the July 2005 issue after I found a couple of bent wheels on Project Charger. Those wheels were the original wheels that came on the car and for that reason they needed to stay with the car, bent or not. Luckily, the guys at Watts Wheel Service were able to straighten those bent wheels perfectly so that I could put them back into service on the Charger. I’ll list their contact information below. Got a question? Send it along.
Resources
LPL Body Works, LLC
5815 Contented Lane
Amarillo, TX 79109
Body and paint repair DVD series
Watts Wheel Service
West 1312 First Ave.
Spokane, WA 99201
Wheel repair


