
A“Cool” Fridge for Your Garage
A Handy Refrigerator for Snacks & Drinks Would Be Useful. Let’s Make It Run & Look as Good as Your Rides.
CHANCES ARE SINCE you’re reading this magazine you’re the type of person who enjoys wrenching on your classic yourself. You take pride in the work you do and probably spend countless hours out in your garage or workshop alone or with your buddies. Sometimes with all that hard work turning wrenches or bench racing with your pals you can get quite parched. You have two choices: wander back into your house and risk tracking in dirt and grease or, worse yet, get caught by your significant other and not make it back out to the shop. Or you can keep a stocked fridge right out in your garage.
Just like our classic rides, appliances aren’t made like they used to be. If you can get 10 years out of a modern refrigerator you’re way ahead of the curve. However, there are scores of vintage fridges floating around for sale that still work after 50 or 60 years. And let’s face it…a vintage refrigerator in your garage will only complement your cool ride. (No pun intended.)
So Many Choices…
There are several different styles of vintage refrigerators in a few different shapes and with a myriad of interior configurations. You can do some quick research online and figure out which suits your particular style or needs. In my case, after a quick search of Craigslist I found a complete, working Frigidaire within an hour’s drive of my shop. The pictures showed no rust or apparent damage and the owner agreed to a price of only $100 over the phone before I made the hike down to get it. I’ve seen similar fridges go for around $100-300 online, all in working condition, so they are within the reach of most budgets. How far you take them from there is up to you. While you’re thinking about what might best suit your needs, follow along as I completely customize this unit.
A Post-War Model
Once I returned home with the refrigerator I plugged it in and let it run for a day to make sure it operated correctly. After over 60 years it still gets ice cold and this is the case for many of the vintage units out there. They contain a completely sealed system so unless one of the copper lines has broken chances are it has held its charge all these years.
After speaking with Austin Jowers of AntiqueAppliances.com. I was able to find out a little more history on this fridge. This Frigidaire was most likely produced in 1946, when the company was partially owned by General Motors and the unit is a bit rare. Certain parts such as the door handle, exterior emblem, and inner door seal are actually pre-war pieces that were likely stored away during WWII, while the cabinet with the full-width freezer definitely is a post-war design.
The Teardown Begins
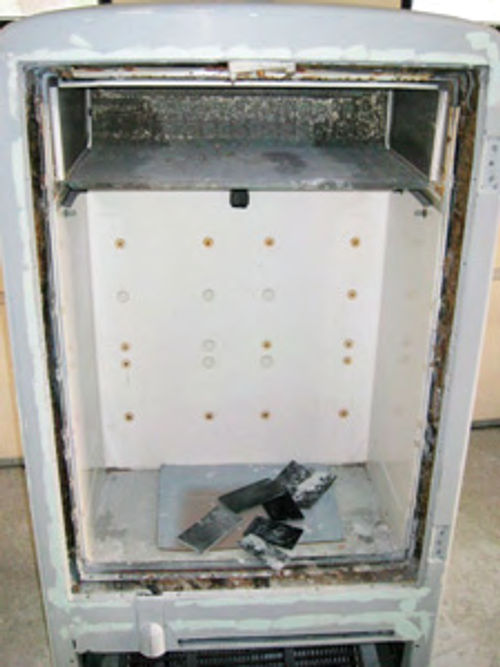
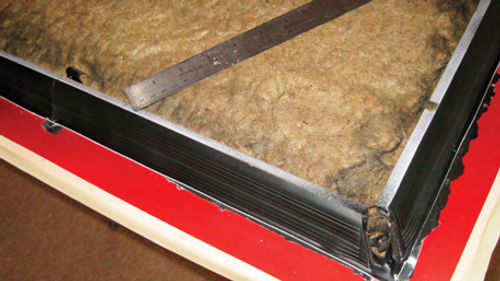
To begin the appearance restoration process I started tearing the fridge apart while taking digital pictures of how everything was assembled and bagging and tagging all of the small parts. The main door and the lower bin door were the first to come off followed by removal of the shelves and drip trays. There are plastic trim strips, held in with screws, that fill the gap between the inner and outer boxes. Removing them exposed the layer of insulation which was still in good shape as well. The flip down freezer door was also removed from inside. This piece was the roughest part of the entire fridge with large dings and dents in it. SuperChrome in Asbury Park, New Jersey, straightened this door and chromed it for us to bring it back to life. The shelves, hinges, lower trim, and outer door handle were all chromed by Artistic Metal Finishing in Somerville, New Jersey. Some of these parts were originally anodized, however chrome brings a much flashier look to give you that extra “wow” factor.
Facing a Tough Original Finish
Once the Frigidaire was apart it was time to address the small amount of bodywork it needed as well as the paint. These refrigerators were originally painted with porcelain paint back in the ’40s and ’50s and I can tell you that the stuff is nearly bulletproof. I would assume one could use an aggressive media and blast all of the porcelain finish off of the cases, however I figured if I could retain it under my new paint it would help in preventing corrosion for another 60 years if not more.
In order to prep that tough porcelain for paint I had to DA the entire cabinet with 80-grit sandpaper. The 80-grit was just enough to knock the shine out of the original white paint but didn’t remove any of the porcelain. After the exterior had been sanded I washed it all down and laid out a nice coat of Nason brand epoxy primer since epoxy seems to stick to just about any surface and is great for sealing out moisture and preventing future rust problems.
The Nason epoxy primer calls for a full 24 hours of cure time before you begin any bodywork or go over it with another material so after a day I scuffed the whole thing with a red Scotch-Brite pad and laid down four heavy coats of DuPont high build 2K primer. The original finish was far from smooth and I had to rely on the 2K to fill in all of the original peel.
Once the primer dried a shot of guide coat spray was applied and the entire fridge was wet sanded down with 220-grit paper. The advantage of using a guide coat is its ability to help you find minor imperfections that your naked eye maymiss.
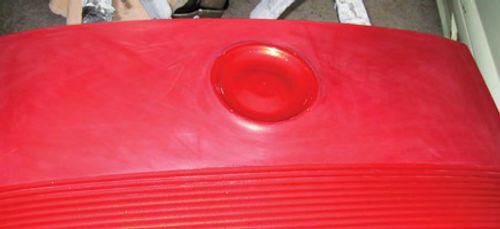
Once I was done sanding I used standard auto body filler to fix any small dings or scratches in the fridge. The exterior got another shot of 2K for any final peel and to cover the bodywork. I chose to paint the rear panel of the fridge as well as the inside of the lower bin in a satin black color as they originally were different than the rest of the fridge. The lower bin needed a good blasting and some repair work to fix the pitting that had developed inside of it. Once that was complete everything was masked off and I applied three coats of Standox Opel Rallye Black which is a fantastic single stage satin black industrial paint.
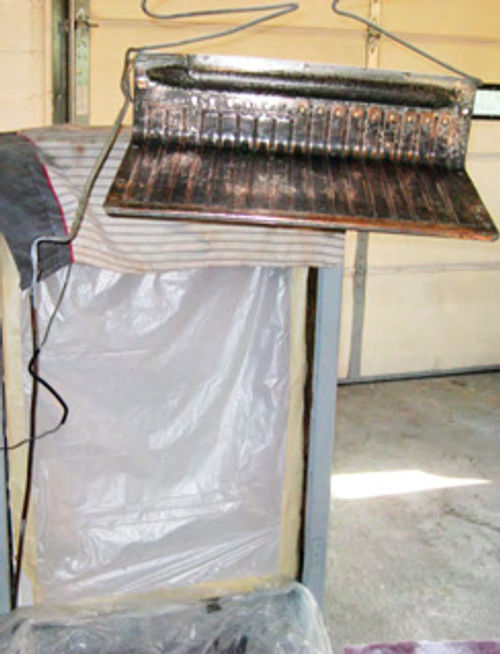
After shooting the black areas I turned my attention to the interior of the refrigerator. While the original white paint was good it certainly wasn’t perfect. I once again used a red Scotch-Brite pad to completely scuff the surface to provide the necessary tooth for good adhesion. Any chips in the original finish were filled with spot putty and the interior trim pieces were scuffed. This finally put me at my first major roadblock of the project. The freezer box needed some sort of refinishing as well. The top and sides were originally anodized, however the back and lower plate I believe may have been a bare finish as it was covered with corrosion and oxidation. I would have loved to remove the lower portion and polish it back up to its natural copper finish, however the Freon lines were brazed right into this plate so I could not completely remove it from the unit for polishing. After much debate I decided the best alternative was to pull it out as much as I could, sand it to remove the corrosion, and paint it the same as the rest of the interior. Once the freezer box was safely hung outside the fridge and everything had been scuffed and wiped down with a prep solvent it was time to apply a few coats of new paint. For this task I turned to the Rust-Oleum line of appliance epoxies. I sprayed three medium coats of their gloss white color and gave it two full days to dry before installing the freezer box back into the fridge.
Formulating a “Kustom” Plan
With the interior close to done and the back panel painted it was time to turn my attention to the rest of the exterior.
I didn’t want to go back to the original white. I wanted something cool, a bit wild, but also something that kept with a vintage/retro theme. I started searching through some of the custom paint suppliers’ offerings and Kustom Shop had exactly what I was looking for. They offer everything from stock colors back to the late 1800s, to modern candy paints, pinstriping enamels and more. Their metal flake line was exactly what I wanted forthisfridge. I’d never hotflake before and this was the perfect time to try my hand at it. It would give me that old school look I was after while adding tons of pop to the fridge.
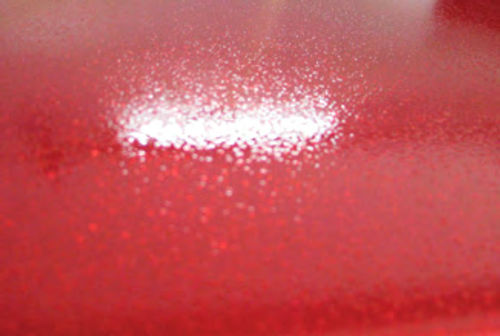
A few calls and emails back and forth with the extremely helpful staff at Kustom Shop helped me pick out the proper materials to achieve the look I was after. (Kustom Shop is a division of TCPGlobal in San Diego. Visit tcpglobal.com.) A few days after placing my order I received aquart of their Fire Red Metallic base with reducer, 4oz. of their.004 FireRed flake, 4oz. of their. 015 Fire Red flake, and two quarts of their 2K Super Flow clear with hardener. This was more than enough base and flakes for the project and just enough clear.

Applying the Metallic & the Flakes
Before beginning the custom paint job I sanded the rest of the refrigerator’s exterior surfaces with 400-followed by 600- grit paper. Since the final sanding broke through to the original porcelain finish in a few spots I began with a light coat of DuPont primer/sealer to help with adhesion. Once that flashed I mixed the Fire Red Metallic base as per Kustom Shop’s instructions and laid out three medium coats to give me complete coverage. Using a metallic base under your metal flake will help with the overall consistency of your job by filling in any spots that are light on flake.
Once the base coat had time to flash completely I mixed up my metal flake suspension. There are a number of methods for applying metal flake and every painter has their particular favorite. This is how I did it: I mixed up a small amount of clear…probably around 5 ounces(Kustom Shop’s mixing ratio is 4 to 1). Then I added my flake into the clear…about one teaspoon of the .004 flake and two teaspoons of the .015 flake. The reason for using two different size flakesis purely visual interest. It just adds that little extra pop to the final job with contrasting sizes. And again, the smaller flake helps to fill in any voids in your spray pattern. It should be noted that Kustom Shop offers flake in many different colors and sizes ranging from .002 to .025. For such a small-scale project, .015 was the largest I wanted to go.
Now it was time to actually spray the flake onto the fridge. This is the make or break step of the job. It helps to hang a piece of paper on the wall of the booth or have a test panel to try out your flake pattern before you start to spray the fridge. Ideally you want a 1.8 to 2.2 spray tip on your gun to allow the flake to flow and not clog your gun. Hopefully, you were clean when mixing it because you can’t strain it into your gun and you need to remove the plastic strainer that’s under your gun cup if it’s so equipped. And finally, you will need to keep the flake suspended in the clear during the entire job. I threw a couple of stainless steel nuts into the gun cup to help agitate the mixture as I was spraying. Be sure to constantly shake the flake/clear mixture in the gun to keep the flake from settling out of suspension.
To apply your flake get your general spray pattern right on your test paper or panel and then begin misting the mixture lightly onto the fridge. Using a number of light mist coats will keep the flake from clumping up or weighing down your clear and causing runs and sags in the paint. You can spray as many mist coats of flake as you wish to achieve the amount of total coverage that you’d like. By misting it on you can do a small area at a time and make sure you get the consistency you want without having any bare spots or spots with clumping. I ended up using four coats of my flake/clear mixture and still had about an ounce of it left, so you can see you’re not putting much actual clear on your surface at this point.
Once you’re satisfied with your flake coverage it is very important to allow your clear mixture to flash for quite a long time…until it just has a little bit of tack left in it. You do not want the flake to be able to rise to the surface when you spray your subsequent coats of straight clear. At this point your finish will be extremely rough from the flake and you need to bury it in clear coat. I mixed the clear as per the instructions and began the process of finishing up the paint project. I laid down one medium coat of clear and allowed it to set up nicely to prevent sagging and running in the next few coats. After the medium coat I sprayed four heavy coats of clear to really bury the metal flake. All of this clear helps to smooth out your finish and keeps the flake well below the surface.
Time to Sand and Polish
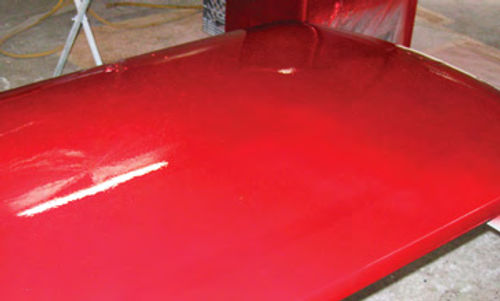
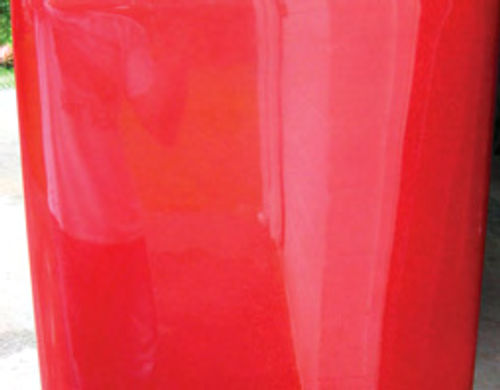
After the paint was fully cured I began to color sand and polish it as I would any other paint job. I started with 1000- grit paper and then moved my way up to 1200-, 1500-, 2000-, and finally 2500-grit. This helped to level out the surface and remove any orange peel. Going to such a fine grit cuts down on the sanding scratches and makes it much easier to buff out the surface afterward. Be certain to really pay attention to how much clear you are removing while wet sanding a metal flake job—you don’t want to cut into your flake. Allflake is manufactured as silver and then finished only on the exterior in whatever color you choose. If you happen to hit your flake while wet sanding, it will show up as silver instead of the intended color. This is part of the reason I used so many coats of clear.
Once the fridge was sanded down to 2500-grit I gave it a three-step polishing to bring the color back up and give it a mirror shine: starting with a general polish on a wool pad, then a swirl remover on a blue foam pad, and finally a micro polish and non-silicone glaze on a white foam pad. The final finish is flawless and the metal flake jumps off of the base and dances in the light.
Putting It Back Together
The last pieces to be restored on this fridge were all of the stainless bits. Most of the clips, brackets, trim and screws were simply polished back to a brilliant shine and painted with POR’s Glisten PC clear coat to keep them looking good for many years to come.
Once the hardware was ready, reassembly began. The interior was installed first,followed by the lower bin. Then I had to deal with two other small hurdles to finish the project. The only parts of the fridge to deteriorate over the past six decades were the rubber ones. The original plug had dry rotted quite a bit and had a number of cracks in the insulation. A quick trip to the local hardware store netted an 8’ replacement cord of the proper gauge and it was only a matter of opening up the relay under the fridge and taking out two screws to swap in the new, safer cord.
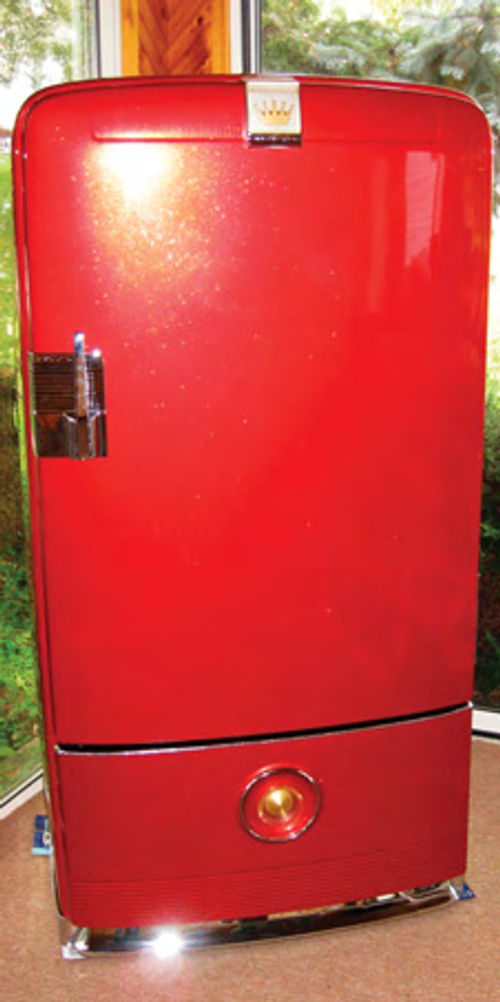

My original door seal was the other part that had seen better days. Unfortunately, this model Frigidaire has an uncommon door seal that incorporates what is called a breaker strip. The breaker strip retains the inside door panel to the outer door shell. There is no direct replacement for this seal. Luckily, after examining my seal it appeared as if the breaker strip was still in good shape while the portion that seals the door shut had dried out quite a bit and broken off in a few spots. After a discussion with the guys over at AntiqueAppliances.com they suggested modifying my original seal and incorporating one of their generic bubble seals into my setup. This meant carefully cutting my original seal down the middle to remove the outer portion and then precisely gluing the new generic seal into the same exact location. The corners needed to be pie-cut to allow the seal to follow the proper radius and I used black dye to paint both my old seal and new piece for uniform coloring. When that was done I finally bolted the door and hinges back onto the fridge to finish the project.
While this project may seem a bit like overkill for a refrigerator, when completed you’ll have a reliable, beautiful and useful classic addition to your garage that will save you some trips back and forth into the house and some cleanup work from tracking dirt inside. Plus, it’s just plain cool!


