
A LONG JOURNEY WITH A PARTS CAR, PT. 2
There Were Some Unexpected Expenses During the Trip Home…and Then the Forklift’s Forks Were Too Short to Lift the 1937 DeSoto Off the Trailer.
Concluding a series begun last month, Curt wrestles with packing up many more large, heavy parts than he had expected to receive when he bought a 1937 DeSoto parts car on eBay and then had to travel to retrieve his find. Our photos continue from the last issue, starting here with number 15.
So far, I’d installed the floorboards I’d brought with me, reattached the car’s four doors and secured wooden covers to the three doors that lacked glass.
Only now, with the car weatherproofed for the long drive home on an open trailer, could I begin loading it with parts.
On the front floor, I placed the flywheel, clutch, generator and a number of other heavy parts, mindful that I wanted to have sufficient weight on the tongue of the trailer so it would ride smoothly.
I wrapped the gas tank in a blanket and placed it across the front seat. Likewise, when I stacked the rims on the back floor, I padded their edges with a blanket to save the nice seat upholstery.
I took special care with the fragile or rare parts: gauge cluster, taillamps, air cleaner, coil, glove box door, horn button, rear-seat ash trays and one headlamp. These parts I padded and placed in a clear-plastic tote that, for safekeeping, I would carry in my pickup.
Other delicate parts—including the steering wheel and the second headlamp—I wrapped and stored under the locked lid of the trailer’s winch box.
My Precious Bumpers
Originally I’d intended to load some parts in the box of my pickup. The aluminum tool box I’d mounted between the side rails at the front of the box consumed 1 1 ⁄2 feet of the box’s 6 1 ⁄2-foot length, however. Occupying the rest of the space were two tables and four large totes containing car parts—items for my booth at the Hershey swap meet, where I was headed next— and two spare trailer tires.
That’s right: two spares. Just weeks before my big trip, one of my trailer tires picked up a nail and went flat. Though just 20 miles from home, it occurred to me that if I’d have to install my single spare tire in New York or Pennsylvania, I’d end up driving a loaded trailer home 1000 miles or more without a spare. So I bought a spare for my spare.
I did somehow find room in the box of the pickup for two DeSoto parts: the ribbed bumpers. They were too unwieldy to fit inside the car and too nice to strap onto the trailer with the other large parts.
I had an ulterior motive, I’ll admit. Because I knew I’d have to park my trailer at a remote site during the Hershey swap meet, I wanted the treasured bumpers to stay in my care.
Securing Parts and Totes
Though a snug fit, I had just enough room to slip the running boards beneath the frame’s running board brackets, one running board on each side of the trailer. I
wrapped the rear fenders and placed them inside the car.
I placed two plastic totes between the front of the frame and the trailer’s air dam. Into these went all the loose hardware, two water pumps, carburetor, fuel pump, motor mounts, loose door handles, oil and vacuum lines and a host of other small parts. I wrapped each tote with bungee cords to secure its lid.
I loaded the front fenders and hood— lashed in place with several 400-poundcapacity ratchet straps—about where they’d normally sit on an assembled car. To prevent the parts from rubbing, I cut and placed the two halves of a thin foam yoga mat between the fenders and hood. Never mind those stiff muscles from sleeping on the ground—I was willing to sacrifice for a higher good (Photo 15).
For two reasons, I’d brought my trailer’s removable sideboards. One, the solid sideboards would deflect the wind that, at driving speeds of 70 mph, might be strong enough to tear away even lashed-down parts. And, two, the sideboards would prevent thieves and the idle curious from opening the DeSoto’s doors and trunk.
Of course, the sideboards would also prevent me from opening the doors. Before I installed the sideboards, then, I took one last look inside to make sure all was shipshape. Yes, everything was padded well, packed tightly and thus unlikely to move.
As a final task before closing up the car, I placed one of my light-duty ratchet straps inside between the two front doors. This would anchor the driver’s door, which, due to a missing latch, wouldn’t stay shut otherwise. The strap also passed over and secured the loose gas tank.
Trailer-Parking Woes
An approximately 30-mile drive took me to Cortland, New York, where I arrived at 7:30 p.m. It was dark and I was tired so rather than hunt up a campground I spent the first and only night of my 10-day trip at a motel.
Thanks to an early start the next morning, Tuesday, I covered the 225 miles to Hershey by early afternoon and drove directly to the swap meet grounds to set up.
I’d reserved a 10-by-30-foot space, room enough to park my truck and set up my booth. Though I’d planned to park the DeSoto in an area set aside for car-hauling trailers, I soon learned it was reserved only for people who were showing cars.
Well, then, how about renting an unused spot on the swap-meet grounds for parking my trailer for five days? I knew it would cost me an extra $90 but, given my predicament, I was happy to pay it.
I couldn’t do that, an organizer told me, because they don’t rent spaces after the deadline has passed for doing so.
Instead, I wound up putting the old DeSoto out to pasture—literally. The owner of an approximately 2-acre horse pasture about a mile north of the swap meet had posted a sign I’d spied on my drive in.
She was opening her pasture to both campers and people simply wanting to park a car or trailer. Parking cost a mere $8 per day or $40 overall, not only an answer to my prayers but a bargain besides.
An Anti-Theft Subterfuge
I could have—maybe should have— hidden the coveted ribbed DeSoto bumpers on the trailer, perhaps by sliding them under the frame.
Instead, I took them with me. During the swap meet, I set up a “self-pay” box
with signs and largely left my booth unattended so I could prowl for parts and literature.
This, of course, left the bumpers unguarded in the pickup box. So that they’d escape detection, I slid one end of the bumpers under the rail-mounted tool box at the front of the box.
The exposed sections of the bumpers I nestled as low as possible in the left side of the box, partly hidden by one of the trailer’s spare tires. Moreover, I wrapped them twice with the long cable I used to lock up the twin trailer spares.
Mind you, the bumper-bolt holes were too small to accept the cable: it would have been easy to free the bumpers by sliding them out of the looped cable. The bumpers looked locked, however, and that was enough. They stayed put.
From Tuesday through Friday at the swap meet, I’d sold everything that was going to sell, apparently, and I’d bought as much or more than I’d brought with me. It was time to head home.
Westward, Dough!
Thus, early Saturday morning, I picked up the unmolested car and trailer from the horse pasture without incident. I immediately jumped on I-81 to begin my long all-Interstate drive home, during which only two events worth noting occurred.
The first involved the toll roads I followed nearly to Chicago. West of Harrisburg, Pennsylvania, I got on I-76, whose vivid green on the map— as distinguished from the blue ink designating other Interstate routes— signified the Pennsylvania Turnpike. The green also signified dough: lots of dough.
No worries, mate! I had crumpled single dollars and quarters galore in my parkingmeter stash. I thought I knew what I was in for because I had traveled the route before.
This time, however, I was towing a trailer, which, unbeknownst to me, meant I was now paying the four-axle rate—a hefty surcharge beyond what the typical car, SUV or pickup must pay.
For the privilege of driving across two-thirds of Pennsylvania, I paid— ulp!—$39.30. The toll was nearly as much, $36.75, to cross Ohio. Indiana—a narrower state, thank goodness—extracted $15.40. Thanks to tolls, my $1000 DeSoto in reality cost closer to $1100.
A Loose Cover
The second incident involved the window cover on the car’s driver’s door, which had begun flapping. If it snapped off before I reached home, it would spoil all of my wind- and waterproofing efforts.
The front covers were especially vulnerable to wind buffeting, I’d realized while making them. That’s because the wide wing windows had forced me to place the foremost of the two 1-by-2 inner anchors nearly halfway back on each front cover.
At the last minute, I’d attempted to compensate for this by drilling the front covers so I could snake a loop of mechanic’s wire through the tiny gap between the door frame and the front of each wing window. I would attach the inner ends of these wires to small 1-by-2 inner anchors I’d cut for each door.
Trouble is, due to tight quarters I could twist and tighten the wires only by spinning the 1-by-2 anchors—a method both clumsy and imprecise. In my rush, I’d also neglected to cut notches for wedging the ends of the anchors against the door garnish moldings.
My inspection (in the parking area at an Ohio toll stop) quickly revealed why the driver’s-door cover was flapping: its 1-by-2 wing window anchor had slipped off the garnish molding. But what to do?
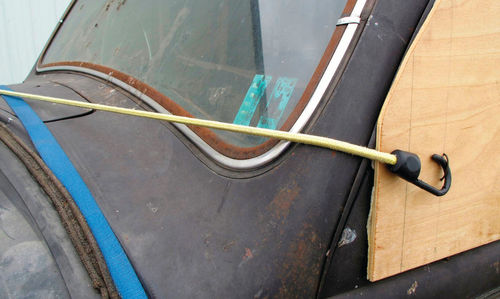
I opted for the expediency of attaching a bungee cord from the wire loop at the front of the cover and anchoring its free end to the car’s firewall (Photo 16).
Sorting and Recording
Once home, I removed and stored the trailer’s sideboards to begin unloading the trailer. I then removed the smaller items I’d hauled home in the two clear-plastic totes on the trailer and the one containing fragile items inside my pickup.
To access the trailer totes, I had to remove the lashed-down hood, front fenders and radiator shell.
As I typically do, I sorted the small parts into plastic bags using Chrysler’s alphabetical parts groupings: Axles, Brakes, Clutch, Cooling, Electrical, Engine, Exhaust, Fuel...and so forth. These small parts filled three apple boxes.
In two ways, I recorded the contents of the apple boxes. First, I photographed most of the small parts. Second, I logged them onto a computer list I keep, arranged by the alphabetical Chrysler parts groupings.
I separated the many pounds of loose hardware into tubs that I can easily sort by application when the time comes: nuts, screws (sheet metal and machine), washers, bolts and so on.
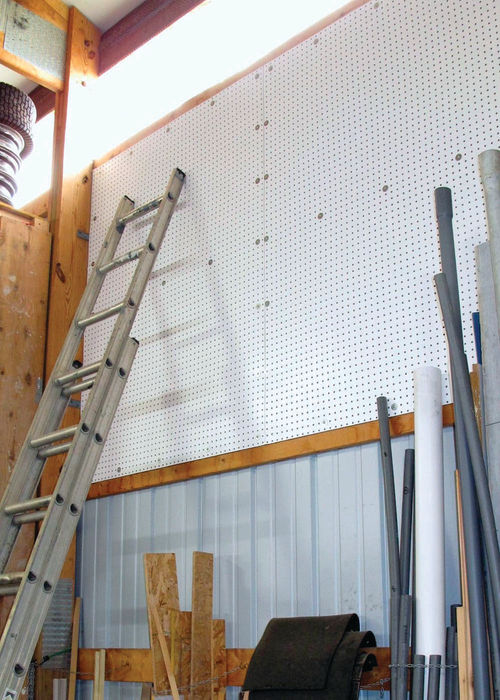
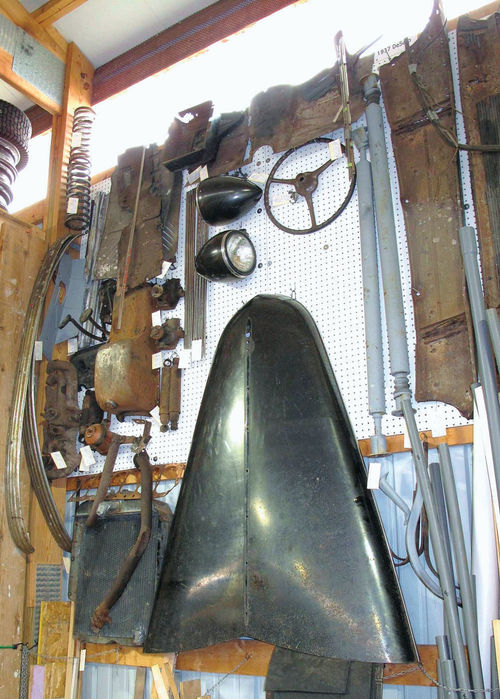
I was less diligent about recording the larger parts for a very good reason: most of them would be hanging in plain sight on a section of pegboard in my pole barn (Photos 17 and 18). Each part got tagged, however, so I wouldn’t forget where it came from and which car it fits.
Hanging Bigger Parts
Where necessary, I attached heavy wire for hanging these parts. Some parts—the oil pan and two driveshafts, for example— were naturally easier to hang, having bolt holes through which I could insert pegboard hooks.
A few heavier parts—wheels, bell housing, flywheel and clutch among them—I placed on metal shelves.
Because the front suspension A-frames were too heavy for pegboard and too bulky for shelves, I made special wall brackets.
For each, I drilled two 3/8-inch holes in a strip of 1/4-inch-thick boiler plate measuring 2 inches wide by 10 inches long. I inserted two 2-inch-long hardened bolts so the threaded ends would extend like coat hooks from a girt (horizontal crossmember) in the wall of the pole barn.
In the girt, I drilled relief holes into which the hidden bolt heads could nestle. These holes were shallow enough that the several deck screws attaching each bracket held the bolt heads as tightly to the wall as if I’d welded them, which saved me that step.
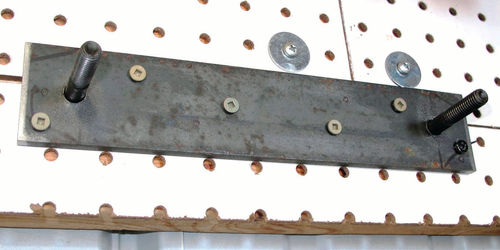

To finish, I lifted each A-frame onto its “coat hooks” and secured it with nuts and flat washers (Photos 19 and 20).
Loose Spring Damages Body
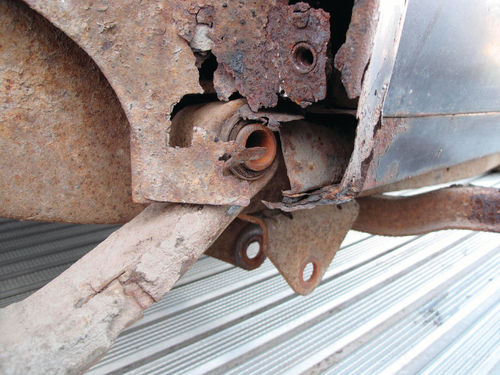
Overall, the body survived its 1400-mile journey in fine fettle with one exception. The unsecured front of the right rear leaf spring, having bounced free of its mount, shifted upward and damaged the back of the right-side rocker panel (Photo 21).
I felt mollified knowing that this area was rusty and needed repairs anyway. In fact, the car’s only body rust follows the line where the left and right rear fenders mount to the body, from the peak of the wheel-well opening forward to the running board. Dirt or salt, or perhaps both, had evidently collected in this joint on each side.
Having dealt with the parts, large and small, I prepared to unload the body and frame. Years earlier, I’d hung from a back wall of the pole barn—on a pair of bicycle-hanging hooks, no less—a wooden, wheeled, homemade body stand. Like suburban sprawl, cars and parts had filled in around the area since then, of course. Consequently, I had to drive my tractor outside to clear out the pole barn’s “aisle,” which is normally clogged. This freed up space for repositioning my table saw and a spare pickup box—both on wheels, fortunately.
A black 1963 Imperial, a large car, was backed up to the wall below the hanging body stand. Though I toyed with ideas for gently lowering the stand and sliding it over the blanket-padded top of the Imperial, many of my imaginative musings ended badly. Yes, I could do without an out-of-control body stand crashing onto the Imperial’s roof.
Repositioning a Big Car
I keep decent, inflated tires on all my waiting project cars so I can roll them by hand. Because the Imperial’s right front drum brake had seized, however, I had to place both front tires on wheel skates.
When I still couldn’t push the car—I didn’t have room to get into a pusher’s crouch—I decided to nudge it forward with a riding lawnmower and a tow strap, as I’ve seen others do. My mower was willing but its drive wheels spun on the smooth concrete floor.
Although guilty of overkill, I opted next to back in my full-size tractor, a hulking 1966 Farmall, which barely fit with its mower deck on back. Within seconds of hooking a log chain between the Farmall and the front of the car, I’d coaxed the Imperial forward 10 or 12 feet.
In a precarious scenario that I won’t be reporting to OSHA, the federal safety agency, I first climbed 15 feet off the ground on an extension ladder to remove two safety chains from the body stand.
I then balanced midway up an 8-foot fiberglass ladder, facing the wall with my back to the ladder, to lift the body stand free of its hooks. Finally, I let the top of the stand slide down the wall while I, holding the bottom end, eased down the ladder, step by step, to the blessed floor.
In my defense, the stand wasn’t particularly heavy—maybe 30 or 40 pounds—although it was unwieldy.
Modifying a Body Stand
I’d built the wooden stand years ago for priming, sanding and painting the body of a 1935 Plymouth Coupe. It has four 4-by-4-inch square wooden uprights at each corner; the bracing and rest of the structure uses 2-by-4 lumber.
As a precaution, I tightened all the screws. Because a 1937 DeSoto sedan body is perhaps 100 to 200 pounds heavier than a 1935 Plymouth Coupe body—more, if I decided (as I eventually did) to leave the doors attached—I reinforced the stand in two ways.
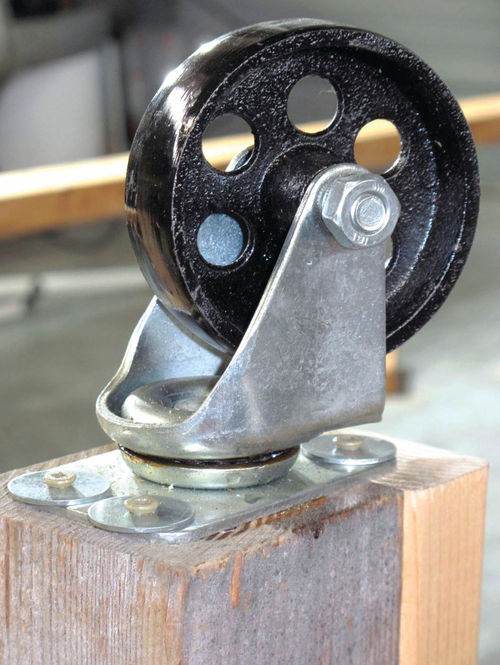
First, I removed the aged and tiny metal casters of unknown load capacity and replaced them with 3 1 ⁄2-inchdiameter metal casters, each rated at 350 pounds. That meant screwing four pieces of 2-by-4 lumber to the bottoms of the corner posts to expand the footprint for attaching the new, larger casters (Photo 22).
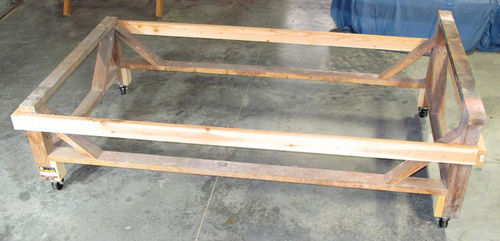
Second, to supplement the existing 2-by-4 bracing, I built a high railing to prevent the ends of the stand—the body resting points—from bending either outward or inward under the weight of the DeSoto body (Photo 23).
Lacking a forklift or gantry crane for lifting the DeSoto body onto its custommade stand, however, I had to wait for opportunity to knock.
For three weeks after a truck unloaded lumber and rafters for a new house near my old-car farm, not a creature stirred at the building site. And then one day a pickup and two workers arrived. More important to my agenda, so did a forklift.
Opportunity Knocks
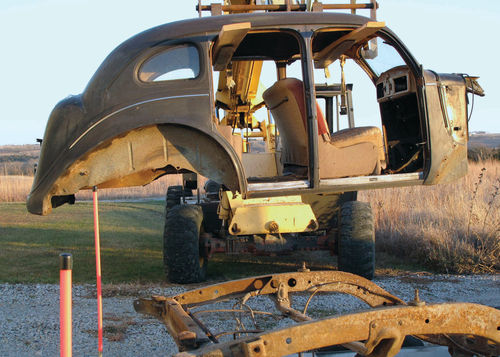
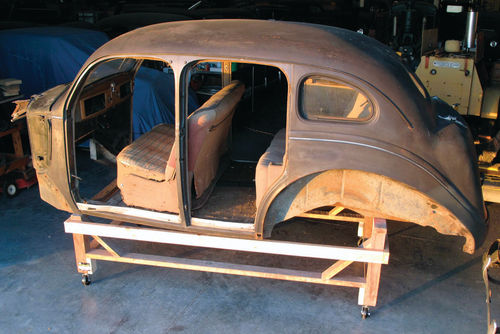
For $75, I hired Brian to move the body, a doubtful prospect once we discovered that his forks, a mere 4 feet long, wouldn’t span the distance between door openings In true can-do spirit, Brian asked if I had some 6-foot lengths of 2-by-6 lumber to effectively extend the forks. After a quick cut or two, I did, and with bated breath we commenced to move the DeSoto from the trailer to the stand (Photos 24 and 25).
With my first chance to carefully inspect its interior, I discovered that my $1000 eBay purchase continued to deliver pleasant surprises.
One, under the front seat’s lower cushion, straddling the battery box, I found a perfect lid for the battery cover.
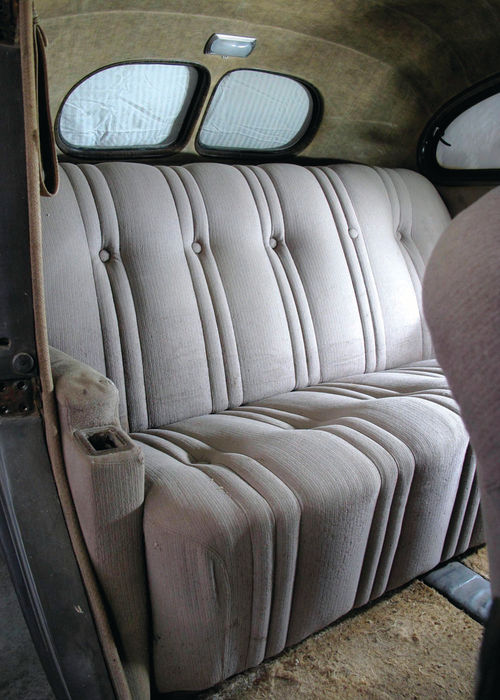
Two, beneath the front seat’s nylon seat covers I beheld broadcloth upholstery as flawless as the back seat’s (Photo 26).
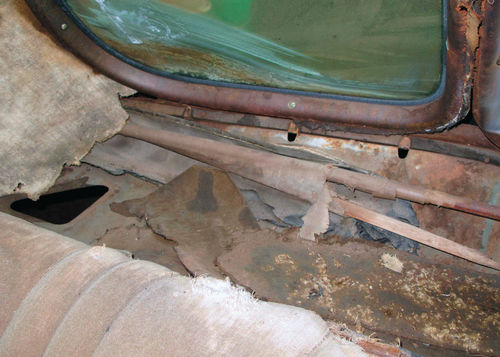
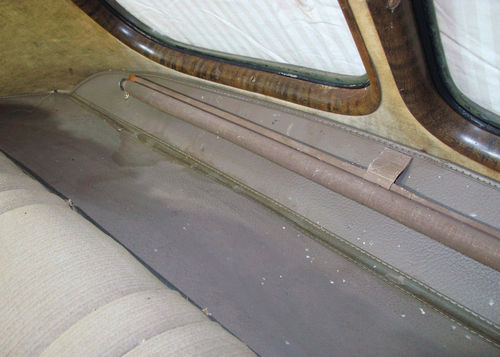
Three, the fiberboard shelf between the back seat and rear window—which had utterly disintegrated in the car I’ve long owned—looked nearly new (Photos 27 and 28).
I could go on. Suffice it to say that despite tedious trip preparations, a 2800- mile round-trip drive and the time I’ve spent since (reinforcing a body stand and logging, boxing and hanging four pallet loads of parts), I’m still pleased as punch about my purchase.
As an inexpensive “parts car,” the eBay DeSoto is loaded with goodies I can use on my other ’37 DeSoto 4-door sedan. Unless, of course, it becomes a restoration candidate in its own right!


