
A LONG JOURNEY WITH A PARTS CAR, PT.
He Didn’t Hesitate to Buy the 1937 DeSoto Despite the Trip and Hard Work Involved to Retrieve It. Then He Was In for Quite a Surprise.
thought it over before accepting the challenge of hauling a disassembled car halfway across the country on an open trailer.
But only for a moment: the eBay auction was ending soon
The distance separating the car and me was a sticking point, I admit. After all, I live in southeastern Nebraska. The solid and nearly complete (missing its engine and transmission) 1937 DeSoto 4-door sedan was 1400 miles away in upstate New York.
Ah, but it was early May, five months before the big annual old-car swap meet in Hershey, Pennsylvania, which I planned to attend.
If I paid the Buy It Now price of $1000 to end the auction, would the seller wait until I could retrieve the car in early October? He would! The car would remain in a nearly vacant barn until I called for it.
I had known of the car: an eBay auction some two years earlier for two ’37 DeSotos included this sedan as a parts car for a highly desirable convertible sedan.
Ultimately, the winner of that eBay auction had restored the convertible sedan using only a few parts from the 4-door. Because the parts car was now surplus property, it was again for sale on eBay.
Just as I was familiar with the car, I was also acquainted with its current owner, Jim. As the National DeSoto Club’s ’37 DeSoto technical advisor, I’d fielded a couple of Jim’s questions while he’d restored the convertible sedan.
So, What Exactly Did I Buy?
This is why I was (mostly) comfortable buying the car without truly knowing what parts came with it, a point on which the auction listing was vague. Only after I bought the car was Jim able to send detailed photos.
But the $1000 price represented a bargain even without the extras. I was getting a frame and rear axle; a nearly rust-free body that included a fully upholstered interior; and four doors plus a trunk lid, all solid.
Swapping the parts car’s nice trunk lid for the battered lid on my own ’37 DeSoto 4-door sedan could save me hundreds of dollars in repair costs for that part alone.
To conserve more money and labor, I’m now even considering restoring the parts car’s body rather than the rustier body on my car.
After I’d won the eBay auction, Jim emailed close-up photos showing the treasure trove of nice-looking original parts that came with it.
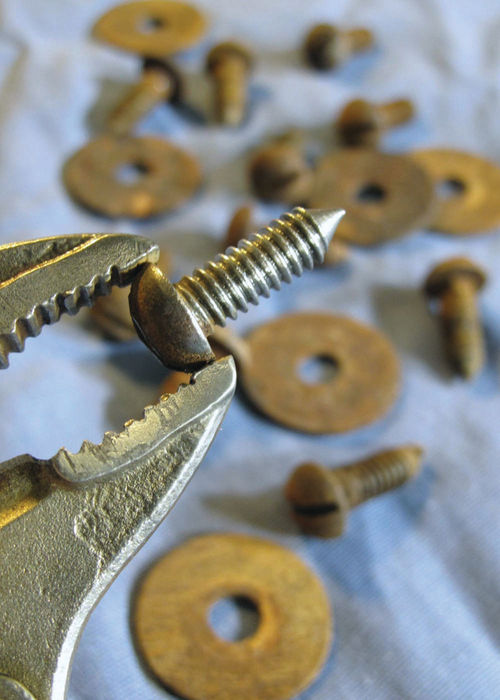
They included four rims, the carburetor, gauge cluster, headlamps which were missing reflectors and lenses, one bumper guard, an oil-bath air cleaner, a radiator and shell but no grille, various stainless-steel trim strips, left and right taillamps (without lenses), steering column and gearbox, a beautiful steering wheel and horn button, a gas tank, clutch and brake pedal assembly, bell housing, several engine, transmission and clutch pieces; two driveshafts, and front coil springs and front-suspension A-frames, including brake-backing plates, wheel cylinders and brake shoes (Photo 1).
Thus I came to own a car and a nice pile of parts nearly half a year before I actually saw it.
My Plan: Reassemble & Retrieve

Nevertheless, I wasted no time preparing to bring home a car that would help me restore my own ’37 DeSoto and provide me with many valuable spares besides.
As it sat, the parts car’s body was without doors or floorboards; on my open car-hauling trailer it would thereby be exposed to the destructive one-two punch of wind and weather (Photo 2)
And yet an enclosed trailer would simply not work: the seller needed to load the car’s frame and body from the side, using a forklift.
My plan, then, was to partially reassemble the car before hauling it home. I hoped to seal it against the elements well enough to protect its nice headliner, door panels and cloth seat upholstery. If I could get these items home intact, they would serve as excellent patterns for my 1937 DeSoto restoration project.
I knew from the photos that the parts car had doors. As to floorboards, they weren’t pictured so I had to assume not.
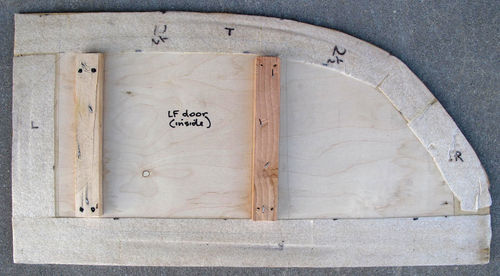
Accordingly, I lifted the two pieces of a ’37 DeSoto floorboard off the parts-storage pegboard in my pole barn. Officially, they are a “floorboard” (where your feet rest) and a “toeboard” (a narrow strip of sheet metal that slants upward to connect the floorboard with the firewall).
Because I’d disassembled another ’37 DeSoto 4-door in the 1980s and saved everything except its body shell—which I’d had no room to store at the time—I had these parts on hand.
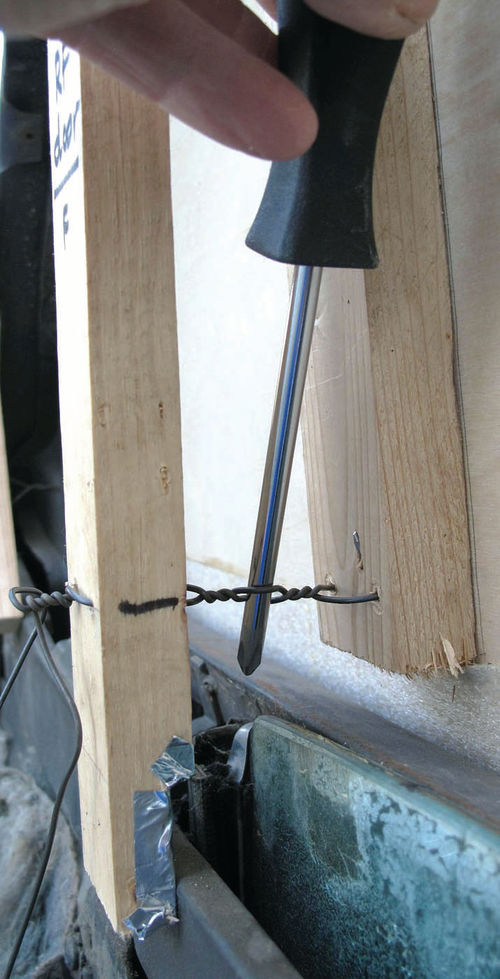
Cleaning Up Some Necessary Screws
I needed screws, of course, both to attach my floorboard and toeboard to one another and to fasten the assembly to the New York parts car. These I simply retrieved from the 60-drawer parts organizer that I’d filled with hardware from the car I disassembled in the 1980s.
At a pedestal grinder to which I’d mounted a pair of wire wheels, coarse and fine, I buffed the screws to clean up their rusty threads (Photo 3). Afterward, those that failed the test when I tried to spin on a nut—ultimately, about half the screws—got a second treatment.
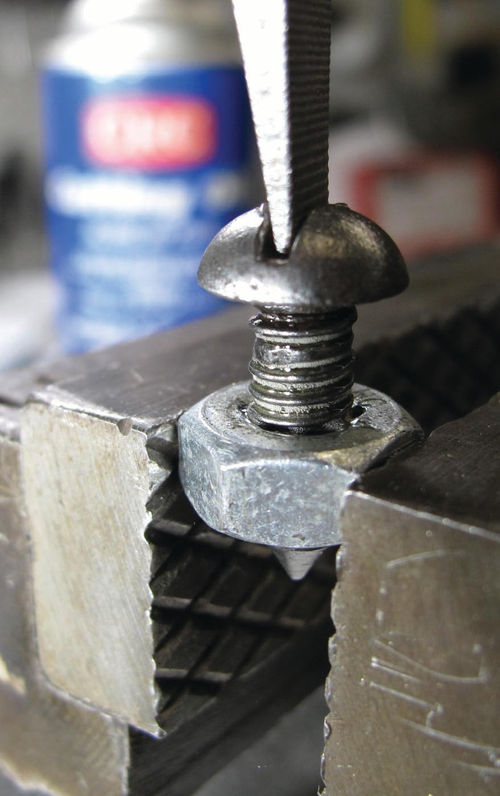
Specifically, I then sprayed CRC-brand cutting oil on each one and then ran it through a thread chaser meant for 1 ⁄4-20 fasteners (1 ⁄4-inch diameter, 20 threads per inch). Less aggressive than a die from a tap-and-die set, a thread chaser will straighten damaged threads so you can salvage an otherwise unusable fastener (Photo 4).
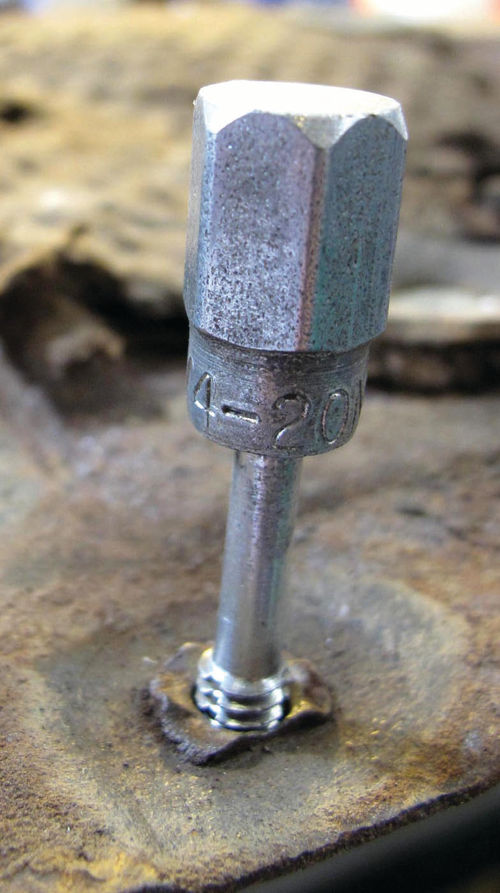
The DeSoto uses six crimp-on nuts where the forward edge of the floorboard overlaps the rearward edge of the toeboard. I cleaned the rusty internal threads of these nuts by running a drill-mounted cylindrical wire brush through each one. I then finished the job by using a thread-chasing tap to dress any damaged threads (Photo 5).
To waterproof the floor, I used aluminum tape to seal slots in the toeboard for the clutch and brake pedals. Likewise, I taped over a hole for the accelerator linkage and did the same for some rust holes.
Elsewhere, I used a scrap of sheet metal to make a new master cylinder inspection cover which was missing from my toeboard. Finally, I cut and shaped pieces of sheet metal to fill holes where the gearshift and handbrake levers had pierced the floor (Photo 6).

Although the parts car had intact glass elsewhere, I had to assume the worst about the doors—that I’d either find the glass broken or the roll-up mechanisms (regulators) jammed. (This was close to the truth: only one of the four doors had glass in it.)
Making Wooden Windows
After transferring cardboard patterns I made using my own ’37 DeSoto as a model, I used a handheld jigsaw to cut window covers from 1 ⁄4-inch plywood.
I suspected, however, that hundreds of miles of jostling and wind-buffeting would cause the wood to scuff, if not cut through, the parts car’s nicelooking paint. To prevent it, I used contact cement to attach strips of thin white foam sheeting (the stuff used as packing material), which padded the inner edges of the window covers (Photo 7).
I nailed a pair of wooden 1-by-2s vertically to the inner edges of each wooden “window.” Through a pair of holes I drilled in the top and bottom of each 1-by-2, I looped a strand of mechanic’s wire.
My plan was for this wire to pass inside the car to a pair of slightly longer 1-by-2s, likewise drilled to receive the mechanic’s wire. With a dado blade on my table saw, which permits wide cuts, I notched both ends of these inner 1-by-2s.
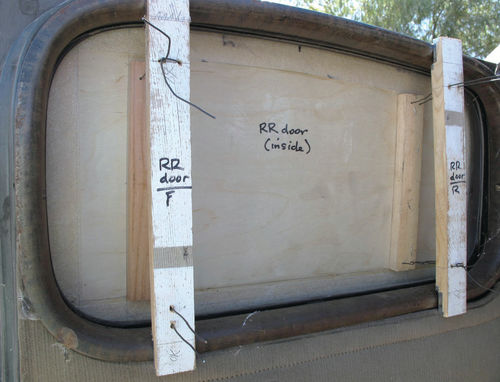
They thereby locked into place against the top and bottom of the window garnish molding to act as anchors or braces to secure the window covers (Photos 8 and 9).
I brushed a single coat of spar urethane on the edges and exteriors of the covers to repel the inevitable rain shower I expected to encounter on the drive home. The covers wouldn’t seal properly if they immediately warped.
Plywood Protection
As a final preparation, I cut several pieces of plywood to place between the trailer deck and the DeSoto’s bare frame. Two large plywood squares would go beneath the rear leaf springs, still attached to the frame.
I’d slide other pieces under the transmission crossmember or frame side rails—wherever the front of the frame contacted the trailer.
As I did with the floorboard screws, I found and cleaned up 32 door-hinge screws (four per hinge, eight per door). They went into a labeled clearplastic can; the floorboard screws went into another. I didn’t want to fumble for either when I needed them urgently.
By pre-lubing all screw threads with anti-seize compound, I likewise hoped to avoid delays during the timeconsuming task of loading and partially reassembling the car.
As my trip departure date approached, I loaded a small plastic tote with the screws and various tools I’d need to reassemble the doors and floorboards: a huge No. 4 Phillips screwdriver for the door-hinge screws; a slotted screwdriver that perfectly fit the floorboard screws; my cordless drill with its charger and a spare battery; a spray can of penetrating oil, and an assortment of cylindrical wire brushes and my thread-chasing set to clean rusty nuts on the parts car.
To handle any surprises, I also threw in the well-stocked 5-gallon pail of tools I use for salvage-yard outings.
Plans for Loading & Driving
The seller would first load the frame onto my trailer and then lower the body onto the frame. I therefore packed a variety of straps to lash this load and other smaller parts.
First, I planned to anchor the four corners of the frame with the wide nylon ratcheting straps I carry for hauling any car.
Next, I’d anchor the body to the frame using two narrower ratcheting straps that were long enough—you can bet I tested them on my own ’37 DeSoto first!—to throw across the cowl and trunk bump of the parts car’s body. I’d anchor both ends of these straps in special tracks mounted lengthwise at the outer edges of my trailer deck.
For lashing down the radiator shell and any other loose parts in the open trailer, I packed 10 or 12 light-duty (400-pound capacity) straps. Because they are endlessly useful, I usually keep about that many in my pickup anyway.
I also packed three or four large (58-quart) Sterilite clear-plastic totes, empty and nestled, for hauling home loose items. I especially wanted to protect the various fragile items, including the headlamps, taillamps and gauges. With the same goal in mind, I threw in a variety of old towels and blankets for padding such parts.
I planned to drive about 475 miles daily for three days—Friday, Saturday and Sunday—and get as close as possible on Sunday to Syracuse, New York, near where the car was situated. I’d pick it up first thing Monday, after which I’d drive on to Hershey, Pennsylvania, to set up my booth early Tuesday for the official Wednesday opening of the annual four-day swap meet.
Rats! A Late Start
An unexpected problem delayed me, however.
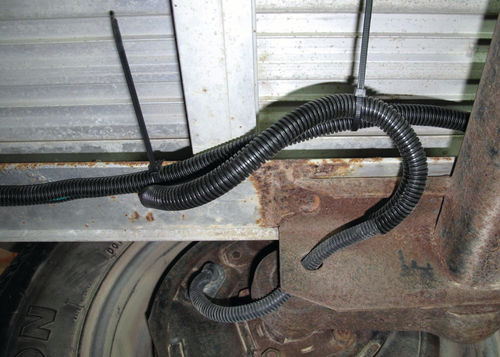
Because my flatbed trailer, which I park outdoors, had attracted some wire-nibbling mice since I’d last used it, the electric brakes were working at just one of its four wheels. Last-minute re-wiring repairs kept me working until 9 o’clock the night before my departure (Photo 10).
That, in turn, prevented me from finishing other trip preparations, including loading camping supplies— tent, Coleman stove, food, sleeping bag and so forth—and tables, parts and literature for my Hershey booth.
Accordingly, my anticipated start early Friday morning got pushed back nearly to midday, which allowed me to drive just 350 miles to Iowa City by nightfall.
I did better thereafter, driving 490 miles to Lansing, Michigan, on Saturday, and 465 miles (including a stretch across Canada between Port Huron, Michigan, and Buffalo, New York) to reach Seneca Falls, New York, on Sunday, still about 50 miles short of my destination.
Driving those final 50 miles on a hilly U.S. 20 through many small towns consumed two hours Monday. Part of the delay was my fault for failing to get exact directions to the farm, which was well off the beaten track. Relying instead on my GPS, I followed a roundabout route with numerous turns and trips down rough, narrow country lanes.
My asked-for directions upon leaving sent me away on a more-direct route: Drive several miles down the road past the farm, turn west at the T-intersection with a state highway and stay on it to reach I-81 at Cortland, New York. No problem.
The Loading Begins
From the time I arrived at the 1937 DeSoto farm at about 9:15 a.m. until I pulled out with a loaded trailer 9 1/2 hours later at 6:45 p.m., I worked nonstop, skipping both lunch and dinner.
It couldn’t have been a more pleasant fall day for working outside, however: sunny, calm and 65 degrees F.
The seller, Jim, a serious car enthusiast, employs two men, Art and Mike, in a car-restoration shop on his old family farm. After we briefly discussed loading strategy, Art jumped in a forklift and loaded the loose frame, centering it between my trailer’s twin axles at my request.
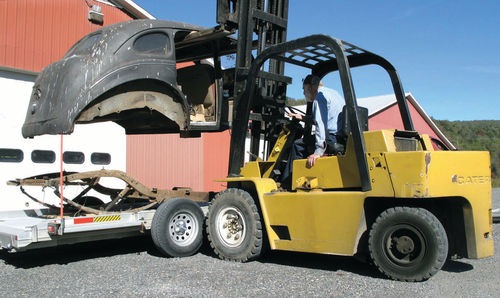
Next came the body—and here I discovered why the doors were off the car. When Jim told me over the phone that his guys would load the body with a forklift, I’d assumed they’d slide the forks beneath the rocker panels and lift from the bottom.
I winced at that, imagining the forks crushing the car’s rocker panels. But the car evidently had already been lifted that way and, judging from the photos, the rocker panels were unscathed.
It was all my fantasy, however. In reality, Art elevated the forks and, with Mike directing, carefully aligned them with the tops of the front and back door openings. Once Mike had inserted four blocks of wood as cushions, Art lifted the body.
Besides lifting the car from its strongest point, this method ensured there would be no conflict between the forks and the trailer tires when Art loaded the body from the side (Photo 11).
A Visit from Santa
Aligning the body perfectly with the frame was a tricky procedure. After a couple of attempts and readjustments, however, Art hit it just right.
We did have to tug a bit to reposition the right rear leaf spring, loose both at the rear shackle and at the front bushing. Those unions apparently had been disassembled to be used on Jim’s convertible sedan.
Next, while the forklift was still out, Art lifted and ferried the heaviest of the loose parts—the rear axle and differential—over to the trailer.
I’d originally considered placing it out of harm’s way in the back of my pickup, along with the heavy radiator shell. But I needed the pickup’s box for swap-meet merchandise and Art had a better idea, anyway: lash the rear axle sideways across the approximately four feet of bare frame rails where the engine would normally sit. This worked.
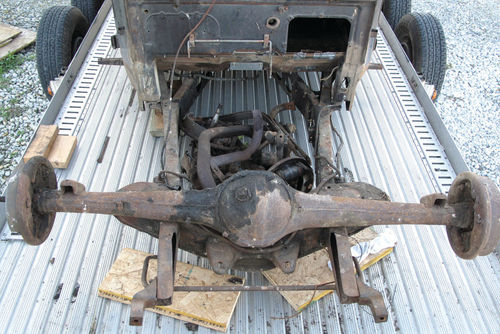
With the rear axle sitting just ahead of the front engine cradle, I ultimately had room to drop the heavy frontsuspension A-frames in the middle of the “engine compartment” and cover them with the radiator shell (Photo 12).
Art, who with his white whiskers resembles Santa Claus, proceeded to play that role as he fetched all the loose parts that went with my purchase.
Instead of a sleigh pulled by reindeer, however, he used his Caterpillar forklift to deliver my presents. Either he checked his list only once or—could it be?—I’ve been a very good boy this year.
Pallets of Presents
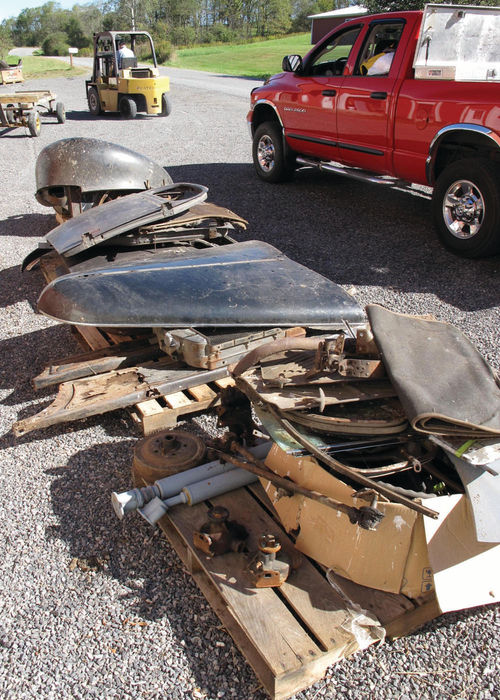
Art brought out the parts on pallets: one, two, three...and, eventually, four pallets loaded with parts (Photo 13).
I spied parts—large parts—that I wasn’t expecting to receive because they weren’t in the photos Jim had sent me. Would I have room enough on the trailer for all these extra items? Though this was a problem, I had a smile on my face as I set about solving it.
The large parts included both running boards, all four fenders, the hood and—my biggest surprise of all—a pair of dandy ribbed ’37 DeSoto chromed bumpers, so much soughtafter by hot-rodders that they’ve become scarce and expensive.
Surprised at my surprise, Art insisted that he’d photographed everything at Jim’s request. Apparently Jim—a busy guy—had emailed me only a sampling of Art’s photos.
Because loading, arranging and securing four pallet loads of parts promised to make for a long day, I got right to work.
My first task was to unload the car, whose interior and trunk were stuffed— amazingly—with even more parts, some I’d known about, some I hadn’t.
New to me: the flywheel, clutch and clutch torque shaft; intake and exhaust manifolds; floorboard and toeboard; two water pumps; cans containing several pounds of screws, nuts, all the door handles and various other hardware from the engine and body, and even the carpeting from the back seat area, neatly folded and in good condition.
Goodies Galore!
Other goodies that I found either inside the car or on the pallets included the hood side-panel stainless-trim inserts, an oil pan, fuel pump, sheet-metal battery cover, shock absorbers, distributor, coil, voltage regulator, front and rear bumper brackets, and the trunk’s two-piece plywood shelf and mounting hardware. This wood, which often crumbles to dust after so many years, was in excellent condition.
One of the most unusual finds was the spare-tire spoon, still sporting black paint.
This spoon—a curved piece of heavy stamped metal that secures the spare tire in the trunk—almost inevitably got lost the first time the car had a flat.
After unloading the car, I installed without difficulty the weatherproofed floorboard and toeboard I’d brought with me, thus sealing the front of the car.
Next, I mounted a cylindrical wire brush in my cordless drill to clean up the threaded holes for mounting the rear doors, which I attached easily.
I spent longer and worked harder at the front doors because the door posts were missing their built-in nuts. To replace them, I found and cleaned up nuts from the car’s loose hardware assortment.
But reaching around the back of the door post in tight quarters to align each nut with the proper door-hinge screw—all the while trying to balance a heavy door—became a lengthy ordeal.
With the doors mounted at last, I attached three of the four wooden window covers I’d brought with me. Only the left rear door still had glass in it.
Next time: After loading up and strapping down a vast number of parts, Curt drives 1400 miles to arrive home relatively unscathed. Now, where will he store all those parts? More important: Given that he lacks a forklift or gantry crane, how will he unload the car body?


