
It’s More Than an Oil Change, Pt. 2
With some thought and planning you can accomplish a lot more during an oil change than just the important steps of draining and replacing the lubricant. It’s a perfect time to conduct a number of inspections that can give you a heads-up on potential problems developing with your ride. Last month we assembled our tools and supplies, greased some fittings and inspected U-joints, bushings and steering components, among others. There were nine photos with last month’s installment, so we’ll start here with Photo #10 and a look at various hoses.
Fuel Hoses will rot after a few years. Inspect both the hose from your fuel tank to the steel line, and where it exits the steel line to the pump on your engine. Twist and flex the hose and look for rotting or cracks. This is usually easily spotted, and catching it now could very likely keep you from being down on the side of the road. (Photo #10 shows one that was recently replaced.) Some vehicles will also have a vapor return hose, and it should be inspected the same way.
Radiator, heater and by-pass hoses: If they are soft and mushy or the other extreme, hard and brittle, they should be replaced. Look for any signs of damage or abrasions. Good hoses will have a firm feel when you squeeze them, but if you are unsure, replace them all on a set schedule as part of a regular maintenance program.
Brake hoses: A typical rear-wheel drive vehicle will have three—one at each front wheel and one extending from the rear axle housing to the steel brake line. Remove the dirt and road grime to inspect for cracks, splitting and rotting, usually near the end of the hose (Photo #11).
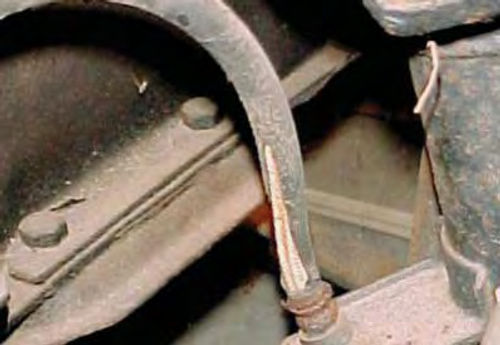
Surprisingly, they can get pretty bad looking before you see any leakage. Also, keep in mind that this is a good visual inspection for safety, but doesn’t necessarily mean the hoses are “good.” I encountered a hose on the rear of my ’66 Chevelle that looked good visually, but was almost completely restricted internally. It was causing a slow release of the rear brakes in my situation.
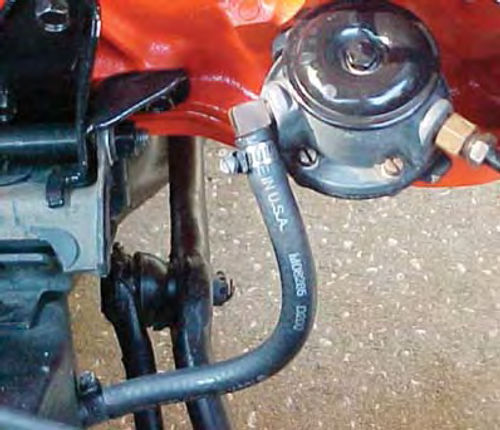
If your vehicle has power steering, inspect those hoses as well. The hose that has crimped ends is referred to as the pressure hose, while the other, that is retained by clamps, is the return hose. The pressure hose is a fitted “vehicle specific” hose, while the other is an oil hose you can purchase by the foot.
Belts, Tires & Rust
From under the vehicle you get an additional view of the engine’s drive belts. If you see chunks missing, cracks or oil contamination, they should be replaced.
Tires: While you most likely won’t have a 100% view of them, don’t use that as an excuse not to look at them. Just a quick look might show you a nail at nine o’clock, uneven tire wear or scalloping. If you are running radials, check for separations by moving your hand over the surface of the tire. As you would expect, it should feel somewhat smooth. If you have a “bump” or abnormality in the tread, you likely have a separation and have found a tire that has been giving you a poor ride quality, will continue to get worse, and ultimately fail.
A caution: Always look closely at worn edges of radial tires before you run your hands over them. Often there can be exposed steel on the edges, and you can badly injure your hand(s).
Rust: Look at the steel brake lines. If you notice the lines are heavily rusted and pitted, replace them. This pertains mostly to cars coming out of the North, and usually I have found the lines on the rear axle housing and the long one running in the frame, front to rear, to be the most vulnerable.
Look over the exhaust system for leaks due to a rotted muffler or pipes. Generally the pipes closer to the engine last longer than mufflers or tail pipes. Don’t forget to look at those hangers, they are made of both metal and rubber, so they can rust and rot. If the driveshaft is heavily rusted, consider removing it and sanding off the heavy rust. Now coat it with a quality rust sealing paint like Hammerite, or similar products available through the Eastwood Co. If you want to go a step further in rust prevention, you can pre-coat the driveshaft with Ospho, a phosphoric acid wash.
In most cases, one-piece shafts are easily removed; simply wrap tape around the U-joint cups to keep them from falling off. You may have a small amount of fluid drain from the transmission when the shaft is removed, so a catch pan is a good idea. Two-piece shafts require a little more effort, so check your shop manual or Chilton’s and decide if it is a task that you want to tackle.
The fuel tank: A quick visual inspection will tell you if there is any wetness on the outside. Older tanks are subject to rust, both inside and out. There are products and services for both.
Under the Hood
For the moment we are finished under the vehicle, so let’s move up top and go under the hood. If you have a top-mounted oil filter, now is the time to service it. Do you know your engine’s oil capacity? When I was growing up, it seemed every domestic vehicle held a total of five quarts, including the oil filter.
That was OK when I was young, but today, let’s verify the correct amount in the shop manual. Start by doing the obvious, fill the crankcase, and if you primed your oil filter, deduct that amount from the total you put in. With the vehicle sitting level, you can now check other under hood fluid levels while the oil is entering your engine.
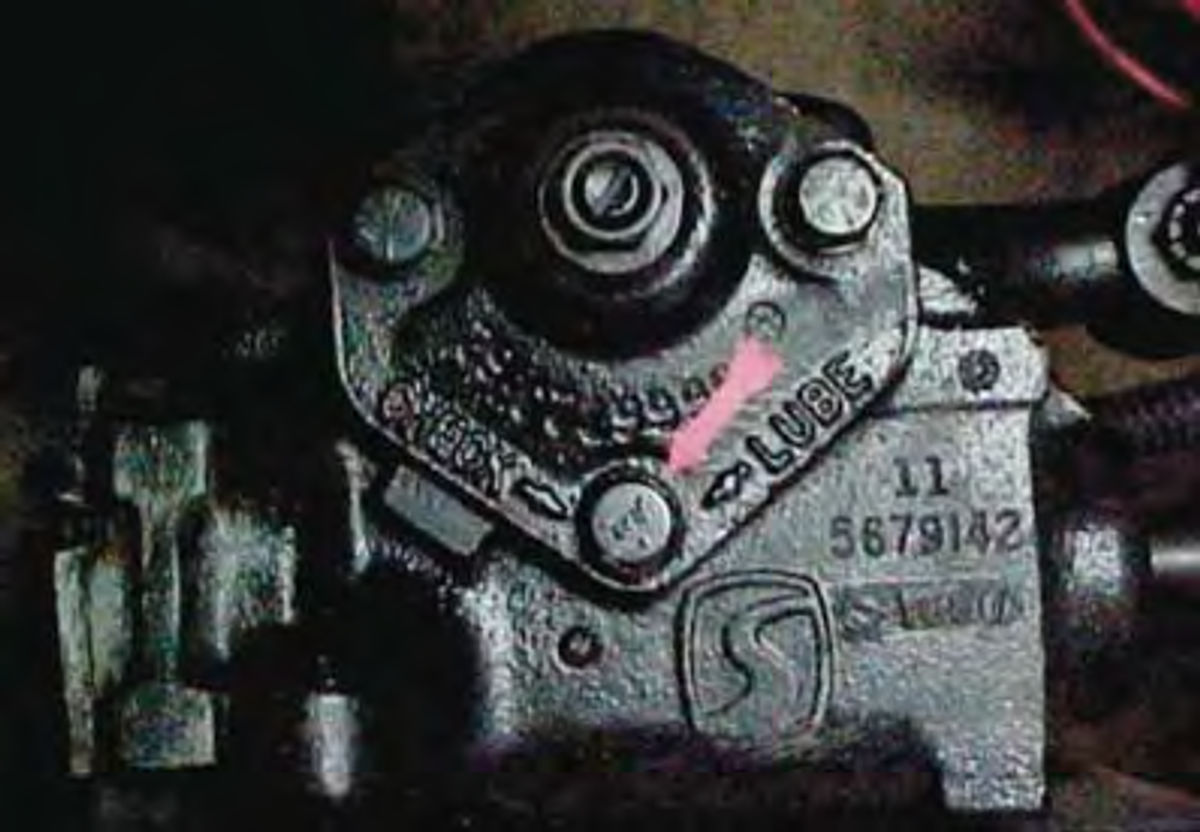
If you have manual steering, you should periodically check the steering box grease level. My Chevelle is filled and checked by the removal of one of the top bolts (Photo #12). Some trucks will use a square drive plug similar to that used in many transmissions and differentials. Power steering reservoirs usually have a dipstick as part of the cap. Some may be marked for both hot and cold-level checks.
Now is the safe time to check the radiator while it is cool. On vehicles not using an overflow system, expansion room must remain within the radiator tank. That means a fluid level down about one inch from the top of the fill neck. On units where your tanks are on the top and bottom, you should see that the core itself is covered with fluid. If you have a plastic overflow reservoir, it should have hot and/or cold-level markings on it.
The brake master cylinder is located up against the driver’s side firewall. Wipe off any dirt build-up, then remove the top to check the fluid level. (If you are uncertain whether you really are checking the master cylinder, have an assistant slowly depress and slowly release the brake pedal. You should see obvious fluid movement; if not, repeat the above but at a slightly faster pace. Still nothing? Check the shop manual to verify its location.)
Generally, proper fluid level is about 1/8-1/4” from the top edge. If it is down slightly, add the correct type of fluid. DOT 3 is probably the most common, but many of us have switched to DOT 5 silicone, and some imports will have different requirements.
You don’t want to mix different fluids, as some are not compatible with others, so know what’s in there.
It is normal for systems with disc brakes to see a drop in the fluid level over time. This is because as the disc brake pads wear, the pistons move outward in order to maintain contact with the brake pad, and brake fluid fills the space behind the piston. On drum brakes, periodic filling should not be needed. If you notice a continuous drop in brake fluid level, you need to find out where the leak is.
Also notice the color of the fluid. If it has gotten dark, almost black in appearance, the fluid is old and probably moisture-laden and should be flushed and replaced. Properly maintaining brake fluid will greatly extend the hydraulic system life.
Of course, if there already is system leakage, such as at the wheel cylinders, that will need to be corrected first.
Batteries: Many allow you to check the water level, usually about 3⁄4”-1” down from the top of the battery. There is a visual indicator in each cell to let you know it has the proper level of water in it. In many cases the fill holes in the battery’s top taper down to a smaller diameter at the proper level, so you will easily know when it’s been reached. In any event, the plates should always be covered. Before leaving the battery, inspect the terminals and clamps for corrosion. Even if they look OK, disconnecting and cleaning them is time well spent. All connecting surfaces should be shiny. You can use most anything here, such as a small pocketknife, a wire brush...or even the post cleaning tool that is made for the job. It’s a good practice to remove the ground cable first. This is the cable that bolts to the engine block.
The majority of post-’50s vehicles will be negative ground, but there are exceptions, so to avoid any unintended welding, let’s be certain.
Just remember to be careful when working around the battery. Don’t lay wrenches or anything conductive on top of it, and it’s a good idea to use protective eyewear. When you remove the ground cable, make certain to avoid contact with the other post.
If you have replacement “emergency” terminal ends on the end of your cables, get rid of them. Replace the entire cable. If yours is a six-volt system, it will require the proper heavier-gauge cables. The twelve-volt cables available at the local discount store won’t do the job. Once cleaned, a coating of petroleum jelly on the posts and clamps, inside and out, is a good corrosion deterrent. Reconnect the cables in reverse order.
In severe situations you may see heavy snow-like corrosion on top of the battery clamps. In this case I would advise disconnecting the clamps and removing the battery from the vehicle.
If the clamps are too corroded to loosen the nut and bolt, use a battery cable puller to remove the clamps from the terminals. This is a two-jaw type puller with thin metal jaws to get in between the clamp and battery. Once removed, the cable ends can be soaked in a solution of baking soda and a small amount of water. Use the same solution to clean the top of the battery, and battery tray as well. If the plastic coating on the cables has started to split open where they meet the clamps, this is due to corrosion that has found its way into the cable itself, and replacement is required. If the cable and clamp look fine once they have been cleaned, a replacement nut and bolt can be purchased at the local hardware store if needed. Usually these are 5/16” NC bolts, @11⁄4” in length.
Of course, look again at those hoses and belts. Heater hoses as well as the top radiator hose (etc.) were likely not visible from below. If your vehicle has an automatic transmission, most require a warm fluid-level check, so refer to the manual to make sure.
Now, Start Your Engine
By now you have likely added the balance of the oil, so, once full, you can start your engine. It may take a few seconds for oil pressure to build, so if you have a gauge, don’t be alarmed.
Once the engine is running, closely view the oil filter for leakage. If it is going to leak, it usually will do so from the beginning, but it never hurts to stare at it a little longer.
If you are comfortable that there are no oil leaks, you can shut it down. Let it sit for a few minutes then check the dipstick to verify it is full.
On older cars and trucks it is not impossible to have the correct amount called for in the engine, yet the dipstick disagrees. In these instances, most likely, the original dipstick was lost at some time and replaced with one that “fit.” (Also, we’re assuming the oil pan is stock and not some exotic extra-deep type with greater oil capacity.)
You can seek the correct replacement dipstick, but for now let’s mark the existing one to indicate the proper “full” line. The easy way to do this is with the corner/edge of a file. A few quick passes are all that is needed.
Make sure the vehicle is level, and let it sit for a while to assure that all the oil has drained back to the crankcase before making the new mark. Sometimes marking the opposite (blank) side of the dipstick is a good idea, and if the “add oil” mark is 1” below the “full,” make the new one the same distance below your new full mark.
Read All About It
If you don’t have a manual for your car, purchase one. They are a good investment. The factory, vehicle-specific shop manuals are the most in-depth and most expensive. However, depending on the level of service you intend on doing on your car or truck, they may be more than you will need.
The older factory shop manuals are easy to read and follow, but as the vehicles became more complicated, so did the complexity of the text. In short, a 1960s manual is easily followed by anyone with interest and basic mechanical ability, while a 1990s manual is more geared to someone who is working in the trade.
Chilton and Motor manuals cover many years and many manufacturers in one book. This is not necessarily a bad thing, but it may lack some specific information you are looking for. I haven’t purchased one in recent years, but they usually are much less costly than factory manuals. These manuals usually can be found at auto swap meets, and many factory manuals are now being reprinted.
Also, don’t overlook the Haynes manuals that are available at most auto parts stores. These generally are vehicle specific but cover a period of several years. They are affordable and easy to follow, but not as in-depth as the factory manuals. Unfortunately, they probably won’t offer anything for older cars. I have one for Chevelles and another for Chevrolets that starts at 1969 and covers about a 20year period. Ask the auto parts store or contact the manufacturer if your application is not on the shelf.
Put Yourself In Charge
Now, even if you don’t feel comfortable doing any needed repairs, once you’ve made your inspections you’ll know if service is required and can make a decision on how you’ll proceed... before you may no longer have a choice in the matter.


