
Make An Earth Post, Pt. 2
This Month We’ll Put Our New Fixture Plate and Vise In Place, And Consider Other Uses for the Post as Well.
Editor’s Note: There are times when you need extra space to work with large tools and parts. This series shows how you can build an outdoor device to help you with those large and cumbersome project pieces. Last month we talked about a parts list, along with setting your earth post in the ground and making fixture and mounting plates. This time we’ll start with drilling through the post to make some mounting holes. There were three images with the first installment so we’ll pick up our second and final installment with Photo 4.
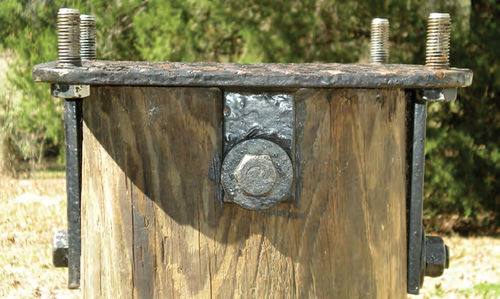
I HAVE A good selection of metalworking tools, but am limited when it comes to wood. Once again, my neighbor had a long, large-diameter wood bit for drilling the mounting holes for the fixture plate. (He also came up with the bolts and nuts I needed.) This is the type of large wood bit that electricians use for running household wiring, so if you know an electrician this might save the expense of buying a bit.
It’s a good idea to allow some extra room for the bolt to pass through, so using a size larger bit is strongly advised. You need to drill these holes with the bit square to the vertical of the post, and pass through its center. Using a larger bit also will allow for some free movement of the bolt, making it easier to line up with the strap on the opposite side.
Before you secure the top plate, make sure to paint all its surfaces with a rugged, rust-resistant paint. If you have the equipment, a powder coating would be great, but regardless, you certainly don’t want a hunk of steel outside just waiting to start rusting. And once it’s completely dry, bolt it on!
The earth post should now look something like Photo #4 except your paint will be fresher. Photo #5 shows a close-up view of the fixture plate attached to the earth post via heavy straps.
If a steel I-beam or pipe has been used, paint all of the beam or pipe.
From here on all procedures are the same regardless of the type of support post.
Securing Your Vise to a Plate
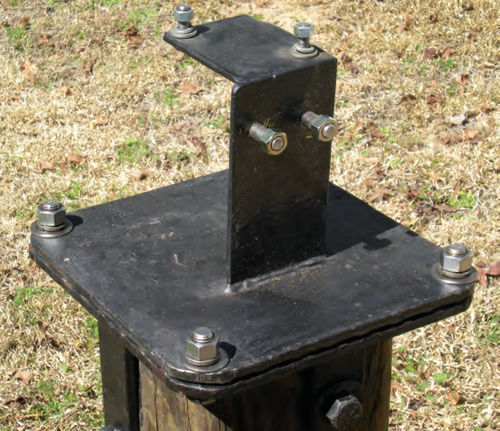
As noted in the previous installment I was working with diamond steel plate, and at this point I’ve chosen to have the mounting plate for the vise with the smooth side up. (See Photo 1 on page 28 of last month’s issue for a look at the vise mounted on the earth post.) Using the plate with this orientation will prevent metal shavings, dirt, etc. from gathering in between the vise and the diamond pattern on the plate. With the diamond pattern facing up on the fixture plate and down on the mounting plate, it’s kind of like a waffle iron. There is no right or wrong way to place them.
Position your vise on the mounting plate making sure its pressure screw and tightening arm will hang over the edge and work freely throughout its entire range. Mark the locations for the mounting holes and use the largest diameter stainless steel bolts that will fit. Drill and then thread these holes the proper size. Using only stainless steel hardware (lock washers and flats) secure the vise to its mounting plate. You want to have 100 percent thread engagement but the bottom of your plate must be flat with no bolts protruding. You may choose to purchase two sets of bolts, a long and short option to help you in making a perfect fit. Remember to take into account the use of washers and locks; this will affect the length needed. Sometimes doubling up on washers will make the bolt’s length fit perfectly without protrusions, but usually not. In that case, tighten them all down and use a hand-held grinder to grind the ends of the bolts off smooth with the base of the mounting plate. Don’t compromise now and settle for a short bolt with less than 100 percent thread contact between the bolt and plate.
If you have spaced your corner “studs” on the fixture plate square and equally, you will be able to position the vise and mounting plate in any one of four locations. This may not sound like much now, but later on you might be grateful for this ability.
Now that you have mated this to the fixture plate and all fits are OK, remove the vise and completely paint the new mounting plate. Once you have good paint coverage and it’s completely dry, bolt the vise on to stay.
Remove or Protect?
Initially I thought of removing and replacing the vise as needed to keep it completely out of the weather when not in use, but I guess I underestimated my age. Speaking for myself, “the thing got heavy fast,” and I didn’t see much sense in having a vertebra exploding out of my back.
So now I needed something to protect it from the weather. First I inverted a plastic garbage can over the top of it, but remember at the beginning of this article how I mentioned something about not screwing up the look of your landscape?
My wife and I are by no means fanatical about a pristine yard, but it looked pretty goofy.
So I went into town to our local auto upholstery shop and explained what I wanted. For a few dollars they took some scraps of vinyl and stitched together a cover. It does a good job, and seems to breathe fairly well, but to be on the safe side I still spray the vise with WD-40 every so often as insurance.
There are several grommet holes around the cover’s bottom, but initially I would just fling it over the vise and that was enough. Then one day I removed it and found that a small bat had been resting peacefully under the cover. Later that evening he flew away on his own, and from then on I secured the bottom of the cover with a bungee cord.
Other Uses for the Post
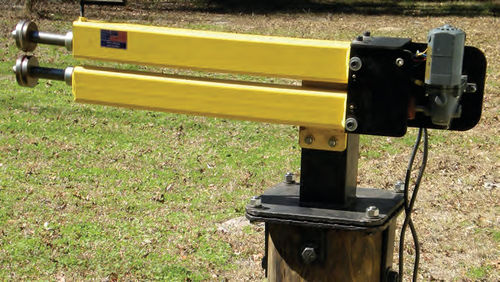
The vise occupies the earth post 95 percent of the time, but on occasion I use it when I am doing sheet metal work to support my bead roller (Photo #6). This mounting plate was made by welding on a section of heavy angle iron. As with the fixture plate, it was drilled and threaded so that I have two studs to line up with when positioning the bead roller. I also boxed in the top of the angle iron. It increases the strength but also gives me another surface where I can mount a small metal bender (Photo #7). So, this mounting plate now functions for two tools.
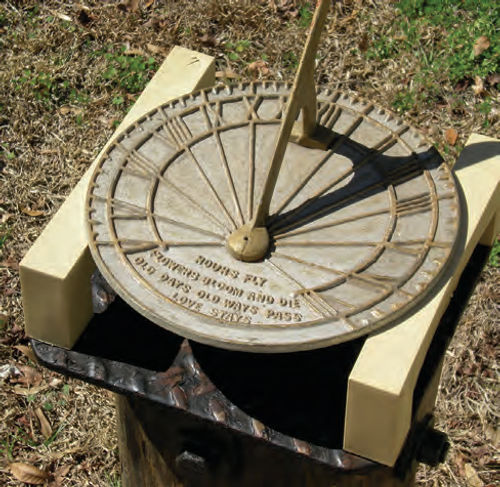
And, finally, if you feel a need to camouflage the earth post, consider letting it support a sundial when it’s not in use (Photo #8). This was an impromptu setup, but you get the idea.
Ways to Keep Your Costs Down
As with any project, if you decide you are going to do it all tomorrow, it will cost you more money.
If, however, you are not in a great rush, let your friends know about the list of items you will need for the project. This can range from the obvious components of the earth post to tools you will likely never need again.
When taking this approach, things seem to come to you. This is not so much a “build it and they will come” approach, it’s more “let people know and things show up.”
You may have to end up buying that tap (as I did), but I also found that purchasing a good used one at the flea market was a fraction of the cost of a new one at the hardware store.


