
Make an Earth Post, Pt. 1
Sometimes You Need Space for a Large Tool or Component. An Earth Post Gives You That Extra Elbow Room.
Editor’s note: Along with covering topics such as painting, electrical system repair and engine maintenance, at Auto Restorer we’ve also made a point of searching for more uncommon projects such as this one where retired auto tech John Armstrong shows how you go about building a handy device for mounting tools outdoors for tackling large and heavy procedures.
FEW TOOLS ARE as handy as the common bench vise, and most of us have one. There are many varieties and sizes to choose from, some being designed for carpentry or machinist work or the more common 5” or 6” vise designed for general use.
There are mammoth vises imported from China (and the size is impressive), and there are American- and possibly German-made models to choose from.
The one common thread, however, is that most of them are bolted down to the corner of a workbench. Now this is fine for many things such as holding a piece to be drilled, filed or shaped. Often a vise can be used to press small things together, and again the bench mounting is fine.
But there also are times when you are trying to work with something that’s long and heavy or just need more working room, and the corner of your bench just won’t cut it.
Time to Go Outside
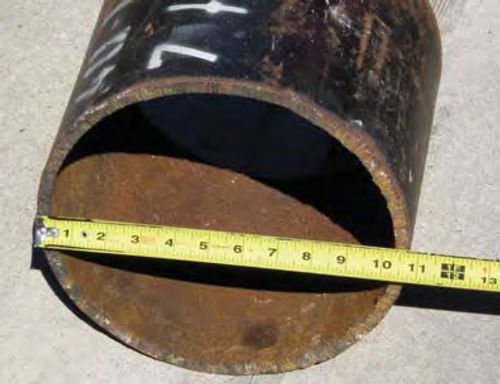
Well, what you need is a vise that’s one with the earth (Photo 1).
With proper spousal approval, look for a location in your yard where you can sink a post or steel I-beam that can be used to secure a vise as well as other specialty auto tools.
Obviously you don’t want to mess up the look of your landscape, but make sure that you have a large enough radius around the location to allow you to work on the largest thing you think your vise could ever possibly hold.
With some creative thinking you can even come up with ideas on how to camouflage the post, should you feel the need. (And we’ll show you at least one possibility in the second installment of this article.)
An Introduction to the System’s Value
My first encounter with this type of setup was in a local hydraulic shop that had an I-beam sunk in the center of their concrete floor. At the time, I had an old hydraulic bottle jack that I wanted to overhaul but I was unable to thread open the top.
After explaining my situation and assuring them that I would purchase an overhaul kit if they could get the jack open, I realized then and there the value of a vise that literally was one with the earth.
They used a handmade six-point box wrench that was probably 31 ⁄2” from flat to flat. It was torch cut from a piece of steel and about five feet long. There was no question they were going to succeed; the hydraulic jack would have to yield to this effort. This is probably the most extreme situation, but it should establish a mental image of what I am referring to, an unyielding vise mounting.
Now, of course, you won’t give up your bench-mounted vise for this. After all, it has served you well and weather and climate are definite factors that come into play when working outside, for that matter, even in the garage or pole barn. So think of this as the really big brother to your bench vise.
This Project’s Parts List
The list of items you will need goes something like this: 1. Your support post. An I-beam, big thick steel pipe, or even a large diameter pressure treated wooden post, probably about 7’ long.
2. Several sections of 1/2-inch steel plate at 12 inches square are usually adequate for your top plate and mounting plates. If you are using a support post with a diameter or width that’s greater than 12 inches, size the plate accordingly. A minimum of 1-inch overhang on the sides would be sufficient.
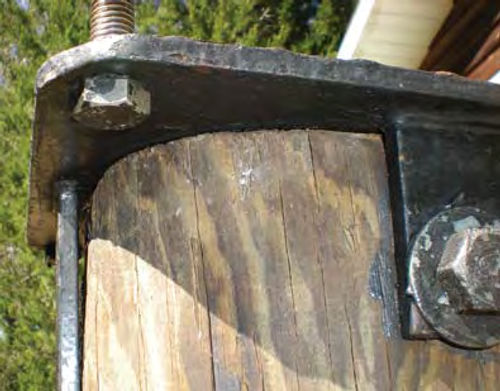
3. If you’re working with a wooden support post, you’ll need either a steel collar that’s large enough to fit over the post (Photo #2), or at least four heavy metal straps to secure the top plate. Also, you’ll need bolts that are long enough to pass through the diameter of the post to secure the straps.
4. Many bags of concrete. And, if you use a wooden post, you’ll need a handful of lag bolts as well.
5. Four 5/8-inch stainless steel bolts that are 2 inches long with matching flats, and nuts; and whatever is required to secure your vise to a mounting plate, also made of stainless.
6. A good strong vise to put on top of the post.
7. Something to cover your vise should you decide to leave it mounted while not in use.
8. Tools needed for the project: Whatever you choose to dig your hole in the earth with, and stuff for mixing concrete. A level, drill press and/or a handheld electric drill. A 5/8” NC tap with tap holder, a 17/32” drill bit for the initial hole and an 11/16” drill bit for clearance holes. A long, large-diameter wood bit slightly larger that your bolts (only for the wooden post application). Basic welding equipment (or you could take the welding portion of the work to a welding shop or tech school).
Finding Supplies & Picking a Location
With some searching for tools and stock, this project doesn’t have to cost a lot of money. I have a great neighbor who makes a living with big equipment and seems to be a magnet for valuable scrap. He comes home with loads of unused “scrap” steel of all shapes and sizes, and anytime I’ve had a project, he has offered me the material I needed at no cost.
When I mentioned I needed a support post for my earth-mounted vise he didn’t have anything large enough in steel but did have some 11” diameter “marine” grade posts that were made to be submerged for boat docks.
In addition, he supplied a couple of 24” square sections of 1/2” diamond plate steel to form the 12” square fixture top and several mounting plates for my vise and other tools. So this dictated my choice of wood over steel.
You may not have a neighbor like this, but there are scrap yards out there, and they can probably supply you with what you need for minimal cost.
Whatever you choose for a support, you will want to sink it deeply enough to have a good foundation, probably between 36”-48”. If you don’t, you will not end up with an earth-solid mounting. This will also play a part in the location you choose. Tree roots and big rocks are too difficult to deal with for the average person with the normal hand tools (such as a shovel and pick, etc.).
Something to remember whether working with steel or wood is the importance of the top of the beam or post being cut square. If the top isn’t square, your fixture plate will not sit level on it and anything mounted to it also will be “off.” In that case, you would need to take corrective measures to shim up the fixture plate to get it level.
If you choose to use wood, I strongly recommend something like the post I used that is made to live in standing water because it’s extremely bug resistant. In Florida where I live, wood-boring insects such as termites would destroy an untreated piece of wood that has been sunk into the earth in no time.
Once you have your steel I-beam, pipe or wooden post of suitable size, you are ready for earth removal.
Digging and Planting
Among the first questions people ask about this project is, “How deep should I plant this support?” As noted above, the answer is the deeper the better and 36” should be a minimum goal. My vise is mounted at a working height of 34” above the ground.
In my location the ground slopes off slightly, so one side may be an inch lower in the ground than the other. Decide what’s the perfect working height for your vise, and should you intend to use the earth post for other items you might need to do some compromising.
I was hoping to use mine to support a large anvil and a vise, and while the 34” working height was great for the vise, it was much too high for using an anvil. I considered lowering the working height, but realized how much more often the vise would be used, and decided against it. I will make something dedicated for my anvil (someday).
When figuring the total depth needed for your support, make sure to allow room when digging for some concrete beneath it. Also add the thickness of two sections of steel plate to its length to determine where the vise will end up.
If a wooden post is used, take a handful of lag bolts and partially thread them into the post in random locations that will be submerged in the concrete. This will give it a better bond with the concrete and help eliminate any possibility of the post ever rotating within the concrete. With a steel I-beam, this is not an issue.
If steel is your choice for a support, now is a good time to weld on your fixture plate. You can read ahead on how to prepare this top plate. If you don’t have welding equipment, take the pieces to a shop (or local technical school welding classroom) and have this done before planting it in the ground. If you are going to weld it yourself, it’s easier to turn it upside down with the plate on the ground and the I-beam or steel pipe centered on top of it. Sure you can weld overhead, but why not let gravity increase the penetration of your weld?
Have Plenty of Concrete
Dig the hole about twice the diameter of the support post, but before you do any digging, make sure you’re aware of any underground phone or electrical lines, and don’t forget plumbing. In my area the phone company will come out and identify where your lines are for free.
Don’t underestimate the amount of concrete needed, it may surprise you. I dumped in about 800 pounds for mine. Bags of concrete are relatively inexpensive and again, more is better.
I would recommend pouring some concrete in first, being careful not to put in too much or your vise support will end up too high. Once your height looks right, continue pouring concrete. A helper will make this a lot easier. Two can work together mixing bags of concrete while still allowing one person time to frequently check and make sure that the post remains square. A wooden support is a little more forgiving as its top can be trued if needed should it not end up “dead on.” An I-beam or large pipe with its top plate already welded on is another story. So it is best to spend the time and effort to make sure it’s square and level as the concrete sets up.
Creating Your Fixture & Mounting Plates
You now have your earth post so it’s time to create the fixture plate for its top. I took one of the 24” squares of diamond steel plate and, using a torch, cut it into four equal square sections. One will be the actual top or fixture plate that stays on the post, and the remaining sections will be used as mounting plates to secure various items to the support post.
Once the plate was cut I performed the usual things, such as radius the sharp corners and smooth the rough edges.
Next, using a drill press, equally spaced holes were drilled at each corner and threaded by hand with a 5/8” NC tap. This will end up being the fixture plate. If you don’t have a drill press, or have a steel support with a plate already welded to it, an electric hand drill will still get the job done.
Now transfer the locations of these holes onto another plate. Make these holes 11/16” because this will be the mounting plate for your vise and will make it easier to line up. Perform this same operation with as many mounting plates as you will need. If you have an extra metal plate you should keep it in the event you come up with something else you wish to secure to your earth post.
Now go back to the plate with the threaded holes and install four fully threaded stainless steel bolts, threading them up from the bottom until they have seated against the base of the fixture plate. This can be seen in Photo #3. (Be aware that my earth post was made several years ago and the photo shows the fixture plate already in place, with aged paint.) These four protruding stubs will give you something to line up with, making it easier when positioning something big and heavy.
If you already have this fixture plate attached to a steel support, then you are a couple steps ahead of those of us who are performing this project with a wooden post.
For those of us with wooden posts, we still need to devise a means of solidly connecting the plate. A section of steel pipe (as shown back in Photo #2) can be used as a collar if it can be fit snugly over the post’s top, or heavy metal straps will work as well. The collar was too small to fit over my post, so four heavy straps were my choice. (If the collar is close to fitting, one complete vertical cut would allow it to spread open slightly.) My metal straps are 2” wide and 3/8” thick. One pair is 3” in length and the second pair is just over 6” long.
Drill a hole (or cut one with a torch) near the bottom of each strap to allow a large bolt to pass through. This bolt will pass through the strap, then through the post and exit through the hole in the corresponding strap.
The straps in the second set are longer so there will not be any interference with the first bolt, and the added distance between the holes assures that you won’t create a weak spot within the post itself. If you’ll feel more secure with extra straps, make the decision now so they can be spaced equally.
If you choose the collar-type mounting, make sure it is cut square, and you will need to cut the same corresponding holes for bolts to pass through the post.
Next we need to secure the straps or collar to the bottom of the fixture plate, so clean and prepare your surfaces for welding. Now is not the time for a weak, contaminated weld.
If you are working with a collar, it should be centered on the plate and welded. If you are using straps, you will need to make marks where they should be welded.
When using four straps as I have, find the center of the plate and mark two lines on the bottom indicating a 90-degree separation. Next center the plate on top of your earth post with your lines facing downward (against the wood). You will use these lines as a guide for placement of the straps.
Lay one strap up against the post and in contact with the plate. Mark its location for welding.
Take the corresponding strap and, without disturbing the plate, go to the opposite side and repeat the procedure.
Now remove the plate for welding. As long as the straps remain perpendicular during welding, you should end up with a good fit. If you have any question after attaching the first strap, let it cool, and then reposition it to verify the location for your next weld. Repeat the same procedure for the next pair.
Once this is done, verify that the fixture plate is level and sitting firmly on the earth post. Use a marker to indicate where the holes will need to be drilled through the post.
Next time we’ll drill the post for our straps, secure a vise to a mounting plate and talk about ways to keep project costs to a minimum.


