
How -to Some Homemade Tools, Pt. 1
There Are Numerous Reasons to Make Some Useful Tools. Cost and Product Quality Are Just Two of Them.
I CONFESS THAT I’m addicted to tools. Not the woodworking variety, but those for automotive and metal working. If a new tool comes on the market for, say, removing oil filters and it’s good,I will add it to my collection.I’ll do that even though I already own three other tools that do the same job well (and always reach for the same one when it comes time for an oil change). Still, you never know when you might need this new variation.
Now, this doesn’t mean I buy every new tool that comes on the market, as there certainly is a ton of junk out there. I will, however, acquire useful, innovative tools. You know, the ones that make you think, “Hey, that’s a good idea” or “why didn’t I think of that.”
This leads me to the focus of this series of articles, because oftentimes “we” do think of “it” and “it” comes to life in the form of a homemade tool. While they may not be fancy or triple chrome plated, “homemade tools” can be some of the most useful in your collection and they don’t have to be complex. In fact, that’s one of the beauties of homemade tools, most are simple. Sometimes it may be an improvement on an existing tool that makes it more useful or better suited for your specific needs. It also can be a tool that’s no longer available for a particular task. It even can be a cost-saving measure, realizing the simplicity of a “production” tool, and choosing to make it yourself.
With that in mind, here are some that I’ve found very useful. (And there will be more of them in the coming months.) Slide Hammer Vise-Grip. This tool actually is a combination of two existing tools. Take a look at Photo 1 which shows a #10 Vise-Grip with a slide hammer shaft welded to it.
The slide hammer pictured here has a two-pound weight with 3.5” of travel. The opposite end of the shaft is knurled so it now becomes the tension adjusting screw, and the total length is 18 inches.
Start with a quality pair of locking pliers like the “Vise-Grip” brand. These are available in several sizes as well as many different designs like needle nose, wide flat jaw, chain wrench, “welding” style, etc. Next find a small-size slide hammer. A used one at the local swap meet is a logical choice to keep the cost down. Even one with bad threads will work, since they will likely be cut off anyway. Small ones like what’s seen here are commonly used in automatic transmission service, so keep that in mind when hunting for one.
Welding will most likely be the easiest method of attachment for most people, and if you don’t have the equipment to do it yourself, take it to your local technical school’s welding class, or a local welding shop. The cost will be minimal even if a professional shop performs the work.
If you have a lathe the shaft could be turned and threaded to the proper size, eliminating the need to weld it to the tension screw. This is just another way to accomplish the same thing.
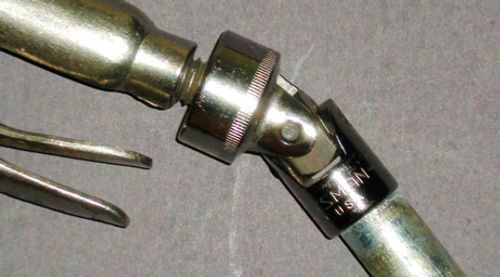
If you find the rigid length of 18” to be a bit much for tight areas you may be working in, consider this option: instead of welding the slide hammer shaft directly to the tension screw, insert a 3/8” drive universal joint type flex socket in between. This will allow the slide hammer action to work at a slight angle, and possibly get into areas where you otherwise might not fit.
Photo 2 shows a flex socket set up in place for welding. The socket end is slid over the tension screw and the drive end is butted up against the hammer shaft. Of course, this won’t be as strong as welding the shaft directly to the screw, but then it’s not going to be used for pulling rear axles out of a ’56 Chevy. Let’s go a step further and instead of using the original tension screw, use a grade #8, 7/16”-14 NC bolt that’s 2” in length and fully threaded. This is the thread size and approximate length used in the #10 series Vise-Grip. The bolt has a 5/8” head, so find yourself a 5/8” flex socket, fit it over the head of the bolt and weld it on. Next weld the “drive end” to your slide hammer. With this method the original tool hasn’t been disturbed in any way. To make this setup as strong as possible, make sure you choose a universal joint that’s held together with small cap screws or solid pins (which is what this new Craftsman joint has). For this photo I first grabbed a 30-plus-year-old Craftsman flex socket, and it was assembled with hollow roll pins. It might work just fine, but if you have the option why not use something with a solid pin or bolts. Of course, it doesn’t have to be a Craftsman, this was just an example. Once it has been welded together, it can be threaded out and interchanged with other types of the same size Vise-Grip.
So, next time a rusty bolt is free of its threads but still won’t come out, you’ll know what to turn to for some extra pulling persuasion.
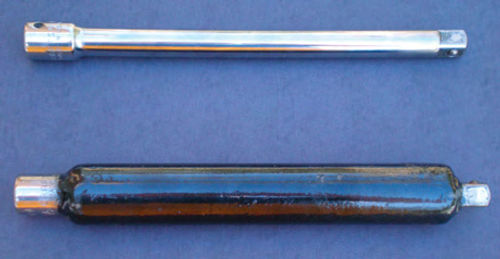
Heavy Duty 1/2” Drive Extension. Here is an improvement of an existing tool. I took a 10-inch-long 1/2” drive ratchet extension and reinforced it with a section of 3/4” iron pipe. Photo 3 shows the regular extension at the top, and the image that resembles a “corn dog” just below it is my creation. The pipe is the length of the extension’s shaft and is welded completely shut at both ends. The coat of paint was applied to avoid rusting.
I needed to use a 10” extension to re-torque the rear wheels on my motorhome. The specified torque is 185 foot-pounds; however, torsion in the extension was very evident, so I was unable to obtain a reasonably accurate reading. I considered purchasing an adapter to step up to a 3/4” drive, and then use a 3/4” extension and socket but this seemed like a needless expense.
Using this reinforced extension I am now able to apply torque without losing a tremendous amount of it in the extension itself. While it’s always best to avoid using any extensions if possible with a torque wrench, in many cases there is no option.
Remote Starter Button. You certainly can buy this item, but making one will likely cost less than even the cheap production stuff, or at least will be made of better components, and it can be fitted with a longer than normal wire if desired. The switch is a “brass push-button starter switch,” (that’s certainly appropriate for this project) made by Dorman, item #86915. This was purchased at Advance Auto Parts for just under $5. There is a PVC 11⁄2” coupling and a 11⁄2” x 1⁄2” bushing that will act as the grip. Their combined cost was $1.45. For the connections I will use a length of 16 gauge (stranded) two conductor wire, probably 8’ in length. (I purchased a 100’ roll of this wire from Radio Shack several years ago, and use it often for projects.) On the end of each wire will be an alligator clip used for connecting to the starter relay.
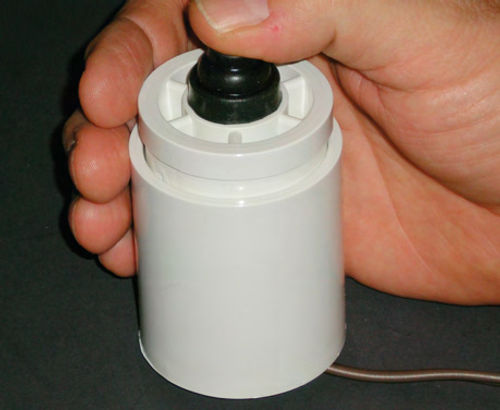
Connect one wire to each terminal of the switch. Terminal connectors are highly recommended here. They will make connecting to the switch much easier. On the opposite ends of the wires I would either use terminal connectors (if a screw is used for wire attachment), or solder the wires directly to the alligator clips. To avoid accidentally pulling the wire loose from the switch, pull up a couple of inches of the wire, and using a plastic tie strap, secure it to the body of the switch. This way, if the wires are accidentally tugged, the pressure will pull against the tie strap and not the terminal connections.
Now slide the switch through the PVC coupling and then through the hole in the bushing. Thread the switch’s rubber cap on until the switch is snug, and then squeeze the bushing into the coupling. The results will look like Photo 4. If all the items are purchased new, this project will cost around $10.


