
How -to Replacing a Headliner, Pt. 2
A More Modern Ride Has a Board-Style Liner Instead of Bows. You’ll Need to Scrape and Glue for This Project.
LAST MONTH I covered the process of replacing an old, worn-out, bow style headliner in a vintage ride. Well, soon after that project was completed, another car came into the shop that also was in dire need of a headliner replacement. However, this particular vehicle used the more modern style board-backed headliner. When these begin to deteriorate and sag you’re often left with puffy material flapping around in the breeze when your windows are open or even worse, there might be a snowstorm of old foam flying around inside your car getting into everything.
The good news is that replacing these board-style headliners is a much easier task than working with their bow-style counterparts. Depending on your specific application, the job can be done in anywhere from one to five hours.
Anatomy of a Headliner
The basic structure of these headliners is fairly simple. There is a cardboard or Styrofoam backer that is shaped to conform to the roof structure of the vehicle and it is covered with a foam-backed material that is glued in place. This whole assembly is then held up in the vehicle at various points using clips, screws and several other trim pieces. But after years of service the foam begins to break down, releasing the material from the backer board. Oftentimes people will resort to using fasteners such as pushpins to hold the fabric back in place. However, this usually is a temporary fix…and not very visually appealing.
As noted above, the good news is that the fix is fairly quick and not very expensive if you can do the work yourself. To that end, the aftermarket has come to the rescue in two different ways: First, there are many suppliers who offer headliner replacement fabrics in a myriad of colors. These fabrics come already lined with new foam and are ready to cut to fit. And second, if you’re lucky enough to be restoring one of the more popular vehicles with this style headliner you can purchase a complete unit ready to install. These new units usually come already glued onto a new backer board and the new board is usually a shaped-to-fit plastic material which is much more durable than the original board.
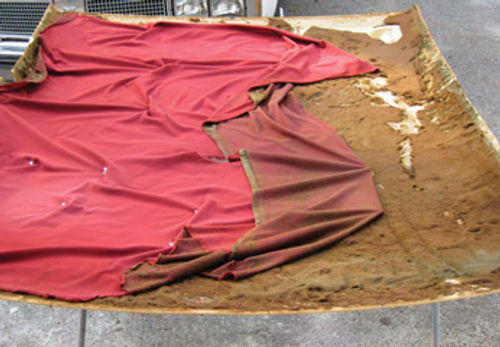
Out With the Old
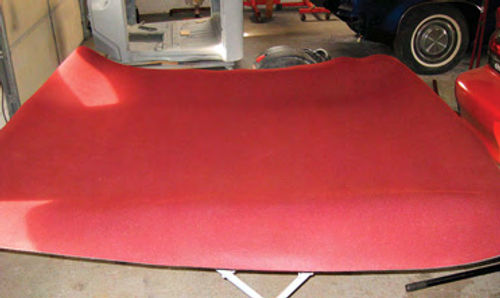
For this article we are working with the headliner in a 1983 Oldsmobile 98 Regency Coupe. There is no complete, ready-to- install replacement for this car so recovering the old board was the only real choice.
To begin this project, you need to get the old headliner assembly out. Take your time and remove any trim pieces around the perimeter of the headliner that may be holding it in place. Often there are screws or hidden clips holding these fragile plastic pieces. You may also have interior sail panels in the rear that need to be removed or at least pulled away slightly.
Once all of the perimeter trim has been taken away you most likely will be left with two other fastening points to handle. The dome light assembly usually supports the center of the headliner and needs to be removed, and the sun visors in the front of the car usually screw right through the board as well.
Once all of the fasteners have been removed, the headliner board will come down and you must carefully maneuver it out of the car. Usually taking it out through the passenger side door opening is the best option as you don’t have to contend with the steering wheel or column. Also, on larger cars such as this Oldsmobile, reclining or even removing the front passenger seat can free up a lot of space for the board’s removal.
While it may seem like we’re adding a lot of extra work just to get the board out, it’s well worth the effort. As mentioned earlier, the old backers generally are cardboard or Styrofoam and over time they deteriorate and become soft. If you try to bend and flex the board to remove it from the car, there is a very good chance it will break and add time, work and expense to your overall repair.
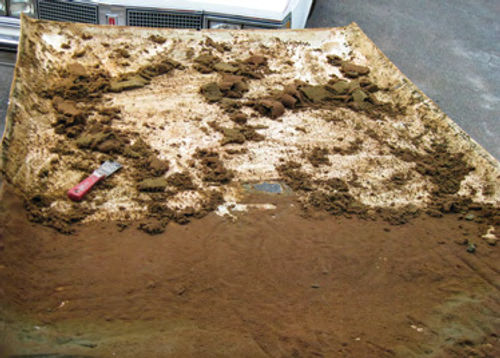
Clean Your Board
After the assembly has been pulled from the vehicle, the next step is to remove all of the old material as well as assess the overall condition of the board.
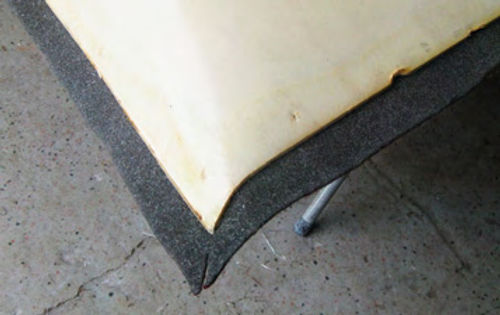
The material itself usually pulls off with little or no effort but it will leave much of the foam still glued to the backer. A paint scraper and a shop vac will make short work of the large majority of the foam. Try not to dig into the board too much with the scraper. Once you’ve finished this step you can now use a wire brush to continue to clean the surface even better. Keep in mind that while you want to remove as much of the old foam as possible; you don’t want to become aggressive to the point that you damage the board’s surface.
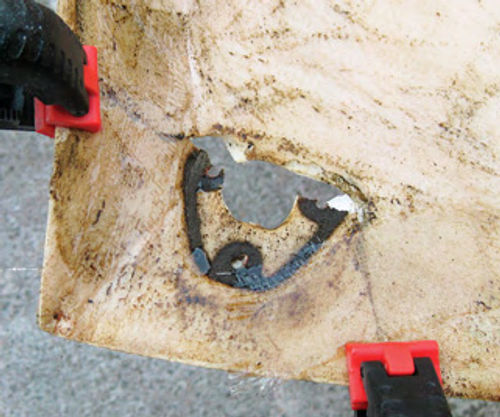
A Fiberglass Fix
Once the board is clean you can inspect it for any cracks or repair any pieces that may have broken off during its removal from the car. Areas around the sun visors are particularly vulnerable to breaking off and often the entire corner will crack.
While this may seem like a huge problem, in reality as long as you have all the pieces it isn’t. You can reinforce any cracks and even reattach broken sections using some fiberglass matting and resin. Clamp any broken pieces back into place the best you can and any areas with cracks should be held in their correct position. Use your fiberglass matting to cut patch pieces that will overlap the cracks and broken areas by at least one inch. Generally I use two to three layers on the back side of the board and one layer on the front side where the headliner material gets glued on. This provides plenty of structural integrity to the overall repair. Mix your resin as per the manufacturer’s instructions and dip your pieces of matting into it before applying them to the repair areas on the backer. Allow proper drying time for the fiberglass before proceeding with the job.
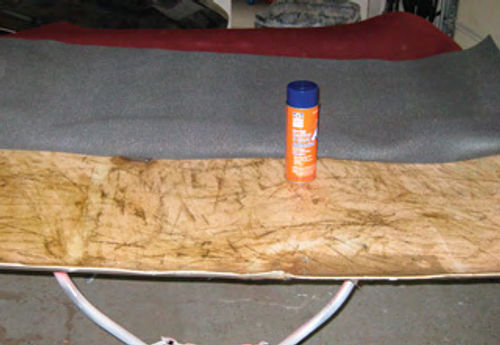
Two Recommended Adhesives
If you haven’t already ordered new headliner material from your supplier of choice you can take this time to bring a sample of your old material to a local interior shop and match it up with something they have in stock. Usually three yards of material is more than enough to do just about any job but measure your board first to be sure. Also add in some extra if you have sail panels to recover or plan to recover your visors.
I’ve used two different adhesives for these jobs and both seem to work quite well. 3M’s Super 77 Adhesive as well as Permatex’s Heavy Duty Headliner and Carpet Adhesive are both viable options and are available at most auto parts stores. One to two cans will be necessary depending on the size of your headliner.
Installing the New Material
Once the fiberglass repairs are dry on your backer board it’s time to begin recovering it with your newly acquired headliner material. Begin by laying the material over the board and trimming the edges to the board’s general shape. I usually leave a good three to four inches of extra material hanging past the ends of the board. This will compensate for the concave shape of most boards and leave plenty of material to wrap around the backside.

Next, with your material centered over your board, find roughly the center line and fold the material over onto itself, exposing half of the underlying board. I like to glue one half at a time as the glue is very aggressive and once the two surfaces meet it is difficult to separate them again. By only dealing with half of the material at a time it makes it much easier to keep control of the situation.
Follow the manufacturer’s instructions on applying the glue to the first half of the job. Usually you have to apply two to three coats to both surfaces and allow the glue to become tacky before adhering. Be careful not to over-saturate the material or to bond your surfaces together while the glue is still super wet as it may seep through the foam and stain the cover.

Once the glue is tacky,slowly begin to roll the material back over onto the board starting at the centerline and pressing it firmly into place. Pay attention to any contours or concave areas as you go along to make sure the material doesn’t bunch up or stretch too much in any particular area. It should only take a few minutes for the glue to set strong enough for you to fold the other half of the material over and follow the same steps on that side to finish the frontside.
Now that you’ve glued the material onto the front side you can flip it over and finish the gluing on the back side. Trim all of your edges down so you have about one to 1.5 inches of headliner all the way around and make some slits in the corners to allow you to fold them over cleanly. Apply your adhesive to each of the small edges and fold them over nicely.
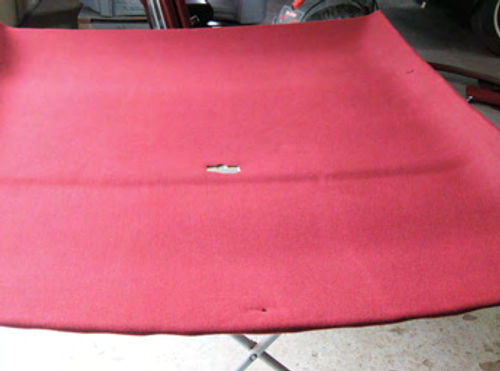
Once the glue is dry the final step before re-installation of the board is to take a razor blade or an X-Acto knife and cut out the holes for areas such as the visor mounts and dome light. At this point it also helps to poke holes through any areas that screws pass through so you can find the screw holes later.
Putting the Board In Place
Your new headliner is now ready to be installed in the vehicle. Re-installation is similar to a reversal of the removal process, however I usually try to install my edge trim first and do the dome lamp and visors last to keep the board from flopping around on the outside edges and possibly cracking again. You also can adjust the interior rearview mirror up to hold the front of the board while you secure the back and sides. An extra set of hands can go a long way with this part of the project but it’s not necessary.
If you plan to recover your visors you can take them, along with your spare material, to a local upholstery shop to have them stitched together if you’re not able to do it yourself.
Then, once the visors are screwed back in you’re ready to get out on the road again…this time with your new, non-sagging headliner.


