
Repairing Carburetor Lead Plugs
Engine Restart Problems Are a Common Concern for Restorers. Fixing Carburetor Plug Leaks Is One Solution.
HAVE YOU RECENTLY rebuilt your carburetor but are still having engine restart problems? The carburetor may be one of many with lead plugs in the float bowl that are leaking.
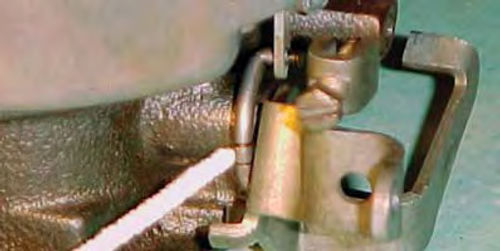
This is considered an external leak, but on the four-barrel Rochester Quadrajet carburetor it’s a leak that will not be seen because it is leaking into the intake manifold. The reason is these plugs are located on the bottom of the float bowl. There are two in-between and slightly forward of the two primary barrels of the carb. Assembled they are visible through an opening in the throttle body shown in Photo #1 in the portion labeled “before.” If there is any fuel leakage here, it will find its way into the intake manifold.
With the throttle body removed, five lead plugs are visible on the bottom of the bowl. There are the two for the primary side as illustrated in the photo and the two larger plugs that are located beneath the secondary metering rods and their passages. There is also a fifth plug beneath the accelerator pump well.
Typical symptoms of this problem are a vehicle that’s hard to restart after it has been sitting for an hour or so, and you may even notice some black smoke from the exhaust on restart.
On the other hand, it starts fine in the mornings or if it’s only been off for a few minutes. The restart problem is due to the engine getting loaded up or flooded with fuel. The short stop isn’t long enough for fuel to build up, and in the morning the engine requires more fuel for the initial start-up anyway.
One- and Two-Barrel Models Differ
On both the Rochester one-barrel model “BV” and two-barrel model “2GV,” these lead plugs are located above the throttle body, so flooding of the manifold is not an issue. They will instead leak down onto the intake manifold causing a gassy smell, and will eventually drain the float bowl. This will create a very hard-starting condition when the vehicle has sat idle for a while. (On my ’66 Chevelle it took about a week.) The fuel pump has to refill the float bowl before the choke or accelerator pump will be of any help in getting the vehicle started.
The carburetors I have referenced here are 1960s vintage. While the fuel bowl design (with regards to these plugs) remained the same on the Quadrajet four-barrel throughout its production, I can’t speak for other later model one and two-barrels. A simple inspection will reveal their location to you. There was a carburetor introduced around 1976 that looked exactly like the Quadrajet but only the two primary barrels were functional. The model designation was “2MC 165 Dualjet” used by Oldsmobile, and “M2MC 200 Dualjet” on Pontiac and Buick. I was told it was the quickest way that GM was able to meet emissions standards, and a year or two later they manufactured a new carb that was just the front half of the well-known Quadrajet. Both of these will likely have the potential of leakage into the intake manifold.
Time and Vibration Lead to Leaks
Probably most domestic carburetors saw their last service as original equipment on vehicles in the late 1980s. GM used what they called Computer Command Control carburetors during this time, followed by throttle body fuel injection. So, Most of the “newest” of the original equipment carburetors are now about 20 years old and have been rebuilt at least once or twice. Ones like the Rochester one-barrel model “BV” on my ’66 Chevelle have likely been rebuilt many more times than that.
The lead plugs were used to fill bores made in the carburetor during manufacturing. Their leakage is probably due to time, vibration and even possibly potent cleaning solvents used in the rebuilding process. In the case of the Quadrajet, their location puts them very close to the heat of the intake manifold. This is likely a contributing factor in their leakage.

While I have referred to Rochester carburetors (due to my vehicle affiliation) this would apply to any manufacturer that uses lead plugs in the same manner, and depending on their design they may also leak fuel into the intake.
Checking for Leaks
Before going any further, you can make a few checks to see if there is internal leakage. Start your vehicle and let it get up to operating temperature. With the engine running at idle, remove the air cleaner and look down into the carburetor. A flashlight is a good choice for sighting into the carb. Wear safety glasses, and use a mirror if that makes it easier.
The choke will be (or should be) fully open and you will be able to see straight down to the blades of the throttle body. (If you have a manual choke and it’s not fully opening, this must be corrected before proceeding.)
The carb should appear dry inside, with no gas dripping. This is because it is running in the idle circuit where fuel is supplied below the blades of the throttle body. Now shut off the engine, without touching the accelerator pedal.
Wait a few minutes and again look down into the carburetor—it should remain dry. If you notice vapor coming up from the throat of the carb there is most likely an internal leak. Recheck and see if it’s dry or are droplets of fuel present?
Several things can cause internal leakage; the most common are a heavy (bad) float, incorrect float adjustment, and a leaking needle and seat.
Internal leakage indicates it’s time for a rebuild, or if you have just done one, a closer look at the float and its adjustment.
This is not, however, an article about doing a carburetor overhaul, but is about dealing with those leaking lead plugs. If you haven’t recently rebuilt your carburetor, it may be a good time to consider it. While you may not need to completely disassemble the carb (in most situations) the throttle body may need to be removed and the carb turned upside down. This could free up sediment in the bowl that can end up trapped in between the needle and seat. I recently took this chance on the computer-controlled carburetor on my ’86 Chevy Caprice after overhauling it a couple of years ago and I had no problems.
Multiple Approaches to the Repair
So, it’s time for a quick review. Internal leakage = the carb is wet with fuel internally and is indicative of a need for rebuilding and/or dealing with possible float problems. External leakage = the carb is dry internally, and may or may not have any visible signs of fuel leakage.
If the carburetor is still on the vehicle, it will need to be removed to proceed with this repair. Removal is usually straightforward, but refer to your shop manual if you’re in doubt regarding the procedure. Regardless, if there are many vacuum hose connections make yourself a map and tag the hoses if necessary; your time will never have been better spent.
Once the carburetor has been removed, put masking tape over the manifold opening(s) or stuff them with clean rags to prevent anything from accidentally getting in. Now use carburetor cleaner and a small brush to clean any build-up of dirt off the exterior. Avoid spraying rubber and plastic parts, namely the choke pull-off, as the cleaner may cause it to deteriorate.
The goal is to clean the outside so if the throttle body has to be removed we won’t be working in a pile of dirt that fell off the carburetor during this disassembly.
The first example will be the one-barrel “BV” off my Chevelle. The throttle body and bowl cover have been removed because I am going to rebuild it, but in this case it also gives better access for cleaning and making the plug repair.
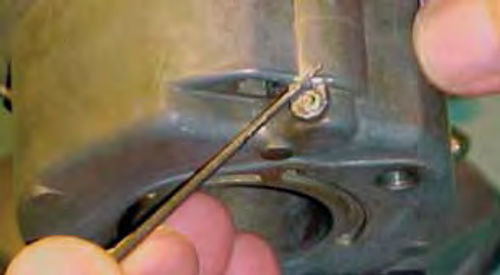
When removing the throttle body, the linkage that connects to the accelerator pump must be disconnected (see Photo #2). Note its orientation, because it can be installed in several different ways.
There are three ways to fix the problem, but if you want to maintain a “factory correct” cosmetic appearance you are limited to only two.
The most common method is to use a blunt punch (also called a drift pin) slightly larger than the plug and give it a couple of gentle taps with a small hammer. The idea is to swell the lead plug, once again sealing it. Care must be used and the punch must be larger than the plug or you risk driving the plug into the bore it’s intended to seal.
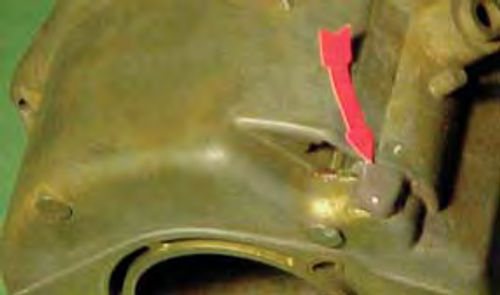
The second choice is to clean the area thoroughly and apply Loctite around the perimeter of the plug, clean up any excess and allow it to sit 24 hours. I use #271 high strength red (see Photo #3). This is a thread-sealing product for nuts and bolts and works by filling any gaps in-between the threads. Because of its close proximity to the accelerator pump’s connecting rod, pay close attention so that no Loctite interferes with its operation. The approach here is to leave the plug facing skyward and let gravity work the product into gaps between the lead plug and the bore. When the waiting time is up, use some solvent on a paper towel and wipe off any excess on the surface.
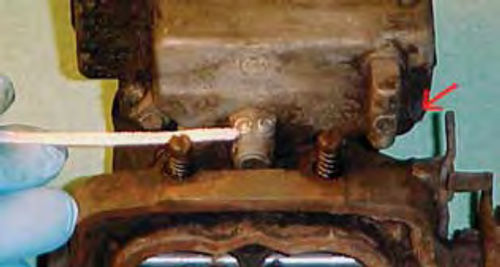
The third choice (which I will combine with what was just done) is to cap it off with JB Weld. If you are not familiar with it, it is a very strong, slow-setting two-part epoxy. The area is clean from the previous repair so now take a small file, piece of sandpaper or Dremel tool and rough up the area surrounding the plug. Doing this promotes a better bond (see photo #4). Mix equal parts of this product per instructions, then apply over and beyond the plugs’ edge; just remember to not interfere with the passage for the pump rod (see photo #5).
To apply, use something small like a toothpick or a Q-tip with the cotton ends snapped off. You also could purchase a package of Dill’s Premium Pipe Cleaners. They are handy for loads of things and one is spreading epoxy. The core is made of wire so cut off what you need and save the rest. They come in a cardboard package of 32 cleaners for about $2 a pack.
Remember to keep checking on the repair since at times this stuff will travel where you don’t want it to go; about the only downside to slow-setting products.
Within an hour it should be stable enough that you don’t have to worry about any movement. Give it a full 24 hours, then put it back together. Should some JB Weld have gotten into the pump rod passage by accident, it’s not the end of the world. A small file is the best choice to carefully remove the offending dribble.
In Photo #6, I am pointing to the location of the two lead plugs on an old Rochester “2GV.” It appears there is plenty of working room on this model, so all that’s needed is a complete cleaning and your choice of repair. I guess I should have given it a good cleaning before this photo because there is a third lead plug under the pump well, disguised by dirt. It is located at about a 45- degree angle to the other plugs–the red arrow in the photo points to its location. In past experience these never were much of a problem anyway.
Repairing a Quadrajet Plugs
Earlier I mentioned only two of the three options may be suitable for the purist who wants a “factory correct” look. Although the JB Weld repair would be small on both one- and two-barrel carburetors, if someone looks really close they might spot it.
On the Quadrajet, however, all is hidden by the fact that it is bolted to the intake. There are a total of five plugs to be sealed, and removal of the throttle body is required. There are two recessed screws that go up through the throttle body and secure it to the float bowl. They are located in-between the primary and secondary butterflies out near the perimeter. Up top, remove the two screws at the back edge of the bowl cover. These are located just inside the gasket that seals the air cleaner to the carburetor. Once again note the orientation of the accelerator pump rod as well as what hole it goes into. Use a “Sharpie” if it helps, the “ink” can be cleaned off later with solvent.
In some situations the accelerator pump lever that is pinned to the bowl cover will need to be removed. Use a small blunt punch and gently tap the pin inward. This will free the lever. Usually this pin ends up against the edge of the air horn, so to re-install, line up the lever and grab the pin with a pair of side cutting pliers and gently leverage against the air horn. This will push the pin back into place. Remove the throttle body and gasket from the float bowl and it is time for the repair.

After doing some measuring I determined that the two large plugs (centrally located, beneath the secondary metering rod passages) are a very close fit into the throttle body and elected to clean and apply Loctite only to them.
The remaining three plugs were coated with Loctite followed by JB Weld the next day (photo #7). Because this is a slow-setting product plus the addition of the sideways plug under the pump, well, you will want to rotate the bowl from bottom up to side up every few minutes to help avoid sags.
Finally, make sure after the repair that it fits without interference with the throttle body. (See the portion of Photo #1 labeled “after.”) Should there be excess JB Weld on the repair, you can use a Dremel tool to shape it or, for that matter, a file will do.
The first described method seems most likely to fail again. Instead, the combination of the second and third methods is the most reliable, and it should be the last time you’ll have to deal with this problem.


