
How -to Vintage Lighting Upgrades, Pt. 2
We’ve Looked At Taillight Improvements for Your Vintage Ride. Now Let’s Consider Some Headlight Options.
EDITOR’S NOTE: IMPROVING the lighting systems on your vintage rides will help you to see and be seen, safety enhancements that can’t be overrated given today’s traffic environment. Last month we upgraded the taillights and added a third brake light to our 1955 Chevy. This month we’ll turn our attention to the front end of the project car. There were seven photos with the first installment, so we’ll start here with Photo 8.
Upgrading Headlamps
Headlamp performance has improved dramatically over the last six decades, and with very good reason. According to the National Highway Traffic Safety Institute, nearly half of all traffic fatalities occur at night, even though only 25% of all vehicle trips occur at night. As a result of this huge disparity in statistics, the evolving requirements for automotive lighting have brought about steady improvements through the years.
The OEM headlights on our ’55 Chevy Bel Air (Project 55) were tungsten sealed beam units, a type of lamp that was introduced in 1940 and became mandatory in 1941. At the time sealed beams were introduced, they were a large improvement over the earlier generations of lighting. However, by today’s standards they are quite ineffective.
A case in point: I have very good eyesight, but I found myself straining to see when driving at night. In fact, the previous owner had advised me to drive with the high beams. But even then it was pretty hard to see, and certainly didn’t inspire driving confidence.
Sealed Beam Halogen Headlamps
There are a number of upgrade options available with sealed beam headlights for better, safer nighttime driving. One option is to install sealed beam halogen headlights in lieu of tungsten sealed beams. Halogen sealed beams are readily available, and are moderately priced.
However, while they perform better than tungsten sealed beam lights, the improvements are somewhat modest. It’s true that the difference is noticeable, but certainly not night-and-day (pun intended). The sealed beam halogen lights I have used are only 35 watts for both high and low beam, which is not much of an improvement over stock. The positives are that they have a stock appearance and are very affordable.
Non-Sealed Beam Halogen Headlamps
Another option is to use non-sealed beam halogen lights. These lights are an upgrade, and can be purchased with European spec bulbs (such as H4), or USA spec equivalent bulbs (such as H2B). These lights are more expensive (roughly three times the cost of sealed beam halogen), but the difference in performance is astounding. The light bulbs are replaceable, and are available in a wide variety of wattages and filament types. Typically they are supplied with 55W low beam/60W high beam bulbs, which is the maximum allowable on the street in most locales. More powerful bulbs are available for off-road use only.
Not only do non-sealed halogen lights have better bulbs, but they typically have much better reflectors and optics as well. Some have a stock appearance and look original at a casual glance. Others have a significantly different appearance, such as tri-bar headlights with colored jewels in the center. In most cases, installation of Halogen lights is a plug-and-play operation, although in some applications the extra current requires upgrades to the electrical system as well.
High-Intensity Discharge (HID)
Another high-tech option becoming available is the High-Intensity Discharge (HID) light, commonly known as a Xenon or projector light. They have been available for OEM use since 1991 and are starting to become available to the aftermarket. HID lights emit a very bright bluish-white light, and are very efficient. A lot of light can be generated from a very small lamp unit. They also use less power and generate less heat than filament-type lights.
The performance of HID is phenomenal. Unfortunately, the primary disadvantages are very high cost and lack of effective conversion kits for vintage rides. As of this writing, I am unaware of any available sealed beam conversion kits that use HID lights. If you really have your heart set on HID lights in your vintage ride, it can be done in two steps. First you have to convert from sealed beam lights to Halogen, and then use a conversion kit to switch the bulbs from halogen to Xenon. Of course, that takes an investment of money and work.
Light Emitting Diode (LED)
The final option is Light Emitting Diode (LED) headlights, which are just coming of age. Over the last five years, several production cars have been equipped with LED headlights. The advantages are strong bright white light and they are pretty efficient. Unfortunately, they are quite expensive and not readily available to the vintage vehicle market. As this technology becomes more commonplace, there may be more options available to the automotive hobbyist.
Improving the Headlights on Project 55
If this were a show car, I would have installed stock sealed beam headlights with the factory T-3 logo embossed in the lens, and limited night driving except when it was absolutely necessary. However, since project 55 is a nice driver, we opted for a set of high quality non-sealed beam Halogen lights. These particular lights look stock at a casual glance, but the performance improvement is amazing.
Installation was very easy, and only took a few hours. The headlight change required removing the headlight bezels and removing the headlights (Photo 8). The new headlights fit into the stock headlight buckets, although some minor grinding of the inner headlight bucket was required to provide clearance for the rubber dust boot that covers the Halogen bulb. I also replaced the wiring from the harness to the headlamps. The stock under hood wiring harness had been replaced in project 55, but the wires to the headlights were original, and were in pretty tough shape after 56 years. The final step was to align the headlights (Auto Restorer, April 2010).
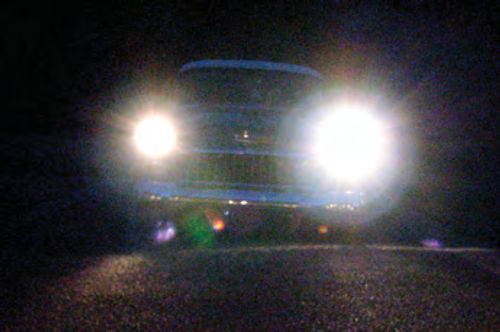
The results were outstanding. Photo 9 shows the difference between a sealed beam halogen headlight and an upgraded non-sealed beam halogen light. The difference in person is even more impressive. Night driving is now effortless, and I no longer worry about being able to see or be seen.
Wiring Upgrades
One thing to keep in mind about lighting upgrades is that they increase the current draw on the vehicle’s electrical system. In most cases, if the wiring is in good shape this is not a problem. But occasionally there can be issues that have to be resolved.
On Project 55, the lights worked perfectly after the upgrade…that is, until I changed the headlight switch. The original headlight switch worked well, except the dash rheostat was flakey and the light stem was loose. Changing the headlight switch cured the rheostat problem, but introduced a new, more serious problem—the brake lights and taillights became intermittent with prolonged use.
The headlight switch on Tri-five Chevrolets was designed with thermal cutouts for the headlights and brake/taillights rather than fuses. The concept was to protect the wiring in the event of a short circuit, but still allow the lights to operate part of the time after the wiring cooled. In reality, this scheme has problems. The thermal cutouts are supposed to allow up to 13 amps total for the taillights and brake lights. This feature worked fine with the original switch. However, the replacement switch would not draw over 8 amps without overheating, resulting in failure of the brake lights and taillights after about five minutes. I obtained another replacement headlight switch, but the results were the same.
I experimented with a few methods to correct this problem at the switch, including changing the preload on the thermal spring and improving the contact surfaces. These changes allowed the lights to operate longer, but did not completely eliminate the issue. The permanent fix was to eliminate the thermal cutout for the taillights, replacing it with a fuse.
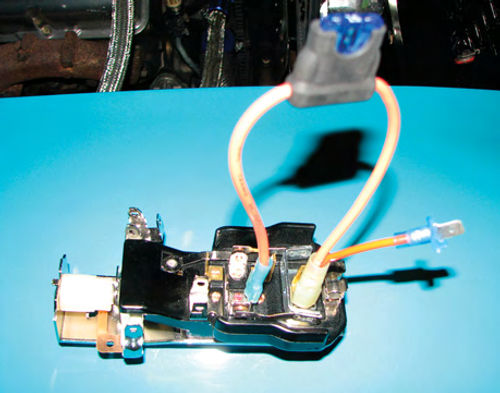
Converting to a fuse was simple—I created a jumper wire with a 15-amp fuse to bridge across both sides of the thermal cutout (Photo 10). This used one of the spade terminals needed to connect the light switch, so I added a short wire with a male spade to the “downstream” side of the fuse for the final hookup. (Note: After this photograph was taken I cut out the thermal spring at the arrow.) The system operates solely with the fuse with no issues.
An alternate method would have been to use an electrical relay, which would have reduced the electrical load to the headlight switch by providing a current path directly from the battery to the lights. However, since the issue was with the reproduction headlight switch carrying less current than the OEM switch, I decided to resolve the problem at the switch.
Project Costs
Upgrading the lighting on Project 55 was quick, easy and cost-effective. Installing the headlights, taillights, and a third brake light was accomplished in a day. The total cost of the project was $123, including two bright taillight bulbs at $10 each, a third brake light ($40) and halogen headlights ($63 for the pair).


