How -to Vintage Lighting Upgrades, Pt. 1
Today’s Systems Are Brighter Than They Were Decades Ago. Here’s How to Become More Visible From the Rear.
OF ALL THE safety enhancements that can be made, there are very few that are as quick, easy, effective and affordable as improving the lighting systems on our vintage rides.
Improvements to lighting systems have been significant over the last six decades. Obviously it is important to see, but it is even more important to be seen when driving your classic car on modern roads. Like many hobbyists, I have heard too many horror stories about accidents caused by distracted drivers, drunk drivers, and drivers who encountered a poorly lit vintage car driving at or below the speed limit at night.
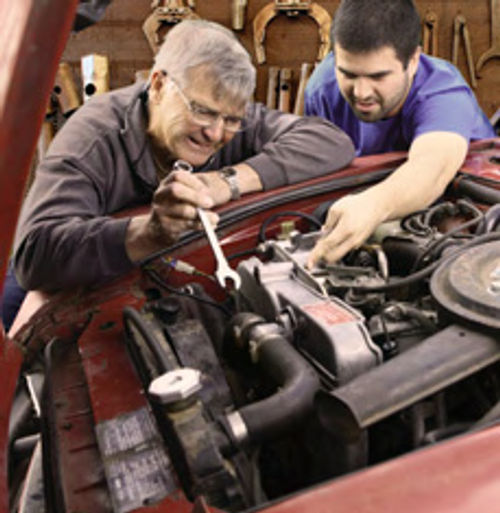
So follow along as we make several simple, yet very effective lighting improvements on our project 1955 Chevrolet, starting with the taillights. These improvements took only one afternoon, were very inexpensive, and made a significant difference in safety and nighttime driving enjoyment.
It’s a Good Thing That Trunk’s White…
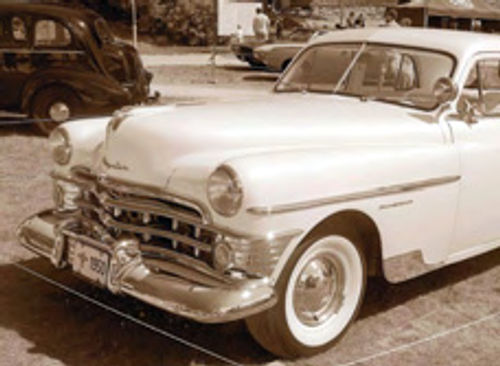
Once we had fixed the wiring on Project 55 (June and July 2011)we were confident to drive our classic Bel Air at night.
However, as it turned out, the car’s stock lighting was not too impressive.
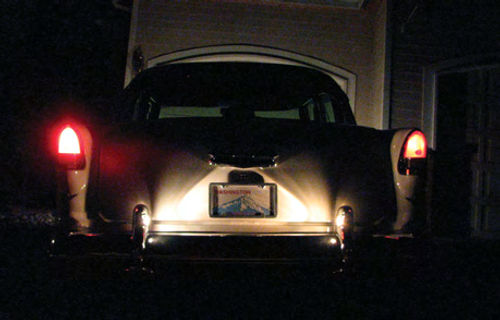
In fact, my wife surprised me the first time she followed me home at dusk.
“It’s a good thing the trunk is white,” she said. “Otherwise, I could have barely seen you at all!”
“Was it really that bad?” I asked.
“Absolutely. The license plate lights were brighter than the taillights,” she said. “I couldn’t see you for more than several car lengths.” That was a big wakeup call.
According to the factory shop manual, the stock taillights on a ’55 Chevrolet are 4 candlepower for taillights, and 32 candlepower for brakes and turn signals. Four candlepower is not very much— about the same as the interior dome light. That might have been sufficient in the mid-’50s when driving speeds were lower, there was less ambient light, and all cars had comparable lighting systems. However, later cars used taillights with 7 to 15 candlepower or multiple bulbs on each side to create more light out the back.

In the ’50s, the emphasis was more on style than safety. Taillights of that era are pretty small and the reflectors are not very efficient. Add in dim bulbs and it’s not a pretty picture. On today’s highways this is totally inadequate. It is difficult to directly compare lighting from a modern car to an old ride since they measure the entire lighting assembly in lumens instead of the archaic measurement of bulb candlepower measurement. Anecdotally, I can tell you that the 10-watt halogen taillights on our ’55 are almost but not quite as bright as the taillights on our modern rides, and the 50-watt spotlights are about the same intensity.
Improving Your Vehicle’s Taillights
Fortunately, upgrading taillights is a quick and easy project that only takes a few hours. There are several very good options available to enhance the visibility and safety of your old ride. It’s important to note, however, that each option has advantages and disadvantages that should be weighed.
High Incandescent Light Bulbs
One of the easiest and cheapest taillight upgrades to make is to use high intensity incandescent lights,sometimes called “bright bulbs.” These are traditional light bulbs made to burn brighter than average and are very affordable. In my personal experience, however, they are not much better than stock. In fact, I was very surprised to find that our Bel Air had already been equipped with “bright bulbs.” I shudder to think how bad the situation must have been with stock lights. Personally, I would not recommend this as an effective solution.
Halogen Taillights
Bright halogen taillight bulbs are available as replacements for most popular bulb types. They, too, are as simple to install as replacing the existing light bulbs. The advantages are that they emit a very bright, white light and last a long time. They are a little more expensive, but are still affordable. (The current cost of halogen bulbs is about $20 a pair.) Given that halogen lights are bright, they are quite effective when it comes to waking up a stock lighting system.
The downside with halogen is that they tend to operate very hot, which can be an issue on cars with small taillight housings and plastic lenses. They also require more electrical current(50 Watts), which can be an issue on some early cars.
So while halogen taillights are a plug and-play operation on many vehicles, some may require modifications to make halogen taillights operate properly. Despite the downsides, it is very hard to beat halogen bulbs as an effective upgrade.
LED Taillights
Light Emitting Diodes, also known as LEDs, are extremely efficient,generating a lot of light with a minimal amount of electrical current. That is a tremendous advantage since they require less current and generate less heat than traditional light bulbs or halogen bulbs.
LEDs can be purchased as plug-in replacements for stock light bulbs. Also, for popular applications (such as ’55 Chevrolets), they are available as complete replacements for the stock taillight assembly. They replace the housing, bulb, and lens as a single unit.
There also is an LED light unit available as a replacement for a standard 1157- or 1156-style light bulb and it fits within a stock taillight setup.
The downsides of LEDs are that they tend to be very expensive, they are somewhat limited in application, and they do not look original. For some owners, these downsides are not an issue. There are new LED lights coming on the market with surprising regularity,so this choice may become more affordable and more attractive over time.
Improving the Taillights for Project 55
For our project car, we opted to go with halogen taillight bulbs. The combination of significantly improved visibility, stock appearance and affordability was hard to beat.
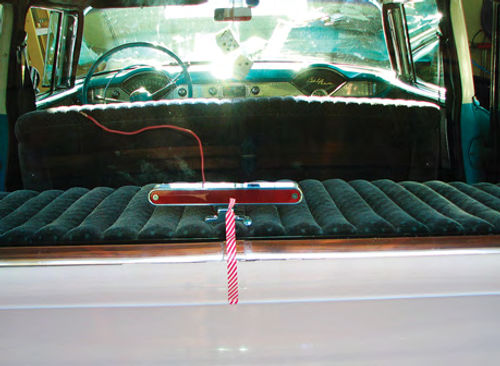
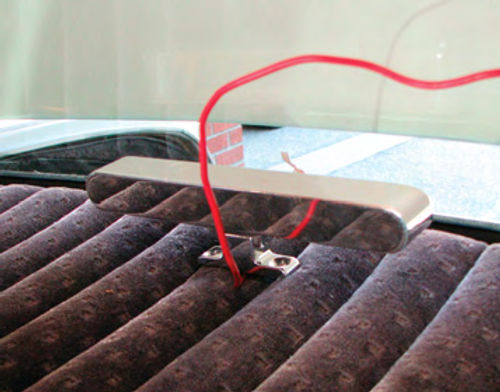
In addition, we installed a new set of reproduction taillight lenses and added a third brake light that’s seen in Photo 1.
I recommend polishing the taillight reflectors and cleaning the lenses when changing taillight bulbs. While it may seem overly simple, it can make a significant difference in nighttime visibility— much more than someone might expect.
Stock reflectors can become dull with age. Soot and deposits from exhaust gasses further dull the reflectors, reducing their ability to work properly (Photo 2).
In cases of severely degraded reflectors, I have seen tail lights lined with aluminum foil to improve their reflectivity. While it is a crude solution, I have performed this trick myself on an early ’50s Chevrolet Pickup that had no reflectors in the taillight housings. It was surprisingly effective.
Photo 3 shows the dramatic improvement to the taillight visibility on our ’55 Bel Air with the addition of one halogen bulb. The difference is significant. Note that this test was performed after I had polished the reflectors and replaced the old clouded lenses on both sides of the car. The halogen bulb is installed on the left, and a “bright bulb” is on the right. The difference was even more dramatic in person.
My only lingering concern was that the heat generated by the halogen bulb might damage the taillight lenses. I ran a test by applying the brake lights continuously for 10 minutes, then quickly removing and inspecting the lenses. While the light diffuser was slightly warm to the touch, it was not hot and there was no melting or discoloration. As of this writing, these lights have been installed for over a year with no discoloration or damage to either the diffuser or lens.
Adding a Third Brake Light
A safety advancement which is included on all modern cars is the High Mounted Center Brake light, often called the “Third Brake light.”
The idea was first introduced in the 1960s and ’70s, and became federal law in theU.S.for all passenger vehicles in 1986. Many safety studies have shown it to be effective in preventing rear-end accidents.
Adding a third brake light to a vintage vehicle is straightforward, although it definitely alters the vehicle’s appearance. Many attractive third brake light units are available on the old car market, such as the one we used on Project 55.
Unfortunately, I don’t know of any way to permanently add a third brake light and maintain a stock appearance on a vintage vehicle. If an owner wished to make the extra effort, I’m sure it would be possible to fabricate a high-mounted brake light that can be attached to the vehicle while driving, then removed while parked at car shows to maintain a stock appearance.
Properly wiring a third brake light to a vehicle with integrated turn signals requires adding a new wire that runs directly from the brake lights witch. This allows the light to come on any time the brake pedal is pressed, and yet it will not blink when the turn signals are used. As an alternative, there are some third brake lights which have two segments, each of which are wired directly from the left and right brake/turn signal elements. This allows the third brake light to blink with the turn signals as well as come on with the brakes.
Installation of a third brake light on Project 55 is very typical of most sedans. First I marked the center of the back glass using vinyl tape. Next I located the light on the parcel shelf so it was centered side-to-side compared to the tape (Photo 4). Next I located the light unit front to back for proper spacing. There is more than one way to do this, so make sure you are happy with the placement and how it looks before drilling any holes.
With the location set, I marked the mounting holes to the underside of the parcel shelf. Remember the old adage “Measure twice,Cut once.” With the back glass installed, there are very few common reference points to measure from between the top and bottom side of the parcel shelf. It can take some ingenuity to properly measure the holes. In my case, I measured from the rear edge of the back seat back to the light, both on the top and bottom side. Before drilling, I double-checked the position by measuring forward from the lip of the deck lid opening on the bottom side. I repeated the measurement on the top of the parcel shelf, and then added the thickness of the glass and the distance from the edge of the glass to the trunk lip. With a few minor adjustments I was able to make all the measurements match up.
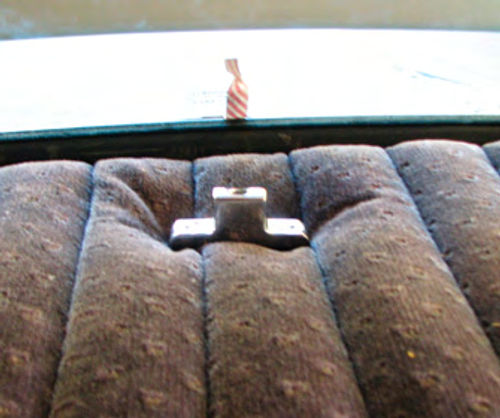
Once I was happy with the measurements, I used the base of the third brake light as a drill guide and drilled up from the bottom of the parcel shelf. I drilled the center hole first, and checked the placement. When I was happy with the location, I drilled the two mounting holes; then bolted the third brake light into place (Photos 5 A & B).
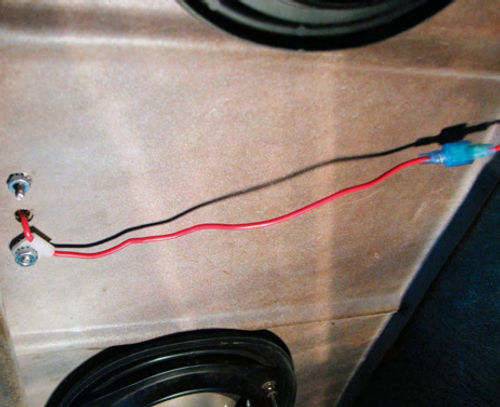
Next Istrung a new wire directly from the brake light switch alongside the wiring harness to the trunk, connecting to the third brake light unit. The wire was properly secured to complete the installation (Photo 6).
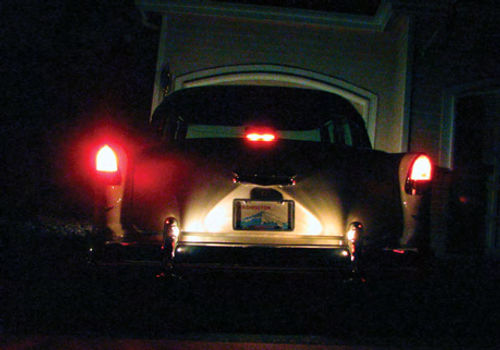
Photo 7 shows the improvement to the brake lights. This unretouched photo shows the third brake light and a halogen bulb in the left taillight, with a “bright” bulb in the right. The difference is substantial, and as noted above, these modifications are even more striking in person than in photographs.
Next,we’ll take a look at upgrading the headlamps on your vintage ride.
The National Highway Traffic Safety Institute says that even though only 25% of vehicle trips occur at night, nearly half of the traffic fatalities occur then. This disparity in accident statistics has led to steady improvements in automotive headlights over the years, and these upgrades are available for vintage cars and trucks.