
How -to Shift to An Overdrive, Pt. 2
We’re Installing an Overdrive Transmission In Our ’55 Chevy. And Fixing Some Problems Left by Previous Owners.
LAST MONTH WE learned about the workings of modern overdrive transmissions and what it takes to install them into older vehicles. This month,follow along as we install a 700R4 transmission into a ’55 Chevy Bel Air. There were five images in the first article, so we will start here with Photo 6.
An Installation Gone Wrong
When it rolled off the assembly line in June 1955, our project Bel Air was equipped with a 2-speed cast iron Powerglide. Laterin life, it was retrofitted with a Turbo 350 transmission which served it well for quite a number of years and miles. When that transmission got tired, the previous owner of our project car had a shop change the transmission to a 700R4. Unfortunately, the overdrive transmission installation was not done properly, and the transmission had a number of problems. It had all the classic symptoms of “stack shifting”—it up shifted much too early, causing the engine to bog, and it did not downshift unless you really stuck your foot in the throttle. The shifts were mushy and the transmission slipped. In addition, the car leaked copious amounts of transmission fluid and the speedometer wasn’t hooked up.
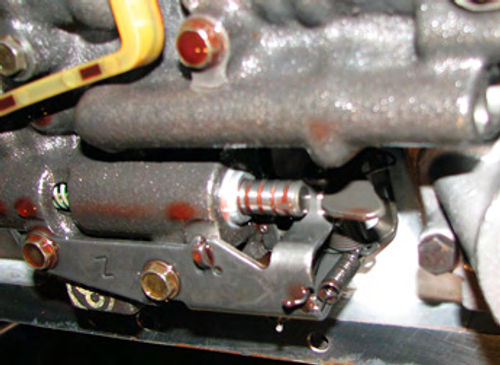
The first order of business was to determine just how bad things really were. The throttle linkage didn’t have the proper geometry and the TV (throttle valve) cable adjustment was very loose (Photo 6). As a result, the TV valve plunger (inside the transmission throttle body) did not move until the throttle was open 1/4 of the way and did not fully depress when the throttle was wide open (Photo 7). The purpose of the TV valve is to regulate the pressure inside the transmission and control shift timing and feel. It is vital that transmission oil pressure start to increase as soon as the throttle begins to move. If it doesn’t, there is not enough clamping force on the friction material, causing the transmission to slip.
Improvements Were Made, But…
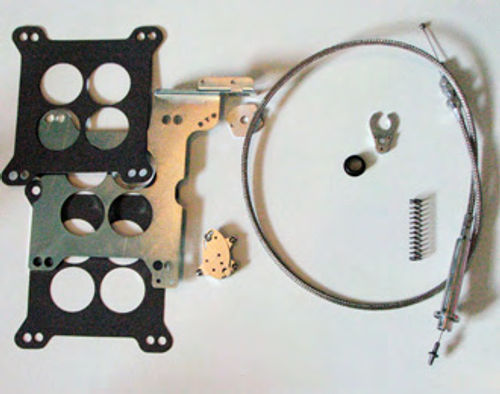
The first order of business was to address the TV cable issue. There are several linkage corrector kits, ranging from simple to elaborate. In my case, I decided to go with a high end TV linkage kit, which comes with the linkage adapter, brackets, and cable (Photo 8). The “TV made EZ” kit has a lot of adjustability designed in, and this transmission needed all the help it could get.
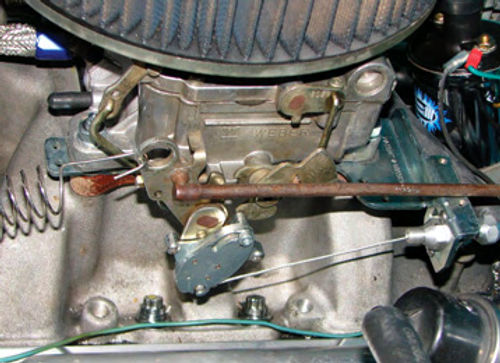
Installation of the TV linkage kit requires removing the carburetor, installing the new gaskets and base plate, and reinstalling the carburetor. The linkage adaptor is put over the carburetor linkage arm and then held in place with Allen head screws (Photo 9). When I installed the proper TV linkage and cable, I opened up the transmission and installed a new Throttle Valve and shift improver kit in the hope of saving the transmission.
The oil leaks were traced to improperly installed transmission cooler lines and a crack in the plastic speedometer gear housing. Also, the speedometer gears were the wrong ratio for the tire size and rear end ratio. I purchased the proper speedometer gears and replacement housing, along with a longer speedometer cable.
Those changes, along with fixing the oil leaks, made the car drivable but the transmission was definitely not happy. The stack shifting problem was solved, but the shifts were still lazy and the transmission still slipped under power. We drove the car gently for the summer, while I shopped around for a replacement transmission.
Starting Over
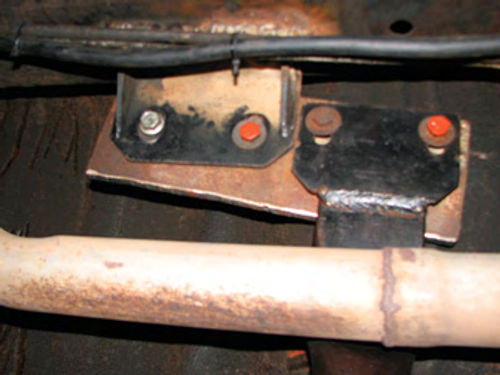
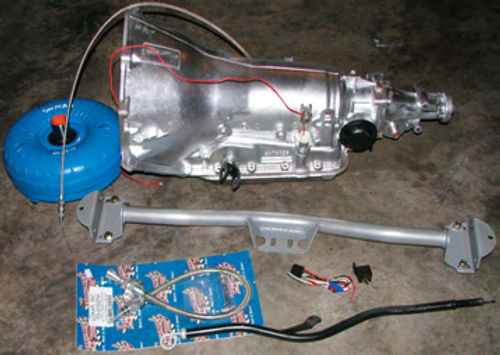
With a new transmission built up and ready to go, I collected all the bits needed to do a quality installation. The Turbo 350 transmission mount had been modified to fit, but the installation was crude (Photo 10). For a proper installation, a new transmission crossmember was purchased, along with the wiring kit for the lockup torque converter and a flexible, fire wall mounted transmission dipstick (Photo 11). For most applications, the standard “Caprice Style” 700R4 dipstick works well. However, on Tri-Five Chevrolets the dipstick tube rides hard on the firewall. A flexible dipstick allows me to install it in a convenient location where it won’t rub. Not shown were new transmission cooler hard lines and a new transmission cooler.
With everything in hand, the car was jacked as high as possible on jack stands and the old transmission was removed. With the transmission out of the way, I was able to do several other repairs that are not possible with it in place.
At some point in history, the starter was installed using the wrong type of bolts, allowing it to twist and chip two flywheel teeth. Chevrolet V-8 starters require special bolts that are knurled to properly align the starter to the block. I installed a new flywheel andre-mounted the starter using the correct knurled shoulder bolts.
One last piece of advice on Chevy starter bolts—they come with SAE diameter shanks for the earlier starters and Metric for the later starters, so be sure to get the bolt that matches the starter.
Next, I scraped 55 years of gunk and slime from the bottom of the floorboards, cleaned down to bare metal using lacquer thinner, and treated any rust that I found. This was followed by priming, undercoating and painting. It took about two weeks to complete.
Installing the New Transmission
Before installing the new torque converter into the transmission, I “primed” it by pouring in a quart of automatic transmission fluid. This helps prevent a dry pump startup on the initial start.
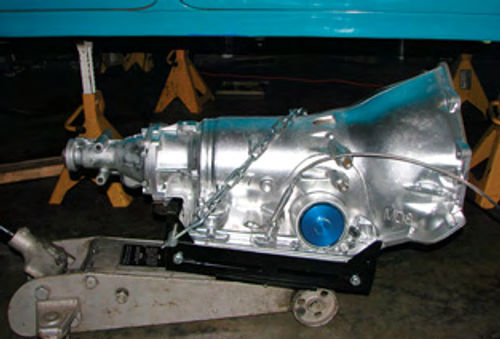
Installing the new transmission was very straightforward. I used a transmission adapter on my hydraulic floor jack, which worked very well (Photo 12).
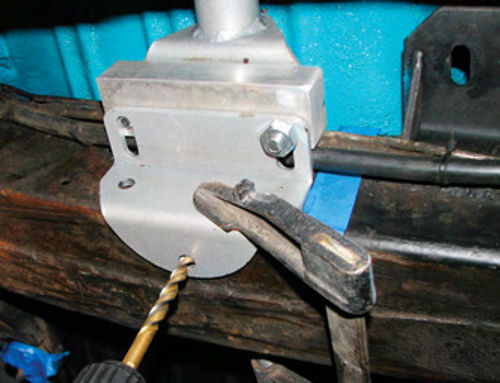
After the transmission bellhousing was bolted to the engine and the transmission angle set properly using the floor jack, I set to work to install the new transmission crossmember. In my application, the motor had been mounted higher than stock, so I added 3/4” spacers on each side to make the driveline angle the same as the original installation. Once I was happy with the fit I installed it permanently (Photo 13). The shortened driveline went back in next.
Shift Linkage and the Neutral Safety Switch
The stock column shift linkage works very well with this transmission. The only complication is the neutral safety/backup light switch. (The neutral safety switch only completes the circuit to spin the starter when the car is in neutral or park.)
The original Powerglide transmission shift pattern was P-N-D-LR,so the switch contacts are in the wrong lever position for neutral and reverse when using any later model transmission (including the Turbo 350 that was in this car for more than a decade). There are a few solutions to this problem. Using an aftermarket shifter is one option, as is adding an aftermarket neutral safety switch directly to the transmission itself. Sadly, many people solve this problem by bypassing the neutral safety switch entirely, which was the case on this car.
However, for Tri-Five Chevrolets there is a more elegant solution. In 1957 the Turboglide transmission was introduced, and it has the same shift pattern as modern automatics.
Fortunately, the 1957 switch can be retrofitted into earlier cars. It is not difficult, but it does require removing and modifying the steering column mast to make it fit. I will be installing the 1957 switch in this car as a future project when I rebuild the steering column.
Keeping It Cool
One of the nice things about working on Tri-Five Chevrolets is the vast choice of quality replacement and upgrade parts. For example, I installed a set of pre-made transmission cooler lines designed for a 700R4 in place of my home-fabricated ones. Since heat is the biggest enemy of an automatic transmission, I also added a small auxiliary cooler in series with the radiator cooler. The transmission fluid flows through the radiator cooler first, where the majority of the cooling happens. Afterwards, it goes through the auxiliary cooler where it cools another 10 to 20 degrees before going back to the transmission.
Time for the Lockup Converter
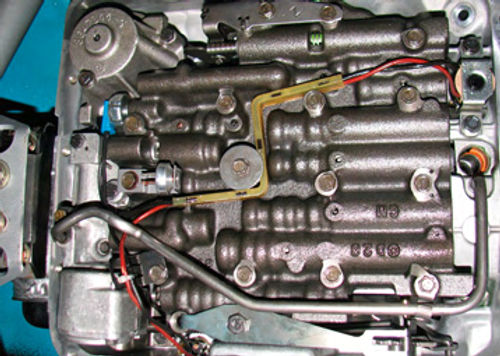
Wiring the lockup torque converter sounds intimidating, but it’s actually very straightforward. When the transmission shifts into 4th gear, a hydraulic pressure switch in the valve body closes, energizing the lockup solenoid (Photo 14). This makes the torque converter automatically lock up about one second after shifting into 4th gear.
Most transmission suppliers will do this procedure when they build the transmission. If you do it yourself, there are excellent wiring kits available from a number of sources. I was able to wire mine using the stock wiring harness with only one very minor change by relocating the grounding plug to the 4th gear pressure switch.
External to the transmission, all that is needed is 12 volts to the transmission plug. The 12-volt signal needs to be switched with the ignition key, and should be wired through the brake light switch so that when the brake pedal is depressed the solenoid disengages. In my case, I used a wiring kit with a relay from Bowtie Overdrives to tap into my brake lights. The instructions were excellent.
The Results
The transmission upgrade was a total success and the car drives like a dream. All upshifts are smooth, crisp and well-timed, and it kicks down to lower gears like it is supposed to. The converter locks up in 4th gear, which is really nice.
As of this writing, the transmission has traveled some 1500 trouble-free miles. Furthermore, the installation is tidy and looks like it came that way from the factory.
Resources
Bowtie Overdrives
Overdrive transmissions and parts
Phoenix Transmission
866-SHIFT UP
Transmissions and parts
PATCTransmission Center
Transmissions and parts


