How -to Refinishing Fiberglass Vehicles, Pt. 2
First We’ll Finish Prepping & Masking This Special Car Body. Then We’ll Paint It and Lay Down a Silver Stripe.
LAST MONTH I took you through the steps to prepare a fiberglass body for paint. Those steps included a little smoothing using plastic body filler and a lot of pinhole filling using urethane primer/surfacer and 3M Super Red Putty.
Now I’m ready for paint.
Nothing But Static
Back in the old days,static was something we found on the AM radio after dark, when the only radio stations we could pick up in my hometown powered down to cater to their locals. At 100 miles away, we weren’t considered locals.
Advancing ahead a few years to the point where radio stations had gone to FM and eliminated the static, most body shops were installing paint booths and beginning to experience static inside the paint shop for the first time.
This time the static didn’t come from the radio, it came in the form of static electricity any time enamel paint was being sprayed. Enamel paint combined with the moving air inside a paint booth created static electricity and that, in turn, converted the vehicle being painted into a dust magnet. You can guess what that did to the paint jobs.
You’re right, anything and everything in the air was drawn to the fresh paint like bugs to a porch light.
Fortunately, it didn’t take long for painters to discover the cure was to ground the vehicle being painted. No more static electricity…that is, unless you happen to be spraying a fiberglass vehicle.
Whether in the wind or in the calm, fiberglass vehicles create static electricity. That’s just the way things are. The problem with that is you can’t ground one of these vehicles and stop the static electricity from turning the body into a dust magnet for everything floating in the air.
To kill the static electricity, you had to apply PPG Multi-Prep DX 103, a known static-electricity killer.
The Fiberglass Static Test
How do you know if the fiberglass vehicle you are working on has static electricity? Pass your bare arm over any surface of the vehicle, staying about an inch away, and see if the hair on your arm is pulled toward the surface. If so, static electricity exists on the car and you must take steps to eliminate it.
PPG DX 103 is a plastic parts cleaner, a cleaning agent for fiberglass mold release, and an anti-static agent. It is the anti-static attribute that I’m after.
To stop the static electricity, I apply DX 103 straight out of the bottle using a spray gun with a 1.2mm tip. No reducer is needed. I apply a thin mist coat over the entire car body immediately after degreasing the surface and a second mist coat immediately after taking the surface clean. After that I can apply the top coats.
But what if I don’t seem to have static electricity problems? You may not—the humidity may be just right and the wind maybe calm—and if there’s no static electricity, you can avoid using the DX 103.
Beyond the Static Electricity Question
The body of this car will be sprayed bright yellow and once the yellow has cured for two days I’ll add a silver racing stripe down the center of the car. Both of these colors will be sprayed in single-stage urethane. Why wait two days for the yellow to cure before adding the silver? To spray the silver I will need to lay down a series of tape lines on top of the yellow.If the yellow isn’t fully cured the tape will leave marks on the surface and sometimes those marks are very difficult to color sand and remove.
How does the single-stage finish I’ll be spraying differ from the base coat/clear coat finishes I’ve sprayed in the past? The main difference will be the absence of a clear coat. Single-stage urethane finishes have a high gloss right out of the spray gun. So, why not use single-stage finishes all of the time and skip the clear coats? It all comes down to being able to color sand and compound the finish. You can’t color sand a metallic single stage finish. You will end up with a mottled and blotchy finish because the metallics become exposed when sanding and that changes the appearance of the finish. You can color sand and compound a clear coat without worry of exposing and sanding the metallics underneath. The same principle applies when color sanding solid colors. You can sand all day long and never expose the metallics. They aren’t there.
Remove the Masking Paper & Clean the Car
As I mentioned last month, the first step in the refinishing process is the removal of the masking paper left on the car from the priming process. Thingslike masking paper and masking tape are ideal traps for trash and primer sanding dust. For Reasons beyond explanation, if you leave that masking paper and tape in place, the trapped trash and primer sanding dust always seem to stay trapped until the second coat of finish goes on. At that point this material becomes airborne and then falls into the fresh paint. That ensures that it will be caught forever in the finish, and the only cure is to repaint.
After the masking paper is removed, the next step is a thorough cleaning using a high-pressure washer. I do not use any soap with the washer, especially soap designed for cleaning cars. Those soaps often have a liquid wax or a water beading agent in them. The last thing I need is to add a contaminant like wax or silicone to a surface I’m about to paint. Water straight out of the tap will do the job and once the car is clean I blow it dry with the air hose.
Applying Masking Paper
While I’m waiting for the car to completely dry out—the blower does a good job but not a thorough one—this is a good time to talk about masking the car for painting.
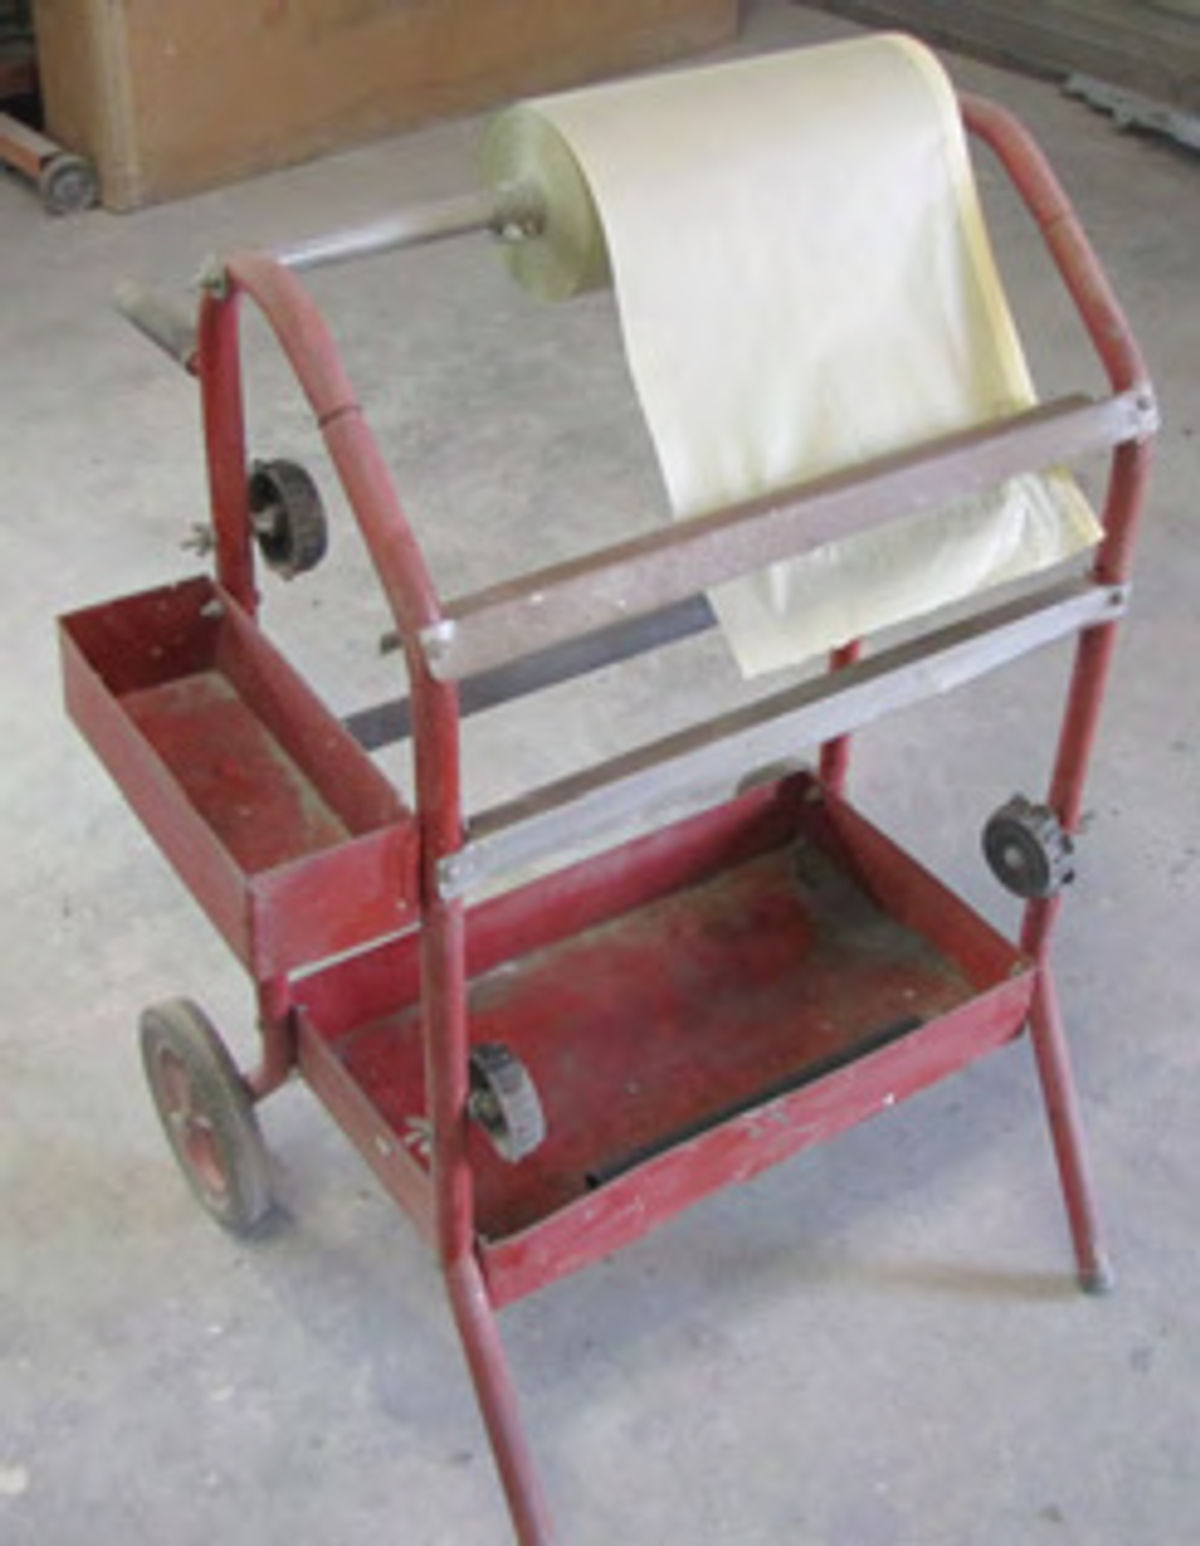
I strongly urge the use of a masking station like the one in Photo 1. If you are wondering where to find a similar masking station, Eastwood hasa couple, #31209 ($90) and #19871 ($55). Either will get the job done.
If you are wondering about the advantages to using a masking station, notice in the photo that masking tape is automatically applied to one edge of the masking paper. You roll off as much paper/tape as you need, lift it across the cutter and half of your masking headaches are handled.
In case you are wondering, newspaper is a lousy masking agent. The harsh chemicals in the paints we use today will bleed right through this type of paper and could easily destroy weeks of hard work by adhering the newspaper to the car. Masking paper, the kind you find at your local automotive paint supplier, is treated to prevent these chemicals from bleeding through.


The process of masking requires a clean, dry surface to work with, thus the reason for cleaning and drying the car. Properly masking a small car like this one requires about two hours of masking and taping.
What I’m getting at is to not be in a hurry. Take time to seal every edge and close every opening.
When you think you’ve done an adequate job, bring out the air blower and go over the entire vehicle. Any exposed edges or loose ends of masking paper will flop in the breeze. When you can blow over the entire car and not disturb any of the masking paper, you are done.
The Seal Coat
The final step in surface preparation before applying the seal coat is to degrease the final primer coat. I’ll use Eastwood #10194ZP PRE Painting Prep to degrease the car. From this point on, latex gloves are a must; this car cannot be touched with bare hands. Why not? Skin has oil on it. You can’t wash it off or rub it off, but you can transfer it to the surface being painted. If that should happen, the result could be fisheye contamination on the surface as you paint.
How do you know if you have fisheye contamination? Little round dots will appear on the surface of the wet paint. Those dots will look a lot like the eyes of a fish. Then what? You must stop painting and allow the surface to dry. After that it is back to sanding to remove the fisheye dots and then starting over with the painting process.
Since the Eastwood PRE Paint Prep comes in an aerosol can I spray a small area at a time, applying just enough degreaser to wet the surface being cleaned. Using a clean, lint-free cloth, such as a Kimberly Clark Wipe All#L40, found at your local paint supply store, I wipe the area dry before moving on to the next area to be cleaned.
Here is how degreasers work: The degreaser wets and loosens any contaminants on the surface being cleaned. Wiping the wetted area with a clean, dry and lint-free cloth picks up those contaminants and takes them away.
Should the degreaser be allowed to dry before you wipe the surface, the contaminants will remain and the dry cloth will do nothing more than move them around, possibly spreading them and making any existing contamination problem worse. The last step is to tack the cleaned and dried surface using a new tack cloth.
Tack cloth basics are to unfold the tack cloth completely to expose all of the cloth to the air. This helps dry some of the resin on the cloth. Then bundle the cloth into a large, soft sponge which can be used to tack off the car.
Stepping back to the use of a degreaser on a fiberglass body, since the car has been primed using a catalyzed primer the degreaser cannot penetrate the primer and soak into the fiberglass underneath.
Once the car has been degreased, wiped dry and tacked off, it is time to apply the seal coat.
For The seal coat I’m going to mix eight ounces of Eastwood Epoxy Primer #50244ZP per the instructions then over reduce the mix by 10%. Adding the 10% extra reducer will allow the coat to go on smoother and give me a slicker surface to apply my color coats over. I’ll have a total of about 18 ounces of ready-to-spray mix. That’s just enough epoxy to let me apply one thin wet coat. Which gun am I using? For spraying primers and seal coatsIprefertheBinksMI-GHVLP(Eastwood #34160; $380).
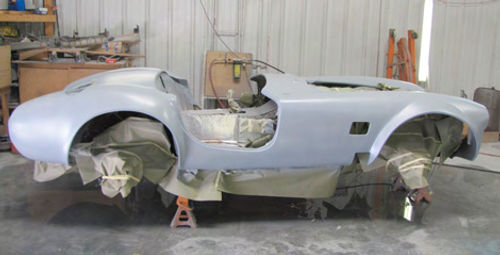
Here is the car in sealer (Photo 2). I’m going to give this coat at least 30 minutes to dry and cure out before continuing on. Be sure to notice that the floor is wet and the stand I used to raise and lower the body during construction is gone. There is no way I wanted that thing around to snag an air hose while I’m painting.
One Last Pinhole Search Before Painting
Anything else that might be good to know at this point in the refinishing process? You bet. This will be my last opportunity to look for pinholes. Recall that I said pinholes have a nasty habit of showing up long after you thought you had removed all of them? They can, and they will. Look closely for them.
What do I do if I find one? At this point I can still go back and fill pinholes using the 3M Red Putty. Once the putty has dried, I can lightly sand it using 400-grit sandpaper and cover the repair with more epoxy sealer.
If no problems are found after 30 minutes of cure time, I wet down the floor again and tack the car off in preparation for the first coat of yellow single-stage paint.
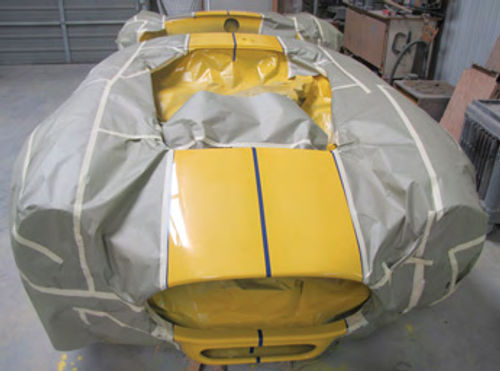
AsI mentioned in the first installment of this project, the yellow is Eastwood Electric Yellow #50215ZP. This is a single-stage urethane finish.
To apply the yellow, I’m using the DeVilbiss Auto Paint/Priming System, Eastwood #50203 ($240), which includes just about everything you need to lay down a professional paint job such as the DeKup Starter Kit, two DeVilbiss HVLP spray guns, and 1.3mm, 1.5mm, and 1.8mm spray tips.
The DeKup Starter Kit is a system of disposable paint cups that really cuts down on waste material and gun cleaning time.I’ll mix and apply four medium wet coats of the Electric Yellow and allow each coat to dry for at least 15 minutes before applying the next coat. What does all of this painting look like in the end? (See Photo 3.)
Color Sanding the Yellow
This is not the way I normally do things, color sanding before completing all of the refinishing, but I wanted you to see the gloss difference between the color sanded body and the un-sanded hood (Photo 4). The difference between Photo 3, the deep shine, and Photo 4, dull and flat, is quite dramatic. So why did I ruin that great shine? I wanted to get the surface of the car as flat and smooth as possible before applying the silver racing stripe. Color sanding the yellow was the best way to achieve that goal.
ThissilverI’musing is a high metallic color. It is also a single-stage color that cannot be color sanded to remove tiny imperfections once it has been applied. What comes out of the gun is what you get. Having the body asslick as possible before laying down the silver improves my chances of getting a perfect stripe.
To color sand the body I started with 3M 1000-grit #1069, graduated to 3M 1500-grit #1050, and finished with 3M 3000-grit #2085.
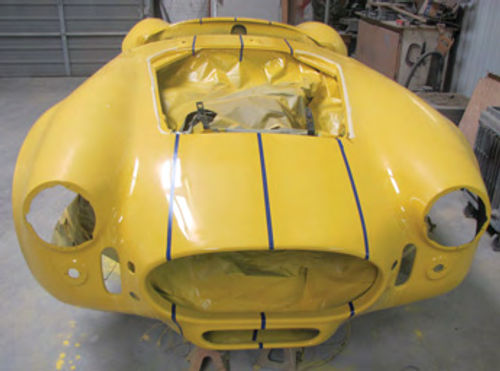
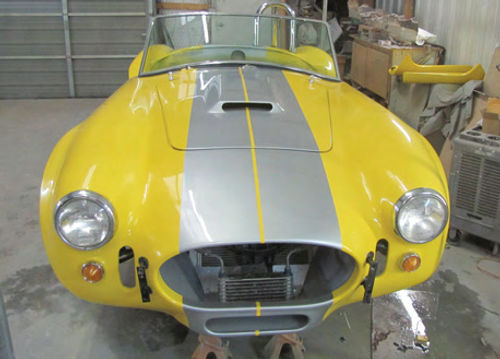
The main reason the hood and deck lid are on the car at this point is to allow me to lay out the silver racing stripe that will go down the center of the car. These panels must be on the car to ensure the exact alignment of the stripe from panel to panel. To miss the layout by even as little as an eighth of an inch would be a disaster and give me an extremely amateurish result.
Notice in Photo 5 that I have once again removed the hood and deck lid. I removed these panels because I want the stripe to do what we call “run into infinity.” In non-paint shop terms that means allowing the stripe to wrap around every panel and appear to never end. I can’t do that with the hood and deck in place.
Placing the Stripe
Let’s pause here for a moment and talk about how I laid out the stripe (Photo 6). Here you can see I used a different type of masking tape to outline the stripe—3M Scotch Fine Line #6303. This is a plastic tape that is blue in color and differs from regular masking tape in that it provides an extremely fine line where one color breaks into the other color, thus the name.
The drawback to this tape is that it will stretch. That means any time you bend thistape over an “L”-shaped surface,such as inside the hood opening on this car, it will have a tendency to lift in the tight corners. To remedy the lifting, try cutting the tape at the deepest part of the corners then laying a short segment of tape over each cut. The cuts relieve the stress from stretching, and the short segments over the cuts prevent further lifting.
How do you make sure each line of the stripe is perfectly straight?Start at one end of the car and extend the tape all the way over the car to the other end. Stick one end of the tape to a pre-measured mark at the end (front tip) of the car. Moving to the other end of the car, hold the tape up off of the surface, pull it slightly taut, then carefully lay it down on the car using pre-measured marks to ensure that the stripe is perfectly placed.
The Eastwood Chop-Top Silver (#50211ZP)stripe is applied exactly the same as the Electric Yellow, using the DeVilbiss gun with the 1.3mm spray tip and applying medium wet coats (Photo 7). The difference is that I only need three coats because this is a metallic paint and, unlike the Electric Yellow, it cannot be color sanded and compounded. Remember, doing so would leave the finish mottled and blotchy. Therefore, three coats gives me plenty of coverage.

Remember the rule, you can color sand a single-stage finish as long as the coloris a solid; no metallics. You cannot colors and a metallic single-stage finish. Doing so will leave you with light and dark spots.
So what does the end product look like? (See Photo 8.) The silver stripe is the perfect accent for this car; silver makes the yellow really stand out.
What about pinholes showing up at the last moment? Not a one in sight. What about compounding the car? Only the yellow was compounded. I masked off the silver before starting and spent several quality hours with a buffer bringing back the shine. Got a question? Send it along.
Resources
LPL Body Works, LLC
5815 Contented Lane, Amarillo, TX 79109
Body and paint repair DVD series
The Eastwood Company
263 Shoemaker Road, Pottstown, PA 19464


