FIXING a Door Stop Mechanism, Pt.2

A Restorer Who Usually Works on ’60s Cars Found Himself Making a Repair on a 2006 Chevy. Let’s See How He’s Doing With This Newer Ride.
Editor’s note: We know that many readers maintain their “newer” cars and trucks that generally are 10 to 20 years old. So when AR contributor John Armstrong told us about a door stop repair he’d made on a friend’s 2006 Malibu we decided to watch him at work. Last month he removed trim and was pulling the door panel and we’ll pick it up there. We had 16 images with the first installment so we’ll start here with Photo 17.
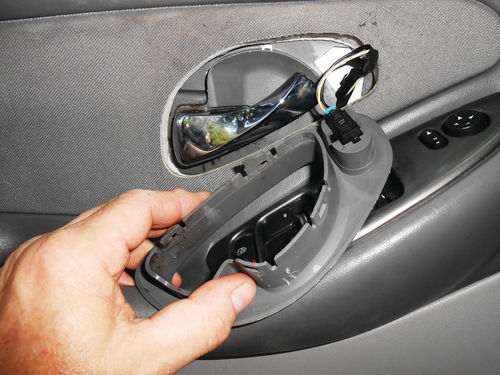
There are still four or five plastic retainer clips positioned around the lower and forward interior edge of the door panel securing it. Each lines up with a specific hole in the door. Photo 17 shows positioning a door panel tool between the panel and door to start releasing these retainer pins. Once one has popped free, it is fairly easy to determine where to place the tool to free the remaining ones.
When all the retainers are free, you will need to lift up on the panel and disengage its upper edge where it’s connected behind the inside window squeegee. No tools are necessary here, just some wiggling and pulling.
At this point you will most likely hear that previously mentioned metal spring clip fall to the ground. This vehicle also has a trunk release button located in the lower portion of the door panel. With the panel removed from the door, simply disconnect the wire from the trunk release button.
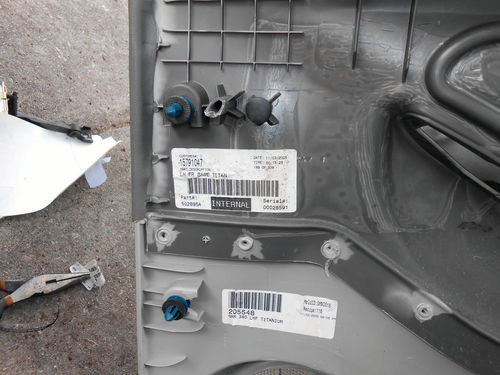
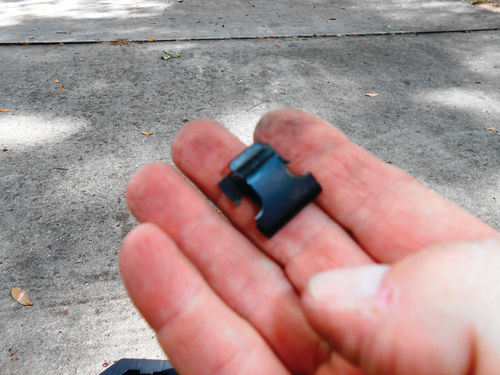
Photo 18 shows the inside of the door panel and two of the retainer clips on its forward edge. Should any be damaged or lost they are easy to locate at most auto parts stores, but it’s always a good idea to bring an old one with you to match up. Set the door panel aside and remember to pick up that spring clip. That’s it in Photo 19.
Time to Reach for the Damaged Part
There is one last obstacle before you will be able to reach inside the door to start retrieval of the door check link and that’s the moisture barrier that is stuck to the metal door. This is made of thin plastic material and retained by some sticky substance like butyl or something similar. Simply pull it away from the door until there is enough room for your hand and arm to find their way in. A word of caution: There are almost always some rough edges and other obstacles inside the door that are looking to injure you. Wearing a long-sleeve shirt will most certainly help protect your arms. Recently I discovered Kevlar protective sleeves that slide on like a pair of gloves and extend to your elbows. They don’t restrict your motion, and are cooler to wear in warm weather.
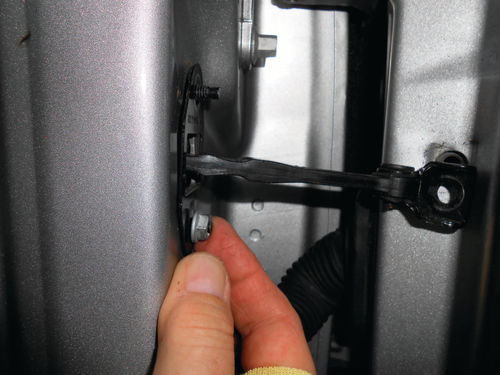
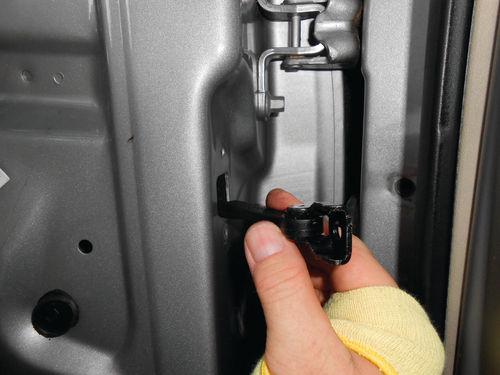
A 10mm socket on a ¼” drive ratchet is all that’s needed to unbolt the check link. In Photo 20 the last nut is being threaded off while my other hand is inside the door supporting the part. Once loose, it’s fed into the door as is being done in Photo 21. What you don’t see here is that inside the door the forward window track is fairly well centered, blocking the part’s removal. Also look closely at the photo and you might wonder if the square hole is even large enough to pull the hinged end of the check link through. The answer is it won’t pass through positioned as in the photo. What worked for removing the check link was to pull it in and upward, going between the window track and the outer door skin. Finally, giving it a 90° turn fit the end of the link through the hole. From then on it was clear sailing out the door. Thankfully the part wasn’t dropped inside the door, so I am unable to address how much fun that might add to the project.
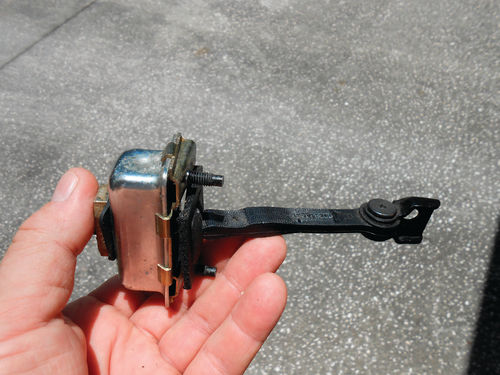

Photo 22 shows the old part once it’s been removed. The new part takes the same dance to fit it back in position, and then the three fasteners are tightened securing it as shown in Photo 23. As you can see, switching out the door stop part itself is fairly easy once you’ve gained access to it.
Inspecting the Old Part
Getting a peek inside the old check link certainly isn’t necessary or part of the job, but it only requires bending some metal tabs back and sliding the mounting plate away to get an idea of how it works.
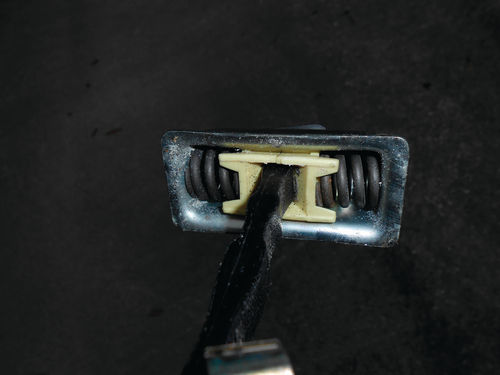


Photo 24 shows there are two opposing springs, one on each side of the connecting strap. Between the springs and the strap are plastic gliders that apply friction. The connecting strap has a couple of gradual steps in it as seen in Photo 25. As the door moves, the strap passes between the gliders and will pause when the gliders fall into these valleys, thus holding the door in those locations. It’s most likely that the part failed because the plastic gliders became worn, but it is possible that one or both springs lost some of their tension.
This piece will be disposed of, but it’s easy to see how it could be rebuilt if parts were available for it. The springs are loaded and under pressure, so naturally you would need to be aware of what you are doing, but otherwise it would be a simple item to repair. Ten years from now that may likely be the case, as the link assembly will certainly be harder to find and eventually new replacements will simply dry up.
Putting Things Back Together
Now it’s time to button things up. Essentially it’s little more than the reverse order of getting to the part. Push the moisture barrier back in place and then with the door panel resting on the ground in front of the door, reconnect the wire to the trunk release button ocated in the lower portion of the panel.
Now raise and position the top of the door panel so that it engages with the inside edge of the window squeegee. Try to start the forward-most edge first, and make sure the lip goes over the inner rim of the window squeegee. Then line up with the door lock button and press the panel down and in place.
If there is any uncertainty about the positioning and where the top of the door panel connects, take a look at the opposite door.
As previously mentioned it will take some wiggling and pushing to get it properly oriented. There won’t be any wondering, you will know when it’s in the proper position. Make certain to pull the three wiring harnesses through the hole in the armrest and they can even be plugged into the control panel. Also remember to replace that metal clip on the leading edge, or the control panel will remain loose when installed into the door panel. There is still the door lock wire that needs to be positioned before securing the door panel. Connect this wire to the door lock button located in the door lever trim piece as shown last month in Photo 8. Before going any further, now is a good time to test and verify that all the controls are working.
Now with the top of the panel positioned properly, the plastic retainers on the inside of the door panel should be lined up as well. You can use your hand to go around and bump them in place. The two pins are reinserted in the back edge of the door panel with the center pin extended outward as seen in Photo 26. Now push the centers in, and they’re done.
Replace the two Torx screws behind the armrest pull handle and then snap the elongated plastic plug back in place to conceal them. All that remains is to pop on the trim around the door release lever and this job is complete.
Tools Needed for the Project
The tools used to do this job were a straight blade screwdriver and a small pocket screwdriver, T-25 Torx driver, a door panel tool and a 10mm deep socket on a ¼” drive ratchet.
Total time to do the job was less than an hour, including taking the photos for this article.
In the not-too-distant future the hinges on my 1966 Malibu will be tackled and you can be certain that won’t be an hour job. At the moment we are involved with some home improvements and the ’66 may be forced to spend some time outside of the garage. Not knowing for sure what lies ahead, I certainly don’t want to end up parking it outside my Florida home with a door off. I could wake to find an alligator residing in her the next morning!


