FIXING a Door Stop Mechanism
A Lot Can Change on Cars Over Four Decades. Let’s See What Happens When a Man Who Works on ’60s Chevys Encounters One From 2006.
Editor’s note: Along with working on vintage vehicles, we’ve found that many readers also maintain their “newer” rides…cars and trucks that generally are in the range of 10 to 20 years old. So when AR contributor John Armstrong told us about a door stop repair he’d made on a friend’s 12-year-old Malibu, we asked him to share the project with AR readers. After all, we want you to enjoy your “new” vehicles as much as the collectibles in your garage. Now, here’s John:
The project vehicles I generally write about are my 1966 Malibu, 1986 Caprice or 1987 El Camino. Additionally there are a couple of vehicles that haven’t been introduced to AR readers yet. One is my wife’s first car, a 1967 Chevrolet Impala 2-door hardtop and a 1967 Malibu.
There’s nothing rare here, no Super Sport models, big block engines or great-looking show cars…just fun-todrive vehicles.
But occasionally someone has a problem with their car or truck and if I can, I will try to help them out. This brings me to a vehicle much newer than my usual era, a 2006 Chevy Malibu.
Recently a friend mentioned that the driver’s door on her 2006 Malibu wouldn’t stay open as it should, and could close unexpectedly on her. Wow, that certainly sounded familiar as both of my old Malibus have been that way for who knows how long.
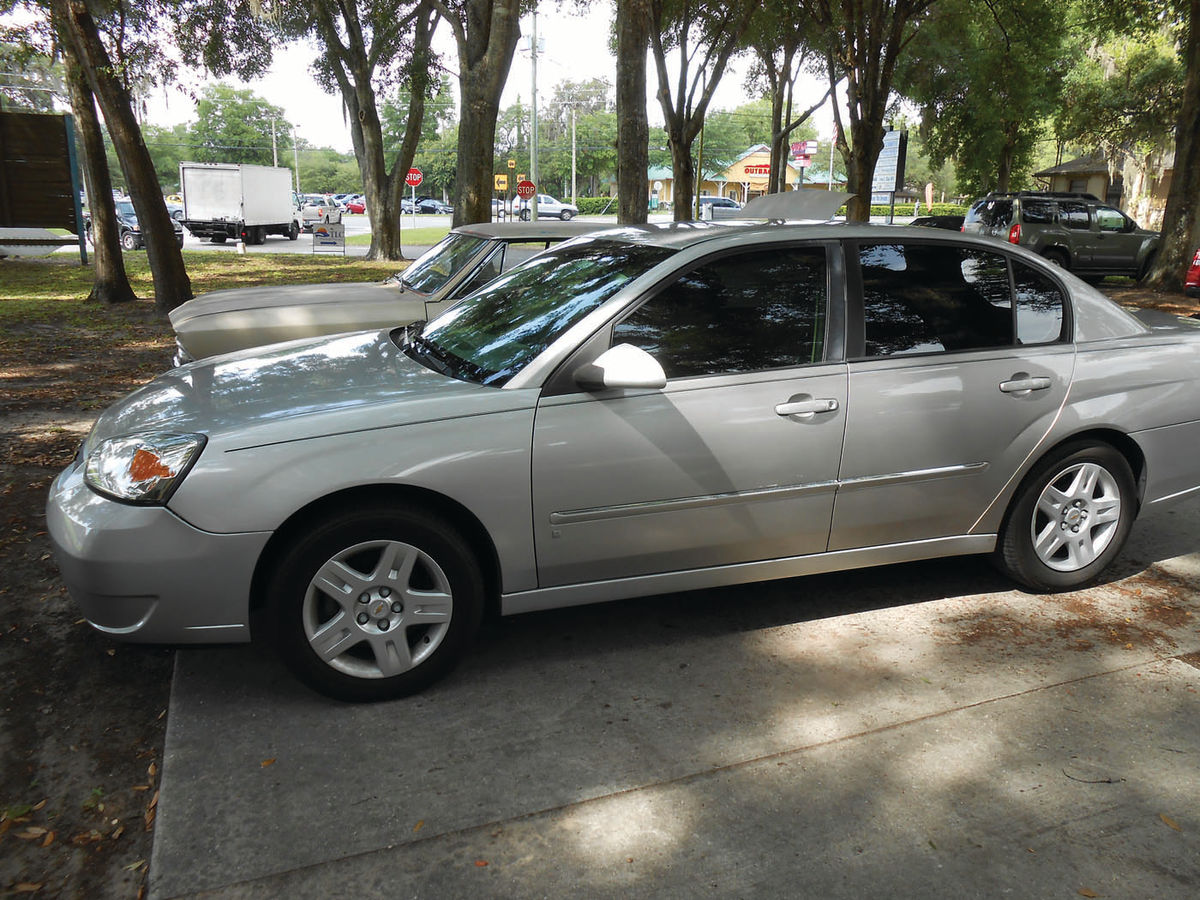
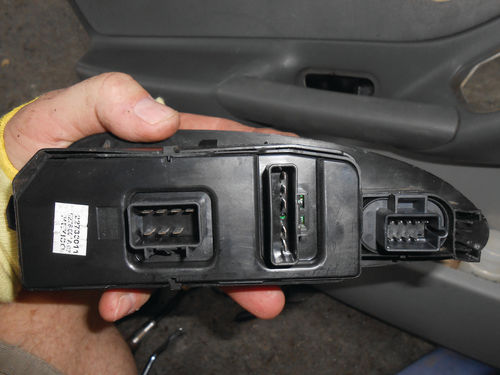
That’s the vehicle in question in Photo 1, and my ’66 Malibu is hiding on the other side. The owner advised me that the local repair shop was having some difficulty locating the replacement part. That sounded unusual for a Chevrolet that’s just a little more than 10 years old. Most likely, I figured, the repair shop didn’t want to be bothered with the job. SoI checked the local auto parts stores as well as rockauto.com to see if the part was available from the independent sources. Unfortunately, there was no luck there.
When I contacted the local Chevrolet dealer they advised that the part was readily available for $52 but would have to be ordered. It arrived the next day.
Sure there is eBay and it was several dollars less from that source. But I have been dealing with the same gentleman at Crystal Chevrolet for two decades, and should there be any problems, there would be no difficulty in getting things set right.
Not What I’m Used to Seeing
As one might expect, I quickly learned that over the span of 40 years a lot has changed with the Malibu. OK, everything has changed. The only similarity is that they share the same name.
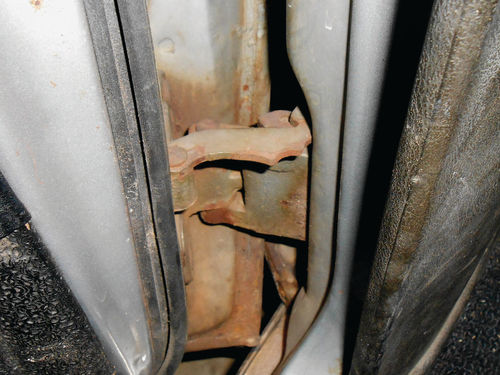

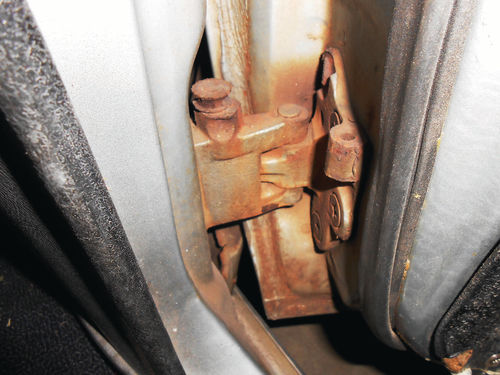
As a comparison, Photo 2 shows the driver’s side lower hinge of the ’66 which should incorporate the door stop (sometimes referred to as a door jack). The roller and spring are long gone, but the detent plate still remains. Meanwhile, Photo 3 shows the driver’s door “check link” as it’s called on Sharon’s 2006 Malibu. While all is still intact, the component simply lost its ability to hold the door open securely. The 2006 only needs the driver’s door check link replaced. (I should point out that this is a nonserviceable item, at least at this time in history.)
My ’66, on the other hand, will need help on the passenger side as well. Photo 4 shows the right lower door hinge has a heavily rusted roller remaining in place, but the detent plate is gone. Luckily there is National Parts Depot (www.nationalpartsdepot.com) close by in Ocala, Florida, a short drive from my home. Mail order wouldn’t be any problem, but I always enjoy visiting their store. They offer a great supply of Chevelle parts and will eventually be my source for the needed repair items for the ’66 Malibu. Online and in their catalog they list several components to rebuild original hinges or you can purchase complete new replacement hinges. Comparatively speaking, the repair on the 2006 is much simpler and entirely different than what’s needed on the 1966.
With the New Part In Hand, It’s Time to Get Started
On the 2006 Malibu, the check link is mounted inside the door, so the driver’s door panel will need to be removed.
Never having removed a door panel from this year vehicle some basic reference information would be very helpful. You can be certain there are always some changes over the years prior and this was no exception. A shop manual would have been great, it’s always the best thing to have on hand, but I was quite certain Sharon didn’t have one for her vehicle.
The next best thing was to do a Google search and see what came up. A search for specifically replacing the check link on this vehicle came up empty. They did show the procedure for other vehicles, but that’s essentially useless. You can see how the part secures in place; it’s how to get it there that’s the question. I then did a search for “how to remove the front door panel on a 2006 Chevy Malibu,” and located a link to a very helpful video.
The basics are the same as with my ’80s vehicles, but some of the information certainly saved me time.
Begin With the Trim
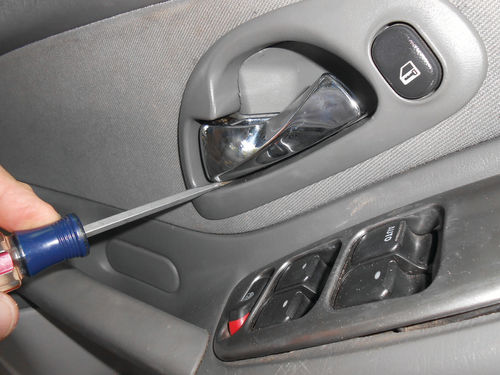

To get started, the trim from around the door latch will be the first thing to be removed. Place a flat blade screwdriver in between the back lower edge of the door latch and the plastic trim plate as shown in Photo 5. Raise up on the screwdriver’s handle so that it applies some downward pressure on the plastic trim. A key thing to remember here is the word “plastic,” so use common sense and not too much force. At the same time get your fingers up under the lower edge of the trim and pull outward as seen in Photo 6 until it pulls free of its fastener.

Now move forward toward the end of the latch handle and repeat the same procedure. There is a second catch in this area. With the bottom free, carefully use the screwdriver and push upward on the inside edge of the trim piece as you see in Photo 7, while again using your fingers to pull it free of the door panel in that area. This should free the trim piece from the door panel, if not, determine where it’s “sticking,” and press up (outward away from the lever) while pulling gently with your fingers until it releases.
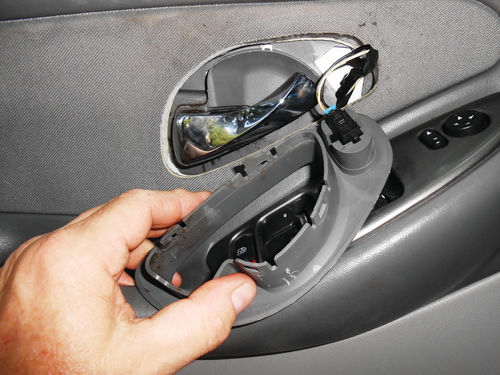

Photo 8 shows it free of the door panel. You can see there are a total of four catch points, two above and two below. Unclip the door lock wire and then set the trim piece aside. Photo 9 is intentionally taken out of sequence to give you a better idea of how this trim piece connects. The trim piece slides over the raised center and is secured by the catches pointed out in the photo.

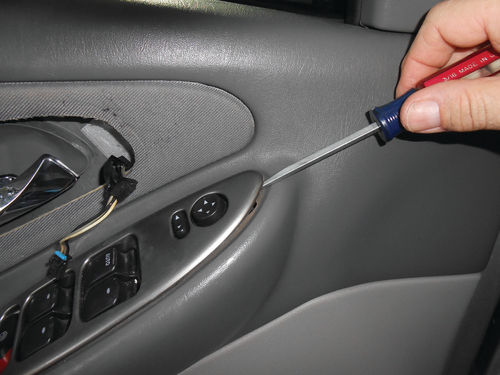
There’s an elongated plastic plug located just behind the door pull portion of the armrest that conceals two door panel retaining screws. Slide a flat blade screwdriver under its edge and it can easily be popped out.
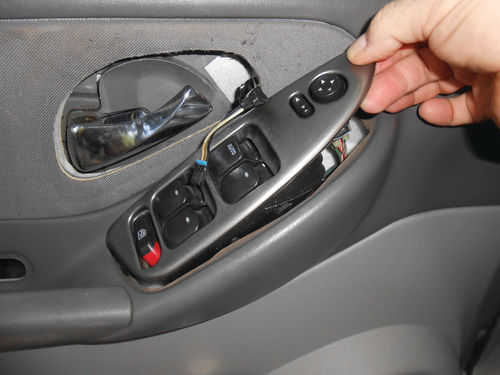
A T-25 Torx driver is used to remove the two screws as is being done in Photo 10. Next the armrest control panel is removed by first prying up on the uppermost edge with a screwdriver as seen in Photo 11. The panel can then be pulled forward to disengage its lower edge and then lifted out as you see in Photo 12 .
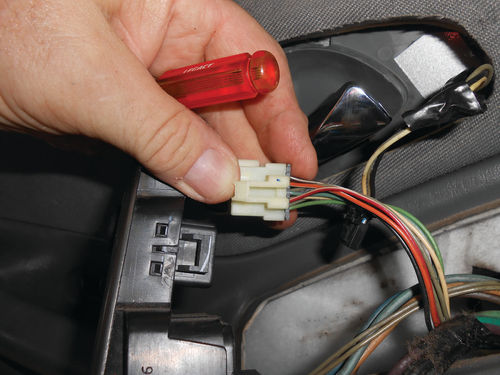
There are three plug connectors that insert into the base of the control panel. Photo 13 shows the plug for the mirrors disconnected. Note my thumb is positioned just beneath the latch for this plug. A small pocket screwdriver was used to depress this catch while pulling the plug free with the other hand. The two other connectors have similar locking catches. Photo 14 shows there is no worry about confusing plugs, they are all very different. Also note all the way to the far right in the photo there is what appears to be an empty cavity. There is a small metal spring clip that slides into it. This is what holds the control panel in place. When prying up the forward edge of the panel this clip pulled out and had fallen inside the door panel. It would most likely be difficult to avoid this from happening, as the clip simply pushes back in place. Don’t worry though, as it will fall to the ground once the door panel has been removed or you could fish around with a magnet to retrieve it.

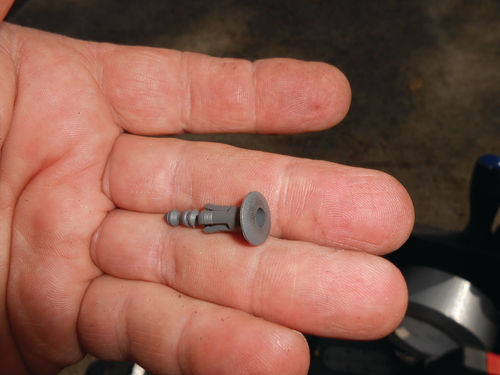
At the back of the door there are two plastic pushpins that retain the door panel. Using a small pocket screwdriver or something similar, push in the center of the pin as is being done in Photo 15. You don’t need to push it in very far, and you will feel a slight detent. Now the pin can be simply pulled out by either using the edge of a small screwdriver, pocket knife blade or your fingernails.
Photo 16 shows a better view of the pin removed while the center is pushed in. When it comes time to reinstall these pins, the center will be pushed out slightly in the opposite direction, and once properly positioned, the center will be pushed flush, locking the pin in place.
Next, we’ll finish removing the door panel and then remove the door check link and take it apart to see how it works. After that we’ll install the new part and put the door back together.


