Browsing Throughn JOHN’S TOOL CHEST
This Time We Found Tools to Remove Damaged Screws, Take Internal Measurements On Brake Drums and for Wrenching In Tight Spots.
Stripped Screw Head Removal
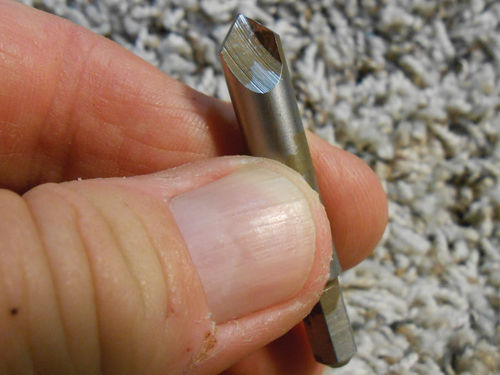
There is not as much of an issue with screws, but occasionally you encounter screws with the drive stripped. The Craftsman #52154 “Screw Out Kit” shown in Photo 1 is handy for Torx, hex drive (Allen), Roberts (square drive), Phillips and possibly others. They are of no value for slotted screws.
It requires an electric or battery powered variable speed reversible drill. Chuck up the correct size remover; push it into the screw head and with the drill in the reverse mode, power the drill up slowly. That’s all it takes to remove most screws. Photo 2 gives you a better look at the tool. The shank has a hex fitting to chuck into the drill so that it won’t slip, and the end that engages with the screw head has a sharp edge that bites in. There are three sizes that will cover screw diameters from #6 through #14. Sears has shown it for $11.99, and this set is made in the USA. If that’s important to you (it is to me), verify prior to purchase where the product is made. Many of the Sears Craftsman items that were USA are now being made in China, so assume nothing and you won’t be surprised.
Brake Drum Micrometer
If you own a vehicle that has drum brakes, even if only on one axle, a drum gauge can be a very worthwhile investment. If you need to purchase a used drum you can know with certainty its internal dimension. Avoid being misled simply because the friction surface is smooth and true. There are some unscrupulous people out there that will bore a drum well beyond its legal limit. With older vehicles you frequently have no choice but to locate a used part, and there is nothing wrong with that. But if you purchase a drum that’s been bored or worn beyond its legal limit, it can be dangerous, and will not perform as it should. As the internal diameter becomes too large, the arc of the brake shoe won’t match the drum, and this will usually result in a spongy brake pedal. With too much material removed from the drum, it loses its ability to absorb the amount of heat it was designed for. Additionally it’s desirable to have the brake drums on the same axle within .010” of each other’s diameter. This may not always be possible, but if you don’t keep them fairly close, your drums will have different expansion rates when they heat up, and that can result in uneven braking, and even brake fade.
Most drums can be machined to .060” oversize, so an 11” drum can be machined to 11.060”. Some drums will be stamped with both a maximum machining diameter, and maximum wear diameter. On my mid-’80s GM vehicles, the drums are marked something like: 9.560” max, discard at 9.590”. If your drums are not stamped with this information, check your service manual for the specifications. There are some odd-sized drums, so know the specifications with certainty before you go hunting for replacements. Here are a few that were found listed in a 1975 Ammco Tools publication:
• Buick, 1966-70 standard diameter 12”, maximum re-bore 12.080”
• Chevy Vega, 1971-75, standard is 9”, max re-bore 9.030”
• Ford, 1961-73, standard is 11.030”, max re-bore is 11.090”
• Thunderbird, 1961-62 & 1967-75, standard is 11.030”, max re-bore is 11.090”; 1963-66, standard is 11.090”, max re-bore is 11.150”
• Lincoln, 1961-62, standard is 11.060”, max re-bore is 11.120”; 1963- 68 standard is 11.090, max re-bore is 11.150”; 1969-70 standard is 11.090”, max re-bore is 11.130”; 1971-75 standard is 11.030”, max re-bore is 11090”
• Mercury, 1961-75 standard is 11.030”, maximum re-bore is 11.090”.
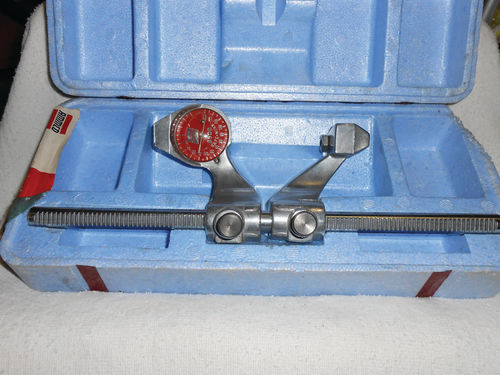
Photo 3 shows an Ammco 8500 drum micrometer. It’s made in the USA and can measure drums from 6” up to 16.125”. Loosen the locking screws and adjust the gauge for the diameter drum you are working on. The various diameters are marked on the shaft. These drum gauges are considered the industry standard; one reason is that there are so many in the field, and they have remained unchanged for decades. They also make a very similar version that will accept an extension allowing the gauge capacity to increase up to 26”. Unless you are dealing with huge trucks, the standard size will handle anything you encounter.
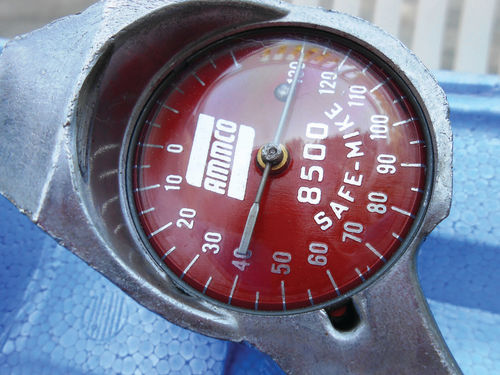
Photo 4 gives a close view of the dial indicator and its markings. The numbers represent thousands of an inch. In other words 10 equals .010”, while 120 equals .120”. The marks in between the numbers are what you would expect. Between the zero and 10 would be .005”; while between 120 and 130 would be .125”. Once you have the gauge set for the proper diameter, just place it in the drum and move it back and forth slightly and record the largest reading on the dial. The gauge can also be used to spot an out of round drum by taking measurements in several different locations, although you must read the gauge very precisely.
These gauges cost in excess of $300 new the last time I checked, but you don’t need a new one. The one shown in Photo 3 was an exceptional find on Craigslist for $40. If it had been used, it was very little, and this was a local purchase. More typically, used ones show up for $35 at the swap meet. A few years ago I purchased six Ammco drum gauges from another dealer for $5 each. You guessed it; I sold them all at my booth for a profit.
Don’t settle for something in poor condition unless it’s free. Furthermore, to verify the gauge’s accuracy I recommend taking a recently machined brake drum to a good machine shop and ask if they could measure it for you. Once you know the diameter of the drum, you can compare your gauge and adjust it until it reads correctly. Ammco makes a test gauge for this purpose, but I haven’t lucked into one yet. You can also get a close idea using a new brake drum as a gauge, however they are often .005” undersized, and can be out of round, so don’t consider it the last word by any means.
While certainly much more difficult to find used, there also is a metric version of the gauge. Keep your eyes open in the event that’s what you need. The markings on the dial indicator will quickly reveal if the gauge is metric or not. You don’t want to accidentally end up with a metric version when you need one calibrated in inches.
Stubby Wrenches
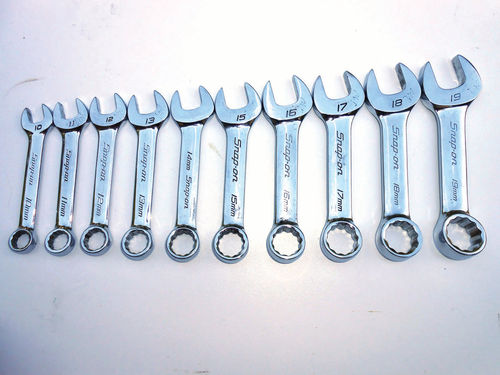
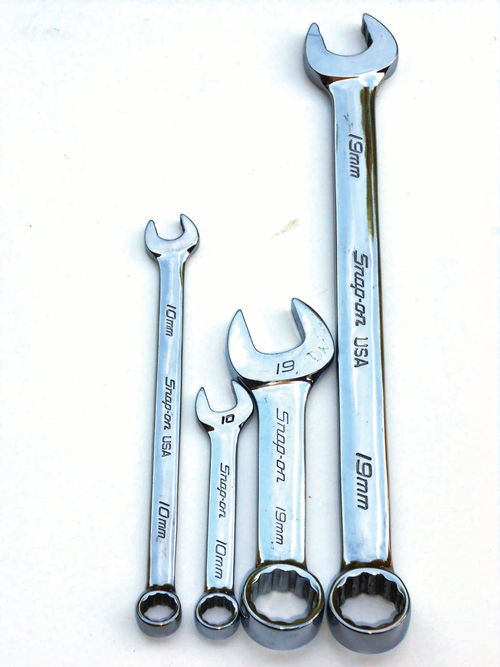
Usually you find yourself with the need to increase torque to loosen a nut or bolt. That may be accomplished by switching to a longer wrench, or in some cases a long-handle ratchet. But once the fastener is initially loosened, you may have a problem if you are in close confines. Even using a wrench of what would be considered normal length might be difficult or impossible. Sometimes getting that adjustment nut loose on the rear of a Chevrolet power steering pump can be one of those situations. A stubby wrench is one good option. Photo 5 shows an old 10-piece Snap-on set (0X1M), which includes 10mm through 19mm. The 10mm wrench is 3 7⁄8” in length, while the 19mm is 5 ¼”. To put things in perspective, Photo 6 shows these two wrenches side by side compared with the (SOEXM) wrenches. No, those are not their long wrenches; those would be their SOEXLM set. The point is they certainly are very short.
Naturally, there are other lessexpensive options than Snap-on, and after all this is going to be a lowtorque item anyway. Tool Topia has a 20-piece Gear Wrench Set (KD 81903) that includes both fractional and metric. It’s regularly priced at $278.39, but I’ve seen it on sale for as low as $119.82. The same set is also available from CPO Outlets, purchased through Amazon for $118.62. There are also stubby wrenches with ratcheting ends, and some even flex. Tool Topia also has a 10-piece Gear Wrench Set (KD 9550) with both these features. It’s regularly $289.67, but has gone on sale for $129.98. Amazon offers the same for $139.20. Additionally Amazon offers a 10-piece Gear Wrench Set (9520) of ratcheting (non-flexing) metric stubby wrenches for $96.02. These all appear to be products of Taiwan. Don’t misunderstand, Snap-on is never a bad investment over time; they are beautiful tools and most items are still made in the US.


