
1958 Chevy Bel Air 4-Door
Turning a Family Car Into a Sport Sedan.
SO, WHY DID I choose a ’58 Chevy Bel Air 4-door sedan? My friends would probably say it’s because I’m a contrarian and have a soft spot for the underdog.
No one can deny the popularity of the Tri-Five Chevys, but I was attracted to something a bit more uncommon.
My wife and I had attended several car shows to talk to owners about their restorations and while doing so I had observed few ’58 Chevys and even fewer that were restored to any significant level. Furthermore, there was no confusing it with any other brand. This big, bold car just grew on me.
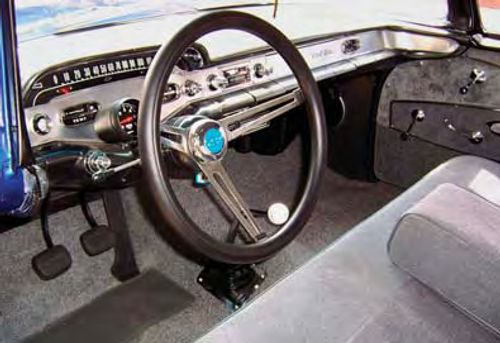
Everything about this car is simply over the top! Its bumpers are huge, and as one writer once commented, it has more chrome and polished stainless steel trim than the ocean liner Queen Mary. Unlike other sedans, even the exterior door/window frames are lined with polished stainless rather than being painted. And I happen to think that the ’58 dash and instrument display is one of the best designs to come out of Detroit.
Bringing It On Home
My search ended 21 ⁄2 years ago when I became the high bidder for this car on eBay. No paper listing the former owners and no numbers-matching components. The car was tired and old, but it was running and nearly rust-free. Best of all, it had all of its exterior trim intact.
Yes, many sellers on eBay exaggerate the car’s condition and this was no exception. I guess their description of “rust free” didn’t include the holes rusted through the trunk floor since a mat covered them up nicely.
Regardless, I actually drove the Bel Air 500 miles home (the generator went within the first 100 miles). When I finally arrived home, my wife just shook her head in disbelief.
Speaking of my wife, she had a few basic rules for me to follow. First, I wasn’t to allow our home to look like a salvage yard. Second, she wasn’t giving up her parking spot in our garage for this old car. Consequently, I built a mini garage on a concrete pad on the side of our house that had acted as a small basketball court. Within this little garage, I tore apart, documented, cleaned, abrasive blasted, welded, restored and eventually painted this old car. This demonstrates that you don’t need a professional-sized garage to complete your restoration project.

The project got going in earnest in September 2006. I originally set a completion date for the summer of 2008, the car’s 50th anniversary, but once I got started there was no stopping me. I finished the car in July 2007.
The key was to do a little restoration work every day, even if it’s just to set out parts for cleaning, or re-reading the shop/parts/assembly manuals one more time. I was able to get a reproduction shop manual and assembly manual for the ’58 Chevy that greatly aided the disassembly and reassembly.
Not everyone is going to feel comfortable doing their own body work or painting but there are several books and videos available to assist those who are more inclined to do things themselves. Yes, many of the restoration tasks are time consuming (it seemed as if I’d never stop sanding primer) but I found that nothing was overwhelming if you have some basic automotive skills and are willing to learn as you go.
I can’t overstress how helpful how-to restoration magazines such as Auto Restorer were during this restoration. Two books I highly recommend are “How to Restore Your Collector Car,” by Tom Brownell and “Revive Your Ride,” by Auto Restorer writer Larry Lyles.
Another great help was the hundreds of digital pictures I took along the way for future reference. These pictures, along with a good shop/assembly manual, will prevent you from having parts orphaned at the end of your restoration.
Furthermore, as shims were removed from fenders and doors, I marked their location and quantity directly in the shop manual beside corresponding diagrams. Smaller parts went into Zip Lock bags that were clearly labeled while larger items received a tag label. On many heavy-duty items (like A-arms) I used a 1/4-inch punch to label them “R” or “L” since many parts for the right/left may look similar but have subtle differences.
If this is your first restoration, there is no getting around the fact that you will have to purchase tools along the way. Over several months I made a significant investment purchasing tools from Sears (Craftsman) and Harbor Freight. Since I wanted to do the work myself, I would budget my expenses to allow for the needed tools as my project progressed. You need to purchase or borrow an engine hoist, engine stand, quality jacks and stands. Along the way you will need grinders, sanders, assorted hand tools, an air compressor, paint gun and more.
The Plan Called for Many Mods
I had long before decided that I would restore this car not to original status but to more of a resto-mod configuration. Performance and safety upgrades would be made to the engine, steering, brakes and suspension.
I initially wasn’t sure what color I would paint it but the stock pastel pink wasn’t going to do it.
Slowly all of the exterior chrome was removed and sent off for replating (this is a major expense). I then removed the hood, trunk lid, doors and front fenders allowing for the removal of the engine and transmission with my engine hoist. Fortunately all of the body-to-frame mounting bolts were easily removed except for one that had to be drilled out due to rust. (I had heard horror stories of these body bolts all being “frozen in time.”)
With the body no longer bolted to the frame, I utilized four hand winches attached to 4x4 trusses I had supported over the car and started to hoist the body off the frame a couple of inches at a time. Then I was able to push the rolling frame out from under the suspended car.
Be ready to get dirty as you scrape, grind, blast and wash off 50 years of grease and grime. I used everything from hand scrapers to a portable sand blaster to get down to the bare metal. Lastly, I used Eastwood’s Rust Encapsulator and Chassis Black to protect the frame and rear axle area. All new bushings, tie rods, ball joints, springs and shocks were installed. A power-assisted front disc conversion was purchased from The Right Stuff along with new brake and fuel lines. New seals were installed on the transmission outgoing shafts and rear end and the stock rear drum brakes were rebuilt and wheel bearings repacked.
Finishing off the frame was the installation of a 327 crate engine from 5-Star Engines. It’s rated at 330 horsepower with HEI (High Energy Ignition) and a Holley Street Avenger 570 cfm carb.
Learning to Hammer, Weld & Paint
I was determined to do the body work and paint myself. After finding out how much custom paint jobs can cost, I knew I could save thousands of dollars doing it myself (even after purchasing the needed equipment). Again, there are excellent videos and books available that make this process far less intimidating. I spent months hammering, grinding, welding, sanding and cleaning body panels prior to applying the first coat of epoxy primer. Be sure to purchase a quality HVLP paint gun and air compressor and shoot lots of test panels prior to actually painting your car. (I got an old hood out of a salvage yard and practiced spraying test panels on it to get comfortable with the spray gun and paint.)
Several weeks were spent applying needed filler and then sanding between subsequent coats of primer until all was smooth and straight. I then applied a urethane base coat (Kirker Royal Blue Pearl) and clear coat.
I hope you agree that all the hard work paid off and that the finished paint job looks beautiful. And yes, even more sanding (wet) and polishing was needed after three to four coats of clear were placed to truly get that high gloss shine. Talk about labor intensive.
This Is Just the Beginning…
Once all of the panels were painted, I started to reassemble the body parts. Following diagrams in the assembly manuals, “shim as necessary” took on a whole new meaning as I tried to get the doors, fenders and hood aligned evenly. I installed interior insulation, carpet, shoulder/lap seat belts, and a custom heating/air system from Classic Auto Air. I also moved the shifter from the column to the floor and installed a Hurst Mastershift floor shifter.
Other additions included ceramic coated Hedman Hedders, Flowmaster mufflers on the dual exhaust, a power steering conversion from Late Great Chevys, a rear sway bar, Cragar Pro Street 15x7 chrome wheels and Uniroyal Tiger Paw 70 series tires. The interior upholstery was finished off by Scott’s Auto Trim in Auburn, California.
The way I see it, I was able to build a sport sedan out of what was once your grandmother’s car. And now I’ve already started on my second restoration project—a ’56 Studebaker Power Hawk.


