
Working With a Plasma Cutter, Pt. 2
We’ll Make More Test Cuts and Give Our Opinion on the Machine. Then We’ll Discuss Maintenance and Buying Tips.
EDITOR’S NOTE: WE’D heard about the benefits of using a plasma cutter when cutting metal, so we decided to try one for ourselves. Last month we discussed the details of the Hypertherm Powermax30 and started to do some cutting. This month we’ll resume our test cuts, compare the plasma cutter with some other cutting systems and give some shopping tips. There were nine photos in the first installment, so we’ll pick up here with Photo 10.
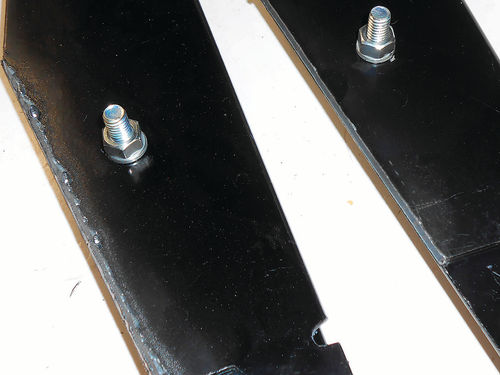
As Photo 10 shows with the brace on the left, moving too slowly with the plasma cutter leaves a lot of slag and a rougher cut, while on the right is a smooth almost razor-edge cut that will require little more than a quick pass of a file. Notice also that there is no paint burn-back because of the extremely small “heat affected zone.”
Being curious as to how hot the metal was after a cut, I reached down (while wearing welding gloves) and picked up the cut-off section and then quickly dipped and removed it from a waiting pail of water. There probably was about 10 seconds of time lapse between the completion of the cut and water touching the piece of scrap. There was no steam coming off the metal scrap, even though the cutting arc of the electrode approaches 15,000° F.
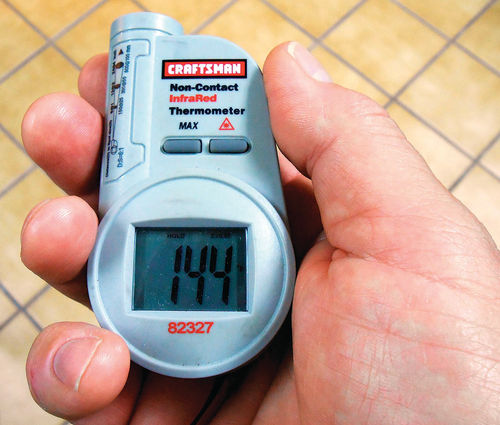
Try the same with an oxyacetylene torch cut and the water in the pail would practically be boiling. I decided to go a step further. The cutting process was repeated and a small Craftsman infrared thermometer was used to record the reading. Photo 11 shows the 144° F reading obtained. Several readings were taken, and they all seemed to fall in the high 130s° F and 140s° F. In other words, it was pretty close to the temperature of hot water coming out of the tap. Being cautious not to put too much faith in those temperature readings, a minute was allowed to pass, and then I lightly touched the metal with the back of my hand. It was not hot, but warm, wow!
Testing on 120V
As you’ll recall, we started this experiment using the adapter for 240V power. For comparison, the machine was now set up for 120V with the standard household plug, and the amp dial set to 20, as though it were using a line protected by a 15A circuit breaker.
There were still a couple of braces that needed to be cut, so this would be a good test. The first couple of cuts didn’t fully penetrate because this time I was moving too fast. The pace was slowed down and once the correct rate was established, the cuts were perfect.
To sum up, my first attempt at using this plasma cutter was a big success. The cut quality was superior to my previous methods and seeing as these cuts require no welding, there will only be some minimal paint touch-up and the job will be done. It was a huge time-saver when compared to my old means of accomplishing the same task. I estimate it took about one third the time, not only because of the faster cuts, but the procedure itself allowed me to simplify the task so there was considerably less handling. If welding were required with this piece, paint would need to be ground back sufficiently; otherwise the cut was weld-ready.
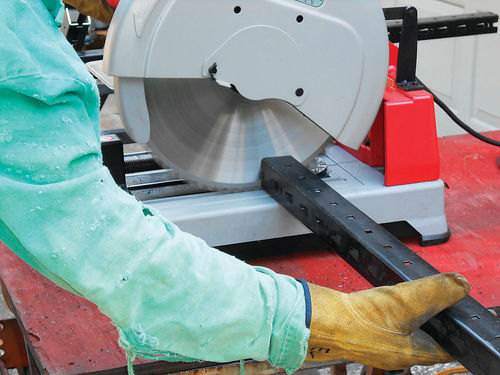
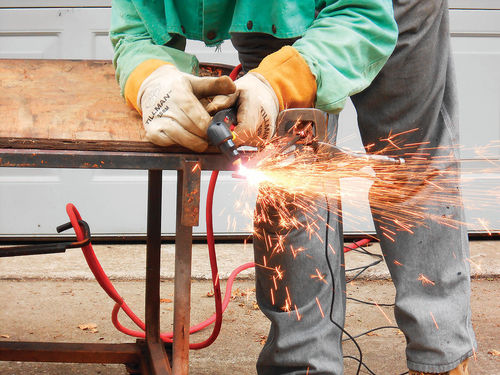
Still, the plasma cutter isn’t always the best answer for all jobs. For instance, the final cutting task for this workbench project is to cut channel to the proper length for the workbench legs. In this instance, the chop saw is hard to beat. As shown in Photo 12, cutting four-sided objects like this and making a square cut are quick and accurate in the chop saw. It could be accomplished with the plasma cutter, but would be much more time-consuming.
Cutting Sheet Metal With Several Tools
Photo 13 is a comparison of various cutting methods on a piece of 18-gauge (.048") cold rolled steel (CRS).
Starting at the far left is a cut made with a Milwaukee 8" metal-cutting saw. It leaves a clean, straight cut and the kerf (width of the cut) measures .090". This tool is essentially limited to straight cuts, and is also capable of cutting thick metal stock. When cutting thicker metal make sure to hold on tight so it won’t kick back on you. The waste material from creating the kerf is in the form of tiny metal chips, some of which are collected and held by the saw, but most seem to land on the ground.
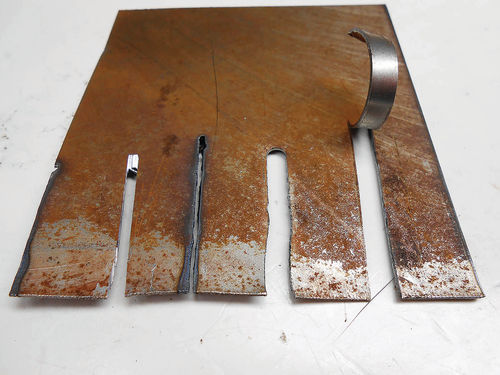
The next cut was made with the Powermax 30 plasma cutter. The kerf width is .040"; straight cuts or right angles are no problem, and thicker metal (within its range) simply means slowing the travel speed. Its material waste is in the form of metal dust, similar to that created when using an abrasive wheel.
The third cut from the left was made with a Chicago Pneumatic (CP 835) air nibbler. The kerf is .170", straight cuts or curves are no problem. It had no problem cutting 18-gauge CRS, and I believe its capacity is 16 gauge. It discharges half-moon shaped bits of metal each time the punch and die take a bite.
The final cut to the far right was made with a pair of Kett electric power shears (KE-440) with a cutting capacity of 14 gauge. Its kerf is the widest at .200", and is limited to straight cuts or very gradual curves. No small circles, at least not with this design. As you can see, the waste material that’s removed curls up during the cut. I have never used them on anything thicker than 18 gauge, but imagine you would have to put some “push” behind it to get it through 14 or even 16 gauge.
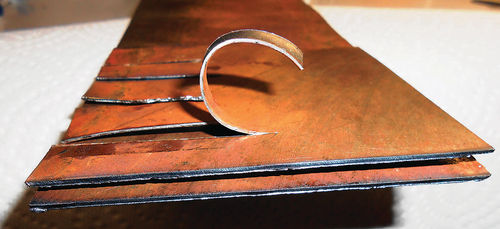
All the cuts were essentially burr-free, needing little more than a light filing. Photo 14 shows the piece with the test cuts and the section it was cut from beneath it. That cut was made with the plasma cutter, and there is no heat distortion.
I experimented further cutting some 20 gauge (.036") CRS. This is typical automotive sheet metal and, as expected, it cut perfectly without warping or distortion.
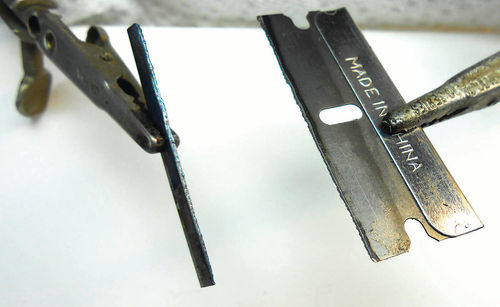
As the “last word” on dealing with thin material, I decided to cut off the edge of a single-edged razor blade. The blade is .011" thick, and the question in my mind was how gently the Powermax30 would cut this. I set the machine at the lowest setting, 15A, and Photo 15 shows the razor blade to the right, and the piece cut off to the left. Enough said.
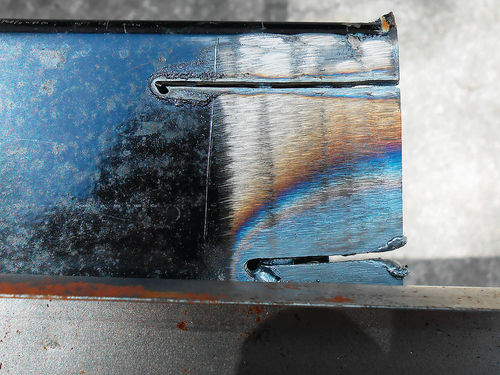
Photo 16 compares an oxyacetylene torch cut to the plasma cutter on a section of .085" channel. The top cut was done with the Powermax30 while the lower was a typical torch cut. The wide fan of metal discoloration shows just how much greater the heat-affected zone is with a torch cut. Now I don’t want to sound like there is no place for an oxyacetylene torch. When you are dealing with thick steel beyond the working range of the plasma cutter, the torch is still a good choice.
The Henrob Torch
It wouldn’t be fair to continue without mentioning the Henrob torch. It’s not sold in welding supply shops, but is available online or at auto swap meets, where I purchased one about 15 years ago. It appears to be selling for around $400 today. This is a pistol-grip style torch with a concentrated stream of heat, and in the right hands can do some beautiful welding on a variety of different metals. When it is set up for cutting it uses a separate oxygen stream positioned either above or below the heat nozzle, depending on material thickness being cut. The heat-affected zone with this torch is less than with a conventional torch and the folks who sell and demonstrate it can make amazing cuts in steel. I found it difficult getting comfortable with the gun-style configuration when cutting, and often removed the torch to replace it with the traditional Victor when I needed to put a lot of heat into something. Eventually the Henrob ended up back in its case, and the traditional torch remained on the end of the hoses. No doubt it’s a versatile tool, and had I applied myself more, possibly I would have gotten accustomed to the torch style. But when you are talking about cutting, it’s limited to cutting steel, relying on oxidation just as a conventional oxyacetylene torch does. A plasma cutter, on the other hand, will cut any conductive metal known to man. (I had a welding instructor who loved saying that.)
Piercing ¼" Plate and Other Metals
Piercing a hole in thin sheet metal is as simple as placing the plasma cutting torch on the material and pulling the trigger. Trying the same approach with thicker stock will end up with sparks kicking back at you.
Photo 17 shows me piercing a hole in a section of ¼" plate. Position the torch at an angle, holding it just above the work piece. This will allow the sparks to initially discharge off to the side as shown here.
Once the torch cuts through and the arc stream is pointing toward the ground, rotate the torch so that it’s perpendicular to the work piece, and now cut out the desired shape. Note that this cut was made using 120V on the maximum 30 amp setting, which requires a 20A circuit breaker for protection.
As a final experiment, a piece of 1 ⁄8" aluminum was cut. There was no noticeable difference in the cutting process between it and cutting steel. The finished cut was a bit coarser, as shown in Photo 18, than that made in steel. This may be typical when cutting aluminum or possibly it shows my inexperience.
Mary Takes a Turn With the Plasma Cutter
After listening to me talk about the Powermax, and assisting in taking photos of me using it, my wife took an interest in plasma cutting and wanted to give it a try. A wooden template was made and placed on 18-gauge CRS to be traced around with the torch. Templates are a great aid, and easy to use; just remember that the object you cut out will end up being slightly larger. If you want to make an exact copy of something, your template must be 1 ⁄16" smaller on each edge to allow for the distance from the orifice to the edge of the cutting nozzle.
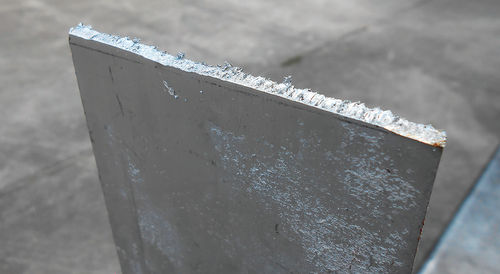
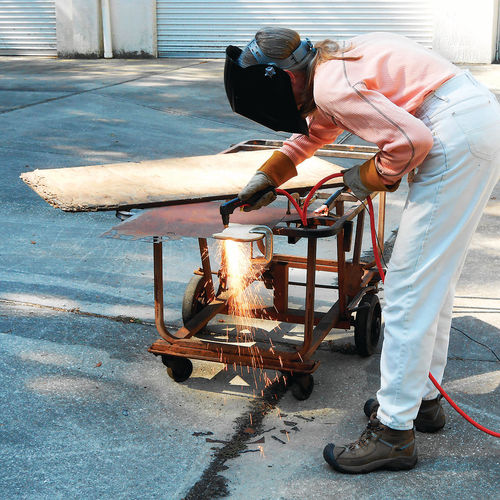
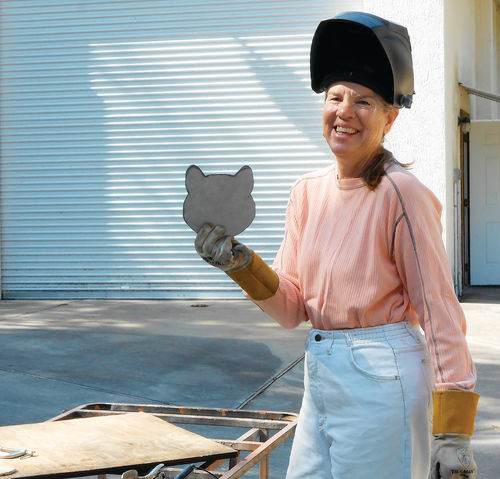
Mary warmed up by making some simple cuts in the 18-gauge metal, and then a few freehand cutouts. Photo 19 shows Mary cutting around the template with the torch, and Photo 20 shows her proudly holding the cutout. Keep in mind that she won’t use a 7¼" circular saw when it comes to cutting wood, she feels too uncomfortable, but she had no problem with using the Powermax30. Finally, Photo 21 shows the wooden template with her metal cutout above it. Up top around the ears there is some slag, and more heat discoloration, but around the right side of the face she picked up her speed and the results were a much cleaner cut.

Plasma Cutter Maintenance
There isn’t much to mention on the topic of maintenance. Last month we covered the consumables used by the torch, which will be the largest concern. Other things mentioned in the manual are inspecting the torch trigger for damage, the torch body and the torch lead. Make sure the power cord and adapters are not damaged, and they recommend cleaning inside the power supply with compressed air or vacuum every six months.
Their website offers service bulletins, while both the manual and website have instructions on how to install replacement parts should the need arise. Simply click on “Downloads” and follow the links to service information. There is a long list of tasks to choose from that appear to cover most anything you might encounter.
Can It Be Your One and Only Cutter?
So, would I give up my collection of metal cutting tools and replace them with the Powermax30? No, but being addicted to tools, I wouldn’t no matter what. There are certainly some tools that one could deem no longer necessary if the Powermax30 were a part of the arsenal, but it takes me many years to make that kind of decision.
On a serious note, though, it would be hard to beat the Powermax30 for cutting most any metal plate, whether it be flat or curved, as long as it’s within its operating range. It’s fast, precise, easy to use and most of all, it’s fun. But the fact that it is all of those things might lead one to become complacent, so you must keep safety concerns in mind. It may cut metal like a hot knife through butter, but you’re still cutting metal. Be aware of where the arc stream is going; stay out of its path, and wear the proper protective gear as we discussed last month.
If you have concerns about how it will perform using a 120V household receptacle, don’t. I couldn’t have told you whether the machine was using 120V or 240V. Had long cuts been necessary where the duty cycle needed to be considered, then 240V increases the work time.
The only thing I didn’t care for was once work was completed, and the machine was disconnected to be put away, all the cables tend to tangle up easily. You would most likely never even think about it except that the machine is so small, light and invitingly portable. My first thought was wouldn’t it be nice if the cables were detachable from the machine. Certainly Hypertherm thought this all out, and either it was a cost issue, a lessening of reliability by doing so, or both. They offer a carry case for the unit, and that in itself probably organizes things making it a non-issue. Some other available options are the 1 micron air filter mentioned at the beginning of this article; shoulder strap for carrying the unit; dust cover for protection if the unit is to remain stationary, and a circle cutting guide.
Where to Purchase One
While it won’t take but a few seconds to find the Powermax30 for sale online, give your local welding shop a try first. I am a firm believer in dealing locally whenever possible. If there is a problem or defect with an item, dealing with familiar faces is far better than zeros and ones. A case in point: years ago I discovered that a new, unused Victor torch had a crack in it. It was purchased as a backup from my local Airgas dealer. At the time the defect was discovered, it was well out of warranty, and showing my receipt only confirmed the same. Nonetheless I decided to see what Bill (the manager) had to say. His words were, “it looks like a defect to me,” and he handed me a replacement torch. While things might not always be that easy, I am certain that dealing online wouldn’t have produced the same results, nor would I have bothered to try, being afraid I would hear laughter coming out of my computer.
Airgas stocks the Powermax30, and while the MSRP is $1460, they are currently selling it where I live for $1204. A Deluxe version is also available which includes the storage case; standard circle cutting guide; gloves; shoulder strap; and consumables. Its MSRP is $1720, but I don’t have a quote from Airgas on it
So will I purchase one? It seems hard to justify spending that amount for just an individual’s use and not using it for business, but I have never let that stop me before.
It will take some budgeting and decision-making on what could be sold to generate cash, but if there’s not one in my garage in three months, it’s only because it’s in my house.
Editor’s note: John recently did purchase a Powermax30.


