Steering Wheel Makeovers
There Are Several Ways to Revive an Aged or Damaged Wheel. They Range From a Cover to a Total Restoration.
I HAVE OFTEN wondered why owners who have gone to great effort and expense to obtain a gorgeous paint job and near perfect chrome will accept a shabby looking steering wheel. A stroll through most any cruise-in will uncover several otherwise beautiful cars exhibiting steering wheels that are faded, worn and cracked.
Considering that you spend all of your driving time with the steering wheel in your field of view, you may wish to improve the appearance of yours.
Obviously, if you can find an affordable NOS or good used steering wheel, replacing it is the simplest way to go. There are aftermarket reproductions of the plastic and chrome parts available, but only for early Mustangs, Thunderbirds, tri-five Chevys or other very popular vintage vehicles.
Other solutions to the problem vary considerably in cost and effort to complete. As with many procedures in our hobby, the appearance and longevity of the results relate to the cost or effort expended. Consider the following:
Stretchable Cover
The simplest and cheapest way to conceal a damaged steering wheel is with a simple cover available at auto parts stores or discount megastores. For less than $15, you can buy a cover that you can stretch over your steering wheel rim in a few minutes.
They can be found in many colors or patterns. Are you big on tiger stripes or leopard spots? They are available.
Most owners will not consider these covers a permanent repair. They are sometimes used on a car for sale if the seller doesn’t want to spend much on the vehicle. Otherwise, these covers are best used to mask a bad steering wheel until the time and money is available to find a better solution.
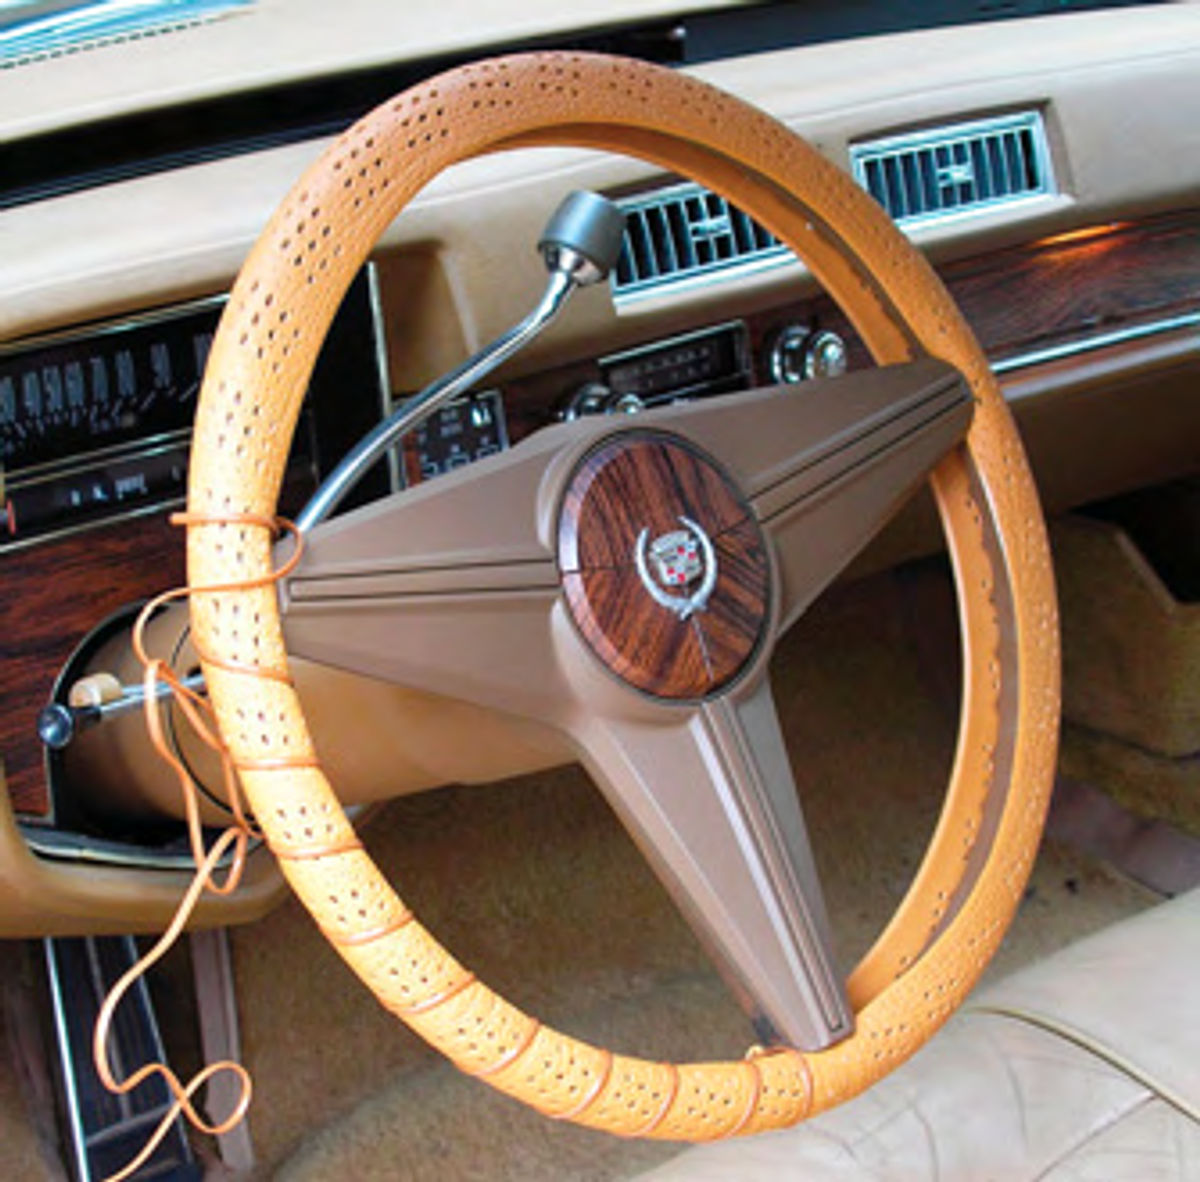
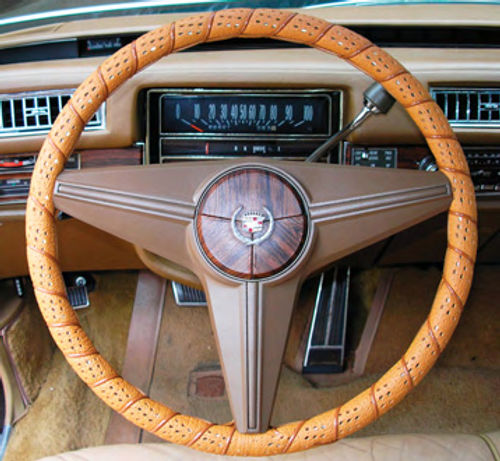
Laced Cover
This is the familiar covering often found at cruise-ins or show-and-shine events. They come in many colors and are attached to the steering wheel with a plastic lace that is spirally wrapped around the rim. Their leather-like texture can conceal even badly damaged steering wheel rims.
They vary in price, but are usually inexpensive. There are several choices between $10 and $25. They can be found on the Internet, in many automotive catalogs or major auto parts stores.
If neatly installed, they can be reasonably attractive—on some cars more than others. For instance, they look right at home on a British sports car, but not so much so on an Oldsmobile. Overall, however, they usually look nice enough to be used on most driver-quality cars.
Installation Instructions are straightforward. If you are very careful and it is the first time that you have installed this type of cover, it will probably take about an hour and a half to install it.
It is important that you use the correct size to ensure that there will be no gap between the inner edges after installation. If they overlap a little, it is not a problem.
To assist in stretching the cover over the rim, the cover should be warm. Leaving it in sunshine for a while or heating it gently with a hair dryer is enough.
It is best if the steering wheel is left mounted to the column during this installation. The force necessary to stretch the cover over the rim is large enough that you will need both hands to complete the task.
As you begin stretching the cover over the rim, it may appear to be too small, but it isn’t. The covers are flexible and can be stretched more than you expect.
Do not rush. If you get concerned about stretching it too much, stop for a moment while applying pressure before continuing. The material will relax a little in that time so that you can elongate it some more.
At first, the supplied lacing may appear to be too short. If you follow instructions as to the spacing of the loops, there will be enough. Also, the lacing can be stretched as much as 25% so there should be plenty.
Carefully wrap the lace around the covered rim. Make sure that it is not twisted and lies flat. The end of the lace needs to be tucked back under the cover per the instructions.
Sewn Leather Cover
The next step up in steering wheel improvement is the smooth leather cover that is stretched over the rim and stitched closed around the grip. The best-quality ones are very supple and fit tightly when the stitching is pulled taut. Properly installed, these appear neat enough to be original equipment, even on wheels that were not originally leather covered.
Best-quality, US-made kits for these are more expensive than the laced type of cover, usually in the $40 to $60 range. The kit includes the pre-punched cover, very strong thread, and a large needle used to stitch the edges together. I have used the Wheelskins brand several times and found their kits tocontain high-quality leather and strong needles (wheelskins.com).
If you can’t find a kit made specifically to fit your year, make and model steering wheel, measure its overall outside diameter and the circumference of the grip area at its largest point. With these measurements in hand, call a Wheelskins customer service representative who will likely be able to supply a custom one for you.
If your steering wheel is very rough or has chunks missing, you should fill and smooth the indentations with plastic filler. Otherwise, the supple leather may allow large imperfections in the basic wheel rim to show through.
Plan on spending two to three hours to complete the installation, especially the first time you install one. The procedure is as simple as the instructions describe, but if you work carefully it will probably take longer than predicted. The results, however, will be worth it.
The cover comes with the ends sewn together, forming a leather circle that must be stretched over the rim to start the installation. The installed location of the seam where the ends are joined should be at the bottom of the steering wheel.
The leather cover needs to be very tight on the rim so you may question whether you have the correct size cover as you stretch it onto the wheel. Use pressure as necessary and pause occasionally as you work it onto the rim.
If the seam that you placed at the bottom of the rim has shifted as you stretched the cover on, it can be pushed back into position at this point. Once you begin stitching, it can only be adjusted by loosening all of the stitches that you have completed.
You may want to wear a glove on the hand that you use to pull the thread taut. Without it, your hands may become sore before you finish.
You need to pull hard enough on the thread to close the edges at the inside of the rim. At first, you may be concerned that you might tear through the leather or break the thread. Don’t worry; the materials in a good-quality kit will easily withstand the load.
Initially, there appears to be a lot of thread to keep from tangling. The further you progress around the wheel, the less loose thread there isto handle.
Avoid the temptation to speed up the installation by making several stitches before pulling the thread taut. Tighten each stitch before proceeding to the next one. It is difficult to tighten several stitches at once and, if you make a mistake, it will require less work to undo the error.
When you get to a spoke, you need to follow directions carefully to keep the cover tight around it. This is especially true if the spoke is more than two inches wide. One steering wheel that I covered with this type of kit had spokes almost three inches wide.

After finishing the installation, there was a slight pucker in the cover at one of the spokes. By flattening the excess with pressure from a spring clamp for two or three days, it flattened out nicely. If necessary, you can use upholstery adhesive to hold it flat.
I installed two of these kits three years ago and they still look fine today.
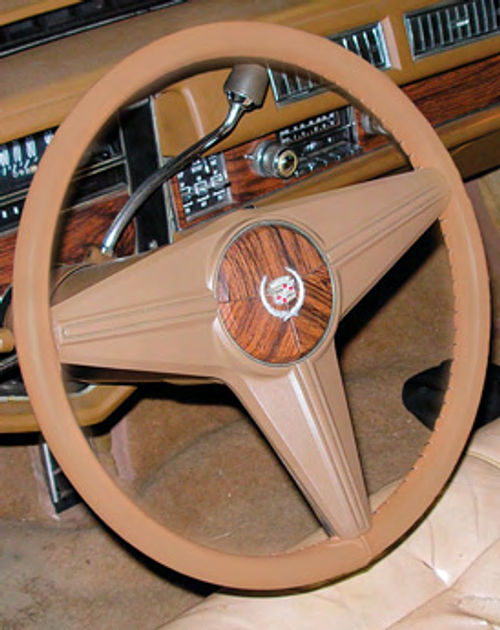
A Refinished Original Wheel
If you are fortunate, the paint on your steering wheel is only faded or worn and there are no cracks in the spokes or rim. In that case, the correction is a relatively simple repaint procedure.
After unbolting the wheel from the steering column, remove the horn ring, metal emblems, and other hardware as necessary. Taking photos or making diagrams of the horn hardware during disassembly will ensure that you assemble the pieces correctly when installing them after the wheel restoration.
The painting process issimilarto painting any interior component: clean,sand, prime and paint.
A thorough scrubbing with a degreaser and brush will remove layers of grime deposited by hands holding the wheel over many years. It may uncover some minor cracks that you hadn't noticed before.
Preparation for painting is determined by the condition of the wheel and how perfect you would like the wheel to look.
Some owners prefer to leave a few blemishes, nicks and gouges as indicators that the car has been driven. If you prefer to make the wheel look more like new, cover those imperfections with a filler or, if they are small enough, use high-build primer.
The next step is to mask off any area that should not be painted. As the inside of the hub will be covered by hardware, it can be masked off to preclude getting paint into the mounting splines and surfaces needed for grounding the circuit when the horn is activated by the horn button or ring.
It is worth the effort to mount the wheel on a rod or dowel through the center hole. Support the dowel horizontally so the wheel will be vertical. As you spray primer or finish coat, rotate the wheel to get the spray angle that will give the best coverage and avoid runs.
Due to the corners and contours of the surfaces of a steering wheel, runs and sags are common problems. So, several light coats are better than a few heavy ones.
After The first primer coat dries,lightly sand the wheel completely. The high spots will be obvious as the base surface comes through. Sand them down until they blend in. Repeat the priming and sanding until you are satisfied. Your Sense of touch will be more accurate than sight to determine when you are done.
It is a good technique to use a sealing coat after the last primer coat. This will ensure that nothing will bleed through to the top coat.
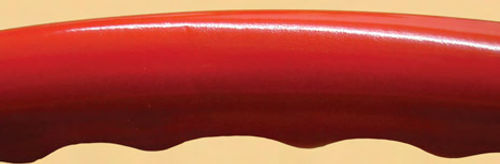
Nearly every paint available on the market has been used to topcoat steering wheels by someone—even hardware store aerosols. Most acrylic lacquer, enamel, urethane and epoxy finishes look good, initially. The difference among them is longevity. The better finishes will withstand sunlight and the effects of wear longer than the cheaper varieties. It will pay to use a topcoat that is UV resistant or add a clear coat that is.
Driver’s Rings are a common cause of scratches and gouges on steering wheels. If possible, I like to allow a week between painting and putting recently painted steering wheels into service.This ensures that the finish will have reached its maximum hardness.
Don’t agonize over small imperfections that may appear after you finish.
Once the chrome pieces are reinstalled and the wheel mounted in the car, most of them will not be noticed.
A Repaired Original Wheel
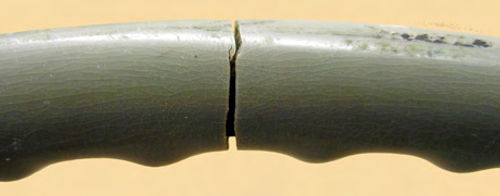
Most damage to steering wheels is due to fading from sunlight exposure and cracks that result from temperature changes as well as residual stresses from the casting process.
Some wheel designs have not aged well. For instance, the 1959 Oldsmobile steering wheel design called for an extremely deep dishing of the spokes. As appealing as the shape was, it caused many of them to crack and warp.
As with most cosmetic restoration, restoring steering wheels is labor intensive. Professionally restored wheels are an expensive proposition, so if you can save the high labor charges by doing the work yourself, it is an efficient use of your time.
There are two popular kits available to restore steering wheels. The materials used are not expensive, but it is nice to have everything in one place when you start. If you plan to restore only one steering wheel or if this is the first one of several you expect to restore, I recommend that you use one of the kits.
The kit made by POR-15 contains instructions and everything you need except for the topcoat paint. It includes tools such as a triangular file, hacksaw blade and holder, an aerosol sprayer, a drill bit and sanding blocks. It also contains a cleaner fluid, epoxy putty, primer, polishing compound, sandpaper, and even latex gloves. This kit usually costs $80 to $90 (por15.com).
The master kit sold by Eastwood costs approximately half as much but is much more basic. It contains detailed instructions, a cleaning fluid, epoxy putty, and a plastic adhesion promoter. You supply the tools, sandpaper and primer eastwood.com).
If you restore more than one wheel, you can save money by using the knowledge that you gained restoring the first one and buying only the necessary materials for your additional projects.

Take your time and follow instructions. You will be more than pleased with the results.
Now let’s go through one of these restorations.
After removing the wheel from the column, thoroughly clean the wheel with mineral spirits. This may uncover more cracks in the wheel and will reveal the actual scope of work to be done.
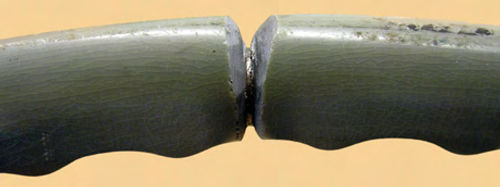
The most common cracks are located at the junctures of the spokes and rim or hub. Often, the small holes on the back side of the rim that were used to support the metal rod inside the rim when the plastic was cast will also exhibit cracks.
Any deep cracks should be opened up with a hacksaw blade mounted in a small handle. Saw deep enough to ensure that you get to the bottom of the crack. This often means all the way to the metal rod forming the wheel.
Using a coarse file, shape the saw cut into a “V” shape. The walls of the “V” cavity need not be smooth. In fact, the epoxy putty will adhere better if the walls are rough than if they’re smooth.
If you have an especially large “V” cavity, you may want to drill a couple of 1/8-inch holes in each surface. When you push the putty into the “V,” some will be pushed into those holes, anchoring the putty more securely.
There is a variation in the hardening time of different epoxy putties. If you are using a fast-curing type, don’t mix so much at one time that you may not have time to insert it into the cavities and rough shape it before it hardens.
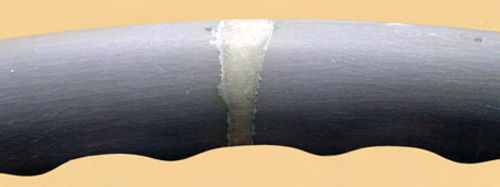
It isn’t critical that you get the outside surface level with the surface of the wheel yet. Just ensure that you have added enough putty to fill the void above the level of the original surface.
After the putty has cured approximately to the hardness of a bar of soap, trim the excess off with a sharp knife. Fully cured putty is harder than the surrounding plastic of the rim so it’s not easy to avoid a lumpy surface if a large amount of putty must be sanded. The closer you get the surface of the putty to the surface of the wheel now, the less you will need to sand off later. It is not a catastrophe if you cut off too much putty at this point as you can add more and trim it again later.
Wait until the epoxy has hardened a few more hours before performing the final shaping and sanding of the epoxy repair.
Unfortunately, a common area with cracks is in the web between the spokes and rim. It is not easy to sand these areas to the proper contour. It helps to have several dowels of different diameter to use as round sanding blocks so that you can nearly match the shape of the repair area of the web. Deep sockets of the proper diameter with sandpaper wrapped around them will also work well.
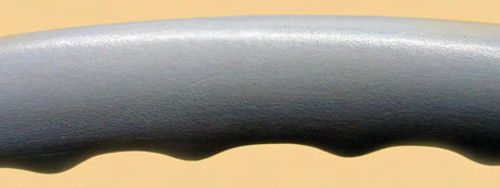
Usually, #220 sandpaper will be coarse enough to remove most excess material. As the putty nears the level of the surrounding surface, switch to #320 sandpaper to finish.
After the putty has cured for another day, you should do a last light sanding and wiping down before painting the wheel using the techniques described in the previous section about refinishing.
Some Chrome Challenges
Pitted or cracked chrome horn rings and buttons may create a bigger problem than the plastic spokes and rims. The cost of re-chroming discourages that option for all but rare chrome parts.
Replacement with a used item in better condition found on the Internet or at a swap meet may be your best bet.
Unfortunately, reproductions are only available for the most popular vintage vehicles such as tri-five Chevrolets, early Mustangs and two-seat Thunderbirds.
On the other hand, cleaning a horn ring with hot, soapy water may improve the looks more than you expect. Pits in the metal usually have raised edges which trap a ring of dirt and grime. A good cleaning may noticeably reduce the area of discoloration. Finish with metal polish and a coat of wax.
If this and several of the above procedures seem to include a good deal of work, keep in mind that the satisfaction from the enhanced appearance of your vehicle will far outweigh the amount of effort required.


